Effective use of the interior space of the home is important for owners of apartments with a small area. If you have a shortage of usable volume in your home, pay attention to the empty space behind the toilet above the flush cistern. It can be used to place containers with chemicals and cleaning accessories.
You can make your own toilet cabinet using our tutorial. Let's talk about manufacturing methods and waterproof materials that are available on the market. The instructions cover the process of installing the frame and assembling the doors step by step with expert comments.
Types of cabinets in the toilet
When planning bathroom storage, you have a choice between wall and built-in cabinets. Both options fit beautifully into the interior, but are manufactured and installed differently.
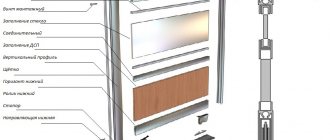
The wall-mounted one is made completely with all walls. The cabinet box is hung on the wall behind the toilet with loops on hooks. Metal lugs are attached to the vertical walls on the rear side of the housing. Special dowels with curved ends are installed as hooks. The best option is to secure the locker to the tire with hook brackets.
The design of a built-in wardrobe differs favorably from wall-mounted furniture in that the walls and ceiling of the toilet act as the top plate and sides. A facade frame with doors and a bottom (if necessary) are attached to them. In addition to hinged curtains, you can install roller shutters.
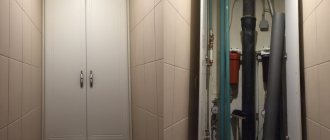
An example of a built-in closet behind a full-wall toilet
If you have no experience at all in this matter, and the desire to make a cabinet yourself overwhelms you, ask for help from neighbors and friends who already have practice in making and assembling furniture.
Special zone
- A plumbing unit has a number of characteristics that distinguish it from any other room.
- High humidity. In this regard, the construction of toilet structures should be made only from moisture-resistant materials.
- Small area. Large cabinets with bulky handles will not fit here, but a built-in narrow cabinet will fit perfectly.
- Communications. In the toilet room, water pipes and valves most often run along the back wall, access to which may be needed at any time. Therefore, the cabinet above the toilet should be easy to remove or disassemble so that the plumber can repair the system if necessary.
What to make it from?
To make a small-sized cabinet body (a small-sized box will fit in a narrow plumbing cabin), you can use the following materials:
- MDF and chipboard;
- furniture board;
- PVC panels;
- LDVP.
If you are making your own furniture, then you probably have pieces of MDF or laminated chipboard in stock. It will be convenient to make a cabinet body from them. To do this, you can use an old tabletop or parts of a disassembled wardrobe.
Furniture panels can be solid-lamella (this is when the slab is assembled from planks of the same length) and spliced. Buy a shield and remove all the body parts from it.
Expert opinion
Svetlana Kolesnikova
Designer
You can choose a typesetting slab to suit your taste in Leroy Merlin stores. Not only the main material is sold there, but also all the accompanying accessories.
PVC panels are ideal for conditions with high humidity levels. Bathrooms “suffer” from this drawback. Vinyl panels will not cause you any difficulties in cutting out parts. To fasten the elements together, use aluminum corners and screws with nuts. From several PVC panels you can assemble lightweight cabinet doors.
You will need laminated fiberboard to make the back of the cabinet. It is secured around the perimeter of the ends on the rear side of the case with screws.
Fiberboard (hardboard)
How to design and make bathroom furniture with your own hands, drawings and photos
In fact, furniture for a bathroom, toilet, or combined bathroom means floor cabinets with sinks, cabinets for towels and household equipment, wall cabinets, shelving, mirrors and shelves. All these items are designed for a specific size, and I cannot give any specific drawings. But giving some ideas for storage in the bathroom is fine.
DIY bathroom floor cabinets
If the bathroom is separate, then it is better to implement the cantilever design described above and not to be tricky with making a cabinet under the sink from furniture materials. The proximity of moisture will not lead to anything good.
However, there is an option to complement the tulip sink with shelving or mobile shelves.
It’s very convenient - while taking a bath, move closer to you such a pull-out table with shelves with everything you need for relaxation. Especially if you like to take a bath and read a book, watch a TV series on your laptop, etc.
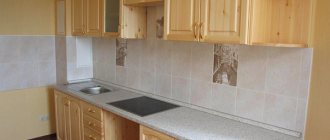
If the bathroom is combined, then most likely there will be enough space for a full-fledged floor cabinet with your own hands. Since the room is large, the problem with condensation is not so acute and it is possible to implement fairly large structures with a body made of laminated chipboard and a façade made of MDF.
Varieties of cabinets with a design similar to the kitchen one look good. Simply adapting the depth is enough. And the height can be left the same, it is optimal for the level of the sink and the installation of a washing machine.
The filling of bathroom cabinets can be different, just like kitchens. You can use shelves and drawers, bottle holders and mesh storage systems.
For large items (basins, buckets, laundry baskets), larger storage spaces can be provided.
DIY hanging mirrors and shelves for the bathroom
If free space allows, it is better to hang the mirror as far as possible from the shower - then there is less chance that it will fog up. And you spend time wiping it in the morning to complete all the “procedures” for caring for your face and hair.
Also, a traditional mirror above the washbasin can become additional storage space. If you place it on the door of a flat cabinet. Moreover, the sash may not be hinged. And, for example, a compartment or folding one.
Or a stationary one, hiding retractable racks behind it.
The reverse side of open shelves and the bottoms of wall cabinets can be used to hang hooks for towels, washcloths, and brushes. It turns out that a kitchen rail is also appropriate in the bathroom - you can hang towels on it. Or use it traditionally, with mesh hanging shelves for various small items and hooks.
How to use the space above the toilet
There are a lot of options for add-ons over the toilet. These can be open shelves or closed cabinets. If the toilet is combined with a bathroom, you can make an option with a folding table - I think it will be convenient.
If the space between the wall and the toilet allows, you can build a low cabinet into it.
It is especially convenient for the elderly and people with disabilities - it will serve as a reliable support when standing up.
Storage under the bath
Surely you have repeatedly come across photos of various pull-out and folding storage systems under the bathroom.
Alas, such options are far from Russian realities. Unless, of course, you live in a private house. In a city apartment, in the event of a pipe leak, the space under the bathroom should be easily accessible. Therefore, sliding screens are what you need.
In general, there are quite a lot of ideas for storage in bathrooms, small and large, and absolutely the entire space can be used effectively. Do not neglect free corners and the space above the door - you can also place shelves there for storing household chemicals that are unsafe for children. Also use basic ergonomic rules: everything you need for everyday use should be at arm's length.
And good luck to you in selecting and making bathroom furniture with your own hands!
Three options for a closet in the toilet behind the toilet
We offer you three options for arranging furniture in a plumbing cabin. We will present each option in the form of step-by-step instructions. Of course, to bring any project to life, you need to know how to use tools.
Guide for the manufacture and installation of a wall cabinet made of MDF
Prepare the room in which you will work. If you have a home workshop, then half the work is already done. Let's get started:
1. Prepare the necessary tools:
- desktop or workbench;
- perforator;
- jigsaw or circular saw;
- drill;
- screwdriver;
- confirmat drill with a crank;
- end mill for installing overhead hinges;
- rubber hammer;
- construction knife;
- iron;
- various utility tools: screwdrivers, a set of bits, chisels, etc.
2. Prepare the following materials:
- MDF sheet;
- end tape;
- LDVP sheet;
- metal tire and hook brackets;
- screws;
- dowels (wooden dowels);
- shelf supports (metal bushings);
- PVA glue;
- jigsaw files;
- dowels;
- confirmations (euroscrews);
- plastic plugs for euroscrews;
- furniture overhead hinges;
- door handles.
3. On a piece of paper, draw a sketch of the future cabinet. Separately draw the top and bottom plates, sides, shelves and door panels with dimensions.
Advice. To avoid hassle with calculations, measure your kitchen wall cabinet. Adjust the height of the side walls, the width of the shelves and other parts to the dimensions of the furniture installation location.
4. Make a specification of all parts and accessories. The following table will help you as an example:
| Name | Size, mm | Material | Quantity, pcs. |
| Top plate | 628 x 330 | MDF | 1 |
| Base | 628 x 330 | — « — | 1 |
| Sidewalls | 1210 x 330 | — « — | 2 |
| Back wall | 1210 x 660 | LDVP | 1 |
| Shelves | 628 x 330 | MDF | 2 |
| Doors | 1210 x 330 | — « — | 2 |
| Dowels | 20 | Tree | 8 |
| Confirmations | 50 x 6.4 | Metal | 8 |
| Overhead hinges | — « — | 4 | |
| Self-tapping screws | 4 x 16 | — « — | 16 |
| Shelf bushings | Ø 5 | — « — | 8 |
| Metal tire | 600 x 60 | — « — | 1 |
| Hook brackets | 70 x 50 x 25 | Combined | 2 |
| Door handles | Plastic or metal | 2 |
5. The plan is ready, go to the hardware store for materials and accessories.
6. It is better to cut out parts from MDF on a desktop.
7. Cover the ends of the finished parts with plastic tape using an iron. Iron the end tape applied to the cut sides of the panels through the paper.
8. Mark the installation of shelf holder bushings on the side walls. Drill holes with a diameter and depth of 5 mm.
9. Insert the shelf supports by tapping lightly with a rubber hammer until the bushings engage the panel.
10. Drill holes for dowels at the bottom and top of the sidewalls. Drill the same depressions in the top and bottom plates.
11. Place the walls and slabs end-to-end on the floor or workbench.
12. Insert the wooden dowels into the seats, having first filled the holes with PVA glue.
13. Connect the panels into a single box.
14. Use a confirmation drill to make holes, drilling through the walls and ends of the slabs at an equal distance from the edges of the sidewalls (60 - 70 mm).
15. Tighten all the housing parts by tightening the Euroscrews with a wrench.
16. Screw the hook brackets on the back side in the upper corners.
17. Place the box with the back side up. After checking the equality of the diagonals of the outer corners of the case, screw the back wall with screws.
Be sure to install the back panel with the laminated side facing the inside of the cabinet. First you need to make slots for the brackets.
18. Use an end mill to cut out recesses in the door panels for the hinge bowls. It is better to do this in advance - before assembling the case. Insert the canopies into them and secure them with screws through the mounting holes. Screw the overhead parts of the hinges onto the sides. Connect the parts, adjusting the gaps with the set screws.
19. Install furniture handles from below.
20. Using a level, mark the dowels for the tire. Use a hammer drill to drill two holes. Nail the tire with dowels.
21. Hang the cabinet on the wall so that the teeth of the bracket hook onto the rod.
22. Use the adjusting screws of the hooks to secure the cabinet.
23. Insert the shelves, resting them on the bushings. The cabinet is ready to be filled.
Expert opinion
Dmitry Laptev
Carpenter with 20 years of experience.
In a construction supermarket, they can cut you an MDF sheet according to the drawing and glue plastic tape to the ends. This will eliminate annoying mistakes when cutting the material yourself.
Instructions for the manufacture and assembly of a built-in wardrobe
Let's set the initial data:
- Let's take the width of the toilet to be 1.2 m, therefore, this will be the length of the shelves and the bottom of the cabinet.
- We will assume the height of the bathroom to be 2.5 m. The distance from the cistern lid to the floor will be 730 mm. This means the height of the cabinet will be 2.5 – 0.7 = 1.8 m. It will be possible to install 4 shelves inside.
- The distance from the tank to the wall will be 400 mm.
Based on these data, we will proceed to the manufacture and installation of built-in furniture in the toilet behind the toilet.
1. On the side walls, make markings for fastening shelves based on the distance between shelves of 350 mm.
2. Nail the supporting corners or sections of timber with dowels. Stack the shelves. They can be cut from MDF, laminated chipboard or an old countertop.
If the sewer riser passes through the interior of the cabinet, then use a jigsaw to make cutouts in the shelves and base for the sewer pipe.
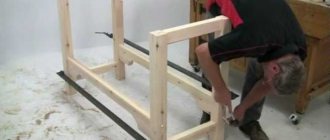
3. Build a frame from 50 x 50 mm timber, connecting the frame with self-tapping screws. The height of the racks is 2.1 m. The width of the crossbars is 1.1 m.
4. Screw the mounting metal corners to the side posts and the top bar with screws.
5. Install the frame by nailing the corners to the walls and ceiling with dowels.
6. Secure the bottom of the cabinet (it can be made of the same material as the shelves) to the horizontal crossbar with screws, and nail the corners that were screwed in advance to the wall with dowels.
7. Hang the doors on single or piano hinges to the vertical beam of the frame. First, use a chisel to cut out the seats for the furniture hinges on the frame and doors. Screw the hinges with self-tapping screws using a screwdriver or screwdriver.
8. Screw the door handles. The built-in wardrobe is ready.
In some cases, a built-in plumbing cabinet is installed to the full height of the bathroom. A blank panel is placed behind the tank. The bottom shelf is not mounted, creating a lower cabinet compartment for storing various long items.
Instead of hinged doors, you can install roller shutters to the entire height of the room. It will be more expensive, but building such a cabinet is much easier:
- After installing the shelves, secure the shutter guides behind the toilet to the side walls with dowels and screws;
- attach a drum with a folded fabric to the ceiling;
- Pull the side edges of the roller shutters into the longitudinal grooves of the vertical posts.
For an interesting example of installing a blind system, see the video:
Installation of a hidden cabinet behind the toilet
If you decide to cover the walls of the toilet with ceramic tiles, then the best option would be to create a hidden cabinet.
- Install a pair of timber racks on each side at a distance between them of 300 - 350 mm.
- Attach plywood sheets to the posts with screws.
- Install shelves inside the niche.
- Attach a reinforced mesh made of polymer or metal to the walls. This can be done with a stapler.
- Drive the staples every 40 - 50 mm.
- Hang plywood panels on piano hinges.
- Also secure the mesh on the doors.
- Cover all the resulting surfaces with ceramic tiles using special glue.
- Make holes in the bottom corners of the doors with a ceramic drill.
- Screw on the handles. Select models that would be invisible against the general background of the ceramic coating.
- Screw magnetic holders to the bottom shelf and the back of the doors.
Designing a technical cabinet in a hidden form will not disturb the beautiful interior of the bathroom.
Features and Benefits
If the material for the main structure is clear, the question remains - if you make a closed type of cabinet in the toilet, which door to choose, what is the difference between them, and which is better.
Let's look at the most common options.
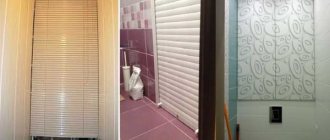
Louvre doors
There are two types: roller blinds and pseudo-blinds. The first one is more preferable when there is no possibility to open the door. The second option is made in the form of blinds, but there are no moving objects; such doors are good for poor ventilation.
Pros:
- low cost;
- the door, as a rule, is installed on top of the opening, easily hiding dimensional inaccuracies;
- Installation of such a door is simple, there is no need for special skills.
Minuses:
- you need to choose the same style as the bathroom/bathroom, which is not always possible;
- often such a design looks inharmonious on the tiles;
- If you close a plumbing cabinet with such a door, problems may arise in the future: in particular, the doors are designed for a small opening, and in the event of emergency pipes and the need for replacement, difficulties will arise due to the small size of the cabinet.
Plumbing plastic hatch
From the name itself it is clear for what type of cabinet this type of door is preferable.
Pros:
- Available in a variety of sizes, providing a wide choice;
- the ability to choose a door to suit your data;
- the cabinet turns out to be quite spacious, with the ability to install shelves and store necessary things;
- there are no boundaries in the color scheme, but more often the plumbing hatch is presented in the “universal” white color;
- easy to install: after the tiling work in the bathroom/bathroom is completed, the hatch frame is glued into place with sealant or any other fastening agent.
Minuses:
There are no significant disadvantages for plumbing plastic hatches.
Doors to order
It is worth considering this option when the area of the room allows you to open them completely.
Pros:
- possibility to choose according to your own sizes;
- large selection of design works.
Minuses:
- this design will be expensive;
- you have to wait a long time for your order to be placed;
- you will have to look for a good master.
Plumbing hatch for tiles
This type of door of all those listed will be the most expensive, but ideally suited to the design of the bathroom/bathroom. The main requirement for this design is a reliable frame that can support the glued tiles. For a harmonious style, it is advisable to select the dimensions of the cabinet based on the size of the tiles, so that during installation the sanitary hatch coincides with the tile seams.
Pros:
- fairly easy access inside the locker;
- stealth (this will be especially interesting if you are a perfectionist);
- all sorts of sizes (but you need to remember the size of the tile itself).
Minuses:
- if your budget is limited or you want to save money, it is better to choose another option;
- You will need the help of a tiling specialist.
Full height wooden cabinet
If you want to add rigor to your design, you can use this type of cabinet.
Pros:
- if necessary, you can quickly disassemble the cabinet and reassemble it;
- this design provides maximum access to the plumbing pipes, which we are trying to hide so beautifully;
- quite an economical option.
Minuses:
- Not everyone likes a wooden cabinet;
- To manufacture parts and install a cabinet at home, you must have knowledge in the field of carpentry.
Doors can also be divided according to the opening mechanism:
- sliding, similar to sliding wardrobes;
- folding;
- swing;
- roller shutters
The main advantages of cabinets behind the toilet:
saving space (especially important for small areas); the ability to make it yourself; choose the perfect size; low costs; the ability to hide communications; additional space is created for storing household chemicals and other things.
Doors
Door leaves can be made from any sheet materials. Let's look at their advantages and disadvantages in the following table:
| Door material | Advantages | Flaws |
| PVC panels | Lightweight material. Cuts with a simple hacksaw. | Manufacturing requires the creation of a supporting frame. |
| MDF and chipboard | Durable slabs. Withstands heavy loads. They have a pleasant appearance. | Open ends can become saturated with moisture, which will lead to destruction of the panel structure (the slab will swell). |
| Glass and mirror | They have high aesthetic qualities. | Fragility. Not used for toilet decoration. |
| Plywood | Durable material. | Afraid of moisture. Requires additional moisture protection treatment. |
| Furniture board | Lacquered panels highlight the natural beauty of the wood structure. | Same. |
| Drywall | GKL sheets are easy to process. | Fragility. Requires pasting with moisture-proof film coatings. |
Material selection
When choosing a material for making a cabinet, its operational properties are taken into account. The material must be:
- Resistant to mechanical stress.
- Light.
- Moisture resistant.
- Aesthetically attractive.
- Easy to care for.
- Eco-friendly.
"Book" doors
Note! If wood is used to make a cabinet, then at the preparatory stage it is treated with impregnations that increase its moisture resistance.
Table 1. Suitable materials for making a toilet cabinet.
| Name | Description |
| A moisture-resistant type of drywall is used. This material is easy to process and install. Fastening occurs on a wooden or metal frame. You can install built-in lighting. Drywall is not afraid of moisture, condensation, is not subject to rotting, and is an environmentally friendly and safe material. After treating the joints and priming the surface, drywall can be painted, wallpapered, plastered and covered with any materials. |
| For premises, choose plywood that is resistant to moisture and deformation. The thickness of the sheets must be at least 14 mm. The material is lightweight and easy to process. |
| Wood is used to make the frame of the structure. It is important that it is properly dried and treated with protective moisture-resistant compounds. Wood can be used to make cabinet facades or doors. |
| Laminated chipboards have a dense monolithic front layer that reliably protects the material from moisture. The advantage of the material is a wide range of shades, textures, patterns and the ability to apply photo printing, which allows you to create a unique toilet interior. The design turns out to be massive and heavy, so it is important to pay special attention to the method of fixing it on the wall. |
| Aluminum | It is used to make a frame when attaching plasterboard sheets. It is important to ensure high-quality protection of the material from corrosion. Some interior styles can use a metal hanging drawer. |
| The material is light and moisture resistant. Has a wide range of colors. |
The thickness of the material should ensure sufficient reliability of the structure, but at the same time not make it massive.
Varieties
Toilet rooms have different sizes and design features in the toilet area; the cabinet models that are selected for a given space depend on their parameters. Products can be mounted, built-in, floor-mounted, or mounted in the form of small hatches with doors behind which meters are hidden. For general information, let's look at each type in more detail.
Hanging
Wall-mounted cabinets are one-piece models suspended above the toilet. They are used when sewer pipes are hidden by installation or drywall. A flat, solid wall makes it possible to install a cabinet on it. Having measured the free space, you can purchase a ready-made design with the appropriate parameters or order it individually. Some craftsmen make products with their own hands or restore and rebuild an ordinary kitchen wall cabinet
It is important that the design does not interfere with the use of the bathroom for its intended purpose.
Some hanging models are large and quite heavy. To install them, you need a solid wall. If there is none, you can use a hidden installation. Lightweight versions of open cabinets are usually installed on a plasterboard partition. But you should remember that shelves without doors collect dust, and things on them must be stored in perfect order.
Built-in
The most common types include built-in models: they are designed for a specific situation and are produced independently or with the help of craftsmen. It is these cabinets that hide unsightly pipes. The design parameter often depends on the size and position of the pipes (from floor to ceiling or in the space above the toilet). When installing the cabinet, mandatory access to meters and other plumbing equipment is taken into account. If there is free space left, it is filled with shelves.
The easiest way is to decorate the doors to match the walls, for example, choose the right self-adhesive film. If they want to visually enlarge the space, use glass, mirrors, or a 3D drawing that leads the eye to the sea or the expanse of a flowering meadow. Often combined materials are selected to create facades.
Floor-standing
Not every bathroom can afford free-standing cabinets on the floor. To do this, at a minimum there must be free space behind the toilet or next to it. Floor cabinets can be cabinet-mounted, modular (on casters), free-standing, or included in a furniture set. You can find different types of these products on sale, it is easy to choose the required size, color and style. Products are ordered individually if it is necessary to implement a specific design idea. Those who like to craft can build a cabinet themselves.
Invisibility hatch trim
Finishing the structure to match the overall design of the room
An invisible structure without finishing does not look aesthetically pleasing enough. It can be painted:
- The surface is coated with primer and putty.
- Use wet putty to make a cut around the perimeter of the door.
- The dry putty is sanded with emery cloth and finally covered with paint along with the walls of the bathroom or toilet.
If it is decided to tile the hatch, then proceed as follows:
- The walls and hatch doors are coated with primer.
- A load is hung on the back side of the door, which will be equal in weight to the weight of the cladding. This will prevent the product from sagging in the future.
- The opening mechanism must be closed (blocked) with a special clip during installation of the tiles.
- The tiles are glued using regular tile adhesive or liquid nails.
- The edges of the tiles should protrude beyond the contours of the door. The projection on the hinge side is from 5 to 50 mm.
- The glue is not applied to the entire surface, but only to the part that will be adjacent to the door.
- Excess glue is removed after a day.
Then fill the seams with silicone sealant, including around the opening perimeter, selecting the composition according to color:
- The edges of the tiles along the seam are protected with masking tape on both sides. However, the sealant may also stick to the tape, making it difficult to remove without damaging the seam. To avoid this situation, the tape is coated with vegetable oil and removed as soon as the seam is closed with sealant.
- Excess composition is removed with a finger dipped in soapy water or a soft plastic spatula. After this, the hatch is left for two days. During this time, the sealant will dry completely.
- After opening the hatch, trim the sealant where necessary if the door sticks.
Wood finish
The aesthetic side does not lag behind the technical side. Sometimes the hatch is not masked, but rather highlighted. For example, an interesting option looks when the hatch is finished with mirror tiles, then it also performs the function of a mirror.
Exquisite hatch models are created not only from plastic and metal, but also from glass and wood. Wooden structures are covered with stain, varnish or wax. Glass doors to a sanitary cabinet in a toilet do the following:
- made of brown glass;
- made of glass with a pattern;
- made of textured glass;
- with a matte pattern;
- tinted to match the color of the tiles;
- translucent.
A unique version of an inspection hatch is a roller shutter. Often they cover the entire wall without making a separate hole, and thus create a false wall. Any drawing or photo can be applied to the roller shutters.
Where to start ↑
Decide on the location of the plumbing. In a typical bathroom you won’t be able to speed up much, the space won’t allow it. But larger rooms have a choice. General recommendations:
It is recommended to place the toilet first from the sewer riser. It is desirable that the toilet outlet flows through the fitting directly into the riser or has a minimum number of turns. It would be correct if drains from plumbing fixtures located further from the toilet spill through it.
Also place the shower, whose typical height of the drain from the floor is small, closer to the riser so that there is no problem with the slope. The drain is located quite low. But the washbasin, kitchen sink, and washing machine can be placed further away. Most washbasins, bathtubs, and toilets are connected to pipelines in a similar way: the axes of sewer outlets and supply water pipes are located at the same height. But there are atypical solutions. It is advisable to select all the equipment in advance, take communication connection diagrams from the seller, and strictly follow them
We recommend paying special attention to the toilet diagram: the drain can be directed in different ways, and at different angles. 90% of domestic devices are equipped with an inclined horizontal outlet, but there are other options. If you are going to install a large corner bathtub that does not have legs, but a supporting frame, take the frame diagram: it is not always possible to “untie” the bathtub drain according to the usual diagram.
If you are going to install a large corner bathtub that does not have legs, but a supporting frame, take the frame diagram: it is not always possible to “untie” the bathtub drain according to the usual diagram.
Having arranged the plumbing, you should outline the location of the pipelines: start with communications.
Floor
It is better to install such a cabinet in a combined bathroom, where the toilet is not squeezed into a tight space between two walls; but this design is quite suitable for a separate toilet. The main requirement is communications hidden in the wall.
To make a cabinet you need the following tools and materials:
- natural wood, MDF or laminated chipboard panels;
- electric jigsaw;
- wood glue;
- manual frezer;
- electric drill;
- furniture fittings (handles, hinges, shelf holders);
- metal ruler and pencil, square;
- regular or plexiglass for windows (to save time and money, you can do without it by making the doors solid wood);
- primer and paint;
- Grinder;
- an iron corner or other device that allows you to attach the cabinet to the wall.
Step-by-step instruction
The situation is similar with glass - it is much easier and more efficient to entrust its cutting to professionals. Having ready-made parts, you can immediately begin assembly.
If ordinary boards are used, the work will proceed as follows:
- Measure the height and width of the toilet with a cistern and determine the desired cabinet parameters.
- Draw a sketch of the product on paper, marking the dimensions of various elements on it.
- Transfer the outlines of the parts onto the board using a simple pencil. Pairs draw in a single copy and, after cutting out the first, use it as a pattern. This method helps to obtain two or more identical blanks.
- A milling cutter is used to cut out a relief on the part connecting the façade and side walls to the roof. To make your task easier, you can buy factory-made shaped furniture strips, which come in various shapes and sizes.
- A grinding machine is used to process the cuts and the rest of the surface if there are irregularities and splinters on it.
- A primer is applied to the front and back of the parts, allowed to dry and covered with paint. It is advisable to choose acrylic enamel in a spray can - this way there will be no smudges or smears on the surface, and the coating itself will be moisture resistant.
- Assemble the cabinet body. All connections are glued and, if possible, tightened with self-tapping screws:
- holes are drilled in the side walls at the same level and shelf holders are inserted into them;
- glaze the doors and install handles at the same stage;
- they hang the doors on the almost finished structure;
- Between the side walls from below, a drawer (crossbar) is fixed.
How to decorate a locker?
In the color scheme for the cabinet, you can choose either delicate white, beige, blue pastel tones, perfect for a small toilet, or brighter and more contrasting green, red, black shades, which will form a catchy accent in the interior and thereby also create the appearance of additional space.
Models made of colored acrylic plastic or frosted, transparent glass look very interesting and original, as well as metal structures, especially often used for a loft-style toilet room.
Homemade cabinets or products decorated with drawings, 3D images or photo printing, which are suitable for a toilet in almost any style, have a rather unusual design. An even greater effect can be achieved by equipping the structure with lighting that automatically turns on when the doors are opened.
The photo shows a wall cabinet with a mirrored front in the interior of the toilet.
Tree
We come up with a design for the future structure, buy bars, and install the frame. To increase service life, we treat the surface with protective impregnation.
We use a niche to create an open closet. We paint the shelves in the required tone. In this case, the acid green color repeats the shade of the ceramics on the walls.
We measure the dimensions of the recess, calculate and create a wooden structure, and install drawers.
We decide on the dimensions of the wall-mounted model and assemble the cabinet for the toilet.
Such a door can be purchased at a kitchen showroom. We first close the communications using sheets of plasterboard, cover the surface with ceramics, leaving an inspection hatch, and finally install a wooden facade.
Box shape
Drywall can be used to cover pipes of any shape. The easiest way to do this is in a typical house, where there is a niche in the toilet in which the pipes are located vertically - the so-called. riser.
Using the box, you can also cover chaotically located pipes by constructing a rectangular, square or multi-level masking system.
When the pipes are located behind the toilet, you do not have to build corners and attach sheets to each other. All you need is to secure the profile and install a single sheet of plasterboard. This option takes a minimum of effort and time, but hides space. Suitable if the shape of the toilet is elongated, and you don’t mind giving up a piece of space.
If the pipes are located in the corner, create a corner box. Profiles are fixed from floor to ceiling and covered with sheets. This box is very compact and does not take up much space.
Important! To make a box in the toilet, you must use moisture-resistant plasterboard. In conditions of high humidity, the simple material will deform.
Tools needed to make a box
To work you will need:
- an electric drill or a screwdriver for tightening screws (doing this with a screwdriver will be too time-consuming and difficult),
- crosshead screwdriver,
- simple scissors and metal scissors,
- hammer,
- rake-level,
- roulette,
- glue,
- pencil,
- narrow, wide and serrated spatulas,
- gypsum board knife,
- velor roller.
- moisture-resistant drywall;
- aluminum profile;
- screws, self-tapping screws, dowels;
- putty, plaster, serpyanka;
- primer;
- finishing material (tiles, wallpaper, paint);
- plastic corner;
- PVC door for easy access to pipes;
- material for sound and thermal insulation.
Tree
We come up with a design for the future structure, buy bars, and install the frame. To increase service life, we treat the surface with protective impregnation.
We use a niche to create an open closet. We paint the shelves in the required tone. In this case, the acid green color repeats the shade of the ceramics on the walls.
We decide on the dimensions of the wall-mounted model and assemble the cabinet for the toilet.
We suggest you familiarize yourself with Antiseptic for cesspools and toilets
Such a door can be purchased at a kitchen showroom. We first close the communications using sheets of plasterboard, cover the surface with ceramics, leaving an inspection hatch, and finally install a wooden facade.
Manufacturing process
The entire process of assembling a closet in a toilet comes down to five steps.
- Measurements of the restroom room.
- Drawing on paper.
- Drawing a design sketch.
- Cutting materials to size.
- Assembly and installation of parts at the installation site.
The closet in the toilet is installed in several stages.
In the list above, all points are clear except the third. What is the difference between a drawing and a sketch? Here's the thing. A drawing is the main document on which all technical parameters of the future product are indicated. Allowances, gaps, lengths and thicknesses are taken into account here.
The drawing shows all the parameters of the future cabinet.
Another thing is a sketch. This section refers to the sketch as it relates to the design definition. For a visual representation of the future cabinet design, its color palettes, patterns and other effects, a sketch on paper is the ideal solution. You can consider several options for the future design of the restroom at once, choosing the best one from them.
A sketch is a drawing of a design solution.
Drawing
Let's draw a future closet on a piece of paper. In the figure we indicate the hatch door. The bottom of the hatch should not be lower than the height of the barrel so that it can be opened. If the barrel is planned with a vertical drain mechanism, with a lever, you need to take into account the height of the drain handle.
Note: the dimensions of the hatch door are standard and can be viewed on any seller’s website.
Together with the cabinet drawing, we will draw a frame diagram. The frame of the sanitary cabinet between the walls of the toilet is not complicated. Vertical racks near the walls and in the places where the hatch is installed. Horizontal racks on the ceiling and floor, as well as reinforcing racks along the bottom and top of the hatch installation. Around the installed hatch, a kind of frame should be formed from profiles for drywall, and the profiles themselves must be reinforced with a wooden beam in order to be able to secure the hatch door.