The question of how to make a cabinet in the toilet behind the toilet arises at the first glance at this cramped room.
Here you need to place detergents and hygiene products, and other small items, but there is not enough free space.
A cabinet placed in an unused space helps solve this problem and also gives the toilet a certain appeal.
You can easily make such furniture with your own hands, but to do this you should take into account the specifics of the bathroom.
What are the doors made of?
If you decide to make a closet for the toilet yourself, making shelves is usually not a problem: two parallel planks are placed on the walls, and shelves are laid on them.
Instead of slats, you can install furniture shelf holders - they come in different sizes and shapes and are easy to install. A hole is drilled in the wall into which the extended part of the holder is inserted. This is one type. The second is brackets that are attached to the wall. In general, there are usually no problems in this part. It's not as complicated as it seems
But there may be questions about what and how to make the doors. The easiest way is to order a façade of the required size from a furniture shop. It is better to order together with the strips to which these doors will be attached. You can also ask for hinges to be cut in. Then installing them will be simple: screw them to the wall and that’s it. Possible facade materials: chipboard, LMDF, plastic, aluminum + glass or aluminum + plastic.
There is an option - to make the doors from sheet material and cover them with the same tiles that were placed on the walls. This is in case you don't want the cabinet to stand out. You can also stick on a mosaic of a suitable shade, use flexible tiles (plastic sheets under the tiles), stick on washable wallpaper, paintable glass wallpaper, etc. There are actually a lot of options.
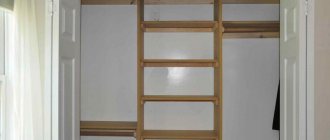
If you are going to make a toilet cabinet “in place” and with walls
Options for finishing doors for closets in the toilet
To make it more convenient...
Closet for the toilet in the process of manufacturing
You can install corners under the slats - if a large load is expected
You can also not make doors, but hang ordinary horizontal blinds, use roller blinds of a suitable color and size. This is one of the simplest and most budget options. To access the shelves, you will need to lift the blinds or roller blinds.
A more serious and durable option is to close the shelves in the toilet with a roller shutter. It is more serious in terms of cost and complexity of installation. You will need to install guides and secure the drum at the top.
Plywood shelves
The most common material for shelves is, of course, plywood. Thanks to its low cost, strength and durability, plywood has held a leading position in this area for decades. In addition, anyone can make a shelf in the toilet behind the toilet with their own hands from plywood. And if you not only want to rationally use space, but also decorate the interior, then this material is the best option for you.
First, you need to decide on the type of shelf; they can be either classic with straight parts or with curly cutouts. If you have a jigsaw, then it is best to choose the curly options. They require a little more effort, but they do a much better job of decorating any room.
First you need to decide on the appearance and size of the shelf that you want to make in the toilet with your own hands, since the size and shape of the parts depends on this. It is best to first find or draw a drawing of the shelf. This will make your work much easier and, in addition, you can easily calculate the amount of material you need.
The next stage is marking the parts on a single sheet of plywood. If your design has several parts of the same size, then it is best to make patterns from cardboard and draw with their help. After the parts are cut out, their ends need to be sanded well. After this, you can fold the finished product and begin decorating it.
Flat surfaces can simply be covered with stain and varnish, this is quite enough. But you will have to work a little with the ends so that the shelf has a beautiful appearance. It is best to use edge tape, which is simply glued to the ends. The tape can be matched to the color of the tint or, conversely, it can be used to shade the ends. When everything is ready, you can hang the shelf on the wall.
Wooden shelves
Wooden shelves are not at all difficult to make. The main thing is to use good, even and fresh material. The photo shows shelves in the toilet made of solid wood covered with stain. The boards must be free of stains, knots and deformations. Before starting construction, treat all lumber. You can go through it several times with an electric planer or sanding machine. Achieve a perfectly smooth surface.
Treat the boards with an antiseptic and coat them with several layers of varnish. If you do not want the surface to be glossy, you can use a special matte varnish. To give the wood an elite shade, we use stain. It will be absorbed into the wood, but will leave the texture and pattern of the cut visible.
To give the wood an aging effect, you can use a gas burner. The fire will highlight the cut rings in a dark color. After firing, the surface must be cleaned.
When the wood is prepared, you can begin installing the shelves. It is more convenient to attach them to furniture corners or wooden corners.
Purchased shelf option
The stores offer a large assortment of corner and classic shelves of all sizes and colors. The most inexpensive option is a shelf system made of plastic. Such shelves are quite practical, but their appearance leaves much to be desired. Over time, the plastic loses its appearance and becomes stained, which is very difficult to clean. Scratches and abrasions make plastic shelves on the wall in the toilet unusable quickly enough.
READ MORE: Glass sealant, sealing of double-glazed windows, polysulfide option for structural facade glazing, how to use correctly
Metal chrome shelves are a good option for a toilet. They do not look bulky and give the interior of the toilet some zest. The remaining parts of the room can also be decorated with the addition of chrome elements. The price of such shelves is a little higher, but it is quite affordable for the average resident of Russia.
Store-bought glass shelves are very difficult to find. If your toilet does not have any pipes that come from neighboring apartments, and the wall space is empty and flat, then you can use purchased glass shelves.
Chipboard shelves
Chipboard is the most popular material for furniture production in Russia. The reason for this popularity is that chipboard sheets are relatively cheap, and thanks to the laminated surface, you can use any color and texture when making furniture.
To make your own shelves from chipboard, you will need the sheets themselves, which have a laminated surface on both sides. The side cuts of the parts are processed with an edge; it can be glued using a regular iron. The cut is made with a circular saw. The cuts are even and smooth.
Euroscrews or self-tapping screws are used as fastenings. The method of fastening depends on the type of shelf construction. If you plan to connect two sheets of chipboard at an angle, then we use Euroscrews. To attach the shelf supports we use self-tapping screws.
Chipboard shelves look neat. This material will last a long time if the humidity in the toilet is low. For shelves, you can use sheets 1.5 cm thick.
Cabinet in the toilet behind the toilet (30 examples with photos)
A cabinet in the toilet is necessary for proper organization of space, for functional and aesthetic purposes. In small bathrooms it is most often installed behind the toilet, this way it will be possible to fill the area as comfortably as possible. In this article we will tell you what types of cabinets there are and give examples of real interiors.
Freestanding models
The design mainly consists of open shelves. The advantage of this option is convenient access to things and the ability to hide some items behind the facades. The downside is that you need to constantly maintain order.
The cabinet takes into account the shape and dimensions of the toilet. This model can be found in showrooms or made to order. Or do it yourself: all you need is furniture panels, timber and fasteners.
Neoclassical-style furniture fills the entire wall space and forms a spacious storage area in the toilet.
The metal rack is compact; for such a design, the model of the toilet is unimportant. Decor and household items are stored on glass shelves.
The cabinet does not take up much space, but is quite spacious - ideal for a small bathroom. Frosted glass fronts hide the contents of the shelves.
Wall cabinets
A universal option that is presented in any store. The dimensions allow the module to fit even into a miniature space and hang it behind the toilet at the desired height.
Mirrored doors create a deceptive effect of extending the room. However, fingerprints remain on the surface, which must be constantly removed - the main disadvantage of this model.
The matte surface perfectly camouflages objects. During operation, you will not have to clean the inside of the cabinet every day.
The lighting and black tint make the cabinet weightless, its outline literally disappears into the room.
Bright toilet interior. Color accents include red painted roller shutters, plumbing boxes and photo frames.
Open niches
In this case, the niche performs a decorative function. The relief of the uneven surface and the contour of the recess are emphasized by spot lighting.
Diversity in a monochrome interior is achieved through the play of light. Volumetric decor fills the recess in the wall and casts interesting shadows.
An open niche laconically complements the minimalism in space.
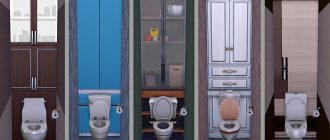
Niches covered by a facade
Toilet interior in vintage style. The color of the doors is in harmony with the shade of the tiles.
The façade material is painted white. The doors are fixed flush with the installation box.
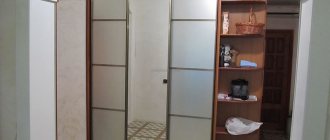
The built-in wardrobe looks compact and provides access to communications. This, by the way, can be done very cheaply with your own hands.
White roller shutters do not stand out against the background of white walls. Despite the color division, the interior is perceived as one.
The wood texture of the floor, cabinets and doors goes well with green ceramics.
The wenge door hides access to communications.
Ceramic finishing of the inspection hatch. In the closed position, the contour of the niche is almost invisible.
Built-in wardrobe, which is closed by furniture roller shutters.
Access to the water heater through the inspection hatch.
Other options
Wicker baskets are suitable not only for towels: your cat will appreciate such a house. If in principle it doesn’t bother you that she will watch you.
The geometry of the room gives ideas for design. In this case, open shelves are not only useful for household purposes, they also visually straighten the wall behind the toilet (suitable for crooked walls!).
Combined option - open and closed shelves.
A mirror-cabinet allows you to use the wall space to the maximum functionally.
Types of cabinets in the toilet
The problem with sanitary facilities is that the space is cramped, but despite the small area, it is necessary to hide detergents, toilet paper, etc. in such a room. A locker placed in the toilet will solve this problem. There are several types of such lockers.
Standing separately
A freestanding cabinet is the simplest solution in terms of installation.
The easiest piece of furniture to install. This is a simple U-shaped design. It is simply installed on the floor. Inside the furniture there are shelves (open and closed) or drawers. This design requires a fairly spacious room. After all, it must be installed on the floor, taking into account that the doors can be opened conveniently.
Mounted
Wall cabinet - the most popular type of furniture for toilet rooms
A wall cabinet in the toilet is most suitable even in the most cramped spaces. The cabinet can be mounted above the toilet, thus saving free space. When fixing such a cabinet above the toilet, it is necessary to leave empty space above the cistern or toilet for the convenience of visiting such a necessary room.
Built-in
A universal solution is a built-in wardrobe.
Such a wardrobe in the toilet is also functional and ergonomic. It is located in a niche. You can hide communications (valves, pipes), tools and household cleaning products in it. A built-in wardrobe looks harmonious in any design; it does not overload the space of a small room. The issue of placement of this variety is approached carefully.
It is necessary to make accurate measurements of the free space and the proposed cabinet.
The material from which it is made also plays a role, because such a design is placed near pipes where condensation accumulates, and even the slightest leak in a pipe can cause damage to furniture. Therefore, the cabinet material must be moisture resistant.
Shelving above the toilet: convenient, practical and affordable
Today, easy-to-install and very compact racks that are placed above the toilet have become quite popular. Their peculiarity is that they have stable legs, and the shelves start higher, above the toilet cistern. Such racks can also be open or closed, many of them are equipped with doors. In particular, among wooden shelving you can find closed models.
Metal racks look more elegant; openwork ones, with all kinds of curls, are especially interesting. But there are also very simple folding models with shelves. This is a simple budget option, but it is no less effective in terms of solving the storage issue in the bathroom.
Rack
The storage rack in the toilet combines the functions of open shelves and a built-in wardrobe. It doesn't take up space and can accommodate jars, drawers, boxes, towels and all kinds of small items. The shelving unit in the toilet holds everything you need for this room, and sometimes even more; it is quite possible to organize a storage area for a mop, brushes, buckets, etc.
Special racks
Complete toilet storage system.
So that owners of small apartments do not feel discomfort and do not rack their brains about how to organize storage in the toilet, modern furniture brands have developed many convenient multifunctional storage systems. Today you can find many original toilet sets in a variety of styles. For example, an elegant metal shelving unit would be suitable for a classic-style toilet, a laconic white set would easily fit into a Scandinavian setting, and stylized wooden models would be appropriate for a rustic style.
Stylish model of a toilet cabinet.
Just what you need for a small toilet.
Neat storage in the toilet.
Installation
At the first stage of planning a cabinet at home, it is necessary to make a preliminary design of the future design. Initially, you should decide on the type of cabinet, whether it will be wall-mounted or built-in, then on the dimensions of the structure itself, and if there are shelves in it, determine the distance between them.
The standard distance is recommended 25-35 cm, but it is worth choosing individually at your own discretion.
After choosing a model, when all the necessary materials have been purchased, you need to build a frame for the future cabinet.
- If the size of the cabinet allows, then you can install shelves inside, attached to pre-prepared corners/beams. The type of shelves is selected according to the expected weight so that they do not sag. And also they should not come into contact with pipes and not interfere with free access to communications.
- And at the end of the installation we install the facade.
Materials for the manufacture of sanitary cabinets
The choice of material for making a cabinet is influenced not only by its purpose, but also by the overall style of the toilet room. There is a large selection of materials and components on the market, all that remains is to decide on the choice.
Drywall of moisture-proof grades allows you to make a cabinet of various designs for painting, decorating with any finishing materials, drawing, decoupage, etc.
Plywood and chipboard are suitable for making facades. Plywood facades can be carved, and chipboard can imitate wood; they require good ventilation to protect them from moisture. Plywood should be treated with antiseptics, painted, stained or varnished.
Wood is well suited for making shelves as it does not sag under heavy loads, but also requires good ventilation. Wood requires stain or varnish
The tiles are used for cabinets hidden in niches and are fixed on a specially made frame.
Mirror canvases are well suited for visually enlarging rooms.
Plastic is a lightweight material suitable for making doors. You can use ready-made wide cladding panels.
Metal profile or corner for making a frame (aluminum or galvanized).
Wooden bars for the frame, treated with antiseptic. Ready-made purchased facades, doors, hatches, ventilation grilles.
Tools for work: tape measure, level, screwdriver, drill, saw, hacksaw, pencil.
Accessories: stainless steel hinges, screws, corners, door closers, furniture magnets, door handles, roller door frame, etc.
Before work, you need to decide on the depth of the cabinet, the height of the shelves, the location of the doors and the method of their fastening. The average cabinet depth is 25-35 cm.
The cabinet frame is assembled from metal corners or wooden blocks. The location of the shelves is marked, which should not come into contact with the pipes. Holes are cut in the shelves for the passage of pipes. At the end, facades, magnets, and handles are fixed.
Wardrobes for medium and large sized bathrooms.
Types of cabinets
To make it convenient to use such items as shelves in the toilet, you need to understand the varieties. Here are the criteria by which cabinets differ.
By type of location. There are wall-mounted and floor-mounted.
Depending on the location, the cabinet can be wall-mounted or floor-mounted.
According to the material of manufacture. Can be made from wood, plastic, wood boards or plywood.
The choice of materials for the cabinet is quite diverse.
With and without doors.
Lockers can be made with or without doors.
The type you choose depends on what you are going to make the item for. For example, open shelves are not suitable for household chemicals, as the appearance will be ruined. But if you want to place flower pots, clay vases and ceramic dishes for decorative purposes behind the white throne, you are welcome. An open view will be very useful.
It is better to keep household chemicals behind closed doors, but books look great on open shelves.
It is also worth considering where you plan to install it. In new apartments, toilets are often combined with bathtubs, forming a single bathroom. In this case, the choice of location for the cabinet is not immediately obvious. It can be placed on the side wall, or directly behind the toilet.
In a combined bathroom, the location of the closet may vary.
But in single bathrooms the choice is obvious. Installation directly behind the toilet barrel. This option is especially convenient for those who are thinking about how to close the plumbing cabinet in the toilet. Installing an option with doors will allow you to hide bulky sewer pipes and a water heater, giving the restroom a finished look.
As a rule, the cabinet is installed immediately above the toilet cistern.
The choice of material is also influenced by the existing design of the room.
The material is selected depending on the design of the room.
Wood is perfect for almost any decorating style.
Wood fits almost any style.
Plastic panels, although they have a long service life, do not look as beautiful.
Plastic is more practical, but less aesthetic.
But laminated boards, made from wood shavings and sawdust, will fit perfectly into a bathroom of any size.
Laminated boards will fit into any interior.
Features of selection and location
A few things to choose from:
- The cabinet is selected according to the size of the room. For example, for a small toilet room in an apartment, small structures or narrow models located above the toilet are better suited.
- In a spacious toilet combined with a bathtub, you can install a larger hanging structure, a cabinet or a pencil case.
- You should not choose products that are too wide and will hang over your head. The most optimal and harmonious option are cabinets with a width of 20 cm.
- It is also undesirable to save on accessories and prefer high-quality and proven products.
Plastic doors for sanitary cabinets
Plastic doors for a toilet cabinet are the easiest to install and, importantly, will fit seamlessly into any interior. Another important advantage of plastic products is moisture resistance and resistance to other types of influence.
Plastic doors come in a wide variety of designs, which allows you to choose a model for any style solution
A wide color palette provides plastic products with enviable popularity
Such doors are easy to clean; a simple damp cloth is enough, and in case of heavy contamination, you can use various cleaning agents without fear of harming the material.
Construction technology
Placing the structure behind the toilet
Before you make a closet in the toilet with your own hands, decide on some nuances: will you cut out all the parts yourself or will you make them to order. The second option is simpler, since all that remains is to mount everything.
Start making a closet in the toilet with measurements. Choose the place where it will be placed and measure the height, width and length of the future furniture. Most often it is located behind the toilet or in a special niche made of plasterboard.
It is convenient if the structure takes up the entire wall, especially when the room is narrow, as in a Khrushchev-era building. If the bathroom is square and the wall behind the toilet is quite wide, it is still more convenient to install a solid cabinet. It can be continued by placing additional drawers on the side of the toilet.
False wall and niche
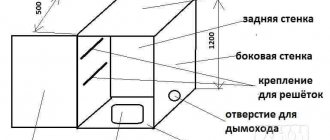
In most apartments, the toilet is a narrow and long room. Its width is about a meter, length - two meters or more. Such a long room is inconvenient to use - the area up to the door is still not used in any way. The situation can be improved by installing a false wall. In this case, the toilet can be moved forward and separated by a partition of 50-60 cm. The remaining space is more than enough for comfort, and the one that is “behind the wall” can be used as a closet.
Sewer and water risers will be hidden behind this false wall, which otherwise will have to be covered with a special box. The space behind the toilet does not need to be sewn up tightly. Here you can make a very spacious closet. It can store powders, stocks of other chemicals, which are usually difficult to find a place.
An example of a cabinet design behind a false wall
To install the device, you will have to move the toilet forward, nail strips to the walls and ceiling (40*40 mm will be quite normal), and fill in horizontal strips that will hold the shelves. The doors for such a closet in the toilet are attached directly to the walls. Or rather, to the planks that are fixed to the wall.
The strip is needed 8 cm wide. Since it will be visible when the doors are open, it is advisable that it be trimmed with the same material as the doors. It is attached to the wall with nails/screws/dowels, and hinges are attached to it.
Open shelves
Stylish storage in the toilet.
Open shelves can transform and complement any interior. They are especially relevant in tight spaces. Such storage systems do not clutter up the space, give a feeling of lightness, and can visually change the interior for the better. For example, in a cramped room they should be installed on a narrow wall, this way you can visually stretch it out, thereby expanding the space.
Homemade storage system in the toilet.
Neat open shelves in the toilet.
Open shelves in the toilet.
Storage in the toilet on open shelves.
Storage in a small closet.
Stylish design of a small toilet.
How to make a corner shelf?
Ideal storage systems for a small toilet.
If the toilet area is very limited, then wide open shelves will simply be inappropriate. Here it is worth thinking about how to take advantage of unsightly corners. Several rows of open shelves of non-standard size - already ordinary ones - will fit well here. They are convenient for storing toilet paper, cotton pads in glass jars, detergents and cleaning products.
To save space in the house, corner shelves are often used. They look more modern and practical. And note, you can embed them anywhere.
The manufacturing process, in essence, does not differ from that described above, but there are some peculiarities. One of them is that the upper and lower parts are made up of two elements with the ends cut at the desired angle.
Then the process is carried out like this: first, the two parts of the top are glued together and clamped for a while. Do the same with the bottom beam. Polish, cover with a primer mixture and fasten according to the algorithm written above.
That's it - the work is almost the same, but a new, convenient, practical product is already appearing.
Open shelves
Stylish storage in the toilet.
Open shelves can transform and complement any interior. They are especially relevant in tight spaces. Such storage systems do not clutter up the space, give a feeling of lightness, and can visually change the interior for the better. For example, in a cramped room they should be installed on a narrow wall, this way you can visually stretch it out, thereby expanding the space.
Homemade storage system in the toilet.
Neat open shelves in the toilet.
Open shelves in the toilet.
Storage in the toilet on open shelves.
Storage in a small closet.
Stylish design of a small toilet.
Built-in storage
The layout of some toilets allows for built-in storage systems. This method works well where there are niches and allows you to use them practically and wisely, turning the disadvantages of space into advantages.
Built-in storage system in a small toilet.
We have collected 20 more gorgeous examples of how to visually enlarge a small toilet. They are definitely worth a look!
Functions
The functional role of such a cabinet in the toilet room can be varied.
Masking of communication elements, i.e. various pipes that can run along the walls in the toilet. At the same time, the cabinet does not restrict access to these pipes, but simply hides them from view. Such products extend the service life of some equipment: ball valves, water meters, flexible hoses
Thanks to the design of the cabinet, these parts are protected from humidity, as well as condensation and dust, due to which they will perform their functions in the apartment longer. The storage function that such cabinets perform is also important. They become an ideal place for storing household chemicals and various household utensils
Thanks to the ability to put such things away in a compact dressing room, the surrounding space is not overloaded, and it becomes easier to maintain order. In some rooms, such a cabinet also plays a decorative role.
What are the consequences of excess moisture in the soil?
You can see the results of this phenomenon yourself - trees and shrubs die. Why is this happening?
- the oxygen content in the soil decreases and the carbon dioxide content increases, which leads to disruption of air exchange processes, water regime and nutritional regime in the soil;
- oxygen starvation of the root-forming layer occurs, which leads to the death of plant roots;
- the supply of macro and microelements by plants (nitrogen, phosphorus, potassium, etc.) is disrupted, because excess water washes out mobile forms of elements from the soil, and they become unavailable for absorption;
- intensive breakdown of proteins occurs and, accordingly, the processes of decay are activated.
Plants can tell you at what level groundwater lies
Take a close look at the flora of your area. The species inhabiting it will tell you at what depth the groundwater layers are located:
- perched water - it is best to dig a reservoir in this place;
- at a depth of up to 0.5 m - marigold, horsetails, varieties of sedges grow - bladderwrack, holly, foxtail, Langsdorff's reed;
- at a depth of 0.5 m to 1 m - meadowsweet, canary grass, ;
- from 1 m to 1.5 m – favorable conditions for meadow fescue, bluegrass, mouse peas, rank;
- from 1.5 m - wheatgrass, clover, wormwood, plantain.
What is important to know when planning site drainage
Each group of plants has its own moisture needs:
- with a groundwater depth of 0.5 to 1 m, vegetables and annual flowers can grow in high beds;
- depth of water layer up to 1.5 m is well tolerated by vegetables, grains, annuals and perennials (flowers), ornamental and fruit shrubs, trees on a dwarf rootstock;
- if the groundwater is more than 2 m deep, fruit trees can be grown;
- The optimal depth of groundwater for agriculture is from 3.5 m.
Freestanding models
The design mainly consists of open shelves. The advantage of this option is convenient access to things and the ability to hide some items behind the facades. The downside is that you need to constantly maintain order.
The cabinet takes into account the shape and dimensions of the toilet. This model can be found in showrooms or made to order. Or do it yourself: all you need is furniture panels, timber and fasteners.
Neoclassical-style furniture fills the entire wall space and forms a spacious storage area in the toilet.
The metal rack is compact; for such a design, the model of the toilet is unimportant. Decor and household items are stored on glass shelves.
The cabinet does not take up much space, but is quite spacious - ideal for a small bathroom. Frosted glass fronts hide the contents of the shelves.
Assembly and installation
Begin installation by installing support bars, guides and internal horizontal partitions. Be sure to use a level to attach all cabinet pieces as level as possible.
You need to drill holes carefully.
When drilling holes in walls, floors and ceilings, try to do it more carefully
It is important that the diameter of the resulting holes is equal to the diameter of the purchased dowels
The shelves need to be attached as evenly as possible.
Also pre-drill holes in wooden blocks, chipboards, MDF with a thin wood or metal drill. This is necessary so that when screwing self-tapping screws into workpieces, the latter do not crack due to expansion and internal pressure. The diameter of the hole must be less than the diameter of the screw. If this condition is not met, the reliability of the connection will be at risk.
If you are installing a plumbing cabinet that hides the piping, heating boiler, water heater, floor heating pipe system or other plumbing fixtures from view, installation will be easier. Here, the need to install internal horizontal shelves is partially or completely eliminated.
It is much easier to make a cabinet that simply hides communications.
How and from what materials you can make a cabinet in the toilet behind the toilet with your own hands
First you need to decide what items you will store in the closet. If
they will be heavy, then take chipboard. If these are powders and household chemicals, then it is better to go with plywood; its thickness is enough for 1 cm.
To make the structure look good, take chipboard; it can be covered with film or decorated in some way.
Before you start making the cabinet, correctly calculate all the dimensions. Sketch a drawing of your design, taking into account your desires and capabilities. Do not forget that the closet should be closed with all the pipes and accommodate everything that you want to put in it. At the same time, meters and valves should be easily accessible.
Prepare materials and tools in advance. Among the materials you need to take:
- furniture magnets;
- corners;
- aluminum corner profiles to attach shelves;
- self-tapping screws;
- furniture hinges;
- beams for the frame;
- dowels
Take the following tools:
- screwdriver, screwdrivers;
- roulette;
- drill;
- building level;
- marker.
To install the frame you need to take beams of size 30x30 mm.
Markings should be made using a level and tape measure. Markings are made where the cabinet will be located. Using corners and self-tapping screws, assemble a frame from bars. Then secure the frame to the wall. This will be the backbone of the future cabinet. Don't forget to treat the bars with stain, varnish and paint. Make blanks for the shelves, making all the measurements and markings on the boards in advance. Metal corners will serve as the base of the shelves. Since shelves are needed not only for storing household chemicals and other things, but also for hiding pipes, so make a slot where the pipe will pass. Place shelves on the corners. If you want to be able to remove the shelves or change them, you can simply put them on the corners or fasten them so that they hold firmly. If the goal is only to hide the pipes for aesthetic reasons, then it is best to opt for dense plastic panels. After all, the main thing here is strength,
so that the blow does not break the integrity. A quick way to check the quality of the plastic is to squeeze a corner of it: if it wrinkles, then it’s not a suitable option. Choose better quality and more expensive ones.
Such panels are secured with clamps. The structure must be disassembled, because easy access to the risers is needed. Make an L-shaped profile along the wall to start. The valves will be located behind a plastic hatch that can be installed with plastic pipe sealant. Ventilation grilles must be installed at the top and bottom to prevent the pipes from rusting due to excess moisture in such places.
It is clear that this is just a list of options for how to make shelves and cabinets in the toilet. Show your imagination by comparing it with your capabilities and desires. This design will help make the free space functional.
Nuances when installing a shelf
If you have enclosed water pipes in the cabinet, the shelves should not touch them, see photo. Usually the pipes are not positioned strictly vertically, so each shelf will have to be “processed” individually. If the pipes have a small diameter, then the holes in the shelves are made using a feather drill, then you need to take a jigsaw and cut the shelf so that it touches the wall closely.
A hole for the fan pipe is cut with a jigsaw, but before that you need to drill the shelf, this is necessary in order to pass the jigsaw file through it
It is important to determine the size of the hole as accurately as possible so that the files are in place
It is not necessary to firmly attach the shelves to the profile, as you may need a place to store tall objects. A loose bottom shelf is often used for easy access to meters and valves on pipes. Loose shelves are the easiest way to gain access and do not require the installation of additional hatches and doors.
Ideas for creating a cabinet in the toilet behind the toilet with your own hands (20 photos)
To reduce renovation costs, you can make a closet in the toilet yourself. The location behind the toilet is the best option, which takes up minimal space. In our article we will tell you what materials are used when creating a cabinet with your own hands.
Tree
We come up with a design for the future structure, buy bars, and install the frame. To increase service life, we treat the surface with protective impregnation.
We use a niche to create an open closet. We paint the shelves in the required tone. In this case, the acid green color repeats the shade of the ceramics on the walls.
We measure the dimensions of the recess, calculate and create a wooden structure, and install drawers.
We decide on the dimensions of the wall-mounted model and assemble the cabinet for the toilet.
Such a door can be purchased at a kitchen showroom. We first close the communications using sheets of plasterboard, cover the surface with ceramics, leaving an inspection hatch, and finally install a wooden facade.
Plastic
We create the frame and internal shelves. We purchase plastic facades with glass ready-made or to order, and install them to the base ourselves.
Material: chipboard, top layer – plastic. Taking into account the exact dimensions, we order cabinet doors, create shelves, and then hang the fronts.
Ceramics
Using metal profiles and sheets of plasterboard, we close the correctly selected installation, then we mount an open niche for decoration. We lay tiles on top of the gypsum board.
We fix the metal guides, cover the gypsum board structure, putty and decorate the surface.
Doors with lathing
First we create the base of the cabinet, cover the walls with tiles, and fix the finished doors last.
PVC or wood is used for the facade. Installation is quite simple; the day before you only need to prepare the block frames, special fastenings for the lock and hinges. For protection, it is recommended to coat the material with stain or varnish.
Guides and drywall are at the base; we lay ceramics on top, leaving a niche for inspection. We close the opening with doors.
We cover the wall with the installation with plasterboard, install an inspection hatch, and close the niche with contrasting roller shutters.
Roller shutters
An economical option that is easy to install yourself. Roller shutters help hide communications, and use the rest for storing items.
Glass
We fill the recess in the wall with shelves and hang a glass facade.
We close the niche above the installation using mirrors.
The inside of the glass has a matte finish.
Combined options
Glass blocks are inserted into the MDF sheet.
Sliding opening system. The door leaf consists of laminated chipboard and frosted glass.
Materials for creating shelves in the bathroom from plasterboard
The main materials when making bathroom shelves with your own hands are plasterboard and metal profiles. The frame of the structure is created from galvanized profiles. It is based on UW or UD guides in the form of original rails made of thick sheets of metal. Elements can have a width of 50, 75 and 100 mm, and a depth of 40 mm. The basis for plasterboard boards are load-bearing CD profiles, which are mounted on guide elements.
To make shelves you need plasterboard sheets and a metal profile
When creating curved structures, arched profiles in the form of slats with reinforced perforation are used. Such elements can bend in any direction due to the presence of a large number of holes and cuts in their structure.
The frame made from profiles is covered with plasterboard. It is represented by sheet construction and finishing material, which consists of a core protected on both sides by a cardboard layer. Cardboard gives the product the necessary rigidity and helps reduce gypsum stress during installation work and during operation. It also protects the inner layer from abrasion.
There are several types of drywall, each used for a specific task. To create shelves, moisture-resistant plasterboard is used in the bathroom under tiles marked GKVL, where the symbol “B” indicates the moisture-repellent properties of the product. Such sheets have a green or bluish tint. Drywall contains special modifying components that reduce its absorption of moisture and prevent the appearance of fungus and mold on its surface.
Drywall has a number of distinctive advantages, which makes it in demand when organizing the interior space of premises. The material is environmentally friendly, resistant to temperature changes, good noise insulation properties, and durable. Drywall is flexible to work with. The material cannot be deformed without appropriate effort. From it you can create elements of various configurations.
Important! Drywall is a fragile material, so you should work with it carefully and slowly.
For the bathroom it is necessary to use moisture-resistant plasterboard, which has a greenish tint
Dimensions and design
There are several options for such lockers:
- A cabinet from ceiling to floor is good in terms of maximum access to communications; additional removable shelves can also be installed inside it;
- Small hatch - designed to hide meters; if you still think about using it for communications, you need to check the condition of the pipelines;
- Medium size (example: 50x70 cm) – provides access to the counter, makes it possible to install several shelves;
- Under tiles - the size depends on the tile itself.
ceiling to floor wardrobe
small hatch
the average size
under tiles
Development of a design drawing
Any design, even the simplest one, needs detailed elaboration. Creating a drawing will allow you not to be distracted by calculations and correcting errors during work.
Detailed design drawing
First, you should draw several sketches, choosing the location of the cabinet, its interior space, and the design of the facade. Then it is necessary to measure the height of the room and the width of the free space behind the toilet so that it becomes clear what dimensions of the structure are acceptable in the existing conditions. The drawing shows the location of pipes and other communications, linking their position to the corner of the room.
Sketch drawing
Taking into account the data space obtained during the measurement, a detailed drawing is developed, which shows the location of the cabinet, communications and access to them, frame features, top and bottom covers, shelves, doors, places and methods of fastening individual elements.
The principle of fastening the frame and shelves
The width of a typical toilet varies between 820 – 850 mm, so the installation of shelves with cutouts for pipes (about 250 mm) occurs across the entire width of the room.
There are several door design options:
- Traditional swing doors require free space for opening.
- The sliding sash does not require free space.
- Roller shutters can be used as a shutter, the blade of which moves up and down along the side guides.
- The interior space can be closed with blinds or curtains.
Mirror swing doors
Drawing a diagram
Before you make a cabinet behind the toilet in the toilet with your own hands, you need to make a competent diagram.
Drawing up a diagram is a necessary step before starting work.
The main points to pay attention to when drawing are listed below.
- Draw the diagram in standard planes (top view, side view, profile view).
- Apply dimensions indicating allowances. An extra 2-3 mm will not make a difference when cutting MDF sheets. Not such a big expense. But when cutting, there is a gap at the cutting site, which is why the geometric parameters of the lined workpiece will differ. To eliminate this discrepancy, the allowance must correspond to the size of the gap from the cut.
- When installing a cabinet with closed doors, draw out the interior arrangement on a separate sheet. This way you can competently plan the internal space and cut workpieces according to pre-specified parameters.
- Separately, draw a diagram for cutting blanks and parts. This will save you money on buying extra material. Proper planning of expenses is the basis.
- Mark all necessary junctions of pipelines, electrical wiring, and sockets. On the cutting sheet, be sure to mark on which side you plan to cut the recess for the pipe. This will allow for better distribution of the material.
It is advisable to make the diagram as detailed as possible.
Draw a sketch separately. For a more effective presentation, use colored pencils, markers or paint. Organize your design at the highest level. Consider several options for the future decoration of the restroom. This will allow you to choose the optimal design.