Tips for choosing
A dowel-nail consists of two elements: a dowel, which is inserted into a hole in the wall, and a nail, which is driven or screwed into the dowel if there is a thread on the rod. The cap has a slot, usually for a Phillips screwdriver. Dowels made of polypropylene are suitable for installation in heated rooms, while dowels made of nylon are able to withstand sub-zero temperatures, so they can be used even outdoors.
You can use a dowel-nail for concrete, brick and foam concrete, it all depends on the design of the dowel. Based on this principle, the following types are distinguished.
- Spacer - fixed due to the expansion of the sleeve in the hole, its relief surface limits the movement of the dowel.
- Universal - fastened in the hole due to the knot that is formed when twisted.
When buying dowel nails, pay attention to their size . The diameter can be from 5 to 8 mm - the larger it is, the heavier objects the fastener can support. The most common dowel nails for fastening plasterboard profile frames into concrete are size 6x40.
The length of the nail can be from 40 to 120 mm - the longer it is, the more securely it will hold the suspended structure. Also consider the amount of fasteners in the package and make your choice based on the amount of work to be done. If you need to display one shelf and several paintings, a package of 6 to 10 pieces is enough. When you need to fasten many items, it is better to take items with a reserve, for example, 100 - 150 pieces.
Dowel-nail for gypsum boards
When using drywall, you should choose the right fasteners. Not only the strength of the structure being created depends on this factor, but also the appearance, service life of the structure, its technical characteristics - whether this structure can be weighted with various objects. For installation of gypsum plasterboard frame. The type and number of selected dowel-nails depends on the type of frame, the selected profiles; they differ in the thickness of the material from which they are made, the material of the walls and ceiling. (Foam concrete, shell rock, concrete, brick, etc.)
To install a metal frame, not only self-tapping screws are purchased, but also dowel-nails. These fasteners create the strength of the entire frame for drywall. To use these fasteners, you should familiarize yourself with their characteristics. Improper use may have a negative impact on the metal frame.
Options for non-standard mounting of shelves on the wall
In addition to the described classic mounts for wall shelves, you can use unusual options:
- rings with hooks;
- water pipes with fittings;
- belts;
- ropes;
- chains;
- hidden fasteners directly in books, etc.
Custom shelf mounting is an easy way to add a special style to your room. In addition to using original holders, you can try hanging a shelf in an unusual way - for example, decorating an external corner with it or fastening the boards not horizontally, but diagonally, creating honeycombs, rhombuses, Christmas trees, chaotically located cells of different sizes and irregular shapes.
The easiest way to mount a wall shelf is to screw in reinforced brackets, for glass products - “pelicans”. If appearance is important, then hidden fastenings are the best option.
Classification of dowel-nails
In order to purchase dowel nails, you should consider the following factors:
- Estimated load on the fastening element, on the surface itself.
- The base into which the dowel-nail will be attached is concrete, brick.
- Surface – ceiling, wall.
The fastening element is not uniform and is available in different sizes and structures.
Installation differences
Depending on the structural structure of the dowel, nails should be worked with different tools.
Manual fixation of the dowel-nail - in this case, 2 types of dowel-nails with different structures are used. Nails without threads are driven in with a regular hammer. Threaded - you will need a screwdriver or screwdriver.
Fixation with a construction gun. For this type of installation, dowel-nails with a metal sleeve are used. They are manufactured to carry more weight.
Dimensions of dowel-nails
The fastening element is produced in various sizes. Depending on the purpose, you should purchase a dowel-nail of the required size. Fasteners are marked with two numbers: the first indicates the diameter, the second indicates the length of the fastener.
| Size diameter/length | Dowel length | Nail length | Min depth for through installation | Max thickness of mounted material | Weight 1000 pcs. per kg. |
| 6/40 | 4 mm. | 42mm. | 50 mm. | 10 mm. | 3.3 |
| 6/60 | 4 mm. | 62mm. | 70 mm. | 30 mm. | 4.89 |
| 6/80 | 4 mm. | 82mm. | 90 mm. | 50 mm. | 7.28 |
| 8/60 | 5 mm. | 62mm. | 70 mm. | 20 mm. | 8.5 |
| 8/80 | 5 mm. | 82mm. | 90 mm. | 40 mm. | 11.02 |
| 8/100 | 5 mm. | 102mm | 110 mm. | 60 mm. | 13.78 |
| 8/120 | 5 mm. | 122mm | 130 mm. | 80 mm. | 16.53 |
| 8/140 | 5 mm. | 142mm | 115 mm. | 100 mm. | 19.3 |
| 10/100 | 7 mm. | 102mm | 150 mm. | 50 mm. | 15.32 |
Technical parameters of dowel-nail
According to GOST 28457-90, dowel-nails are produced. They undergo processing - hardness 53-56HRC. But they may have a deviation of 51/5HRC.
- The rod can be bent according to factory settings: with a length of 50mm. – 0.1mm curvature; length is more than 50mm. – 0.15mm.
- There should be no ripples or cracks on the nail. The nail must be sharp if the dullness is 0.8 mm. – it is considered unsuitable.
- The nail point can be multifaceted.
- There may be a washer on the nail. A force of 0.3 kN is required to shift it.
Dowel nails are made with an anti-corrosion zinc layer. It must be no less than 6 microns.
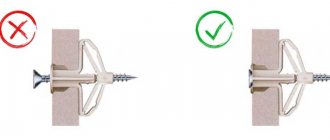
What is a metal wedge dowel?
This fastener is commonly called a metal wedge anchor. It is made from metal. The word "anchor" is translated as "anchor".
The metal dowel for drywall has a different installation technology. The moving part of the fastener is driven in with a hammer, due to which the dowel is wedged into the surface.
According to GOST, 2 types of metal dowels for drywall are produced: 6/40 and 6/60, where 6 is the diameter in mm, 40(60) is the length in mm. Wedge anchors are available for sale in packages of 100 and 200 pcs.
How to hammer a metal dowel wedge quickly with a hammer drill, watch the video.
Video:
Features of using a wedge anchor
The wedge anchor is made of galvanized steel or stainless steel. Carbon steel is used and coated with white or yellow zinc. On the head of the anchor there is a manufacturer's mark indicating the density of the metal used.
Basically, these metal wedge fasteners are produced for fastening profiles or hangers to the base and are the recommended fastening.
The wedge anchor is produced in the form of a metal rod. There is a locking cap at one end, and a wedge-shaped spacer end at the other. When mounting, an anchor is placed in the hole made and the moving part is driven in with a hammer. In this case, the wedges diverge in different directions, thereby fixing the fastening element in the ceiling. The wedge anchor is particularly reliable when attached to the base.
Factors affecting structural strength
In order for the wedge anchor to have a long shelf life and also maintain strength, there are some factors that influence these indicators:
- The wedge anchor is driven into the base, which has no voids. This ensures fastening strength.
- With high humidity, the concrete base will constantly absorb moisture, which can cause premature corrosion of the metal.
- If there is constant pressure (movement, vibration) on the base into which the wedge anchor is mounted, the wedge will soon break out.
- If there is a moving part left above the surface - the rod, this means that the anchor has not fully opened. However, the service life is limited.
- Chemical solutions should not be allowed to come into contact with the fasteners. They will destroy the fastener.
Comparative table with which you can determine the strength of the anchor wedge:
| Name | 6/40 | 6/60 |
| Diameter of wedge anchor, mm. | 6 | 6 |
| Wedge anchor length, mm. | 40 | 60 |
| Max thickness of fixed material, mm. | 5 | 8 |
| Drill diameter for hole, mm. | 6 | 6 |
| Min depth of hole for anchor, mm. | 45 | 65 |
| Pull-out force minKN from concrete B25 | 3.60 | 5 |
| Weight 1000 pcs, kg. | 10.70 | 16.05 |
Separately, it should be noted that for fire safety reasons, all suspended structures must be secured with metal wedge anchors.
Polymer glue
What is needed:
any polymer glue.
Peculiarities:
- suitable for both heavy and light paintings;
- does not leave any marks on wallpaper, paint or any other finishing.
Execution algorithm:
- if you are dealing with heavy frames, then you should glue completely around the entire perimeter;
- if the image is light, then it is enough to just apply glue to the corners;
- It is best to organize a small press immediately after this and leave it to dry in this form for about a day.
In this option, the main thing is to choose an adhesive that does not leave greasy marks on the walls. Be sure to check this before purchasing, so as not to become an eyewitness to damaged wallpaper or paint.
Base for dowel nails and wedge anchor
In order for the fastener to have a long service life, you should know what the base should be:
- Reinforced concrete ceiling slabs in apartment buildings.
- Concrete – the floor in an apartment or poured concrete in a private house.
- Solid brick. There are several types of this material: ceramic, silicate, clinker bricks. Each material has its own density, which determines the service life of the fasteners. Such material can be encountered in private buildings.
- Foam concrete blocks. If there is no cavity in them, you need to know the density of the foam block.
Dowel-nails and wedge anchors are not mounted in a wooden base, as well as in walls made of foam blocks and other hollow materials. Since the spacer elements will not be fixed in the base, but mainly in the void, which will not provide the required strength.
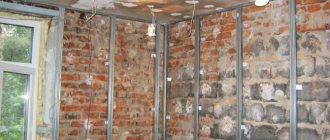
How to properly attach a profile to the wall
Before attaching a metal profile to the wall, you should have a set of tools and materials:
Profile – guide profile is mainly galvanized. This gives reliability to the created structure. The calculation is made using an online calculator or on your own. Material must be taken in reserve.
Dowel and nails for fastening the profile - for a solid wall measuring 6/40. If the base is wood, then 25mm self-tapping screws are applicable.
Drill with 6mm drill bit. and a screwdriver. Before using electrical tools, it is necessary to calculate the load on the electrical wiring.
Scissors for cutting metal. When installing a guide profile, it is sometimes necessary to make an incision on a metal product or cut it off.
Installation of the guide profile
To install the guide profile, a prepared surface with ready-made markings is required. How to fix the profile to the wall? Installation is carried out in the following algorithm:
- First of all, the guide profile is applied to the marking (the line can pass both from the inside and from the outside - depending on the nuances that arise)
- Next on the profile you need to mark the places for future fasteners. Basically, you need to retreat up to 15 cm from the edge of the profile. Maximum, the second fastener is located at 25 cm. from the first and so on - every 25cm.
- If there are no holes in the profile, they are made independently. Even if there are these places marked by the factory, according to the craftsmen, one should be made exactly in the middle between the holes for the strength of the structure.
- The diameter of the drill should be 6 mm and its length 50 mm. if the drill is longer, you should mark a boundary on it; this can be easily done with electrical tape or tape.
- A plastic dowel is inserted into the hole made both in the base and in the profile. It is hammered into place with a hammer. This should be done carefully, as deformation may occur during installation. Then the plastic part will become unusable.
- After installing the first plastic part of the dowel, a threaded nail is installed using a screwdriver. The deeper the nail enters the component, the more it opens, fixing all the fasteners with special tendrils.
- If the profile is longer than required, it is cut off with metal scissors.
- If you need to sharpen the profile, then you can use special extensions.
- You should retreat 15 cm from each end to the border of the profiles and fix the guide dowel with nails.
The screwdriver should not be set at high speed, so as not to drive the nail into the plane more than it should be, thereby bending the profile.
The guide profile is an integral part of the entire metal structure for plasterboard, so its fixation must be strong and of high quality.
Fastening a profile to the ceiling or fixing a wall frame under gypsum boards are similar in technology.
Video:
Regular hook
What is needed:
- hook;
- pliers;
- glue.
Peculiarities:
- maximum weight up to 1.5 kg;
- requires selection of a pattern for camouflage.
Execution algorithm:
- take a regular hook in your hands and, using pliers, bend it so that it can be applied to any flat surface;
- glue it to the wall with any glue;
- select a piece of wallpaper with a suitable pattern;
- glue in such a way that only the bent loop remains protruding;
- feel free to hang the picture.
This is what it looks like in the picture.
As you can see, the simplest way to quickly hang a picture on any wall surface. The only negative is the weight limit of the frames used. And if you don’t have a suitable one, then you can always make a frame with your own hands.
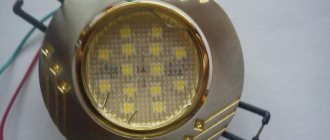
Attaching hangers to the ceiling under plasterboard
How are hangers attached to plasterboard structures? Many will answer this question “dowels and nails are used.” This is wrong, because the suspension takes on the load of the entire plasterboard ceiling. When weighing heavily, over time the dowel and nail cannot withstand it and comes out of the surface. The result is sagging and deformation of the suspended ceiling. According to experts, the best fastener is a wedge anchor. How to attach profile hangers? To ensure the strength of the structure being built, a metal wedge anchor, size 6/40, is fixed in the side holes of the suspension. Installation is carried out as follows:
- According to the intended markings, a hole with a diameter of 6 mm is made on the ceiling, the depth of the hole is 40 mm.
- This hole is cleared of dust (you can blow it out yourself).
- A hanger is attached to the holes made.
- The wedge anchor is inserted into the suspension eye and hole until it stops.
- Afterwards, the protruding rod is driven in with a regular hammer. With each blow he goes deeper into the concrete surface. This indicates that the anchor elements are straightened in different directions, thereby fixing the entire fastening element.
Installation of one anchor takes 10 seconds. This fixation of hangers is the most durable compared to the use of dowel-nails.
At what distance should the profile hangers be attached? The strength of a plasterboard suspended ceiling directly depends on the hangers. The hangers are attached to a marked line intended for the ceiling profile. On this line, every 40-60 cm, suspensions are attached with anchor wedges. The distance depends on the material used to make the suspension. If the metal is thin, then the distance will be 40cm.
Distance of fastening of direct hangers along the cord
It is allowed to use dowels when creating a box on the ceiling. This design does not burden the dowel-nail due to the low weight of the plasterboard box.
Distance for attaching hangers to the wall
Video on how to properly attach the suspension
Video:
Video:
Fastening in “serious” ways
In this paragraph we will look at ways to fasten objects or a series of objects that have significant weight, without using nails. It is worth noting that dismantling some elements will be difficult and will leave behind characteristic marks . In this regard, it will be necessary to update the wall covering.
No. 11. Picture board
This method is used when you don’t mind the floor and ceiling , but you do mind the walls. Please note right away that if you have a suspended or suspended ceiling, then this method is not for you . Unless, of course, this was foreseen in advance. It is worth noting that using an entire separate wall to place objects will help achieve unique interior solutions.
Such a board can become the center of the room and set the rest of its furnishings. Compositions that are designed to tell about something look more harmonious and thoughtful. For example, a series of landscape photographs taken at different times of the year, which convey the brightest moments of each month and tell the story of the decline and rebirth of nature. Or a series of black and white portrait photos of a married couple, which depict the story of their acquaintance and the most significant moments. Or the story of a person dear to you growing up. to highlight such an element using spot lighting . And it’s even easier to build such a structure. You can use real wooden boards, knocked together into a single sheet of the required size. More affordable options involve the use of laminated or sanded chipboard or MDF.
You can paint the surface yourself in a suitable color. For fastening, you need special brackets , which are sold at any hardware store.
- You immediately need to mark the floor , and then transfer it using a plumb line or laser level to the ceiling . This way you will avoid distortion.
- Now you need to make holes in the floor and ceiling . They do not have to be located opposite each other.
- Dowels are inserted into the holes and a pin is screwed in . You need to screw the bracket onto it. The brackets must be able to be adjusted in thickness using a clamp.
- Now insert the sheet into all the brackets on the floor and ceiling at the same time. At this stage you will need an assistant. While one person holds the sheet, the second should clamp it in the brackets.
- Then you need to check the deviation of the plane from the vertical position using a level.
It is best to place 5-10 cm from the wall in order to emphasize the individuality of this object and direct maximum attention to it. If you have already decided on the order in which objects will be placed on the board, then it is better and more convenient to make fastenings for them before installation. If not, you will have to use the stairs.
Installation features
When installing a profile with dowels and nails to the walls, certain difficulties may arise. To avoid this, you should familiarize yourself with certain nuances:
- When installing into a brick wall, you should determine the location of the dowel-nail. If the fastener gets on the boundary (in the mortar) between the brick, then there is a high probability that it will pop out. Because the solution may crumble.
- Before drilling into the wall, you should know for sure that there are no electrical wires going through there. Otherwise, a short circuit will occur.
- If there is metal reinforcement running through the wall, this will also have a negative effect on making the hole.
- To properly install the dowel-nail, you need to make holes with the same diameter as the dowel (6mm).
- You need to drill the wall at low speed so that the material does not come out from the surface in one piece, which will create a large hole.
- When driving the dowel, the limiting collar will prevent the fastener from falling into the hole. Therefore, the dowel should be driven in carefully.
Double-sided tape
What you need:
only tape
Features:
- Suitable only for light and small paintings;
- can be used for any SMOOTH non-textured surfaces;
- After dismantling the painting, most often the wallpaper comes off along with it, or the paint peels off.
Execution algorithm:
- It is best to choose double-sided tape on a fabric basis to use - this way you can be sure that you were able to hang the picture seriously and for a long time, because this type of tape has ideal strength and will withstand even a decent weight;
- stick a strip of tape onto the surface and secure the image;
- You can do it differently: stick 1-2 strips on the picture itself from the back, and then remove the protective sticker and lean it against the wall.
To eliminate the possibility of torn wallpaper during dismantling, it is best to keep the already peeled fragment strictly perpendicular to the wall surface.