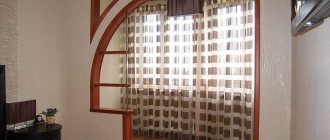
Drywall is an excellent replacement for plastering work, it saves a lot of time and money, the result looks great, and a minimal amount of dirt is generated when working with plasterboard slabs.
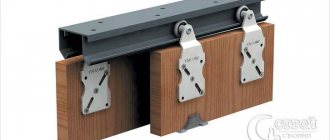
There are several possible ways to glue drywall to a wall. The most commonly used method is to attach plates to a structure made of steel guides. This method allows you to lay additional layers of sound and thermal insulation, extend communications, and in general is quite convenient.However, in typical small-sized apartments its use is not justified, since when mounted on steel guides, a large amount of usable space is lost. And if for a private house this is not critical, then in a city apartment the loss of up to 10 centimeters of space on each wall can reduce the area of the room from 16 to 14 square meters, which, you see, is quite noticeable.
It is this circumstance that forces one to choose in favor of gluing plasterboard sheets to the walls in order to level them.
When attaching plasterboard boards, use steel guides, this will allow you to lay additional layers of thermal and sound insulation
Preparing walls and material for gluing drywall to the wall
Before gluing
drywall to the wall, it needs to be additionally prepared, namely:
- Completely remove any remnants of old wallpaper from the walls, strip down to concrete, brick or plaster. If you plan to glue drywall to old plaster, make sure its contact with the wall is strong;
- If the wall is painted, it is necessary to remove the paint using abrasives or use special primers that improve contact between the material and the wall;
- Prime the prepared surface to ensure reliable and uniform adhesion of the glue to the wall;
- All communications and wiring must be carried out in the main wall before cladding with plasterboard slabs begins. Cables in grooves must be secured with ties every half meter.
Helpful advice: in case of failure of individual sections of the wiring, or if it is necessary to replace them after the expiration of the wires' service life (which is up to 20 years), use a corrugated cable.
Embedded into the wall at the initial stage, a corrugation of round cross-section and small diameter, with a lingering conductor, will make it possible in the future, if necessary, to simply pull sections of wires out of the wall without destroying the external finish. With low cost and ease of installation, it pays for itself many times over. Being, among other things, additional protection for your wiring.
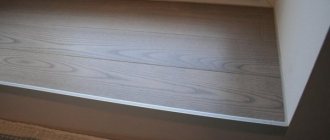
Plasterboard slabs must be laid out along the walls in advance on a flat surface, face down. Cut them so that during installation there is a gap of up to one and a half centimeters from the floor and ceiling. It is needed for ventilation and as a heat shrink seam. Leave the corners untouched for now; they are tiled last.
Install supports 10-15 millimeters high along the wall; you will place the slabs on them during the installation process.
Before gluing plasterboard boards, clean the surface of your walls by removing all remnants of old wallpaper or plaster.
Types of glue
The choice of adhesive solution directly depends on the appearance of the surface on which the drywall will be glued.
In construction stores you can find special adhesive compositions that can be used when working with drywall.
- Ceresit is a tile adhesive, but it also glues plasterboard sheets well.
- PerlFix - allows you to glue drywall to porous surfaces such as brick walls. An inexpensive and easy-to-prepare composition that can be easily used for DIY repairs.
- Fugenfuller is a dry putty, diluted with water, mixed by hand, and applied thinly with a roller.
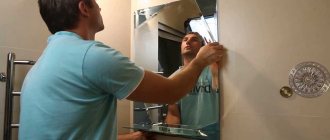
- Silicone glue. It is used when it is necessary to stick ceramic tiles or a mirror onto drywall.
- Knauf Fugen. This composition is used for gluing gypsum boards to wall surfaces that do not have defects. Has a plastic consistency. It is applied very thinly.
- Polyurethane foam. Convenient and easy to use material, inexpensive. For this reason, it is most often used when working with drywall.
Necessary tools for attaching drywall to the wall with adhesive
Finally, before gluing drywall to the wall, you need to prepare all the necessary tools, such as:
- A notched trowel for applying glue if the curvature of the walls does not exceed 5 millimeters;
- A trowel, for mixing the glue and for applying it to the surface, if the curvature of the walls exceeds 15 millimeters or more in some areas;
- container for mixing glue - it is best to take a modern construction plastic container, the glue from which
- will come off easily after drying. Dilute the glue little by little, it sets very quickly;
- A mallet, preferably a rubber one, for leveling the sheets after they are pressed against the wall;
- Level and rule at least 2 meters long, including for leveling the surface horizontally;
- Plumb line, painting knife, construction pencil, tape measure, level. All these tools are needed during the preparatory stages.
It is important to know: you can mark the floor and ceiling using a plumb line; it will make further alignment of the walls easier.
Prepare all the necessary tools in advance, they will greatly reduce your time, and the result will be of better quality.
Tools
Speaking about the set of tools required for work, it is worth noting that it is much smaller when choosing the option of gluing gypsum cardboard to wall panels.
For frame plantings, much more is required.
So, you will need:
- Drill to speed up the process of kneading the adhesive mass with a mixing attachment. Thanks to it, the composition is much more homogeneous with better characteristics. Although, if you wish, you can even do without it;
- Long construction level. You can also use the rule, which is very convenient to control the overall plane along with how straight the sheets are located along the walls or ceiling;
- The list is completed by a small-sized trowel (spatula), adapted for uniform application of the adhesive mass to the surface, along with a well-cleaned container where the adhesive mass will be mixed.
Basic ways to stick drywall to a wall
There are three main methods that are used when you need to fix drywall with glue to the wall. The choice of one method or another depends on the curvature of the walls on which installation is carried out:
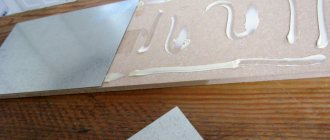
- If the walls are fairly even and the curvature of individual sections does not exceed 5 millimeters, the simplest method is used: after all the preparatory procedures, putty or special glue is applied to the slabs laid out along the walls using a notched trowel; the glue is applied around the perimeter and in the center of the slab. If the slab is thinner than 10 millimeters, two strips of glue are applied in the center. In areas to be finished with tiles, the adhesive is applied in a continuous layer. The adhesive layer is from 5 to 15 millimeters.
- The technology for walls with a curvature of 5 to 20 millimeters is different in that the glue is applied with a trowel, in a layer of 25 to 35 millimeters, in piles, in a checkerboard pattern, every 30 centimeters. In this case, the height of the glue is adjusted to suit specific areas of the walls.
- For walls with a curvature of more than 20 millimeters, a third method is used: installing beacons. Before installing the slabs, strips of plasterboard 10 centimeters wide are glued to the wall. They are attached every half meter, aligned with the rule. Glue is applied to them in the same way as in the second installation method. After drying for a day, the slabs themselves are glued onto the lighthouses; the glue is applied using the first method.
How to hang a TV on a plasterboard wall without it falling
What you can’t do without: after installing the slabs, do not rush to immediately seal all the joints and seams - let the glue dry thoroughly, this will take 48 hours, during which there should be no drafts, sudden changes in temperature and humidity in the room. After this, all seams and joints can be sealed.
An additional way to stick drywall to a wall
In addition to all of the above, gluing drywall to the wall can be done using polyurethane foam. However, this method should only be performed by professionals, otherwise the result will be of poor quality and short-lived. The advantage of this technology is that installation can be easily done by one person. Foam mounting is done using the following technology:
- The slab is leaned against the main wall on supports and secured to it with hardware using plastic dowels installed in plasterboard;
- The slab is leveled using a level and adjusting the fasteners;
- Small holes are drilled next to the dowels, sufficient to insert the spout of a foam container;
- Through the holes, foam is pumped behind the wall in small portions, since too much can cause the wall to swell, which means the whole job will have to start all over again. The holes are made in a checkerboard pattern, every half a meter or a little less from each other.
- After a day, the fasteners are pulled out of the wall, and all the holes are filled with putty.
However, this method requires a lot of skill and is not recommended for use by non-professionals.
Before starting work using polyurethane foam, you need to know what kind of work it will be used for and the composition of this substance. Please study the article Polyurethane foam Macroflex 750 ml Technical characteristics
Finishing
Of course, installation of gypsum boards is not the final stage of interior finishing. Usually the walls are painted or wallpapered. Despite the smooth surface of drywall, the sheets need preparation before final coating.
Here is a step-by-step diagram of the work:
- If there are no factory chamfers on the edges of the sheets, they are cut out with a knife. The joints between the sheets are filled with a special putty for gypsum board joints. To do this, the composition is mixed in accordance with the manufacturer's instructions, and the joints are evenly coated using a narrow spatula.
- While the composition retains its plasticity, a reinforcing tape is pressed into it, which will be covered with a second layer. Read more about sealing seams here.
- Repeated puttying is carried out after 10–12 hours, when the first layer hardens. After this, the protruding surfaces are cleaned with sandpaper.
- Now the sheets need to be primed and wait for the composition to dry completely.
- Then the first layer of putty is applied, which must also dry.
- If the surface does not meet the requirements, priming is performed again and a second layer of the mixture is applied.
- After drying, the surface is treated with fine-grained sandpaper.
- At the final stage, another layer of primer is applied to the putty, wait until it dries and begin finishing the room.
You can learn in detail about all the stages of gluing drywall to the base by watching the video. The workflow is clearly presented here, which will be useful for novice craftsmen.
If after reading the article, viewing photos and videos, you still have questions, ask them in the comments: a gypsum board installation specialist will answer you.
Summary. Useful tips
As you can see from the article, gluing drywall to a wall is not that difficult. And with constant practice, frame fastening is even easier and faster.
Depending on the condition of the walls
Several different methods can be used in one room. For example, a frame with insulation is made on the external wall of a house, and slabs are simply glued to the internal walls.
For each specific case, use the most suitable option. Do the work slowly. Having previously made all measurements and markings. This way you will save yourself from many mistakes and rework.
Drywall is the material of the future. Easy to use, it retains its qualities for a long time. Don't be afraid to try it once and you will realize that it is a comfortable and good material to work with.
source: //mrgipsokarton.ru/uroki/kak-prikleit
The installation method, in which a sheet of drywall is attached to a vertical surface with glue, has a number of undeniable advantages. It allows you to simultaneously glue the material and level the walls, protect the coatings on the reverse side from the effects of aggressive environments and the harmful effects of microorganisms, thanks to the ease of installation technology, you save your budget and personal time.
Installing drywall with glue saves space in the room, which, if the frame was installed, would be 5-6 cm less on the side of each wall. To perform a quality installation, you will need:
- decide on the choice of glue;
- prepare the surface;
- Follow the installation instructions.
Which is better: heated floors or radiators?
Warm floorBatteries
The process of gluing a gypsum board sheet
Cladding with plasterboard sheets: advantages
Facing with HA sheets is carried out in the following cases:
- surface leveling;
- improved heat and sound insulation;
- hide wires and pipes;
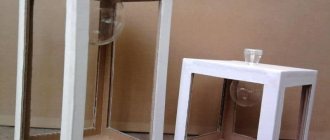
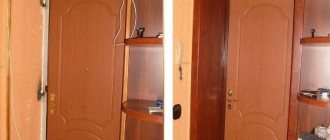
- surface decoration - creating niches, shelves, design with figured elements.
The plasterboard sheet has a flat surface; when mounted on a wall, it does not deform, but remains flat. This is convenient for subsequent painting, laying tiles, and wallpapering.
In various rooms with high humidity and high temperatures, the following types of gypsum boards are used:
- An ordinary room with moderate temperature changes is a gray gypsum board sheet.
- Wet room: bathroom, corridor in a private house, balcony, attic, kitchen - green sheet of plasterboard.
- A room with a working fireplace, a Russian stove, with a rough stove - pink gypsum board.
On the construction market there are types of floor plasterboard and facade plasterboard for outdoor work.
There are methods for attaching sheets to the surface - frame and without frame. In the first case, profiles are applicable. For the second method, you need to choose the right adhesive composition.
Advantages of gluing gypsum board to the surface:
- installation is easy and quick;
- less expensive method compared to frame;
- this method does not take away extra centimeters.
The negative side is the inability to hide wires and communications behind the casing.
We recommend: Propylene glycol
Characteristics of adhesive mixtures and their manufacturers
To install a sheet of drywall on a wall using the adhesive method, use products from two reputable manufacturers: Knauf (Perlfix series, Germany) or Volma (Montazh series, Russia). The use of a domestic brand is preferable for the following reasons:
- the cost is lower;
- the mixture consumption for applying a layer with a thickness of 1 mm and an area of 1 m² per serpyanka is only 2-3 kg, compared to 5 kg of the Knauf brand;
- The complete drying period for Volma glue is 24 hours, for the Knauf mixture it reaches 7 days;
- strong adhesion to the surface due to the content of gypsum fibers;
- the setting time of the mixture on a flat surface is 1 hour, with Perlfix this threshold occurs 30 minutes after mixing; if the mixture is applied to a sickle tape, the setting period is even less (40 and 15 minutes, respectively);
- It easily takes the shape of irregularities and does not shrink after hardening.
For DIY installation, it is preferable to use Volma glue. For a beginner, the packaging form of the material is also convenient - 5, 15 and 30 kg. This makes it easy to calculate the material, save on costs, determine the amount of work in advance and have a certain period of time left before the mixture has time to set. Knauf adhesive mixture is designed for a professional approach. Packaging form: 30 kg.
To glue a sheet of drywall to a wall with Knauf mixture, you will need professional skills to work at a fast pace. Packaging form Perlfix – 30 kg. The optimal temperature for the mass to acquire its properties is +5 degrees under normal humidity conditions.
Volma glue packaging form Installation
Completion of work
After the adhesive has completely dried, after 2-3 days, start filling the joints: apply putty for leveling, then press the reinforcing tape into it. Once everything is dry, apply another leveling coat of joint compound to the joints and any protruding nail heads (if used).
Puttying gypsum board joints
For leveling, you can use the same mixture that was used for gluing the plasterboard.
Seal gaps along the floor with caulk. Finishing work can begin only after the joints have completely dried.
Surface preparation
Before you start gluing a sheet of drywall with Volma glue, prepare the surface for it. To do this, using a level or a stretched cord, a series of measurements are made to reveal irregularities at the base of the walls. If deviations do not exceed 2 cm, proceed to the following steps:
- clean the walls from old finishes (wallpaper, paint, plaster), dust and other contaminants;
- the surface is covered with two layers of primer, which increases the level of adhesion of the material from which the vertical floors are made (brick, concrete, wood) with glue;
- if deviations in curvature are slightly more than 2 cm, a layer of plaster is applied to the wall, this will smooth out the unevenness, which will then be filled with glue;
- then they calculate the layout of the plasterboard sheets so that after installation they do not touch the floor at a distance of 10-15 mm (this space is required for climatic adaptation of the material);
On a rough wall, you can install a sheathing or glue sickle tape, which will allow the glue to adhere even more firmly to the wall.
Applying plaster over serpyanka
Marking
With the adhesive installation method, plasterboard sheets are usually installed vertically, which must be taken into account when marking the internal space. This is true for apartments with standard wall heights - one sheet 2.5 m long is just enough to cover the space from floor to ceiling. If we are talking about “Stalin” buildings or private houses, where the wall height often exceeds 3 meters, this rule does not work, so the sheets can be installed horizontally. The marking is carried out in such a way as to minimize the number of joints and symmetrically glue entire gypsum boards.
If the installation of drywall is carried out for the purpose of leveling the walls, you need to do the following:
- find the two most prominent areas and draw a line between them;
- retreat a distance equal to the thickness of the sheet from the first line and make a control mark;
- Using a building level or plumb line, transfer both lines to the ceiling.
Glue installation
As tools for gluing a gypsum board sheet with your own hands, you will need:
- bucket or basin for kneading;
- drills or mixer;
- building level;
- trowel and spatula for applying glue;
- hammer with a wide board.
Installation steps:
- dilute the glue in a bucket of water in the proportions indicated on the Volma package;
- the calculation of the mass of the mixture is made depending on the volume of work performed and the curvature of the walls, on average it is 10-12 liters, so that it does not have time to set;
- apply the adhesive mixture to the wall or to the sheet of drywall itself, evenly distributing it over the surface in small dots in a checkerboard pattern in increments of 40 cm or in strips 15 cm wide. This application will allow you to adjust the location of the plasterboard relative to the vertical and horizontal plane;
- It is recommended to glue the gypsum sheet from the corner of the room; to do this, it is carefully pressed against the wall and leveled;
- If the level shows that the sheet is lying unevenly, by tapping with a hammer on a wooden board, the glue applied on the back side is distributed more evenly, reducing the resulting voids.
Distribution of glue over the surface of the gypsum board sheet and its correct consistency
After installation is completed, sickle tape is glued to the joints between the sheets of drywall for additional reinforcement of the seams. The gaps between the joints are filled with Volma glue or special putty. Each seam is carefully processed so that subsequently moisture does not get between the joints and destroy the structure of the gypsum boards.
After the mass has dried, the serpyanka is treated with trowelling sandpaper to remove excess glue, a primer is applied again and, after it has dried, the surface of the drywall is puttied. All stages of installing gypsum boards using the adhesive method are shown in the video below.
Compositions used for installation
The choice of adhesive composition is one of the key stages of the work. The mixture must be selected based on the surface material and fastening technology. The modern construction market offers the following options:
- Special gypsum glue. The most popular composition is “Perlfix” from KNAUF (see photo below). Other adhesives intended for gypsum plasterboards are also suitable, for example “Volma Montazh”.
- Gypsum and cement based plasters.
- Putties for starting and finishing finishing. It is recommended to use special high-strength compounds, for example “Knauf Fugen” (“Fugenfüller”).
- Tile adhesive (any). The product “Ceresit” SM 11 has proven itself quite well - a dry composition based on cement with mineral fillers.
- Silicone sealants based on acrylic and polyurethane, “liquid nails”, assembly adhesive. These compounds are only suitable for mounting on a very flat wall or when gluing gypsum board to gypsum board or another sheet of drywall.
- Polyurethane foam. It is necessary to select a material with a minimum expansion coefficient.
When attaching gypsum boards to foam with your own hands, you need to keep in mind that this is the most labor-intensive method and is not suitable for doing it alone. The gypsum board must be constantly supported and leveled, pressed against the wall until the foam hardens, or secured with dowel screws. The method is somewhat popular, but experienced professionals do not recommend using it for beginners.
On a note
Remember, if the wall’s unevenness reaches 10 cm, it is not allowed to glue drywall onto the Volma mixture, since the end result will not be of high quality: the sheet will not be able to fit tightly to the surface, and the adhesion strength will be impaired. And the glue consumption will be unreasonably high.
Correctly taking measurements of walls before gluing gypsum boards is the basis for high-quality installation
In such cases, it is recommended to carry out a standard installation of a metal or wooden frame. This installation method will allow you to additionally insulate plasterboard walls and hide cables and pipes. When using the adhesive method, it is not possible to carry out such work, or great efforts are required to drill special grooves for electrical wiring.
source: //gipsohouse.ru/walls/4158-kak-kleit-gipsokarton-na-steny.html
Among the many building materials intended for wall finishing, plasterboard
. It is environmentally friendly, as it consists of natural ingredients (gypsum and cardboard). In addition, gypsum boards allow you to achieve a finish that was previously beyond the capabilities of even the most qualified specialists. After installing the sheets, the surface becomes perfectly flat and ready for further work without first eliminating height differences. The material is in good contact with various types of finishes. But to do this, you need to choose the right adhesive for drywall, which will ensure maximum adhesion of the surface to the finishing components.
Properties and characteristics of gypsum board adhesive
Before you begin finishing drywall using glue, you need to thoroughly clean the base itself from dirt and dust. In addition, two coats of primer must be applied after cleaning. This will increase the adhesive qualities of the base and increase its strength. Priming is carried out in two stages:
- The first layer is applied to the entire surface, after which it is allowed to dry. The second can be applied after 24 hours.
- At the second stage, the primer is performed using an undiluted mixture, and it is also allowed to dry for 24 hours.
The properties of the adhesive base depend on its composition and characteristics. There are four main types of gypsum board adhesive:
- mounting;
- gypsum-based mastic;
- specialized glue;
- polyurethane foam.
When using assembly adhesive, it is very important to follow the technology for its preparation. It is usually indicated on the packaging. Glue for this type of gypsum board is applied to the base using a spatula in a circular motion. The distance between strokes should be no more than 30 and no less than 15 cm. During the gluing process itself, you need to carefully monitor the uniform installation of the slabs. Therefore, during installation, a special level is used, on which the sheets of drywall are placed. Note that correction of the position of the installed section is possible over the next 10 minutes.
Gypsum-based mastic
Gypsum adhesive mastic means the base contains glue and lime. The glue is filled with the required amount of water and left for about 15 hours. During this period, its granules swell. After this time, 1 kg of lime is added, which must first be diluted with liquid, bringing it to a thick state. To achieve this consistency, the mixture is boiled using the steam bath method. You can resort to the services of a regular gas stove, setting the fire to low. After reaching the desired consistency, gypsum is added. This type of mastic has good adhesion properties. Setting time varies from 40 to 50 minutes.
Gypsum sawdust is prepared on the basis of sawdust and gypsum. Glue for plasterboard sheets of this kind has the consistency of food sour cream. To achieve this appearance you need to: mix sawdust and building gypsum in a ratio of 1 to 4. Next add a glue solution (1 liter of water per 25 g of dry mixture). The setting time for this ingredient is 1 hour.
Sulfate-alcohol mastic - in production, sulfate-alcohol stillage and water are used in a ratio of 1 to 4. Gypsum is added until the consistency of sour cream is achieved.
Special glue
Most hardware stores sell specialized drywall adhesives. It comes in 750 ml bottles. Experts recommend using it in the ratio: 1 cylinder per 15/sq. This substance should be applied along the entire perimeter, and then coat the remaining surface, forming stripes every 25-30 cm.
Its peculiarity is its fast setting. But use is permissible only in cases where there are no large differences in elevation.
Polyurethane foam
To carry out high-quality gluing of walls with plasterboard using polyurethane foam, you need:
- Approximately 8-9 holes evenly across the entire panel area.
- Around the resulting holes (at a distance of approximately 3-4 cm), you need to drill holes whose diameter does not exceed 6 mm.
- Glue pieces of foam rubber onto the surface at a distance of 10 cm from each of the resulting holes.
- Place a sheet of drywall on the wall surface and secure it with screws. After strengthening, be sure to put on the washers. This is necessary so that the panel does not “float”.
- Polyurethane foam is poured into the 6 mm holes made.
After completing this work, the washers are removed and the screws are recessed into the base itself. Before final strengthening and removal of the washers, the sheet must be leveled using a level.
Before gluing drywall to the wall, you need to assess the situation. Pasting surfaces with plasterboard is applicable in the following cases:
When it comes to leveling surfaces with large potholes and bumps. Using starter type putty may correct the problem. But it is used only if you have the appropriate experience. In addition, this option for leveling the wall takes a lot of time. Thanks to the plasterboard sheet, you can level out depressions and hills if you fasten each sheet end-to-end.
Also, the gypsum board “sits” on the glue when working with slopes after installing metal-plastic windows.
Peculiarities
A universal building material - plasterboard - allows you to independently level walls, mount an interior partition and much more for little money and in a short time.
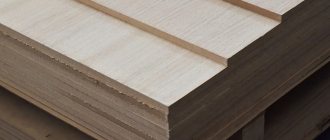
A sheet of drywall consists of two layers of cardboard glued together with a layer of gypsum. Standard sheet size is 2500x1200x12.5 mm. Such a sheet has an area of 3 square meters and weighs about 30 kg. You can find drywall in other sizes on sale. In practice, two options for fastening plasterboard sheets are used:
- using a steel profile;
- using special glue.
The first method involves installing a special metal structure for further fastening of plasterboard boards. This requires additional financial costs, as well as at least minimal installation skills.
To work with the second method, it is important to know how to glue the slab to the wall. Gluing plasterboard sheets can be done on any wall surface, you just need to remember that plasterboard is basically paper (albeit quite hard), and like any paper, it is afraid of moisture. Therefore, drywall is intended only for interior decoration.
Technology for installing drywall with glue
The technology of installing drywall with glue itself requires certain skills from the master. The main thing is to ensure uniform application of the material. If a thick mixture is used, then it is applied to the back side in a circular motion over the entire area. It is important to maintain the uniformity of the applied circles so that the sheet lies evenly on the surface to be treated. In order for the material to completely cover the entire area on the front side, the slab is tapped using a wooden strip. Impacts should be applied carefully so as not to damage the integrity of the panel.
If a special-purpose gypsum board adhesive is selected, it is applied along the entire perimeter of the sheet, and then the entire back side is coated with stripes. The distance between strokes should be approximately 25-30 cm. This will ensure the most even distribution of the adhesive over the entire area of the material.
source: //ogipse.ru/182-kakoj-klej-dlya-gipsokartona-luchshe-ispolzovat/
Drywall or plasterboard sheets (GKL) is a material with which you can give the desired shape to both walls and ceilings, as well as level the walls and ceiling in a room. The most common way to install this material is to install it on a metal frame.
Structure of a plasterboard sheet.
However, sheets of drywall can not only be attached to the frame, but also glued to the wall. This is especially true for small rooms, when you want to save the available space in any way.
Let's look at how to glue drywall to a wall and ceiling. To work you will need the following tools:
- A hammer drill with a stirrer or a mixer is necessary to stir the glue. In addition, you may need a hammer drill to make holes in the walls for wires.
- Level or rule - used to determine the verticality of the wall and the horizontalness of the ceiling. Note that you can limit yourself to a level if its length is 1.5-2 m.
- Notched trowel - allows you to apply the glue in grooves and is used in the case of smooth walls.
- An ordinary spatula or trowel is necessary for applying glue with slaps when the wall is initially uneven.
We glue gypsum boards onto relatively flat walls
This method is applicable for concrete walls. Of course, concrete walls cannot be called absolutely smooth, but they are still much smoother than brick walls. The adhesive layer with this method of installing drywall will be quite thin. The wiring cannot pass under the sheet - in this case it is laid in pre-drilled holes in the wall.
Scheme for attaching drywall with glue
The concrete wall must be primed with a regular primer. You may need a special primer if the concrete wall is not initially bare, but painted. In this case, applying a special primer is much easier than washing off a layer of paint. It is necessary to mark and drill holes for sockets and switches in the concrete and on the sheet in advance.
After the preparatory work, we directly glue the drywall to the walls. Mix the glue according to the instructions on the package, but do not mix it too much as the glue sets quickly and may dry out. Glue is applied to the gypsum board using a notched trowel along the perimeter of the sheet and in the middle.
Next, the slab is installed on the wall on pre-prepared pads, which can be pieces of the same drywall, and the ends of the wires are brought out from behind it. Then the sheet must be leveled using a rule or level, and only then press the sheet against the wall. The pads should only be removed after the adhesive has hardened. After installing the plasterboard boards, the joints are finished, which we will discuss below.
We glue gypsum plasterboard onto less even walls
Scheme for leveling a wall with plasterboard.
To glue drywall
A brick wall that is not level will require a thicker layer of adhesive. Note that the preparatory work will be the same as in the previous case, that is, the walls are grooved for wires, holes for sockets and switches are drilled, and the walls are primed.
In this case, you should use a different glue - Perlfix is most often used. In this case, the glue is applied in a different way. It should be applied using a regular trowel (or use a trowel) in slaps across the entire sheet of plasterboard with a distance of approximately 250mm between slats.
In addition, glue can be applied not over the entire sheet, but along the perimeter and in the middle of the sheet, as in the previous case. In this case, the distance between the slats should be approximately 250 mm around the perimeter, and along the middle of the sheet it is advisable to make two rows of such slats with an interval of 500 mm from each other. The distance between the flip flops should be approximately 300 mm.
Next, just as in the previous case, the sheet is placed on linings and leveled using a rule or level, and then pressed down. After the glue has hardened, the pads are removed.
We glue gypsum boards onto very uneven walls
When the walls are completely uneven, then installation of drywall will be impossible without the use of a small frame. Only the frame is made not from a metal profile, but from the same plasterboard.
GCR is cut into strips 10-15 cm wide - the so-called beacons. These strips should be glued to the wall along the entire perimeter and vertically after about half a meter. Each strip is leveled using a rule or level and pressed against the wall. The evenness of the wall is achieved by using different layers of glue in different places of the beacon.
//www.vashgipsokarton.ru/www.youtube.com/watch?v=dH5aFLGi9RQ
As for the wiring, in this case the wiring can be hidden directly into the wall without grooves, placing it between the beacons.
After the glue under the beacons has hardened, we glue the drywall to the walls. To install drywall on the wall, use the simplest gypsum glue. Note that it can be glued to any adhesive, including polyurethane foam. Glue or foam is applied directly to the places where the sheet will stick to the strips. When installing on foam, the composition is applied in a small amount, and it must be pressed firmly against the beacons until it hardens completely, otherwise the foam will collapse. It will be very difficult to tear the gypsum plasterboard from the beacons, so if you do not press the foam in time, the resulting bumps will be impossible to fix, only to break and completely redo. Therefore, if you do not know how to handle foam, then it is better to use gypsum glue.
Plasterboard on the ceiling
Types of drywall and their color markings.
Is it worth gluing plasterboard to the ceiling? Perhaps undesirable. When gluing drywall in whole sheets, the adhesive mixture must be applied not to the whole sheet, but in slaps. The glue may not hold up and the sheet may fall off. If you apply glue to the entire surface of the sheet, the sheet will become very heavy, it will be difficult to lift it, and it may bend.
If you still decide to stick gypsum board on the ceiling, then first of all you need to choose the right sheets. All plasterboard sheets are divided into:
- fire resistant;
- ordinary;
- moisture resistant.
For non-residential premises, moisture-resistant ones are used - for the kitchen, bathroom, toilet and hallway, as well as ordinary ones - for other premises. The required sheet thickness for ceiling mounting is 9 mm.
Then you need to determine the horizontalness of the ceiling. As a rule, slabs in typical houses are rarely laid strictly horizontally - they are usually laid at an angle. You need to determine the lowest corner of the ceiling by measuring the distance between the ceiling and the floor at each corner. It is necessary to start installation from the lowest angle, that is, from where the measured distance will be the smallest.
To install drywall on the ceiling, you must use the strongest adhesive. The glue should cover as much of the sheet as possible, but not the entire sheet.
Safety regulations
Despite the fact that it would seem that there may be threats during ordinary tile laying, they still exist.
Let's study the basic rules that need to be followed:
- Protect the skin of your hands and face - such substances contain many chemical elements. When dry mixtures are mixed with water, alkali is formed. In case of contact with human skin, there is a risk of burns.
- Use a respirator - dust emanating from dry mixtures can enter the respiratory tract, which can also cause permanent harm to a person.
- Wear glasses - if dust and grains of chemical elements get on the mucous membranes of your eyes, they can cause burns.
If dust does get in somewhere, follow these instructions:
- Rinse the area where the pollen has landed. If you find deep damage, immediately seek medical help from specialists.
- If you swallow dust, you should immediately leave the room for fresh air and try to cough. Be sure to rinse your nose.
If you start to feel unwell or experience pain in your lungs, immediately call an ambulance and seek help from specialists.