- March 29, 2020
- Walls
- Daisy Angel
Recently, wall decoration with MDF panels has become increasingly popular. This trend is explained by the fact that with the help of this material you can quickly level and put in order surfaces of an impressive area. Installation of the panels does not take much time, because there is no need to wait for numerous layers to dry, as is the case with plastering work. The leveled surface does not require additional finishing, as when using drywall. MDF panels have another important advantage, expressed in affordability.
Before gluing MDF panels to the wall, you should inquire about the technology of the work. Installation can be carried out in one of two ways. The first is fastening to the frame sheathing, the second is fixing with an adhesive composition. You can use, for example, liquid nails. This adhesive is suitable exclusively for wood products and wood products, as well as sealing cracks, as it contains sawdust filler.
If it is necessary to fill up defects in existing sections of the wall, you should select a mixture based on the shade so that after repair, individual sections of the wall do not differ in color.
If you are thinking about the question of how to glue MDF panels to a wall, you must first select the material. It is made in a variety of shades and can have a textured relief that imitates wood species. You can choose panels in stone imitation, matching them to your interior design.
The panels can be combined with each other, installing them horizontally or vertically - everything will depend on the desired end result. So, if the ceiling is too high and makes the room uncomfortable, it is best to install the panels horizontally, combining different shades. If it is necessary to visually raise the wall, the panels are installed vertically. Products can have different widths and lengths, so before choosing a shape and color, you should think about what effect you want to achieve.
Which glue to choose
One way to install MDF panels on walls is to use glue. It can be presented in the form of a universal compound or a special mounting adhesive. The last option is liquid nails. If we are talking about frameless installation, then liquid nails will be the most suitable option. One of the leaders on the market is Moment liquid nails. In addition to the tube, you will have to purchase a gun, which will make it easier to apply the composition.
You can also use polyurethane foam. The main purpose of this mixture is sealing, but professionals today quite often use the compound to install panels on walls and ceilings. Each manufacturer has two types of similar composition in its assortment. One of them is intended for interior work, the other is universal. You can use any panel to install panels on the wall.
If you are going to install MDF panels on walls for the first time, then it is best to purchase liquid nails. They are easy to apply and the attachment is quite strong. Application should be carried out in a thick or thin layer; thanks to the thickness, minor defects in the wall can be smoothed out.
After the mounting compound has dried, it will still remain elastic and flexible, thereby ensuring resistance to vibration and deformation. This is important for boards made of particle board materials, since they change linear dimensions when exposed to humidity and temperature changes.
Pros and cons of the material
Advantages noted by installers:
- Strength. MDF can withstand light loads and does not collapse when installed with nails or screws.
- Homogeneous structure. There are no voids or areas of low density.
- Providing thermal insulation and protection from external noise.
- Mold resistance.
- Ease of machining.
- Easy to clean from dirt.
- Increased resistance to moisture.
- Stability of geometric dimensions.
Disadvantages of the material:
- flammability of MDF, the material ignites upon contact with hot objects;
- low mechanical strength;
- delamination of edges at the joint line;
- unsuitable for exterior decoration due to insufficient resistance to precipitation;
- formation of fine dust when cutting or drilling;
- increased cost (especially for MDF finished with natural veneer);
- the formation of voids between the finish and the wall, which negatively affects the area of the room.
MDF can withstand heavy loads and is durable.
Selection of glue by composition
On sale you can find two-component cyanoacrylate adhesive for MDF, which is based on a viscous gel and an aerosol activator. Among the main advantages of this mixture are:
- high strength;
- Possibility of use for gluing complex surfaces;
- Ideal for application to vertical surfaces.
The substrates to be glued may have an uneven or porous structure, but the glue increases the strength of the connection and prevents the mixture from being absorbed by the porous surface.
When thinking about the question of what is the best adhesive for MDF panels to buy, you should pay attention to the described composition, which does not splash or flow from the walls. It can be used for any wood materials. If the glue remains after work, you can use it to glue:
- rubber;
- plywood;
- skin;
- most plastics.
It is even used in repairing and making furniture. It is especially suitable for quick gluing.
Types of MDF panels
The material is usually classified according to:
- Due to dimensions, slats with end locks and rectangular tiles are often used in domestic conditions. There are MDF sheets with a length of 1 m and a width of 600 mm.
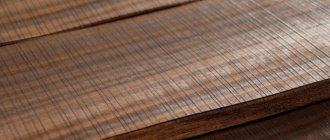
- The method of finishing the façade surface. Budget versions are covered with synthetic enamel, which provides protection against moisture penetration, but does not increase resistance to mechanical damage. There are laminated panels coated with glossy or matte polyvinyl chloride film. They are highly durable, but the layer comes off when heated or exposed to moisture. To finish MDF planks, natural veneer can be used, which has a beautiful structure and low strength.
The material is classified by size and surface finish.
Preparing tools
In order to work comfortably, it is necessary to prepare tools that will speed up the installation of the material and make the work as simple as possible. Tools you should prepare:
- electric jigsaw;
- roulette;
- construction stapler;
- pliers;
- plumb line;
- metal screwdriver;
- simple pencil.
The pencil can be replaced with a marker. Don't forget to have a construction corner on hand.
Care
The panels are not washed with products containing acids.
Powders are also not used. It is necessary to use a general cleaning product once a month. Once a week, wipe the surface with soft microfiber soaked in water at room temperature without chemicals.
Steam cannot be used. When directing a jet from a steam generator, the panels will immediately lose their original appearance and become deformed.
The panels are fixed to a frame base - which is more durable - and to glue - in rooms without fumes and sudden changes in temperature. Surface care does not require expensive products or effort.
Stages of work. Basic installation methods
Wall covering with MDF panels is carried out using glue or on a frame. Both techniques can be used for installation in an apartment or in a house, but for adhesive installation the basic condition must be met - the wall must be flat. If the panels are glued to the surface, it is first leveled with plaster or drywall. If you decide to use glue, then there will be few auxiliary materials - these are liquid nails and fittings.
If you need to level a wall using MDF panels, hide communications behind them, or implement sound or heat insulation, you will first have to install a frame that will bring the surface into one plane. The frame can be made of metal or wooden beams.
Scope of application of MDF panels
Finishing material is used for:
- wall cladding in residential or office premises;
- floor finishing (laminated parquet);
- formation or design of arches or other curved surfaces in interiors;
- coffered ceiling finishing;
- production of facade parts of interior doors or finishing of metal panels;
- production of furniture and interior items (for example, window sills).
For production, fine wood chips with urea resins are used, the density varies from 600 to 800 kg/m³.
During mechanical processing, dust is released, which makes it possible to cut out ornaments or deep cavities. The material is used for the manufacture of speaker enclosures or containers. It is found in the interior trim of trams and buses (in areas not exposed to moisture).
Which lathing to choose. Inspection of walls
The easiest way to cover walls with MDF panels is to use wood, since you can use staples or nails for this. When installing on a metal profile, you will need metal screws, and in this case you cannot do without a screwdriver. When using a frame, a gap is formed between the cladding and the wall, in which there will be no air circulation. Such conditions are attractive to fungus and mold.
Before installing the sheathing, you should inspect the wall. If it is wet, it is first dried and then treated with an antiseptic composition. It is better not to install such cladding on external thin walls, as it will quickly become unusable and an unfavorable microclimate will be created in the room over time, which can contribute to the formation of allergic reactions.
What is better for a concrete wall
If there are no irregularities on the surface of the partition, and the plane is located vertically without blockages, then for installation you can use liquid nails or any glue with similar properties. When there are depressions or protrusions on the walls, you will have to mount a frame made of a wooden block or metal profile. To drill holes you will need a hammer drill and a set of drills. MDF panels can be attached to the frame with screws or metal clamps; the technology is chosen by the master at his own discretion.
Preparation of materials for installation on the frame
If you plan to install panels on a frame, you should prepare:
- wooden beam;
- insulation material;
- metal hangers;
- clamps;
- wood screws;
- small nails;
- dowels;
- fittings profiles.
The timber is treated with an antiseptic. Foamed polyethylene can act as insulation. Clippers will be needed to fix the panels to the frame.
Types and production of lathing
First, let's look at how to attach wall panels for interior decoration of MDF to the wall using lathing. We have already said that the sheathing can be made of wood or metal, so we will look at each of these options. Let's start with the most affordable in terms of finance - a frame made of wooden elements .
How to fasten wooden
The manufacturing process is as follows. First we need to go to a hardware store, where we will need a wooden block.
The ideal option would be a beam with a cross-section of 3x3 cm. When choosing, you also need to pay attention to the condition of the beam itself - it should be smooth, without chips or visible deformations.
Humidity is also of great importance - this figure should not exceed 15 percent. Also in the store you need to purchase antiseptic fire protection - this is a special composition that allows you to protect wood from fungus and mold. In addition, this composition reduces the risk of wood fire.
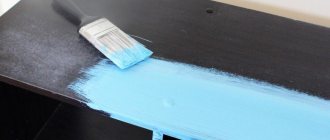
The composition is applied to the timber using a regular brush. If something is unclear, then all the information you are interested in is indicated directly on the container with this composition. Now you can move on to measurements. Using a regular tape measure, we measure the width and length of the walls, so that we can then cut the bars to the desired size.
Remember that the length of the bars should be slightly less than the distance between the walls. If you make a mistake in these measurements, then the beams will have to be squeezed between the surfaces, and this will inevitably lead to damage to the material.
The lathing can have a vertical and horizontal direction. It all depends on how you will attach the MDF elements to the wall or ceiling. Here is MDF for the ceiling.
Remember that if the panels are mounted across the wall, then the sheathing elements should be positioned horizontally, and vice versa.
Next we move on to cutting our bars. The work is simple, but even here many beginners manage to make mistakes. To avoid this, position the hacksaw strictly perpendicular to the material - this is how you will achieve perfectly even ends.
The method of fastening the bars depends on the material of the wall surface. If the walls are wooden, then the bars are fastened with ordinary self-tapping screws.
If the walls are made of brick or concrete, then you need to use dowels. The bars must be positioned strictly parallel to each other, so watch this moment.
It is also important that the bars are on the same plane, so check them using a level. After making the frame, you can proceed to laying the thermal insulation layer.
A good option would be ordinary mineral wool in rolls, which can be cut into pieces of the sizes we need.
Now you can proceed directly to attaching the panels to the sheathing. There are several ways to attach MDF sheet panels to the wall. The first method is fastening using clamps, which are similar to a bracket.
Can also be attached using 3x20mm self-tapping screws and small-head finishing nails. The choice of one option or another is a purely individual matter, because each person has his own preferences and skills. At the end of the work, corners are installed on the external and internal corners.
It is best to simply glue them to the panels, because any other fastening elements will be visible on the surface, which will worsen the appearance of the finish.
Metal fasteners
Now consider the option of using sheathing made of metal elements.
We start by attaching the wall profile. We mark a line around the perimeter, after which we attach the elements to the surfaces. They are also fastened with dowels or self-tapping screws - it all depends on the material of the wall surface. Next, mark the lines along which the profile elements will be fastened.
Each profile strip should be at a distance of half a meter from the other. To ensure that the frame is level, straight hangers are installed along the marked lines, with the help of which not only alignment is carried out, but also strengthening of the entire structure. Next, elements of the main profile are inserted into the straight hangers.
Fastening is carried out with small self-tapping screws, and the ends of the hangers are bent. You also need to ensure that all elements are on the same plane.
The level is also used for these purposes. Installation of MDF panels to a metal profile is best done using clamps.
Single standard brick is the most common among all types of bricks. Here is its size.
Putty is necessary when carrying out finishing work. Here you will learn how to dilute putty.
To create concrete and cement mixtures, crushed stone of various fractions is used. By clicking on the link, you will become familiar with the weight of crushed stone.
We connect them to the profile using small self-tapping screws. It’s good if you have a screwdriver with a magnetic attachment, which will allow you to do all the work much faster. The final stage will be attaching the external and internal corners to the MDF panels. As in the first case, we glue them onto liquid nails.
Installing panels with glue
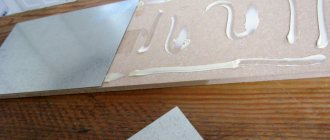
If you are faced with the question of how to glue MDF panels to the wall, then you must mark a horizontal or vertical line before installing the first product. You will need to control the position of the panels using a level. When choosing an adhesive, it is important to consider its plasticity after drying, otherwise there is a risk of deformation of the panels. It is important to purchase a mixture that is not affected by temperature changes and humidity.
Before gluing the MDF panel to the wall, you must apply glue to its back side - these can be wavy lines or individual dots. The product is pressed well to the surface and then comes off for a few minutes. After this, the final fixation is carried out: the panel is installed and pressed again. In this case, it must be maintained for several seconds until the glue sets securely.
Glue "Moment Montazh"
Liquid nails of this brand are also ideal for gluing MDF panels. Using “Moment” of this variety when decorating walls with such sheets, as in the case of Titan wild, is allowed both inside and outside. Consumers praise this glue for its optimal combination of price and quality.
This product is packaged in a special tube, which is inserted into a construction gun during operation. Using such a tool allows you to dispense “Moment Montazh” with high accuracy. And this, in turn, eliminates the possibility of overspending.
Among the advantages of this adhesive for MDF panels, consumers include, among other things, the fact that it does not have any unpleasant odor. In addition, you can work with this product at ambient temperatures from -20 to +70 °C.
“Moment Montazh” has received simply excellent reviews from consumers, including professionals. Many masters believe, among other things, that it has better qualities than even many imported compounds of the same group.
How to speed up the repair process
To speed up the process, the composition can be applied to several canvases at once, which are pressed against the wall and then opened. They need to be left for a while so that the glue begins to polymerize a little. Having torn off the last of the panels, you need to glue the first one, after which you can proceed to the second.
When installing the canvases, you should press them well against the surface, and for better fixation, each of them can be secured with self-tapping screws in two places. Screwing is carried out into the groove of the panel, then the screw is closed with the tenon of the next one. But usually glue is enough. In addition, additional mechanical fixation prolongs the work and makes it more labor-intensive. Yes, and you will have to spend extra money on metal fasteners.
Marking
Thus, it is clear what glue to use to glue MDF panels. But before you begin this procedure, you should definitely make markings on the walls. In order for MDF sheets to stand up straight and subsequently hold firmly for many years, before installing them, vertical lines should be applied to the surface to be finished. You can mark the walls when gluing such panels, for example, using a plumb line or level. But it is best to use a level for this purpose. With the use of such a device, lines on the walls can be drawn as accurately as possible.
What to consider during installation
If you are interested in the question of how to glue MDF panels to a concrete wall, then you should know that liquid nails are best suited for this. But for a good result, it is important to inquire about additional nuances of installation work. For example, the panels cannot be bent, so the material is cut in the corners to install them. Then the edges of the products can be covered with a corner, which is used for external and internal corners.
MDF panels are also installed quite often on mounting foam. It is important to avoid distortion when installing all the following lamellas. The first panel is installed in accordance with the vertical level and fixed with self-tapping screws in those places where they will be covered. If this is a corner, then you can decorate the screw with a decorative overlay; the screws are covered on top by the ceiling, and on the bottom by a plinth. The position of the panels will need to be monitored throughout the work. Experts recommend placing a level on every fifth panel.
Mounting Tips
During installation, it is necessary to periodically check the position of the panel edge; small gaps lead to gradual distortion of the finish. When installing the frame on hangers, fixation points should be placed at intervals of no more than 600 mm. Metal brackets allow you to adjust the position of the sheathing from the wall and compensate for unevenness. Vertical guides should have a length 10-15 mm less than the distance between the floor and ceiling. Laying insulation reduces the likelihood of MDF panels warping due to temperature changes and condensation settling on the surface.
Why choose the adhesive method?
Now you know how to glue MDF panels to a wall with liquid nails. But if you are still in doubt about which installation method to use - frame or adhesive - you should consider the advantages of the latter. Frame installation is more expensive and takes more time, because you will have to install a wooden or metal frame, spending additional money on materials.
The adhesive method does not take away free space from the room. If you use mechanical fasteners, then even the smallest finishing nails will be noticeable, and the adhesive method allows you to get a good result and an attractive appearance of the walls. To extend the life of the panels, MDF can be coated with an insulating primer and a layer of putty. This will prevent swelling of the material and the appearance of mold. When products have unpainted surfaces, the joints are caulked to prevent moisture from entering.
How to attach MDF panels to the wall: step-by-step instructions + video
Greetings, experienced and novice home craftsmen! This article is devoted to the features of finishing walls with MDF panels. Proper installation, taking into account all the subtleties of technology, is the key to a result that will delight you for many years.
We evaluate the premises
MDF wall panels can be mounted in two ways: on the lathing or directly on the wall using glue. Before choosing an installation technology, I recommend assessing the condition of the walls in the room, taking into account two factors:
- MDF is made from wood fibers, so it is recommended to protect the material from contact with moisture and surfaces damaged by fungus.
- The panels must be mounted on a flat surface.
If the walls, freed from the old finish, are almost perfectly smooth and dry, you can install MDF panels without sheathing, using glue. This will take a minimum of time, but eliminates the possibility of insulating the walls and replacing individual panels in case of mechanical damage.
Uneven walls require the installation of sheathing made of wooden slats or a metal profile. In a house with brick walls or in damp rooms, wooden sheathing should not be used - there is a high risk of fungus developing, which will damage the finish over time.
Tools and materials
To trim the panels, as well as marking and installing the sheathing, we will need:
- a plumb line (easy to make from strong thread and a compact weight like a nut);
- tape measure (at least 3 meters), building level and pencil or marker;
- electric drill + drills for wood and concrete, screwdriver (you can use an electric drill with variable speed control + attachment for self-tapping screws);
- metal square, handsaw or jigsaw, hammer or staple gun.
To attach slats, panels and decorative corners, you need to stock up on:
- wooden or plastic mounting wedges;
- self-tapping screws with eraser sockets or dowel-nails (for sheathing);
- self-tapping screws for fastening the outer skin panels;
- clamps (special clamps for fixing panels to the sheathing);
- small nails or staples;
- You will also need “liquid nails” for MDF panels or glue for thick wood.
Preparatory work
Attention - we carry out this stage only if we want to “plant” the panels with glue directly to the wall; if you have chosen the option of attaching the panels to the sheathing, then the stage of preparing the walls can be ignored. To begin with, the walls must be cleaned of old finishing, make sure there is no mold and moisture, if necessary, carry out an antifungal treatment and dry the surfaces well. If the unevenness of the wall is too large, then you will have to plaster the surface and prime it; read how to do this here.
Installation of sheathing
The first thing you need to know is that wall insulation can be done in two ways:
- after attaching the sheathing, fill the cells with foam plastic or other heat-insulating material;
- Before installing the sheathing, stick foil foam foil 3 mm thick
Depending on how you will mount the panels vertically or horizontally, we will mount the sheathing either horizontally or vertically.
For wooden sheathing, I recommend using slats with a cross section of 20x40 mm. It is advisable to pre-treat them with an antiseptic. A wooden frame can be mounted using dowel-nails or self-tapping screws, but a metal frame is best fastened only with self-tapping screws, otherwise the profile can be accidentally bent.
The length of the fasteners is selected based on the thickness of the sheathing strips and the thickness of the plaster layer. It is important that the fasteners extend 30-40 mm into the base of the wall. The lathing is attached to the wall in increments of 500 - 600 mm.
Vertical sheathing elements are installed in corners - end-to-end, strictly at 90 degrees to each other, and also as a frame for door and window openings, columns and protrusions.
It is important to constantly check the plane of the frame and the “evenness” of the planks relative to each other using a level.
For leveling, wedges made of wood or plastic can be placed under the slats. Imprecise joints of wooden slats should be leveled with a plane.
The lower and upper horizontal rails on each wall should be attached with a slight indentation from the floor and ceiling, respectively - skirting boards will subsequently be mounted to them. Then the horizontal framing of window and door openings is performed. The remaining horizontal elements are installed at a distance of no more than 500 mm from each other. In the end it should look like this:
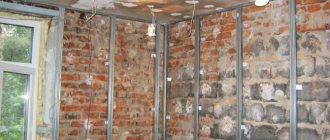
The metal profile frame is mounted according to the same principle and looks like this:
Installation of MDF panels on a frame
Fastening the panels can be started from any corner. The first panel needs to be cut off with a jigsaw or a handsaw, having previously marked the part along its entire length. I would like to draw your attention to one important point: before installing the panels on the wall, carefully calculate how much gap will remain after the penultimate panel - if the gap is very narrow, it is better to cut a wider strip from the first panel so that the finish looks beautiful.
The first panel must be pressed with the cut side against the sheathing of the adjacent wall and, using self-tapping screws, attached to the horizontal planks of the frame with an indentation of 1 cm from the edge.
On the groove side, the panel is attached to each rail with clamps, which can be nailed with a staple or a small nail into the central hole. To avoid accidentally damaging the edge of the panel with a hammer, attach pliers to the head of a half-hammered nail and nail through them.
Each subsequent panel is inserted with a ridge into the groove of the previous one and secured with clamps. The last element is cut to width, and its edge is fastened with self-tapping screws to the vertical batten of the sheathing.
Installation of MDF panels with glue
Everything is simple here - the previously prepared wall is pre-primed. “Liquid nails” for MDF or wood glue are applied to the back side of the panel in large dots. Then the panel should be pressed against the wall and tapped to ensure a tight fit, and then torn away from the wall. The glue spread over the surfaces should air a little so that it can adhere better later. After 3-5 minutes the panel is pressed against the wall again. It must be tapped thoroughly to ensure a tight fit to the wall.
Important: the first panel on each wall is attached to a vertical mark made using a plumb line. Subsequent panels are inserted into the groove of the previous element only after the glue has gained sufficient strength (this point should be indicated on the packaging).
Final stage
After all the walls are covered with MDF panels, the ceiling and floor plinths are attached. Then the internal and external corners are closed with a special decorative element - a split corner for MDF, matched exactly to the tone of the finish. The split corner is attached with glue, which is most conveniently applied with a thin snake along the entire length of the element.
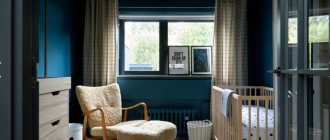
The end result should look like this:
Conclusion
Even a beginner in the field of self-repair can perform high-quality wall coverings with MDF panels. If installation with lathing is chosen, it is important to correctly calculate the amount of required material and fasteners. I advise you to first draw a detailed diagram, putting down all the dimensions.
Video on the topic “how to attach MDF panels to the wall with your own hands”:
What types of clamps are there? How to choose the right lumber and how to secure it
When carrying out cladding work or interior decoration, you cannot do without reliable fasteners. Recently, kleimers have gained extraordinary popularity. They allow you to make smooth walls, ceilings or a facade without visible fasteners.
Yes, I can give you some advice: if your carpenters do not want to fasten with clamps, but recommend nails or screws, then it is better to get rid of such performers. They are lazy to create excellent and beautiful things. Well, about everything in order in my material.
- What is a clamper and what is it used for?
- What types of clamps are there and why?
- How to find the fastener size?
- Methods of fastening clamps using the example of lining and imitation timber
What is a clamper and what is it used for?
Clamps are iron staples that are designed for strong, reliable fixation of lumber. With their help, building materials are discreetly and neatly attached to the sheathing or control rail. This type of fastener has been used for a long time, having a number of significant advantages over the well-known nails and screws.
What types of clamps are there and why?
Fasteners are made only from zinc-coated iron or spring steel, which has sufficient strength and low elongation.
” >
Photo 1. Reinforced clamps for installing imitation timber
This type of brackets comes in several types:
- special - used for carrying out manipulations on the facades of buildings, during the laying of porcelain stoneware slabs and tiles;
- for mounting plastic;
- for fastening lining, block house and other wood cladding materials.
Advantages of using clamps
Using a clamper instead of nails and screws, as was previously the case, allows you to achieve the following advantages:
- Increase the speed and quality of installation work;
- Avoid damage to finishing materials in the process of fixing them to the sheathing;
- Get a beautiful surface without a single visible fastener;
- Easy to use, since the technology for fastening the clamps is nothing complicated.
- Excellent operating conditions: no instability of products and their loosening during operation, non-susceptibility to corrosion and other destructive processes.
Kleimer is a popular type of fastener today. Many repair and finishing works cannot be completed without its use.
This hardware allows for a reliable and hidden connection, and a wide selection allows you to select fasteners of the desired shape and size.
Necessary tools for working with panels
To work with MDF panels, you may need standard installation tools:
The concrete slab should be 10cm thick and 3 to 5cm from the edge of your garden. Question 6: How are my garden houses packed? Answer 6: You receive your garden house on a pallet, packed vertically. Before assembly, the elements of your garden house should be stored tightly.
Question 7: How to build a garden shed? Answer 7: Before installing your garden shed, check all installation instructions. Do not attempt to build a house in a garden when parts are missing or damaged. Construction must be completed by two people in one day. This should be done as much as possible throughout the day.
- Carpentry tools, screwdriver, hammer, pliers.
- Reiki or profile.
- Construction glue.
- Minvata.
- Skirting boards and corners.
Advantages and disadvantages
Like any other building material, MDF panels have advantages and disadvantages that must be taken into account before purchasing and using.
Advantages:
- a large selection of texture, size, color, shape on the repair and construction market;
- average price range, which remains lower than analogues (for example, solid wood);
- simple installation, the material can be installed by both the master and the user himself;
- high-quality appearance, the material looks expensive and presentable;
- if the product is mounted on the floor or walls, it is additionally insulated from noise and cold;
- absence of harmful chemicals in the composition that could harm human health.
Flaws:
- the possibility of combustion when interacting with a flame;
- gradual wetting and rotting of the base if the frame interacts with water for a long time or is in a damp, damp room.
Despite the possibility of treatment with fire retardants, manufacturers do not recommend doing this, since harmful substances enter the structure. Therefore, it is better to place MDF in places where it cannot interact with fire or water.
Instructions for use and basic operating rules
Working with B7000 glue is in many ways similar to working with other compounds; below is a step-by-step action plan:
- The temperature required for operation is from 18 to 32 °C.
- The surfaces to be glued must first be cleaned of dust, old glue residues and other contaminants, and then degreased with acetone or medical alcohol.
- The glue is applied to a dry surface in a thin layer directly from the tube; for this purpose it has a thin metal tip.
- If the composition gets on other parts, it can be easily wiped off before it completely hardens. Excess glue from the cracks is removed with any thin and sharp object (a needle or toothpick, for example). Even if it has completely hardened, the work can be redone: heat it to at least 80 degrees, and it will lose its properties.
- It may take up to 15 minutes for the parts to set, and it will take a day to dry completely.
Video instruction:
Features of metal lathing
When creating a metal frame, you cannot do without a profile, special fasteners (aka “ears”) and connecting elements. Experts advise purchasing them for those who have to complete a large amount of work in a relatively short period of time. If one or two rooms need paneling, then you can refrain from purchasing them. To fasten the metal frame to the wall, only self-tapping screws are used (for a concrete base, self-tapping screws with a diameter of 4-6 mm are suitable, and if the wall has enviable strength, then a smaller diameter of the fastener is required). By the way, self-tapping screws or dowels are attached simultaneously with the plastic “socket”, therefore, the hole in the wall must correspond to its diameter, and the protrusions are not taken into account.
The best synthetic resin liquid nails
Synthetic resins have increased adhesion and tensile strength. The substance is resistant to negative temperatures and open exposure to water. Optimal for use outside the house/apartment and has a long service life.
Moment Installation Universal MP-40 - with a low price
These liquid nails are the best due to their affordable cost. For 400 g of the substance you will have to pay only 120 rubles. The product from the German brand is distinguished by its universal use. Suitable for metal, glass, wood, stone.
Pros:
- you can use finished products with this glue at temperatures of +70 degrees and -40 degrees;
- It is allowed to apply the composition even at a frost of -12 degrees;
- liquid nails are resistant to water;
- Something can be corrected within another 15 minutes.
Minuses:
- the cartridge does not have a screw cap and you need to use the entire container at one time, otherwise it will dry out;
- final drying time reaches 168 hours.
The best water-based liquid nails
The name suggests that the water-based liquid nails are environmentally friendly. This substance is well suited for use on materials with which people come into contact (decorating a bedroom, children's room, furniture repair). They emit less unpleasant odor. But due to their water base, their strength indicators are slightly lower than their analogues, so they are suitable for non-critical structures (not subject to excessive loads).
Moment Installation Express MV-50 - for decorative panels
These are the best liquid nails for use in finishing living rooms due to their environmental friendliness. Suitable for metal, polystyrene foam, wood and plaster.
They are best used when installing wooden panels due to their low consumption and ability to interact with all types of chipboard and MDF. Available in 400 g packs.
Pros:
- convenient tube with a long spout and a screw cap;
- each m2 treated with glue can withstand weight up to 50 kg;
- if something is attached crookedly, then you can make adjustments within 15 minutes;
- moderate frost resistance;
- safe for respiratory organs.
Minuses:
- you have to wait 15 minutes until it hardens, and the total drying time is 48 hours;
- can be applied at temperatures not lower than +10 degrees.
Ultima 309 - for brick
These are the best liquid nails when you need to attach something to bare brick. To avoid drilling into the wall with a hammer drill, just drop some glue onto the surface and press down for 5 minutes.
The product is available in cartridge-type packaging and requires a gun for squeezing. The long spout allows you to reach hard-to-reach places. Supplied in 360 g containers.
Pros:
- there is a special ring on the tube so that after use you can secure the nozzle in it and screw the neck on for a tight seal;
- cost for 360 g from 150 rubles;
- Setting time is only 5 minutes;
- suitable for use both outdoors and indoors;
- water resistant;
- after 24 hours it is allowed to give a full load;
- sticks to concrete, brick, stone.
Minuses:
- you need a construction gun;
- cannot be used if the outside temperature is above +35 degrees.
Properties and composition
Polyurethane adhesive UR-600 is a one-component composition, that is, in this case the active substance is not mixed with a solvent. It includes polyurethane rubber itself and additional components, previously dissolved in acetone and ethyl acetate. The latter are necessary to ensure the initial viscosity of the mixture.
Glue UR-600
The composition is included in the contact category, that is, the bonding of parts begins immediately after the material and substance come into contact. It is a colorless or milky viscous liquid and does not require additional hardeners.
The composition is capable, according to expert reviews, of gluing a variety of materials, although it is mostly used when joining rubber products - boats, shoes, upholstery, and PVC materials.
However, there are other advantages:
- the composition of UR-600 is resistant to alkalis, acids, gasoline, oil and water;
- the seam is exceptionally strong, but remains flexible and elastic;
- operating temperature range - from -50 to +120 C. This is one of the most universal adhesive solutions;
- Rogneda does not include components that have a narcotic effect - toluene, for example;
- The product is produced ready for use. The photo shows UR-600 glue in a package.
Pasting tool
Drywall
Due to its excellent quality characteristics and low cost, the finishing material is often used for interior decoration.
Finishing the attic with plasterboard allows you to implement original design solutions. All communications that spoil the interior are conveniently located under the structure. The finishing material easily absorbs moisture, but if you use a special moisture-resistant type, then finishing the attic with plasterboard will last for decades.
Just like OSB, it is used to divide a room into several separate rooms.
Advantages of gypsum board panels
The demand for products is constantly growing. And this is not surprising, because the products are high-quality and durable, helping to finish any surface during the repair process. The most stylish and practical solution for decorating a room. Therefore, it is worth noting their advantages and positive qualities.
Advantages of gypsum board panels:
- No preliminary surface preparation is required before installation;
- Immediately after finishing, the room can be used;
- Finishing with panels allows you to maintain access to communication systems without damaging the decorative coating;
- Panels optimize costs for finishing work;
Plasterboard panels are used not only as a facing material. They are also used to create load-bearing structures. Or in the form of light interior partitions. They are easy to install and do not require too much space.
Using panels you can imitate natural materials. For example, wood or stone, or decorate the interior of the room with original ideas in a classic style. Modern plain wall panels allow you to decorate any interior.