Which sofa to choose for the balcony depends on the lifestyle of the apartment owner, how often guests come to the house, whether there is glazing or whether the open balcony needs to be improved. In the article we will also tell you how to make a sofa on the balcony with your own hands.
Few people are lucky enough to have spacious loggias and balconies, so laconic models without pompous armrests are especially popular. If you provide drawers in the sofa, you will also be able to organize additional storage spaces.
Outdoor furniture is selected for open balconies; you can find it in the garden furniture department. As a rule, this can be a plastic, metal or wicker sofa. Textile pillows as seats and backrest will add comfort.
How to make a soft sofa with your own hands
If you know how to use a screwdriver and a sewing machine, then making a sofa for the balcony will not be too difficult a task. At the same time, you can delegate some part of the work to your partner.
- To start constructing a sofa with your own hands, you should arm yourself with a pencil, ruler and paper. Decide on the size of the sofa and draw out each detail on paper indicating the dimensions. Then it will be possible to accurately cut parts from the material.
- The base of the future sofa is being prepared. Plywood is cut out in accordance with the size of the sofa, and a base of wooden beams is attached to the lower part - 4 slats around the perimeter and several with a pitch of 40-50 cm inside, connecting the long sides of the frame. This will ensure the seat is rigid.
- Place felt and a spring block on top of the base. Secure the structure with a furniture stapler so that the block does not move during operation.
- The upper part is covered with felt. You need to cut the felt to size and attach it to the base with a stapler.
- Now the base is wrapped in foam rubber and secured again with a stapler.
- A pattern is cut out of furniture fabric and a cover is sewn for the back and base. For greater reliability, it is better to duplicate the stitches (that is, stitch them twice). The cover is pulled onto the base, first one side is attached, then the opposite side is stretched so that there are no wrinkles.
- The back can be made soft in a similar way, or separate large pillows can be provided. The back wall of the backrest is covered with fiberboard and additionally covered with fabric.
- A box is cut out of the boards; the bottom can be made of chipboard or fiberboard. The sides of the box are also upholstered with fabric.
- To the base you need to add a front plank with legs, as well as wheels that will ride along the planks in the box. Then the sofa can be unfolded.
- You need to put cross members on the sides of the box so that when unfolding the base does not move forward.
- The backrest is screwed onto the canopies. The canopies are located in the center of the backrest. In fact, the bottom of the back is the front part of the back of the sofa when folded. Therefore, it is important to do the back upholstery on both sides.
Scheme for unfolding the sofa: the base is moved forward along the guides and stands on the legs => the back reclines and rests on the base.
Materials
For production you will need materials:
- padding polyester or foam rubber
- felt
- wooden beams
- plywood
- Fiberboard
- spring block
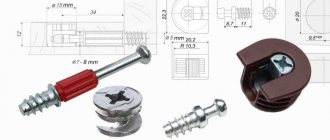
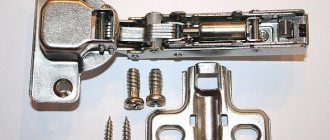
- furniture fittings (hinges, wheels, legs)
- self-tapping screws
Tools
Depending on which version of the sofa you decide to design, you will need the following tools:
- furniture stapler;
- screws or furniture nails;
- large and small levels;
- parquet saw (or circular saw);
- drill with Forstner drill;
- screwdriver;
- jigsaw;
- clamps;
- grinder (if you need perfectly processed ends);
- sandpaper;
- roulette;
- ruler;
- square;
- pencil;
Assembly
The assembly stage follows separately after cutting all the parts or is performed separately.
Assembly sequence:
- The frame bars are connected to each other. It is also possible to glue them with PVA glue, this will make the fixation reliable and make screwing easier. Metal corners will strengthen the structure.
- A “pie” is assembled from a soft felt base, a spring block (foam rubber can be used instead of springs), and an additional layer of felt (or padding polyester).
- Fittings are installed - wheels and legs.
- The base and the box are connected.
- The back is screwed on.
Depending on which sofa for the balcony was chosen, individual assembly details may vary.
Sofas made from pallets
You should choose pallets as the main material for creating furniture. These elements are finished products, which are assembled in the form of shields.
- Boards without cracks are selected.
- The dimensions must fit the planned space.
- Pallets must be durable.
- The material is chosen in light shades.
- Corners, fasteners, handles and legs are used as additional materials.
Before work, the surface is thoroughly cleaned and sanded. Three pallets are enough for the design.
Sofa made of pallets - an original and convenient solution
A simple sofa is made as follows:
- The base is made from two pallets. One element is placed on top of the other and secured with screws.
- The third element is mounted to the rear wall of the base.
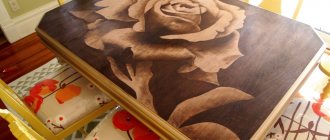
- The structure is treated with a special primer solution.
- Coating with suitable varnish is carried out.
- Legs are mounted at the bottom of the structure.
- Upon completion of the work, pillows and a mattress are placed on the base. It is recommended to make a sofa with armrests or a corner structure from 4-4 pallets.
Advice! If the pallet structure has a woody tint, then soft elements made from burlap or wicker fabric are used. When decorating a soft set in black or white, the pallets are also painted in contrasting colors.
What furniture is suitable for balconies
Considering that the windows are often open here, it is better to choose a sofa whose upholstery is made of thick furniture fabric. They are usually easy to clean with a vacuum cleaner and a sponge soaked in water. If you use natural fabrics (linen, cotton), then removable covers will be appropriate.
Considering that the windows are often open here, it is better to choose a sofa whose upholstery is made of thick furniture fabric. They are usually easy to clean with a vacuum cleaner and a sponge soaked in water. If you use natural fabrics (linen, cotton), then removable covers will be appropriate.
If the balcony faces the sunny side, and the sofa is planned with drawers, then for better safety of things, the inside, that is, the box itself, can be lined with foil polyethylene foam. It will work like a thermos, and warm air from outside will not enter the box itself.
Soft sofa - bed
If the square meters of the balcony allow you to place a sleeping place here, then you need to take advantage of it. You can install a ready-made sofa bed.
Or you can assemble a full-fledged sleeping place by building a podium. This option is suitable if you do not need to free up space, since this entire structure will always be on the balcony. But this also has its advantage - a spacious place to store all sorts of things.
For work you will need furniture panels, 18 mm plywood, gas lifts, and corners.
The frame frame is assembled from furniture board. You can make a vertical partition in the center. The ratio of sections may be different. If the frame cannot be attached to the floor, then you can use corners and use them to fasten the panels together. Covers are cut out of plywood according to the size of the sections and attached to furniture hinges. To fix the covers, you also need to install gas lifts. On the opening side of the lid, you need to make a recess for your fingers to make it convenient to open.
A regular or air mattress is used as a soft base.
Corner sofa on the balcony
The variety of corner sofas is dictated by the variety of balcony configurations. If space allows, you can choose a corner sofa in the shape of the letter “L”. The model is convenient, has a lot of seats, but also takes up a fair amount of space. But for small balconies with a non-standard layout, when the external architecture of the building creates corners inside the room, you can order or make your own sofa strictly according to the shape of the room. The size of such a model can be both large and tiny.
Topchan
If you decide to make a trestle bed on the balcony, you will get a small but spacious closet on top of which you can relax. You can put a soft base on the trestle bed and decorate the pillow.
The layout of the trestle bed is simple. First, a frame is made from wooden beams. Inside, you can leave the space without division, or you can make shelves or vertical partitions. If you haven’t yet decided what will be stored in this closet, then you don’t have to separate it, so there will be a place to put large items.
The doors are attached from the front. It is better to choose door handles that are flush with the surface of the doors (as on sliding wardrobes) or install a lock that opens when you press the door.
The doors of the trestle bed can be made of wood, but then it is worth impregnating them with matte varnish, this will make the wood moisture-resistant, and if you decide to dry your laundry, the wood will not absorb anything.
For the soft base of the trestle bed you will need foam rubber, meter padding polyester, chipboard and furniture fabric.
The foam rubber needs to be glued to the chipboard, then wrapped in padding polyester and secured with a stapler. The synthetic winterizer will soften the connection between the foam rubber and the chipboard, and if the foam rubber was glued together in several layers, it will also hide the seams. Now you can upholster the resulting base with fabric.
It is better to take thick foam rubber, then the trestle bed will turn out soft. Now the soft base can be attached to the frame with a screwdriver. From the remaining fabric you can sew long pillows and stuff them with padding polyester or holofiber. They will act as armrests.
Chair-bed
Sometimes the size of the balcony does not allow it to accommodate a sofa, but you want to create a cozy environment for relaxation (this situation is especially typical for Khrushchev-era apartment buildings). Then a chair-bed will come to the rescue. When folded, it will take up minimal space, and to lie down it will be enough to unfold it. The chair in both its positions remains a functional piece of furniture for a small balcony.
Advantages and disadvantages of homemade sofas
Self-assembly is characterized by a lot of positive aspects. The development takes place on the basis of our own ideas, which allows us to create a unique, individual design, the dimensions of which will exactly match the room. At the same time, a self-made sofa has many advantages:
- The product will cost its owner much cheaper than purchased analogues, which will help save money.
- In the process of production, a person gains experience. Having learned how to do the work, he can easily repair such structures, reupholster the fabric, and assemble more complex furniture.
- At the design stage, you can determine the design of the planned product yourself and design it in full accordance with the interior style of the room.
- The work does not require special tools or special conditions. The usual means at hand will do, and assembly can be done directly in the apartment or in the courtyard of a private house.
- Independent control of product quality will allow you to create a high-quality product.
- A handmade sofa will become a source of pride for its owner, which will amaze guests.
One of the disadvantages of such products is that without sufficient experience it is impossible to manufacture complex structures. The process is also labor-intensive and time-consuming. If the technology is not followed, the structure may fail prematurely.
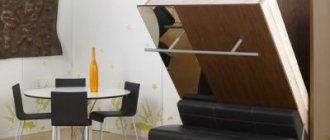
Interesting solutions in interior design
For the interior of a balcony or loggia, sofas with a functional feature are of interest. Since the main task is to place the sofa on the balcony organically, saving useful space, and even better, using it in one way or another.
This design option for the back of a sofa on a loggia can be called original.
It's easy to repeat. It is enough to attach the furniture pipe to the holders to the wall and sew the pillows. Even a branch painted or varnished will work as a holder. In this case, the pillows are attached to the branch with ribbons.
If there is no room for a table on the balcony, then a mini-table can be arranged on the side of the sofa. Then it will be very comfortable to sit with a laptop. The interior space of a sofa (or couch) drawer can be organized in any way you like. There will be order if you think through several sections. For example, place two drawers at the bottom, and under the opening base place small sections for every little thing.
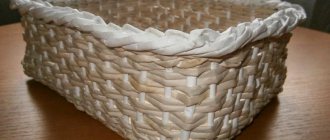
Balcony sofas made from pallets (wooden pallets for transporting goods) will also be interesting and simple to make. It is enough to find new pallets, varnish the surface and sew soft seat cushions.
The balcony ceases to be a space for collecting rubbish that is a pity to throw away. Now there are many opportunities to make this room cozy and useful, where you can sit with a cup of coffee or tea, read or just work on a laptop. And with a sofa on the balcony, useful storage space will not only not be lost, but, on the contrary, will be organized.
A sun lounger on the balcony is an additional sleeping place in the form of a couch, folding bed, bed chair, chaise lounge or roll-out sofa. A sun lounger can easily turn the balcony into an additional “living space”. It will allow residents to accommodate guests for the night, if there is no room in the house, to relax themselves in a fresh place.
A loggia or balcony is more often used as storage rooms. Here residents store old things and household items. Many people use such rooms for recreation, insulating them and equipping them. But it’s best when a balcony with a loggia combines two or more functions. For example, installed furniture with built-in drawers: a sofa, a bench, an armchair, can become a piece of decor, create coziness and at the same time serve for storing various items.
Useful tips
Not everyone can master the art of carpentry, but with some perseverance, making a sofa for a balcony turns into an interesting and exciting activity. To build a product quickly and efficiently, you need to listen to several tips:
The basic rule is that it is better to spend more time on design and calculations than to later lose money due to the need to purchase new materials. There is no need to rush; you can even find several books on furniture making, visit forums, or simply read the most popular articles on this topic. Then the balcony sofa will turn out to be beautiful and of high quality, will last a long time and will delight the owner with its convenience and aesthetic appearance.
Types of benches for a balcony with a drawer
Before you make a bed on a balcony or loggia with a built-in drawer, you need to follow the parameters of the place where it will be installed. It is necessary to arrange convenient access to the bed, make sure that the drawer can be pulled out freely, so that nothing interferes with it.
The most common models of beds with a drawer:
- Sofa Book. The model has a simple transformation mechanism. The seat converts into a bed. The lounger is suitable both for relaxing on the balcony and for storing small amounts of things in it.
- An armchair bed is an alternative to a sofa when a balcony or loggia does not have a lot of free space. This type of lounger uses a mechanism similar to a “book”. You can place a small box under the chair to put laundry there, which will also serve as a support.
- Corner sofa. The angular shape of a couch on a balcony is represented by upholstered furniture with a rounded shape or an angle of 45. Corners can be formed on both sides. In this model you can place more drawers, where more things can fit. The lounger is considered comfortable and practical in design. It is installed on wide balconies.
Types of balcony chairs
Wicker . A rather cozy option that will create a relaxed, light atmosphere. This chair is also suitable for country style and will go well with wooden details. Chairs can be made of rattan, willow or other similar materials. Such furniture requires careful handling and does not tolerate moisture well, so it is better to hide it from rain and moisture.
Hanging . Although they resemble a swing, they appeal not only to children. Every day, wicker chairs are increasingly conquering the market and are often used in minimalist interiors. The chair does not take up much space and can withstand heavy loads. The smooth lines of the frame soften the atmosphere, conducive to relaxation.
Rocking chair . Those who like to dream will appreciate it. Now there is a wide variety of them: wicker, wooden, with or without soft seats. You can choose a rocking chair for your balcony to suit absolutely any interior. A quality product costs a lot, but will last for many years.
Folding . Such furniture is used at picnics, cottages or verandas. It is compact and does not require special care. A folding chair is an excellent solution for an open or small balcony. If necessary, it can always be removed. You can complement it with decorative pillows or a blanket.
Bag chair . Completely devoid of any frame. It adapts to the shape of the body, providing maximum softness and comfort. Children adore these chairs, because they can jump or run on them without the least risk of getting hurt.
Chair-bed . This solution may be suitable, for example, for a narrow and long balcony. It is suitable for those who like to relax in complete comfort. It is worth buying a chair-bed for the balcony if you use the room as a full-fledged room or you often have guests. Its main feature is its versatility: when folded, it acts as a regular chair.
How to make
Making a simple model of a sun lounger on your balcony with your own hands is easy even for a beginner. To assemble complex models, ideas and advice from professional carpenters and designers will be useful.
- At the first stage, the future design is drawn on a sheet of paper, in the form and style that they want to see it. The design is shown in more detail in the drawing. Separately draw out the details and mark out the main dimensions.
- Before putting the parameters on the drawing, measure the place where the sunbed will be installed. Find out the length and width of the area. The lounger should be smaller in size to fit comfortably in the intended location. The drawer must also be free to open. It is more convenient to install the structure in the direction along the balcony. Free space is maintained for movement around the site.
- Based on the drawing, all necessary elements are manufactured: frame, back of the sofa, seat, side parts and drawer parts.
- Elements of a deck chair for a balcony are made in the following sequence:
- the frame is made of wooden boards. The width of the seat blank depends on the width of the balcony or loggia. In panel and block houses, it has 750 mm. Long and ordinary loggias have a width of 1200 mm;
- for a balcony lounger, you can take two edged boards with a section of 250x40 mm. and one 100x40 mm. The length of the boards should be 1.7 m. By connecting them together using bars, a total area of 0.6 by 1.7 m is obtained;
- The stiffening elements are made of wooden blocks with a cross-section of 40x40 mm. or 50x50 mm. The bars are placed across the shield in the middle, at the beginning and at the end. Fastening is done with self-tapping screws;
- the frame for the shield is assembled from 40x40 mm bars and 100x40 mm boards sawn into four parts, 0.5 m long (according to the height of the sunbed). You need 4 bars 1.7 m long, 4 bars 0.5 m long. Assemble a wooden frame. The boards are placed in the corners. Bars are placed on top and bottom of them, forming rectangles. For connections, metal corners with holes for self-tapping screws are used;
- put on a shield. It should completely cover the top of the frame;
- The side parts of the lounger, backrest and seat in natural parameters are transferred from the drawing onto sheets of plywood or chipboard laid out on the floor.
- draw out the elements of the box: bottom, front, back and side walls;
- Blanks are cut along the marked lines. Their parameters must match the external dimensions of the frame. The lining must completely cover the sides, backrest and seat surfaces.;
- To prevent mistakes, parts are tried on on the balcony.
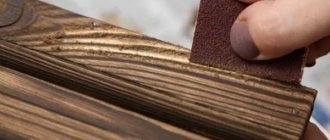
The finished elements of the lounger are processed with a sanding machine or made smooth by sanding by hand. Wooden surfaces are treated with protective compounds against the penetration of insects and moisture. Use stain and varnish.
Materials
Materials for work will be:
- boards 40 mm thick, cross-section 250 and 100 mm;
- timber with a section of 40x40 mm;
- plywood sheets 10 mm and 9 mm thick for the box;
- wooden or plastic slats for the box;
- soft filler (foam rubber);
- furniture fabric for covering the seat, back, sides;
- wood glue for gluing material;
- screws, corners, self-tapping screws for rigid adhesion of parts;
- brush for coating;
- stain and varnish.
Tools
To make and assemble a deck chair for a balcony you will need to use the following tools:
- electric jigsaw;
- drill and screwdriver;
- grinding machine;
- plane;
- hacksaw;
- furniture stapler.
Assembly
Assembling a homemade sun lounger with a box on a balcony or loggia takes place in several stages:
- the frame is covered with plywood (thickness 10 mm). Sides, seat, back, back. The front remains open;
- for the box, along the lower sides of the niche formed inside the lounger, strips are attached from the inside that will hold it. Use similar metal corners and screws. Wooden planks are sanded.
- they cover the back and seat with planks. Plywood sheets are used for cladding;
- the headrests and lower sides are made in the same way;
- cover the seat, back and armrests of the lounger with foam rubber;
- carry out additional grinding of corners;
- cover it with facing fabric. For fixation, use a furniture stapler;
- assemble a box from parts cut from 9 mm thick plywood;
- The made box is varnished. After drying, it is inserted into the groove. A handle is attached to the front wall.
Preparing the circuit
A correctly drawn up diagram or drawing helps to calculate the required amount of materials and accessories for homemade balcony furniture.
If chipboard cutting is ordered in a store or furniture workshop, you will need dimensions accurate to 1 mm.
To make the project easier to make, each part is drawn separately.
When taking measurements and during production, they use the same tape measure, since every centimeter can be important when accurately adjusting to the size of the balcony.
Andrey Peregubsky
Furniture handyman
Ask a Question
When measuring a balcony, be sure to check all dimensions - there are often situations when the width of the balcony at the partition and at the door may be different. This will lead to gaps remaining between the furniture and the wall or the structure will not fit in the given location.
The drawing indicates the methods of fastening the parts and whether any additional products are used (corners, ties) - this will help you not to visit the store again, but to buy everything you need at once.
Be sure to take into account the thickness of chipboard, laminated chipboard (16 mm) if they will cover the frame with it.
Photo gallery of beds
You can find a suitable model to make a sun lounger on the balcony with your own hands or purchase ready-made furniture in a store by studying the photo gallery of sun loungers. It is easy to find on the Internet or in the catalog in the sales department. Couches, folding beds, chaise lounges, sofas and armchairs of various configurations are presented in a colorful design. If someone’s balcony interior is not yet decorated with such an item, after viewing it, an irresistible desire appears to correct this mistake.
What will you need?
Sofas for loggias are easy and simple to make yourself. The advantages of such solutions include:
Finally, acquiring practical skills in making furniture with your own hands will be a plus. No obvious disadvantages of making sofas independently were identified. The only thing that should be taken into account is that responsibility for the safety of homemade furniture and the period of its operation falls entirely on the master. To make a functional and at the same time beautiful sofa for a loggia, you will need basic skills in working with wood materials, namely:
To assemble a sofa yourself, you will need a simple set of tools and materials:
We pay special attention to the fact that the bars for the frame should be selected from hard wood. There should be no noticeable chips, cracks or other damage. When purchasing plywood, preference should be given to sheets with a thickness of 10–15 mm.
The upholstery fabric is selected from wear-resistant, dirt- and moisture-resistant fabrics. These requirements are best met by: