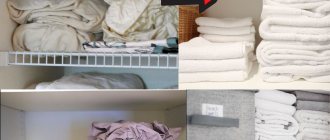
Great storage ideas
Simple and inconspicuous cardboard boxes for shoes, sets of dishes and small household appliances can be transformed into a masterpiece, you just need to use your imagination. The main criterion for selecting a suitable box is its sufficient density and strength. The shape also plays an important role - rectangular cardboard boxes are much more convenient.
Cardboard shoe boxes can be covered with gift paper
The most suitable option is to use shoe boxes. Depending on the size, they can be used to store a variety of things: jewelry, accessories, stationery, cosmetics, tools, children's toys, medicines, books, magazines, some food, industrial products, clothing, shoes, and much more. In addition to the main function - storage, decorated cardboard boxes will become an integral part of the interior, and, undoubtedly, a source of pride for the owner.
Where to begin
Before you start modifying shoe boxes, you need to provide everything so that you don’t get distracted from the work process by little things:
- choose a suitable box, think over its design;
- choose a comfortable, well-lit workplace;
- find a sufficient amount of material;
- Prepare tools: scissors, stationery knife, tape, glue, etc.
Original lamps from boxes
Selecting materials for decoration is very simple. You can simply paint it with paints, cover it with paper for decoration, colored paper, wallpaper, newspaper, sheets of music, geographical maps, napkins, stamps, jute rope, woolen threads. Products covered with various types of fabric, ribbons, leatherette, and oilcloth also look impressive. Children's boxes can be covered with candy wrappers, sheets from coloring books, stickers, key rings, matches, drawings of animals or favorite characters, parts from construction sets, and mosaics.
The most popular way to decorate shoe boxes is to cover them with paper or fabric.
How to cover a box with paper
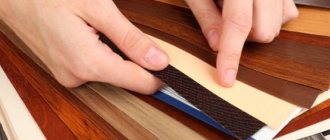
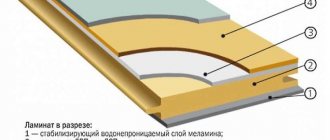
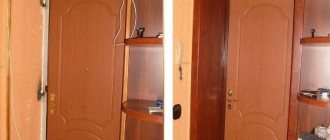
How to choose film for furniture
Gluing the kitchen facades with film will help give a new life to an outwardly worn out but still strong set. This idea will also be useful for changing the interior of the room.
To make the updated product beautiful and practical, you should choose the self-adhesive material wisely.
Types of film
Several types of film are used for furniture:
- from PVC (polyvinyl chloride);
- polyester;
- polypropylene.
These materials have similar properties. They are moisture resistant, resistant to abrasion, high temperatures, and physical impact. Do not react to components of solvents and household chemicals.
Films can be smooth or textured, imitating fabric, leather, or pile.
Vinyl materials are most often used to decorate furniture.
Single-layer films are a sheet of PVC composition with an adhesive layer covered with paper. In two-layer versions, a paper or fabric backing is added under the polymer.
Color selection
The design variability is unlimited. Films are:
- Plain . A light palette refreshes the room. Yellow, orange, pink shades promote a good mood and increase appetite. Blues, cyan, violet are calming. Green helps to achieve harmony. Black, white, red are best combined with each other or with other colors. Dark colors are appropriate in a well-lit room.
- Under the tree, stone . Always relevant in the kitchen, fit into almost any interior.
- With imitation fabric or leather. This film will help in creating an interesting, unusual design.
- With various images, drawings, patterns. Absolutely everything can be reproduced on them: city landscapes, nature, animals, abstractions.
- With photo printing. You can make a custom film with any selected photograph or an exclusive image or your own drawing.
In order not to get confused in the variety of patterns and colors, base your choice on the general concept of the kitchen interior. The updated set should match the color of the walls and other furniture in the room, and the facades should match the shade of the countertop.
Selecting an effect
In addition to color, materials for pasting furniture have different finishes:
- Glossy . Ideal for use in dimly lit kitchens as it reflects and diffuses light. The surface to be pasted must be perfectly smooth: glossy vinyl emphasizes the smallest irregularities of the renewed canvas.
- Matte . Universal, looks discreet in any lighting and in different colors.
- Metallized . Plain fronts with a metallic sheen add shine and brightness.
- Mirror . Visually expands the space and brightens a dark room.
- Holographic . Has shine and a three-dimensional effect.
Even wallpaper will come in handy
Wallpaper is great for decorating shoe boxes with your own hands, the remains of which can be found in every home. To cover a box with vinyl or non-woven wallpaper, you will need wallpaper glue, and if the selected wallpaper is paper, then PVA glue will do. First of all, you need to measure a piece of wallpaper of a suitable size, taking into account the margin for overlap, and attach the box itself to it. Use a pencil to trace the outline of the bottom, then fold the wallpaper from the parallel sides of the box, pressing it tightly against the walls, and smooth the folds with your fingers. Unfold and do the same on other sides. After trying on, you need to cut off the excess pieces and you can start gluing. First you need to coat the bottom, apply it to the pattern, then the sides, carefully pressing and straightening the canvas, and then inside.
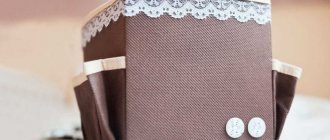
Decorating the box with pieces of wallpaper, sequins and buttons
In the same way, the boxes can be covered with fabric. In this case, it is good to use double-sided tape as an adhesive element, since the glue can saturate the fabric, leaving streaks on it.
Decor using decoupage technique
The decoupage technique is based on gluing a cut-out design to the surface of an object and fixing the resulting composition with varnish.
Paper napkins are great for decoupage. First of all, you need to paint the shoe box and let it dry. Usually you have to apply several layers, it all depends on the original background of the box. Then you should make a composition of napkins with a suitable pattern or design. After careful fitting, you need to attach the napkin to the box, face up, and carefully apply glue to it using a brush. There is no need to apply glue under the napkin. This way all the elements of the picture are glued. After complete drying, varnish is applied. You can paint the elements yourself to hide where the patterns combine and give the image a finished look. One more coat of varnish and the work of art is ready.
It should be noted that if the box is glossy, then you need to first get rid of the top layer using sandpaper.
Errors when pasting
You tried your best, but something went wrong. It doesn’t matter, almost everything can be fixed safely.
Bubbles? If they are small, then simply pierce them with a needle: squeeze out the air that gets in where it is not needed and carefully smooth the problem area with a cloth. With larger ones, an ordinary syringe will help - inserted inside, it will draw out all the air, and the hole will easily disappear when smoothed.
Folds? Whatever helps dry your hair will also work great on your hair. Run a hairdryer over the folds and they will smooth out. Don’t get too carried away, otherwise, by getting rid of one trouble, you will invite another.
Crooked? If you remember to leave a margin of 1 centimeter for each fragment when taking measurements, then you definitely won’t panic: an ordinary stationery knife will correct the situation, which can be used to remove the excess, and joining will easily cover the traces of your “cunning” operation.
Original design
One of the most impressive materials for decoration are buttons, due to their variety of shapes, colors, and sizes. The boxes can simply be completely covered with buttons, you can glue only the lid, or some separate side, or you can lay out a certain pattern or design from buttons. To simplify the work, the first layer of buttons can be glued by placing them face down on the table, coat the surface of the box with glue, apply it to the buttons and press firmly. You will have to work hard on the next layer of buttons, gluing each one separately to hide all the gaps. If you decide to depict any kind of design, first the surface of the shoe box will need to be covered with either paint, paper, or fabric. Then draw the image on the surface and paste it with buttons.
Similarly, you can decorate a cardboard box with coins, sequins, beads, rhinestones, matches, counting sticks, and colored pencils.
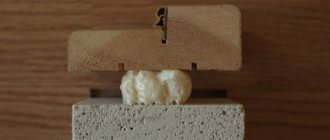
DIY decorative box
It is important to give a loved one a decorative box, festively decorated, for any celebration. If you wish, you can decorate the top of the box with various decor suitable for the holiday.
A template is first printed on a sheet of paper or the diagram is drawn by hand. The sheet is cut along solid lines and folded along dotted lines. When assembling the box, it is important to ensure that the semicircular ends are between the other two, the semicircles should remain outside.
A souvenir is hidden in the middle of the container, and then all that remains is to close it on top with a lid and decorate the box with ribbon.
Each decoration method has its own nuances
Working with different materials always has its pros and cons (see table)
| Decoration method | Auxiliary tools and materials | Features of work | |
| Covering a box with paper products | scissors, pencil, ruler, brush, varnish, | PVA glue, stationery knife | make quickly and easily, materials are available |
| Covering with fabric, ribbons, etc. | marking soap, glue or double-sided tape | Rich appearance, good for making jewelry boxes | |
| Decoupage | acrylic paints, sandpaper, cut out designs, | painstaking work requiring skill and patience | |
| Painting with acrylic paints | paints, brushes, varnish, pencil, | sandpaper | the manufacturing process is delayed due to the need to wait until each layer of paint and varnish dries |
| Use of buttons, sequins, coins, rhinestones and similar materials | transparent glue-moment, paper or fabric for the base | the original appearance of the finished product, the work will require diligence, since gluing small parts will take a lot of time | |
The exciting process of turning a nondescript box into a work of art can be a very rewarding hobby for anyone. It’s better not to settle on just one, but to try different methods of decoration. This will require a lot of time and patience, but the end result is undoubtedly worth the effort.
Advantages
- it is moisture resistant - an important plus for a room in which the water supply valve literally does not close;
- it is practical - you don’t need to put in a lot of effort to ensure that the covered tabletop or facades retain their classy appearance;
- it is durable - the film copes with any type of impact and lasts for years;
- it does not require professional installation - even the person whose hands grow from a well-known sad place can handle the pasting.
Of course, the latter is true only in one case - if this person first becomes familiar with the process technology.