For convenient storage of books with the ability to quickly get the desired copy, it is best to use a cabinet with glass doors. Furniture stores pay little attention to this piece of furniture - with the advent of electronics, there are very few lovers of paper publications. Making a bookcase with your own hands to match the interior of the room is a good solution for an experienced craftsman.
We will talk about making homemade furniture from selected materials. The instructions will help you make a drawing, select fittings, correctly assemble the body and decorate the doors at home, even if you have no experience.
The simplest type of book storage is a shelving, the disadvantage of which is the penetration of dust.
Bookcase options
There are 4 types of basic design solutions to assemble a bookcase.
Corpus. A traditional structure in the form of a free-standing building, with open shelves or closed with sliding, hinged doors.
Modular system. It represents a set of furniture from several separate buildings, from which various combinations of book storage with facades of the same style are made. All that remains is to choose a variation of the module layout for installation in the living room, bedroom or children's room.
Built-in. Occupies the space between adjacent walls, ceiling and floor. There is no need to install a top plate and side walls. Often homemade built-in furniture is mounted around the doorway.
Angular. Effective use of usable space in the corner of the room combined with ease of use of the interior of the cabinet.
Furniture with a secret: advantages and features
Furniture with secrets - table and cabinet with additional drawers
In past centuries, in the homes of wealthy people, a mandatory part of the office was a table or a cabinet with secret drawers, which were used to store especially important documents, money, and jewelry, which made it possible to protect them from thieves. Later in France, a special table-cabinet was invented, called a secretary, because it was really possible to store various secret documents and small valuables in it.
The drawers were often equipped with secret locks and secret locking mechanisms
The popularity of secretaries and other furniture “delicacies” equipped with various secret spaces was not accidental. Their design has its advantages that ordinary tables and cabinets do not have, and features that are unique only to such products.
They are no less relevant today: valuable papers, expensive jewelry, important correspondence and documentation are stored in stylized safes and hiding places. Among the obvious advantages of such furniture are:
- storage of valuables without access to them by strangers;
- their arrangement in different furniture elements;
- the possibility of making secret storage facilities with your own hands.
Among the factors characteristic of furniture with a secret, the design features of such products are highlighted, making it possible to prepare places for storing a specific type of valuables. As a rule, if hiding places are specially equipped, they are equipped with secret locks, and today - with an electronic security system.
Today, the furniture market offers products not only for personal use, but also for enterprises and organizations. In addition, it can be made to order according to individual drawings.
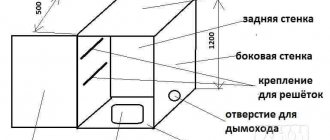
Making a drawing
After choosing the materials and design of the bookcase, we begin drawing:
- Designate the location for installation.
- Using a plumb line and level, determine the correctness of the floor horizon and the verticality of the adjacent walls; if you find violations of these parameters, correct them according to our instructions.
- Sort through your library collections to determine the sizes of all book formats. Their approximate samples are given in the table:
| Format | Height, mm | Width, mm |
| Standard (subscription editions) | 205 — 220 | 135 – 150 |
| Landscape, magazine | 290 — 300 | 205 – 210 |
| Small, brochure | Up to 180 | 100 – 115 |
- In accordance with these data, calculate the number of shelves and the dimensions of the intershelf space. Consider single or double row arrangement of books. Add 50 - 70 mm to the calculated size to make it convenient to move the volumes.
- When determining the height between the shelves, add 50 mm to the calculated value for the same reason.
- If you have accumulated a lot of non-standard literature, then it is better to store it in the lower compartment of the cabinet behind the hinged blind doors.
- Using the accumulated initial information, you can now draw a detailed diagram of the layout of the cabinet parts.
- Make a detailed list of the quantities and sizes of materials needed to assemble your homemade furniture.
Preparing cabinet parts
Once all the drawings are prepared, begin preparing the cabinet parts. Sawing parts is a rather difficult job, so it is better to entrust it to specialists. A machine for sawing chipboard is quite expensive, and it makes no sense to buy it for the sake of making one piece of furniture. You can use a jigsaw, but the work will, firstly, take a very long time, and, secondly, it will not be of sufficient quality. It is best to order chipboard cutting at the place of purchase.
Let's take a standard rectangular open cabinet as a basis for production. For it we will use oak-veneered chipboard and oak itself. You can cover the rectangular ends of the panels with veneer, or prepare oak slats in advance, which will be glued to the ends and rounded off towards the end of the work.
- Take oak boards 30 cm wide and 3 m long, and cut them into pieces 1.6 m long. After this, you need to adjust them to the size of the slats. Here you will need a template for leveling the board, a sawing machine and a guide. The dimensions of the template are as follows: length 1500 mm, thickness – 20 mm, width – 250 mm. When cutting, place the template under the board.
- Prepare the required number of slats. They will need to be passed through a planer, but be careful: both sides must be parallel to each other and absolutely even. The slats should also be sanded so that the surface is perfectly smooth.
- The slats are completely ready, and now they need to be attached to the chipboard using glue. At this stage you will need a clamp. To prevent the workpiece from being pressed when clamping the clamp, place a piece of plywood of suitable thickness under it. When glue comes out from the seams of parts when clamped, carefully wipe it with a rag, or remove it with a chisel after drying. The slats should be joined at an angle of 45 degrees.
Step-by-step instructions for making parts from MDF and chipboard sheets
When choosing a cabinet bookcase, proceed in this order:
- Step 1. Place the MDF sheets on a workbench or table.
- Step 2. Apply markings in accordance with the drawing with a marker or pencil.
- Step 3. Use a jigsaw to cut out the top and bottom plates, sides, middle partition and shelves.
- Step 4. In the edges of the shelves, we use a router to make two longitudinal grooves at the top and bottom.
- Step 5. Cut out sliding panels from glass.
- Step 6. Use a special drill to make holes for the handles.
- Step 7. Cut out the back wall from a sheet of fiberboard.
- Step 8. Cut out the hinged doors for the lower cabinet compartment.
To avoid mistakes when cutting materials, contact a specialized workshop. Glass and MDF sheets will be professionally cut there.
Drawing
When drawing up a drawing, you need to pay attention to two nuances. You should use a level to check how horizontal the floor in the room is. If this is not taken into account, it is possible that the shelves will be located at an angle to the surface. If there is a slope, you should decide what is easier - to level the surface of the room itself or to take into account the slope in the design and compensate for it at the base of the cabinet?
Bookcase drawing.
It looks like this: if the slope is 2 mm per 1 m distance, then the height of the legs should compensate for this. If the cabinet is 1.5 m long, then in the direction of the slope the first leg should be 3 mm less than the second.
The level must be checked both along the wall and perpendicular to it.
Pay attention to the presence of baseboards in the room. If it exists, you should either again take this into account in the design, which will involve a large amount of work when preparing the drawing and manufacturing the structure.
Or you will need to remove the baseboard where the bookcase is supposed to be located.
Assembly instructions
- 1. Mark the installation locations of the fasteners. Drill the fastening points with a confirmation drill.
- 2. Screw the legs to the bottom plate.
- 3. Place the horizontal slabs, sidewalls, middle partition and shelves on edge.
- 4. Connect all the elements step by step into a single structure, screwing in the confirmations with a special key.
- 5. Turn the case upside down. Use a tape measure to check the equality of the diagonals between the opposite outer corners of the cabinet.
- 6. Using self-tapping screws and a screwdriver, secure the back wall.
- 7. Place the cabinet in a vertical position.
- 8. Insert the glass panels into the grooves of the door frame and secure.
- 9. Screw on the handles.
- 10. Install the blind doors of the lower compartment, securing the hinges with screws to the doors and side walls of the cabinet.
- 11. Screw the outer vertical locking bar to one of the doors from the inside. Pre-process the rail with a router.
- 12. Attach the decorated slats to the ends of the sidewalls, top and bottom plates, and shelves with nails or glue.
- 13. Fill the shelves and lower compartment with books and various items.
You can do without decor by pre-milling the ends of the furniture. We prime their surface, then coat it with furniture varnish.
How to do it at home?
Blanks
According to the available drawings, the main parts for the cabinet are cut.
If you do not have the proper experience, it is better to order cutting of the material from specialists . For example, sawing chipboard with a jigsaw will take a very long time and the work will not look neat.
During the preparation of parts, all drawings and diagrams are checked.
After cutting, the workpieces are polished. To give the ends a beautiful embossed appearance, milling is performed. Milling rules:
- securely fasten and prepare the router;
- do not allow the workpiece to deviate when the router feeds;
- movements should be careful and smooth;
- slats are processed only after setting the desired size.
Advice . If irregularities appear after processing, they are smoothed out with sandpaper.
Assembly
Assemble the cabinet on a flat surface to avoid distortions and curvature in the structure. Sequence of work:
- Attach the side walls to the top, using a corner to check the correct installation of the elements.
- Make holes for fasteners. The diameter of the drill should be smaller than the fasteners used.
- The parts are pulled together using confirmations. They come with a hex wrench to make the tightening process easier.
Having connected the upper part, move on to the lower one. To adjust corner joints, use a corner.
Advice. It is better to install shelves without a back wall.
Shelves in a bookcase are subject to loads, so it is not advisable to make them removable . The shelves are attached with confirmations in 3-4 places on one side of the side wall. This ensures the stability and reliability of the entire structure.
At the final stage, the back wall is mounted. To fix it, take a sheet cut from chipboard or plywood. For fastening, use a construction stapler or nails or self-tapping screws. Doors are hung on hinges if they are provided for in the design.
Features of manufacturing and assembly of parts of a plywood bookcase
Cut the material and install furniture elements in the same order as in the previous case. Connect the parts with self-tapping screws, rest the shelves on furniture corners. Sand all surfaces with a sander or sandpaper. Then cover with primer and furniture varnish.
Expert opinion
Victoria Chernikova
Decorator
Advice. It is better to cover a homemade plywood cabinet in the Provence style with white or gray acrylic paint. The furniture will look impressive in any interior.
Milling the ends and back wall for the cabinet
End milling can be done at home. Before work, it is necessary to check the quality of the device on material blanks. Then you need to select cutters for the desired relief, set the offset, and securely fix the part.
When feeding a block into the machine, it is important to avoid deviations of the element. Actions must be smooth and careful.
After the work is completed, the quality of milling of the elements is checked. Irregularities are smoothed out with sheets of sandpaper.
Doors
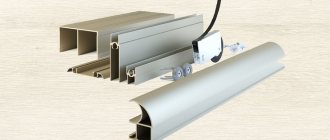
You can make movable fences for bookshelves in the form of glazed swing frames. Assemble the frame from milled wooden slats with pre-made longitudinal grooves. Insert glass sheets into them.
In the built-in closet, close the shelves with sliding doors. Assemble the frames from an aluminum profile with longitudinal grooves for installing the filling. Door leaves can be made from MDF or glass. You will need a guide to the manufacture and installation of sliding systems.
It is convenient to use folding doors. Their advantage is the possibility of simultaneous access to all the contents of the cabinet. Installation of folding doors is described in a separate article.
From the wall - into a stylish set
The owners of this brown “wall” took it to their dacha, and then decided to try their hand at remodeling it into modern furniture.
The chipboard covering was cracked and peeling off in places, so it was completely removed. The cabinet frames were dismantled and re-attached with Euroscrews. The parts were sanded, puttied and painted. The tabletops and legs were made from old boards, and the door layout was re-nailed.
Moldings were added to the front of the cabinet, making it unrecognizable. The result was three sets for different rooms: two bedside tables for the living room, a wardrobe for the bedroom and another set of three cabinets.
And here you can watch a detailed video about remaking a bookshelf from an old wall. The owners turned it into a TV stand.
Decor
Decorative details can change the appearance of a cabinet in a positive way. They can be made from wood or plastic. These are wooden slats, planks, cornices, rosettes and baseboards, processed by figured milling. Plastic products are cast in molds to match the color of wood of different species. If you don’t want to make decorative elements yourself, buy ready-made ones at a hardware store.
Expert opinion
Alexander Didenko
Furniture assembler at Mabaks
Attach the shaped strips to the ends of the shelves so that their upper edges are flush with the area for books. When you take out the volume you need, you won’t get the book caught on the decor.
Top 5 inspiring ideas
Thanks to the installed furniture, the apartment becomes an artistic space. Wardrobes play a key role in a room that should feel “comfortable”. Models include a wide variety of styles and sizes. Before deciding what the closet will be like, they look for the best place for it in space. The functional model should make it possible to easily classify and find a book without problems.
Using drywall
The advantage of a plasterboard stand with wood elements is that its dimensions and shape are completely adapted to individual needs and preferences. The “body” of such furniture is steel profiles, which are screwed to the floor and to the wall with dowels. In those places where the shelf is located, additional profiles are used to strengthen the structure.
Ceramics as an interesting alternative
A bookcase can be created by combining two materials: ceramics and wood. The design of this model is based on brick racks that are attached to the wall. Wooden bookshelves theoretically do not require fixing, since the protruding parts of the brick provide sufficiently stable support. It is preferable that the wood boards have a thickness of about 3 cm (shelf 25x50 -70 cm).
Application of furniture boards
The most famous and popular materials for bookcases are OSB and MDF furniture boards. Craftsmen often order pre-cut elements. To ensure stability, the extreme corners should be further reinforced with metal brackets. Such shelves can be finished by painting or varnished in the chosen color. If the bookcase was made from OSB panels, it must be properly primed.
Why are boxes needed?
Decorative plywood boxes with beautiful small details inspire a nod to the spirit of Cubism! It's easy to create an irregularly shaped cabinet using boxes of different shapes. To ensure its stability, the drawers are held together with simple black metal clips. Some of the boxes are painted inside with muted pastels, using two coats of water-based paints. Bright plywood stands out beautifully in contrasting color.
New life for an old staircase
Is the old staircase that has been lying in the attic for the last three decades no longer needed? It can be turned into a neat bookcase with minimal cost and minimal effort. It is placed in the corner of the room or used against the wall; it is suitable for magazines and children's books.
How to repair a bookcase
Over time, the furniture wears out, the outer covering ages, and the load-bearing units become loose. We provide several examples of repairs in the table.
| Type of failure | Repair |
| Scratches on MDF and chipboard panels | Paint over minor damage with a tinting pencil. Fill deep grooves with melted wax to match the color of the furniture. Then polish the repair area. |
| Loose hinges | Remove the hinges. Fill the mounting sockets with epoxy resin. Secure the hinges with new screws in the updated holes. |
| Skewed hinged doors and shelves | Take out all the contents of the bookcase. Check the base horizon. Eliminate the cause of body distortion by leveling the places where the legs rest on the floor, for example, by placing the remains of pieces of fiberboard or other suitable material. |
| Loosening of body parts at joints | Reinforce the cabinet elements with additional corners made of plastic or metal. |
| Replacing glass in the door | Remove the door from its hinges. Remove one of the frame slats and remove the damaged panel. Insert new glass, return the bar to its place. Hang the door back on its hinges. |
| Repurposing old furniture into a bookcase | Completely dismantle the filling. Disassemble the case and insert new shelves. Reassemble the cabinet in reverse order. |
What to consider when drawing a cabinet drawing
- First of all, decide on the model of the cabinet and the place in which it will stand. Break the cabinet drawing into several component parts, carefully drawing each detail. Specialized computer programs such as “Basis Furniture Maker” or “AutoCad” will be good assistants in this matter. When creating drawings, take into account any little things, even the baseboard on the floor of the room, which can easily eat up about five centimeters from the closet, and, moreover, will not allow you to move it to the wall. In this case, bevelling the vertical ribs from the baseboard side will help. You can also remove the baseboard completely.
- Now determine the exact dimensions of the cabinet. This means not only the width and height, but also the number of shelves, as well as the distance between them . The minimum depth of a shelf for books is 20 cm, for deeper shelves - 30 cm. The thickness of the shelf should be at least 2.5 cm with a length of 1 m, this will help to avoid sagging.
- Be sure to decide on the color of the furniture in advance. There will be no problems with this, since modern industry offers a large selection of colors and shades.
conclusions
We looked at 4 structural types of bookcases that can be made from 7 available materials: chipboard, MDF, fiberboard, plywood, plasterboard, furniture panels and glass. By following our guide, you can make your own storage unit for your book collection. Ideas for building cabinets can be found in the Ikea catalog or in the gallery below.
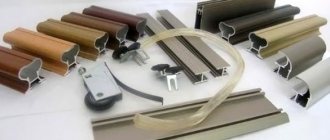
We make the cabinet ourselves: necessary materials and tools
The materials for the closet depend on the project and style of the room. High-quality and expensive products are made from solid wood; furniture made from cherry, oak, alder, maple, etc. is valued. Wooden shelving is natural, environmentally friendly, and does not contain synthetic components. The material is strong, durable, aesthetic, but expensive. Chipboards are more affordable. The advantages of chipboard and MDF sheets are the variety of textures and shades.
Finishing materials will be required: slats, borders, metal inserts, frosted or transparent glass. For the shelves and back wall of the cabinet you will need furniture panels or plywood. Wooden blocks are needed for the legs.
Before you make a bookcase with your own hands, you need to prepare a set of tools. Necessary for work: a screwdriver, an electric drill with attachments, a milling machine, a grinding machine. When finishing, you will need knives, rulers, tape measure, building level, brushes, pencil, sets of screws and washers, nails, hammer, carpentry glue, varnish and paint.
Potato box
The fastest way to make such a box from an old cabinet is suitable for large volumes of potato storage. Simply place the cabinet on the back wall, open the door and add the potatoes. If you need a much smaller size, then disassemble the old cabinet and assemble a regular box from the walls. To add beauty, you can design a lid with a lock or latch.
vote
Article rating
What tools will be needed during the assembly process?
For self-assembly we will need the following tool:
- screwdriver with a bit for confirmation;
- confirmation drill;
- roulette;
- pencil;
- bit for screws.
We also need fasteners:
- confirmations
- self-tapping screws
- furniture corners
- thrust bearings
The bookcase, the assembly of which is described in this article, turned out to be quite spacious thanks to a well-thought-out design.
All the necessary details can be made based on the drawings that will be attached at the end of this instruction.
It is better to entrust cutting and edging the ends of parts to professionals and order it all at once from a furniture shop. After all, doing this at home is quite difficult. In principle, there is nothing complicated about gluing furniture edges, but this only applies to paper melamine edges. ABS edges can also be glued at home. But we would still recommend that you do the plastic edge gluing on a professional machine.
How to decide on sizes
The dimensions of the rack are limited only by the area of the room and the requests of the owners. But there are a few things to consider.
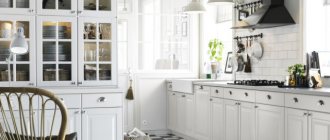
- The size of the product should be proportional to the size of the room. For a small room, compact products with open shelves or transparent glazing are suitable so as not to create a feeling of cramping. In a spacious room, large systems with a dozen sections will look good, where the entire home library is visible.
- If the book storage system is made to cover the entire height of the walls and the ceilings are high, provide access to the upper shelves - a special library ladder is suitable for this.
- In addition to height and width, depth is also important - preferably at least 15 cm, so that standard-sized books can be placed on the shelves. For large-format publications, you need to provide a depth of at least 30-35 cm.
Instagram @lavkadesign
Instagram @proekt.torard
Instagram @salomatina.design
Instagram @hollstudio
Instagram @nomadform