Organizing storage areas in rooms - in the kitchen, in the dining room, in the pantry, in the living room - is an important stage in interior design. A voluminous cabinet, boxes, open shelves or racks can be used as structures for placing dishes, personal items, books and toys.
In its shape and structure, such furniture resembles open shelves, but has a number of differences. Most furniture stores offer their customers a huge assortment of ready-made racks and shelves, but do-it-yourself designs have a more advantageous design and practicality.
What materials can be used for manufacturing (wood, metal, plywood and others)
The most common, accessible material is wood. Its cost is affordable; you can buy already processed boards. The most important thing to consider is that if this product is being made for the first time, then it is convenient to make it from this material and errors can be avoided.
Wood is the most common material for shelving.
If the rack model does not have a complex structure, then you should choose 5*5 planed timber and boards of suitable size from which the shelves will be made. The latter can also be made from plywood or chipboard.
Metal - this material is also used to make such a cabinet. But it is worth considering that to work with it, you need to have basic skills. You will need to drill holes in the metal frame, and this should be entrusted to knowledgeable people due to the strength of this material. But if you have the skills, then metal is a good basis for a rack, the shelves of which can be made of wood. This material is durable and has a beautiful appearance.
To make a metal shelving unit you will need certain skills.
To make this product you will need:
- For racks - a wooden block or profile pipe.
- For the frame - rail or profile.
- For shelves - boards, chipboard.
Prepare materials for making a rack.
Selecting material for work
At home, an interesting rack can be made of several types of material:
- Wood.
- Metal.
- Metallic profile.
- Drywall.
Each of the presented materials has a number of advantages and disadvantages that determine the choice of one or another structure.
Note!
- DIY feeder - step-by-step instructions for creating a feeder + detailed diagrams with photo reviews
- Do-it-yourself rugs - TOP 120 simple patterns with master classes on how to make them yourself + photo reviews of finished rugs
Do-it-yourself dolls: a master class on making a beautiful doll. Simple instructions with photo examples of ready-made options
Required Tools
Before you start work, you should purchase metal corners, brackets that may be needed for installation, screws, dowels, nails, and prepare the necessary tools:
- Jigsaw or hand saw.
- Drill.
- Grinding machine with different attachments, rings of different hardness.
- Screwdriver.
- Hammer.
- Level.
- Roulette.
- Pencil, chalk.
- Phillips screwdriver.
- Skins with different grinding surfaces.
- Tassels.
You will need quite a lot of tools.
If you are making a wooden product, you should buy surface treatment fluids, varnishes, stains, and paint.
Drawings and dimensions
First of all, it is worth mentioning the collapsible frame options. Such models are very mobile. Their parts are connected with bolts. The storage can be easily moved to the desired location. But there are also non-demountable frame racks.
To join their parts use:
- welded joints;
- self-tapping screws;
- nails (this is determined by dimensions and material).
When large in size, such assemblies are virtually stationary. It is not only impossible to take them out through a door or window, but even to disassemble them. It will only be possible to break it, so dismantling is fraught with many difficulties.
As for the console versions, such racks do not have sidewalls. But it provides for attaching the shelves to the solid rear wall.
Both options - the traditional stationary and console ones - can be placed in the pantry and used for a variety of things. But, of course, the fixed type is more massive and spacious.
As for folding models, they are closer to a stepladder. The dimensions are relatively small, and you can’t count on decent capacity. However, the mobility is even higher than that of the collapsible versions, and this largely compensates for the low capacity.
As for the shape, rectangular and triangular types of shelving are optimal for both the pantry and other rooms. A rectangle is generally a classic shape. You just need to choose whether to install square legs or extend the supports to support the entire structure at once. When drawing up a diagram, you should pay attention not only to the geometry, but also to the dimensions of the storage unit itself.
The height is mainly limited to 2 m. In this case, even most people of average height, without stepladders or stools, can reach the top shelf. As for the depth, it is entirely determined by the size of the objects laid out.
Hanging or protruding things are not very good, but a huge half-empty space is unlikely to be a rational choice. To store books, magazines, and flowers, you need shelves 0.3 m wide and 1 m long.
It is not advisable to exceed the length, since then additional racks are needed to avoid subsidence.
For garages and sheds, for garden tools, for wallpaper and for illuminated seedlings, it is recommended to use shelves 0.4-0.5 m wide. They can also be used to stack:
- tires;
- canisters;
- spare parts for cars and garden equipment;
- metalworking, carpentry and entrenching tools;
- fasteners;
- various clothes.
Important. When making parts of a rack from OSB, fiberboard, plywood, it is advisable to focus on the width of the finished sheets. In this case, it will be possible to prevent the creation of unnecessary waste and not overuse materials.
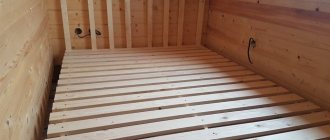
Particular attention should be paid to the shelving in the bathhouse. All of them must be mounted not only on the floor, but also on the wall, because otherwise it is impossible to ensure reliability. It is unlikely that anyone will like falling from a shelf to the floor. All such products must be made of wood and carefully polished.
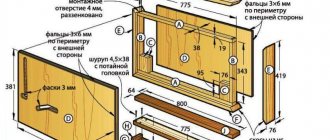
This is what a rack cabinet looks like with a height of 1716 mm, a rear wall width of 1038 mm and a single section width of 324 mm. But this is a homemade budget class shelving unit. The depth of the shelves reaches 500 mm. Their length is 1550 mm. For work, plywood with a thickness of 1.5 cm and pipes measuring 2.5x2.5x0.2 cm are used.
Types of racks
The list of species with descriptions is below.
Frame
These products require a supporting base in the form of a wooden frame or metal. The required number of shelves can be attached to it. This is the most convenient option to install.
The frame rack is the easiest to assemble.
Beam
According to the scheme, they resemble the first manufacturing method, but have a more complex design and more materials. Suitable for household needs.
Beam racks are often used for household needs.
Modular
These are racks consisting of a ladder, a box, and a lattice. They can be of various shapes, attached to the wall, or have a free-standing structure.
Modular shelving often consists of boxes.
Console
This type of product does not have side walls, while the shelves are attached to the rear wall. Ideal for hallways and closets.
The cantilever rack has no side walls.
Rope
It should also not have sidewalls. This is a decorative type of shelving in which the shelves are attached to ropes. You should not store heavy things in this design. Can be used for a nursery, as a stand for souvenirs and toys.
Rope racking uses ropes instead of sides.
Cantilever racks
They are difficult to make on your own. They have a curved shape. They can perform a decorative function. Cannot withstand heavy loads.
The shelving of a cantilever structure performs a decorative function.
Bridge circuit
This type of design is not as practical at home. It is mainly used in production. Inside it there are partitions, which are made of boards similar to shelves.
The bridge circuit is used in production.
Functional, practical furniture in a couple of hours
Many people prefer natural, environmentally friendly materials. It’s easy to assemble a wooden rack with your own hands from what you have in the house.
Old doors, pallets, beams, chipboard sheets, and boards will be used.
Note: Be sure to check the accuracy of dimensions when cutting and assembling. A few extra millimeters can lead to distortions and instability of the structure.
The simplest version of a homemade shelving unit is made from ready-made wooden boxes. The side sheathing looks interesting in the product, opens the view, and can withstand books, flower pots, things, and crafts. Before starting, you should carefully inspect the boxes for integrity, reliability of assembly, and condition of the wood.
Each box must be prepared: cleaned of dust and dirt, sanded to a smooth surface, painted with oil paint to match the color of the interior. Painting “like wood” followed by varnishing in several layers will give a special elegance to the product.
Assemble the structure according to the drawing, carefully installing the fasteners. Install in place, secure with dowels to the wall or floor.
How to make shelves for shelving
In order to understand how to make a wooden rack yourself, you need to determine where it will need to be placed and what it is needed for storage. You need to draw up a drawing in which you need to identify each element, think over the design of the product, and the method of its assembly.
First you need to draw up a drawing of the future product.
At the very beginning of preparation, you will need to measure the space where the rack will be located. For this you will need a tape measure. The height and width of the structure should be acceptable and convenient for using this structure, depending on the items that need to be laid out on the shelves.
For conservation or books, you need to choose boards 25-45 cm wide. For a rack where tools will be stored, you need to choose wider shelves. The length of shelves for children's things, toys, and souvenirs does not have to be long. 1.5 meters will be enough.
For toys and souvenirs, you can get by with narrow and short shelves.
If you plan to assemble a kitchen rack, then the length should be up to a meter. If you neglect this technology, the boards will begin to sag under heavy objects. The width corresponds to the depth of the rack; the length should be such that the boards fit tightly enough into the frame.
After determining the length and width, you need to go directly to the preparation of the shelves. The thickness of the board must be at least 2.5-3 cm. You can fix the shelves with transverse bars - this will give them additional strength. You can attach such a block with small nails.
An important step is preparing the shelves.
Tips for arranging equipment under wallpaper
Features of the layout of the premises dictate their conditions for the location of retail equipment. We've put together some tips on how to best arrange your shelving to make the most of your store's space.
Rectangular room
For this type of sales area, wall-mounted shelving is best suited. They don't take up much space, and at the same time they can hold a lot of goods. If the area of the room allows, then you can place storage units or double-sided shelving in the center. A cabinet for catalogs is also suitable.
Room with columns
The columns can be decorated with photo wallpapers and a nightstand for catalogs can be placed next to them.
Room with additional corners
Single-sided and double-sided shelving can be placed along the walls. Storage units fit well between vertical double-sided shelving. The corners in the center of the room are suitable for branding under photo wallpaper.
L-shaped room
The “ledge” can be designed as a brand zone for photo wallpaper or a product that you want to highlight. Examples of textures are glued to the walls, and equipment for photo wallpaper is placed along them. Along the other side it is convenient to place wallpaper racks and storage units.
Irregularly shaped room
Base manufacturing technology
The second stage of work is preparing the foundation. Let's move on to its lower part. A thick board will be useful, equal in width and length to the dimensions of the rack. To add the necessary strength in this place, you can also nail cross bars.
The base consists of vertical and transverse slats.
We move on to the side walls if their presence is suggested by the design. If your budget is limited, you can replace wooden boards with plywood of an acceptable thickness. Its width should correspond to the lower base. The height must be according to the developed drawing.
Having prepared the sides, you need to use a pencil or chalk to mark the place where the shelves are attached. Their height can be different, depending on the objects that need to be placed in a given structure. Experts advise making the distance between shelves about 20 and 40 cm. You can use these two indicators to compactly place each item and make it universal.
The distance between shelves may vary. Another step is preparing the back wall. Some craftsmen do not use this part; the texture of the wall surface suits them. But if the design requires this shelving part, then it can also be made from thick plywood.
Types of structures
Racks also differ in the method of fastening:
- Stationary models. They have a durable frame, support legs or a solid base.
- Mobile options. Shelving is easy to move around the room and is often equipped with wheels on the bottom edge.
- Hanging racks. During manufacturing, it is important to ensure the strength of the fasteners and the sufficient thickness of the shelves.
The choice of a professional depends on many factors - the size of the room, the style of the interior, the purpose of the rack.
How to assemble a complete rack
Assembly steps:
- The installation of the rack should begin from the bottom. The side parts and the back wall (if present) are attached to the bottom shelf. You can attach metal, plastic corners or other fasteners to the sides in the marked places.
- Shelves are placed on the holders and secured with self-tapping screws. It is convenient to perform these actions together with an assistant. You should use a level.
- Alternately, moving upward, all boards are fixed at the marked height.
- Once assembly is complete, painting work can be done.
You can use an example to consider a drawing of a metal rack.
Drawing of a metal rack.
The corner design has slight differences and is more difficult to assemble. It requires connecting two side walls using beams at the desired angle.
The corner rack is a little more difficult to manufacture.
If you follow the instructions and correctly complete all the required steps, then after a while you can bring your idea to life and show off a special rack you made with your own hands, in which you can put away any things you need for storage.
Preparation of the drawing
If desired, the master can use ready-made plan diagrams of various shelving models. Today, instructions and video tutorials on how to work are freely available. To create a custom drawing, you must display the following options:
- Design dimensions.
- Diagrams of shelving shelves and their location.
- Frame structure.
- Availability of additional fastenings.
Further work is carried out according to the prepared drawing in order to avoid possible errors in construction.
Note!
- DIY family tree: instructions for creating a family tree + DIY design ideas
- Do-it-yourself sun lounger: photos with instructions for creating sun loungers + detailed diagrams of the stages of work
Do-it-yourself aroma diffuser for the home - instructions for creating an aroma diffuser. Step-by-step instructions, diagram + recipe
DIY shelving ideas
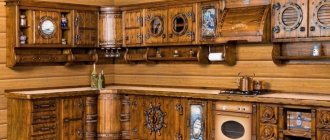
Cabinet for kitchen or living room
The finished product will be stylish and beautiful and will fit perfectly into the classic and retro style of the interior. A model of the future cabinet is drawn on paper, and places for shelves are outlined. Then the parts are cut out to the required size.
The sides of the cabinet and its bottom are made thicker in one of the following ways:
- Take 2-4 identical pieces of cardboard. Carefully coat the first cut with glue, apply the second, and let the glue dry. In this way, all the parts are connected to each other, resulting in a piece of thick material.
- Cut out two identical cardboard pieces. Prepare long strips of thin or corrugated cardboard 1-2 cm wide, bend them like a snake and stick the ends onto one part. After drying, cover the snakes with a second cardboard element, pre-lubricated with glue, and allow the entire structure to dry.
The process of cutting out and thickening all the elements of the cabinet is quite important, so you need to be careful and patient. To avoid confusion, all parts are numbered or signed in another way. The glued cardboards are placed on the floor for a day and pressed down with a weight so that they do not warp.
Then proceed like this:
- Grooves for shelves are cut into the side walls of the future cabinet from the inside.
- Place the shelves inside, securely glue them with “Moment” or hot glue, and leave to dry for 24 hours.
- They connect the structure into one whole - glue the top and bottom, glue in the internal partitions, if any.
- After the structure has completely dried, all side sections are carefully sanded with sandpaper or carefully sealed with thin strips of paper.
Making a cabinet from corrugated cardboard
The next step is to decorate the cabinet. All surfaces are covered with craft paper or regular white paper, and then painted with acrylic paint.
There is another option for finishing the structure. It is coated with a wood primer, allowed to dry, and putty with an even, smooth texture (for example, finishing gypsum) is applied.
The dried layer of putty is sanded with fine sandpaper and painted over in any color. For example, the combination of beige and gold paint looks beautiful - they are alternated with chaotic strokes.
You can also paint all surfaces in one shade, and then go over some areas with a damp sponge dipped in a different paint, or treat only the corners and contours. Any decor and fittings are glued onto the finished cabinet.