Installing a cabinet is not an easy task, especially when you don’t know how and where to install some of the components for this piece of furniture. Auxiliary parts can be, for example, ball guides for drawers.
Not everyone knows how to install them, but in the meantime, without them it will not be possible to create a full-fledged place for storing clothes and any other accessories. In this material we will talk in detail about what parts the ball guide mechanism consists of, and how to install these components in the place intended for them.
Ball guides for drawers: how to install
Ball guide design: highlights
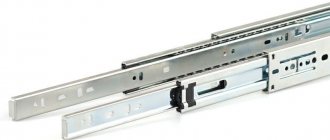
So, in order to understand the operating principle of the components we install, it is necessary to turn to their most simplified version - two-section non-separable guides. These parts consist of two rails, which:
- vary in size;
- have the shape of the letter “P”;
- are located one inside the other.
The operation of this element of the system, which is responsible for drawing out the drawers, is carried out due to the mutual movement of tracks made of steel relative to each other, which, in fact, make up the part that interests us. They are also called telescopic because of the way they fold.
Installing ball guides for drawers does not take much time
Between these tracks, as a rule, in the upper and lower parts, there are small balls. They are similar to the same balls that are usually placed in a bearing.
The element responsible for maintaining the structure as a single whole is the outer rail segment. It plays the role of a limiter, preventing the device from moving the drawer further and damaging the weight of the piece of furniture.
Kinds
When choosing furniture guides, you need to pay attention to various factors. The most important parameter is the type of design, according to which they can be roller or ball, and also be equipped with a closer and have a reverse action. Each option has both advantages and disadvantages, so to make the right choice you should study the characteristics of each type.
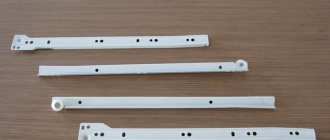
Roller
The choice of these furniture guides is considered the most popular. They appeared on the market more than 15 years ago, and quickly became in demand among furniture manufacturers and ordinary users.
Roller guides for drawers have many advantages:
- Do not require the use of lubricating pastes and other compounds;
- Ensure smooth movement of boxes;
- They are easy to install, since there is no need to drill numerous holes for fasteners.
Such furniture guides are installed on both sides of the recess allocated for the drawer. Slight deviations in furniture and drawer dimensions are allowed. Even if small errors were initially made in the installation, the design can be adjusted. The length of the roller guides can vary from 200 mm to 600 mm.
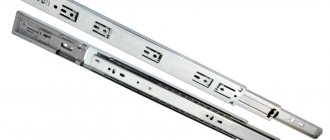
Ball
Ball guides are considered quite popular due to their smooth running and ability to withstand significant loads. In addition, they are in an affordable price range. Such telescopic guides can be equipped with closers or produced without them. They consist of two elements, one is attached to the drawer, and the other is attached to the side wall of the furniture. To disconnect them, you need to press a special lock.
There are many models of ball furniture guides that differ in height, which can vary from 17 to 45 mm. Additionally, they differ in the degree of extension. The most popular designs are those whose height reaches 45 mm. They can withstand a load of up to 36 kg, so even large and heavy items can be stored in the drawers.
With door closer
Guides for drawers with closers are considered interesting. They are similar in design to the previous version, the only difference is that these elements are equipped with a closer and dampers. Due to the former, the drawer is picked up in a certain position, after which it smoothly closes independently, without any effort on the part of the person.
The damper ensures that the drawer closes smoothly and silently. Additionally, it acts as a shock absorber, so that even if significant force is applied to close the drawer, strong impacts and noise are prevented.
Designs with a closer are considered reliable and comfortable to use. They can withstand significant loads, which is why they are popular among furniture manufacturers.
Full extension
Full extension slides are popular modern designs. They are based on a special ball bearing. This system ensures complete and smooth opening of any drawer. To use such a retraction system you will have to make some effort.
Guides that ensure full drawer extension are available on the market in numerous models; the choice depends on the planned load. The installation of such fittings should be carried out with extreme caution, since careless handling can cause damage to the integrity of various parts.
Hidden mounting
Installation of guides of this type is considered the most difficult and time-consuming. But this fittings are becoming more and more in demand, as they are convenient to use. The design is equipped with a closer and a reverse action system.
The undeniable advantage of these furniture elements is that they are installed under the bottom of each drawer, so you get the feeling that the object is floating in the air. Other advantages include good reliability of the products, and the movement of the box is smooth and free of extraneous unpleasant sounds. The drawer closes softly and quietly.
Initially, such fittings were installed only on solid wood products, but today they are equipped with structures made of chipboard and MDF. Depending on the model, such guides can withstand loads of up to 50 kg.
Reverse action
Such guides are similar in principle to fittings equipped with closers. The only difference is that the drawer opens by lightly pressing the front with your hand.
A significant advantage of this design is that it is not equipped with any handles or recesses for control. It has an attractive appearance and also allows you to integrate the box into any part of the structure. Often used in the production of furniture in modern styles, where it is important that the glossy surface is not disturbed by any fittings.
It is better not to use reverse action guides for children's furniture. They cause the drawer to pull out abruptly and can injure the child. In addition, pushing such a box will require significant effort.
Tandemboxes and metaboxes
Such fittings appeared on the market relatively recently, but quickly became in demand. Design features include:
- The guide is located directly inside the metal side wall;
- Equipped with a closer;
- Dampers are definitely used.
An important advantage of such fittings is the ability to withstand really significant loads. This is especially true in relation to products in which the guides are installed in a hidden manner.
Another advantage of such elements is their interesting design; they fit well into furniture made in various styles and sizes. Due to excellent performance characteristics, the products are easy to use and have a long service life. In order for the installation to be carried out correctly, it is necessary to use special marking devices. They help to accurately determine the location of the guides and avoid distortions.
I would especially like to mention Bloom's guides. They combine many advantages inherent in various types of furniture fittings. Due to the complexity of the design and ease of use, the cost of such products is considered quite high. Therefore, tandem boxes are usually used in luxury interior items made from natural wood or other similar expensive materials.
Existing types of ball guides
The system we are considering today, which comes as a component for home furniture, can take various forms. So, they will vary due to the original purpose of this motor system, and the set of functions with which it was originally endowed. In the table below, let's study what ball guides can be and by what criteria they are distinguished.
There are many types of ball guides
Table 1. Types of ball guides
| Criterion | Description of species |
| Possibility to disassemble the device | According to this criterion we can distinguish:
|
| Number of "steps" | Based on this parameter, we can divide existing types of guides of the type we are interested in into:
|
| Construction type | According to the item you are looking for, ball guides can be distinguished:
|
| Device installation method | Installation of the parts we are interested in can be carried out in two ways:
|
A box with such guides moves almost silently and can withstand considerable weight
The final cost of mechanisms that cannot be disassembled after installation without losing functionality will be much less than the same value for dismountable mechanisms. The fact is that the latter are produced using sophisticated technology, and are ultimately equipped with specially reinforced balls, which allow the device to be disassembled and reassembled several times without damage or fear of losing small structural elements.
The balls inside the device are made of steel. They move along the internal space of the metal profile, allowing you to easily pull out drawers made of absolutely any material and of any size from a closet, chest of drawers, beds and other pieces of furniture.
These guides are suitable for installation on drawers made of almost any material.
The final cost of these propulsion systems will be influenced by any of the parameters listed above in the table, not just the possibility of disassembly. So, the more pure stages and the number of levels with which the desired system is equipped, the more expensive it will become. This is due, of course, to the difficulties that the manufacturer had to go through when creating the device we are interested in.
The role of ball guides in furniture production
Despite the fact that the principle of operation of telescopic devices is used to create many products in various fields of scientific and practical human activity, they most often continue to be used in the production of cabinet furniture of various types.
Ball guides are needed to equip furniture with them, which then becomes much more functional, and in addition:
- allows drawers to slide out silently;
- increases the permissible load, which has a direct impact on the box, extending its service life.
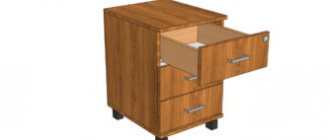
Scheme for installing ball guides in a drawer and a box underneath it.
So, as an example, we can cite wardrobes, inside of which multiple drawers are installed, saving free space and generally increasing the usability of this piece of furniture. Usually such drawers are filled with clothes and accessories, as they say, to capacity. And yet, thanks to ball guides, they work silently and accurately.
By installing ball-type guides into your piece of furniture, you will increase the service life of the furnishings equipped with them, as well as increase the convenience and efficiency of using the furniture.
Specific installation calculations will depend on the parameters of the box and fasteners selected for it
Ball guides for drawers, dimensions for installation, nuances of choice
In terms of quality characteristics, ball mechanisms are much better: they are more stable, durable, provide smooth movement of the drawer and are almost silent. But they also cost a little more.
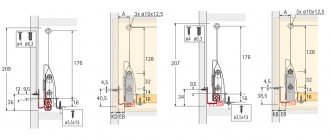
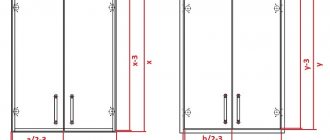
The good news is that the calculation of drawer frame dimensions for roller and ball slides is exactly the same. The size of the gap between the box frame and the sides for both types is 12.5-13mm.
That is, you can always change the roller guides to telescopic (ball) ones if for some reason you are not satisfied with the quality of the first ones.
The exception is mortise guides and hidden installation: the technological dimensions of the gaps between the box frame and the sides are calculated differently for them. In size, the hidden-mounted drawer is larger in width, and the gaps between the sidewalls and the box are smaller (by internal size -49mm versus -90mm when calculated).
There is also a difference in the installation of ball guides on a drawer: if the roller guides “cling” under the bottom, then the ball guides - along the center of the side.
The dimensions of ball guides for drawers according to the installation holes also follow the “32 system”.
When choosing ball guides for a drawer, pay attention to the size, metal thickness and load-bearing capacity of the mechanism. Thin telescopic mechanisms are more designed for installing pull-out shelves with low and medium loads. More “powerful”, wider in size are suitable for deep chest of drawers up to 900mm wide.
The design of the drawer and its internal contents can also vary in size and functionality. You can read about this here.
Ball guides for drawers: selection of parts
The set of components we are interested in consists of:
- left telescopic skid;
- right telescopic skid.
Each of the mentioned runners is also divided into two component segments.
Please note: do not assume that ball bearings can only be installed on commercially manufactured furniture. No, in fact, they can be installed on furniture made by yourself, but you will first need to find out its parameters and purchase suitable parts according to them. The fact is that the guides differ from each other in many different parameters, among which thickness is of particular importance.
Each parameter of the components must be selected by carefully measuring the piece of furniture being assembled.
The depth of the drawer on which installation will be carried out must be equal to the length of the part we select, however, we must take into account that between the back wall of the piece of furniture being equipped and the back wall of the drawer, When installing guides, it is necessary to leave a minimum gap of 1 centimeter.
Also, when selecting guides, it is necessary to take into account the thickness:
- the retractable mechanism itself;
- the outer walls of our box.
In addition, do not forget about adding a technological gap that compensates for the inaccuracies you made when measuring. Using this gap will subsequently provide the drawers with completely free movement. Most often, the value of this technological parameter is approximately a millimeter.
Adjustment of drawers using this type of guides is carried out in two planes
The width of the drawer is calculated by subtracting the following double values:
- thickness of the outer part of the walls;
- the thickness of the mechanism itself;
- the size of the gap left.
The same parameter as the length of the box will be limited by the free space at our disposal. However, it is much easier to calculate it, because all you need to do is reduce the free space by the size of the next gap.
In order to carry out the measurements we need, we will first have to install the drawer in the cabinet box according to all the rules, and then we will be able to adjust it, make the markings correctly, and subsequently properly hang the guides.
Telescopic guides for drawers are modern fittings that allow you to effortlessly open even massive structures. Would you like to learn in detail about the installation of telescopic guides and the correct calculation for their installation? Read the special article.
Video - Ball guides. Installation
Roller guides for drawers, dimensions for installation, nuances of choice
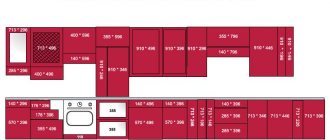
The dimensions of the roller guides for drawers and storage systems are selected according to the depth of the niche in which they are planned to be installed. In this case, the assembled box should be at least 10-20mm smaller in depth. For example, in a cabinet with sidewalls 420mm deep, guides 400mm long are selected.
The size range of roller guides for drawers is presented in sizes from 250mm to 550mm (rarely more, up to 600, 650 and 700mm) in increments of 50mm.
There are mounting holes along the entire length of the rails. The distance between them obeys the well-known rule for cabinet furniture, called “system 32”. Its essence lies in the multiplicity of distances for installation to the number 16/32 - 64, 96, 128, etc.
One part of the rail with a “corner” shape is attached to the drawer, with a grip on the bottom, and the second – to the inner side of the wardrobe.
When choosing roller guides for a drawer, it is important to take into account not only the length of the rails themselves, but also the quality characteristics of the mechanism itself:
- Metal thickness. The majority of breakdowns occur due to insufficient rigidity of the rails. Drawers fall out of their grooves, bending them with their weight. To prevent this from happening, when choosing, pay attention to the thickness of the metal. It is optimal for shallow (up to 300-350mm) and low (up to 200-250mm along the facade) drawers to choose roller guides with a thickness of 1mm. For everyone else - 1.2-1.5mm.
- Load bearing capacity. Roller guides for drawers are the most inexpensive mechanism on the market. Cheapness is also determined by the obviously low requirements for ride quality, weight loads, etc. The dynamic load on the roller mechanism should not exceed 10-20 kg, taking into account the weight of the box itself (depending on the size, a drawer can weigh 3-7 kg).
If you are planning to make drawers in a wardrobe or dressing room with a larger load and quite voluminous in size, it is better to choose an equipment option among ball pullout systems. They will last much longer and will not irritate you with harshness, squeaking and noise when moving.
How to install ball guides on drawers with your own hands
So, we have come to the moment for which, in fact, you were looking for this article. It involves learning how to independently install ball guides on drawers for a cabinet or other piece of furniture. So let's get started.
Drawer on ball guides
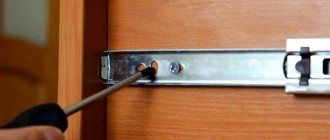
Step No. 1 – make markings for fittings
So, first of all, you need to make markings for the fittings being installed. It is done using a pencil and a ruler, since we need to mark the axis passing strictly through the central part of the box.
First of all, we need to draw an axis under the guide
After this stage is completed, we move on to the next one.
Step No. 2 – Attach the component runner to the marked side of the drawers
So, we have drawn the axis along which the parts will be installed. Now you need to place a guide rail on it so that the front edge of this part is flush with the façade of the furniture segment being equipped. However, you need to carefully ensure that the part does not bulge forward, since in this situation it is quite possible that a gap will appear, which we do not need at all.
Pay attention to the runner. The regulating holes cut on it will help us place it correctly. They are small and oblong.
The required adjustment holes are needed in order to correctly secure the runner relative to the box.
Using the discovered holes, we align our runner strictly along the marked axis. This is easy to do: just line up all the holes with a line so that it clearly runs through their center.
Then we insert a self-tapping screw into the hole located horizontally on our part. Now we can move the runner back and forth without changing the position of its segment.
Adjustment hole responsible for the direction of movement up and down on the back of the drawer
We secure the rear segment of our runner through the gap responsible for the movement of the box along the vertical axes. This will be necessary in order to subsequently be able to adjust the height of the box by following the next few simple steps.
- Using a screwdriver or screwdriver, remove the self-tapping screw from the front hole, which is responsible for the horizontal movement of the box.
- We will re-screw the same self-tapping screw, however, into the front hole, which is responsible for the movement of the box along the vertical axis.
Duplicate adjustment hole for the “up and down” direction, for the front segment of the cabinet part being equipped.
Then we get that the part will subsequently be attached to the drawer by means of two adjustable holes located both in the front and in the back of the drawer, responsible for movement it along the “up-down” axis.
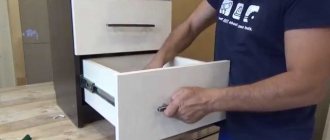
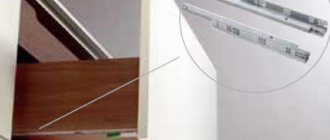
Step No. 3 - installing the guide directly to the side of the box
Now, in order for our device to work and the drawers to slide out, it is necessary to attach the second part of our guide system to the inside of the cabinet box, inside which the drawer is then installed.
The mounting hole, inside of which a self-tapping screw is placed, is of the most common type, round
Only here you need to take into account one important point: unlike the segment of the guide system that attaches to the side of our drawer, the part that goes into the box has much more adjustable holes. And in addition to the gaps through which the system can move along the axes of interest to us “up and down” and “forward and backward,” they also have other grooves of the horizontal and vertical type, into which screws also need to be screwed.
Mounting hole and adjustment grooves, the presence of which must be taken into account when installing this part of the guides
Attach the guide and adjust it, thus inserting screws as in the previous step into only two holes so that the box fits inside the correct box. Once you are sure that everything is installed and adjusted as intended, remove the boxes again and screw the screws into all the holes of the box parts.