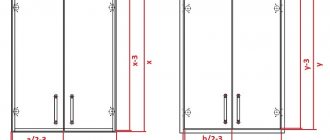
In the modern furniture market you can find many types and designs of drawers. But what we are interested in now is not their appearance. No matter how high-quality the guides are and no matter how high-quality the assembly is, there are many cases when problems begin to arise over time. Most often this happens
- when the load is exceeded
- incorrect installation of guides
- exceeding the effective service life
- deformation of individual parts during operation
The problems cited relate to the mechanics used in modern furniture to pull out drawers. There are fewer problems with the box itself and its design. Let's look at them first.
Reasons for the breakage of the chest of drawers
No matter how well the chest of drawers is assembled, there are many reasons why problems with the design may arise. Most often, the internal guides of the box fail. The reasons for its failure are:
- Exceeding the permissible load.
- Incorrect installation of guides.
- Exceeding useful life.
- Deformation of some parts of the structure due to improper use or transportation.
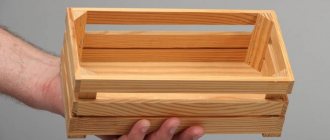
The frame of the box itself can break, although this is much less common. The most vulnerable place is the bottom of the box. Most furniture makers skimp on this design space and connect the bottom to the sides of the drawer. This greatly simplifies the production technology, and the background becomes a load-bearing part, taking on the role of a part that forms the geometry of the frame.
The cause of the failure in this case is insufficiently strong fastening of the bottom to the structure. The bottom is secured with small nails at the front and back of the box, and is held in place by guides on the sides. The design works well for a while, but over time the nails become loose. The bottom is starting to peel off. Troubleshooting is not that difficult.
Bottle holder for the kitchen - a wonderful idea
For the kitchen, the main thing is the functionality of the interior. Correctly and optimally organized kitchen space promotes quick cooking, a good mood, and, therefore, the prepared dishes become more healthy. Various storage methods help to properly organize your workspace in the kitchen: drawers, cabinets. Any housewife, when preparing a variety of dishes, uses sauces, oils, spices, which she stores in bottles and jars, stuffed in cabinets and the refrigerator. So you have to rush around the kitchen, wasting time and energy. Smart people have long come up with a wonderful device - a bottle holder for the kitchen . What kind of device is this and is it possible to make this miracle with your own hands? Let's figure it out.
DIY process of repairing a chest of drawers
Damaged furniture must be repaired as soon as possible. Further exploitation will lead to even greater destruction. Peeling of furniture veneer is often observed. The coating gives the headset a pleasant appearance. The furniture does not fall apart or become deformed. Often, due to high humidity in the room, the top layer of the chest of drawers becomes covered with cracks and swellings. The material then peels off.
In this case, it is necessary to repair the chest of drawers as soon as possible, before the inner layers of wood begin to warp. First of all, the peeled veneer must be ironed through a sheet of paper.
If this measure does not produce a visible result, then you will need to make a small file along the wood fibers. After this, lift the edge of the veneer and coat both sides of the file with glue. Any adhesive that protrudes beyond the edge is immediately wiped off with a sponge. It is recommended to treat the seam with stain. The final step is to coat the file with clear varnish.
Replacing guides
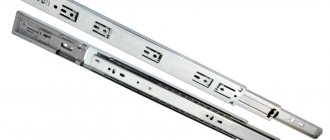
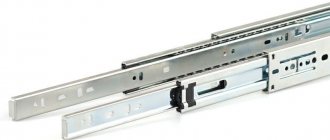
In most cases, pull-out panels and furniture drawers are equipped with roller guides. They have only two support points (roller) located on the supporting part of the structure. For this reason, the guides are not very reliable and often fail.
Such accessories are best replaced with ball elements. Its design consists of a solid central block in which small balls are located. These guides are almost impossible to install incorrectly. They allow the drawer to be pulled out completely and firmly locked in the closed position.
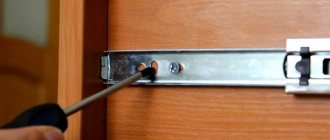
To change the slides, you must first remove the drawer and remove the old accessories. Such fasteners are fixed with 2-3 screws.
Important: the ball guides must be parallel to each other. This is the most difficult and important aspect of installation.
To do it right, first mark the dresser and drawers. Using a building level, make sure that the fasteners are positioned strictly horizontally. Having aligned the guides, secure them with 15 mm screws.
Repair of the frame itself
Repairing drawers is easy. To restore the bottom, you will need to remove the old support. After this, the bottom with supports is drilled along the perimeter. The fasteners must touch the sides. It is necessary to ensure that the geometry of the structure does not change. Therefore, the sides of the box are pierced with staples sequentially.
The drawer doesn't close all the way
Hello! In this short post, I want to solve the problem of many novice furniture makers. Sometimes I read interesting questions, one of which sounds something like this: “How to install a drawer with telescopic guides into a box?”
The fact is that when the drawer is inserted into the box, when closing it (the drawer), some resistance is observed. And this is natural. But the following may also happen: when closing the box, the front part of the movable plate (containing holes in which metal balls are located) may “bite”, that is, it will be slightly deformed (bent). In this case, how much this part bends, how many balls will fall out of it.
This problem is solved simply: the plate takes its original shape using pliers (of course, the dropped balls are put in their place), after which its front ends (those that were bent) are pressed against the guide itself as far as possible with the same pliers.
In order to correctly insert the box with telescopes, you need to observe the following points:
- Those parts of the guides that are attached to the box itself should be pulled out of it as much as possible.
- The moving plate with balls (which we talked about above should also be shifted forward as much as possible - from the box to the outside).
- When a drawer is inserted with its guide rails into the corresponding places of the guides, which are fixed on the box itself, you need to make sure that the drawer does not warp when it slides inside the box. It should go straight in.
- At a certain stage, slight resistance may appear. If the drawer slides smoothly, then you need to apply a little force, the latches on the guides will work, and everything will go like clockwork.
Here, in brief, are the main points of working with telescopic guides.
Biglis
I am also of the same opinion. especially after watching videos on YouTube - when telescopes are placed with an inclination of 5-7 degrees and it works as a closer - it moves in smoothly on its own. To close my drawers, I put in 7-10 kg of force to push them in or out. My wife can't cope at all..)
100% that the drawers are wider than necessary, or the cabinet is too narrow for the drawers, which is the same thing.
To overcome this, you need to arm yourself with a jigsaw and reduce them, or look for other guides, although now this is problematic.
Misalignment is a consequence of incorrect manufacturing or assembly of furniture.
If you assembled it using the finished holes, but it does not fit as expected, then you will have to find out what is causing this. The simplest thing, if these are guides (the most common mistake of additive operators in factories), is to check the position of the receiving skids (they must be screwed in the same way). If there is a difference, then re-drill the holes for the screws on one receiving slide to the distance that the drawer does not close.
Types of repairs
Recovery operations are divided into three classes:
- adjustment;
- make repairs;
- complete renovation.
Products need adjustment after purchase and after complete restoration of the previous one. And here we mean setting up mechanisms, looping, adjusting levels, fixing dangling handles. It happens that you want to repair a chest of drawers by simply updating a design that has become boring or has lost its freshness. Then they move on to cosmetic restoration, based on the current condition and the desired result. A complete renovation means returning the functionality of parts of the furniture and replacing elements that are not the subject of restoration.
Replacement parts
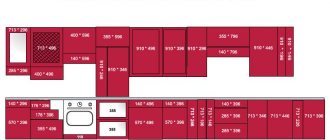
I measured the length of the parts and went to a furniture fittings store
In the store, the guides were of different lengths; it took less than a minute to select the appropriate part.
Rails for drawers are sold in pairs, that is, there are two parts: the one that is attached to the body and to the drawer. And a pair costs about 70 rubles. Pairs are divided into right and left, this is important!
Each pair is marked. R will mean the right part, L, respectively, the left
Detecting the Problem
The problem was very acute.
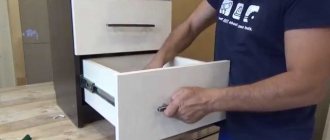
The middle drawer stopped moving out completely and was very crooked. Outwardly, everything looked bad, and it’s not so much the appearance, but the fact that every day I had to strain over this chest of drawers, shaking the drawers to get things out. After pinching my finger one more time, I decided enough was enough! It's time to take matters into your own hands. I started looking for the problem. I had to take out all the boxes and inspect the guides.
The reason for the misalignment was discovered almost immediately - these are the plastic rollers on the right side
This part of the permanent load simply collapsed. It's strange that this happened on one side.
The second left side of the guides had completely intact rollers
The worn out rollers were in the bottom and middle drawers of the dresser.
As it turned out, the rollers themselves cannot be replaced, only the entire part. For other actions I had to unscrew both guides, or slats, as they are correctly called. In addition, these things had to be unscrewed both from the chest of drawers and from the drawers themselves.
Attach the front part
Once the new piece is installed, drill holes for screws to attach the drawer face and handles. It's much easier to do this now while the drawers are still in place. To attach the new piece, drill a couple of small pilot holes on one side, then insert the screws. You just need to attach them, then it will be easier to attach the front panel.
Installation of new guides
My enthusiasm knew no bounds. I immediately started attaching the bottom. But then it suddenly became clear that for some reason the holes for the screws did not coincide with the new part, and screwing them into an untouched place, screwing them inside a narrow box, was not the most pleasant task.
The screwdriver slipped out of my hands with difficulty, and the screws continued to fall
And then I remembered that there was a screwdriver in the house. Yes, I can use it! First, I inserted a small bit into the screwdriver to make small indentations for the screws.
The tip of the screw easily fit into these gaps and did not fall out or twist easily.
It was, of course, easier to screw into the boxes than into the case
All that remains is to put the finished boxes in place and enjoy the flawless work.
Perfect fit without distortion or gaps
It took me three and a half hours to do all the work, including going to the store. Most of the time, to be honest, was spent on my clumsy attempts with a screwdriver. If I had just pulled out the screwdriver it would have been faster. So if you have such a tool at home, learn how to use it and use it, it will definitely come in handy.
Installation of roller elements
When the markings have been made, they move on to attaching the guides.
Work begins with the box. Apply the strip to the marked line so that the roller is located at the back wall. Attach it to the bottom using self-tapping screws. It is advisable to pre-drill the holes for them: if you tighten the fasteners right away, the chipboard or wood may split. Then screw the second pair of planks to the furniture body, aligning their position along the marking line.
When assembling furniture, you must ensure that both rollers simultaneously enter the track.
How to fix a dresser drawer with a cut-in bottom?
The second type of fastening the bottom to furniture is a mortise bottom, which is usually plywood glued to the walls of the box. Manufacturers rarely use this fastening method, but it does exist. Such a fund rarely causes problems and in most cases they arise due to its destruction. So, if manufacturers used laminated chipboard for the bottom of the chest of drawers, then you will probably encounter a situation where the glued sections are torn out of the grooves. Of course, they can be laid using the methods described above for attaching the false bottom, but it is still better to change the chipboard sheet.
What is not necessary to repair pull-out chests of drawers?
We learned how to quickly and easily fix a drawer that keeps wiggling and falling out. In some cases, there is no other option but to completely replace the bass. Let's look at what is not recommended for doing this job:
- Nails. You should forget about this option, as it is not suitable at all. Today, only lazy people use nails to repair their furniture. Because wood can change its original shape over time, the nail heads will come out and damage the guide mechanism. No matter how long the nails are, they will not hold the structure as firmly as, say, construction staples.
- Glue gun. It is not suitable for one simple reason: the glue does not hold the bottom of sliding furniture well, since it cannot withstand so many heavy loads. When using hot glue to repair a drawer, you may encounter the problem of the composition leaking from below.
Technical Tips
The main differences between economy furniture and middle-class furniture are the materials and fittings used.
Well, to expensive furniture, design and branding are also added as differences. Inexpensive furniture can be “modified” by replacing the fittings that come from the factory by default. Of course, we are not talking about replacing it with Blum or Hettich - we offer inexpensive accessories from the Russian-made Boyard factory. Despite the low cost, it performs the necessary functionality and lasts a long time.
What are the advantages? The doors do not slam, but are quietly closed. The drawers move smoothly over their entire length and are also adjusted if necessary. Such a system not only adds comfort to use, but also provides functional benefits - it’s convenient to view the contents of the drawers.
If you decide to assemble it yourself , you will most likely have questions :
- The additive on the sidewalls does not line up with the mounting holes on the ball guides
- How to attach a slide to a drawer
Below is a short photo report in which we tried to highlight these issues.
Frame repair
Since the chest of drawers itself is a load-bearing structure, it is subject to increased requirements for strength and stability. Ideally, it is recommended to pull out the chest of drawers on slides, disassemble the parts, and replace dry or cracked panels. Before tightening furniture bolts, it is important to thoroughly coat the joints with PVA glue so that they do not come apart later. After the glue has dried, restoration begins. And to do this, the old coating is removed using a solvent with methylene chloride (leaving it to act for a maximum of half an hour), or removed with a spatula, knife or emery board. Then the defects are puttied, the surface of the chest of drawers is sanded, thoroughly cleaned and degreased, after which a new selected coating is applied (varnish stain, varnish tint, varnish paint, decorative film).
Why do you need a door closer: operating principle
A door closer is a device that allows large and heavy doors to close smoothly and quietly. The closer is often installed on doors in rooms with very high traffic.
Thanks to the closer, entrance and interior doors close tightly immediately after the leaf is released, which allows you to save heat or coolness inside the room.
In addition, closers significantly extend the life of door locking devices. The principle of operation of the mechanism is quite simple. The main working element of the device is the spring. When the door is opened, it is the door that contracts and accumulates energy, which returns the door to its original position. An oil shock absorber allows the door to close smoothly and silently.
Door closer allows large and heavy doors to close smoothly and quietly
Some door closers have more than one shock absorber, but several, but this does not change the principle of operation.
The type of closer determines the mechanism that drives the operating spring. Thus, gear-driven closers and devices with a sliding rod are distinguished.
Solving problems with the design of dresser drawers
Drawer repairs often involve correcting the bottom or front fastenings. With a ceiling installation, you remove the boxes, remove any old nails or staples from underneath, and then nail the panel into place with new fasteners. With a mortise bottom (a sheet of plywood or HDF is placed in grooves in the side walls), the boxes are disassembled, the grooves are thoroughly cleaned, the bottom is replaced with a new one from a suitable material and the grooves are hammered. A facade that is loose or in need of replacement is unscrewed, coated with PVA in places of contact with the front and side walls of the box, and then screwed or nailed with pins (chops) using new fasteners.
Sources
- https://mebiq.ru/repair/remont-komoda/
- https://VideoSort.ru/interer/kak-vytashchit-yashchik-iz-komoda.html
- https://HouseChief.ru/remont-yashchikov-komoda-svoimi-rukami.html
- https://sdelay-mebel.ru/kak-zamenit-napravlyayuschie-na-vydvizhnom-yaschike/
- https://viavim.ru/remont-vyidvizhnyih-yashhikov-komoda.html
- https://DachaMoya.ru/tehnika-v-bytu/kak-razbiraetsya-napravlyayushchaya-dlya-yashchika.html
- https://StabMarket.ru/stiraem/kak-razobrat-teleskopicheskie-napravlyayushchie-dlya-vydvizhnyh-yashchikov.html
- https://mebel-25.ru/svoimi-rukami/zamena-napravlyayushchih-v-komode.html
- https://mebel-furnitura-omsk.ru/v-gostinoj/vydvizhnoj-yashchik-ne-zakryvaetsya-do-konca.html
- https://DecorObot.ru/bytovaya-himiya/kak-razobrat-sharikovuyu-napravlyayushchuyu-dlya-yashchika.html
- https://shkaf-info.ru/remont-vydvizhnogo-yaschika-svoimi-rukami/
- https://mebel-expert.info/gotovaja-mebel/sborka-mebeli/kak-ustanovit-napravlyajushhie-dlya-vydvizhnyh-yashhikov
- https://VseMe.ru/pochinka/komoda
The best furniture fittings manufacturers
Among the manufacturers most in demand on the furniture fittings market, the top lines of the ranking belong to foreign companies. Russian importers of Chinese products have also proven themselves well:
- The world-famous Austrian brand Blum (pictured) has conquered markets in more than 20 countries over almost 70 years of existence. The company began its journey from a blacksmith shop that produced horseshoes. In 1958, the first furniture fittings were released. Blum offers high-quality door closers of various types and price categories. It is worth paying attention to the lifting mechanisms and devices for retractable systems offered by the manufacturer.
- German fittings Hafele also occupy a leading position in the world market. The company has been operating since 1923. Eco-friendly, energy-saving production allows us to set reasonable prices for products. Of interest is the line of mortise shock absorbers, spring and gas lifts for facades.
- Hettich fittings are produced in Germany and are deservedly popular among consumers. The assortment includes products from economy to luxury class, a wide selection of furniture hinges with built-in closers. The site has the option of designing a furniture set layout with the selection of the most suitable fittings.
- The Siro brand in Russia sells accessories produced at a factory in Italy. Among the products, numerous groups of mortise closers and compact lifting mechanisms stand out. All products undergo testing and quality control in an international certification concern.
- The manufacturer Vauth-Sagel specializes not only in the manufacture of fittings. At plants in Germany, wire and sheet metal are processed. This ensures high quality material for the production of furniture components.
- The domestic company Boyard (photo on the right) sells products made in China. The assortment includes budget-friendly, high-quality fittings. It is worth studying the representative's proposals if you need hinges with a built-in closer or closers for drawers.
- The TBM company represents Chinese products under the Firmax brand. All products are tested in our own product testing center. In the company's retail outlets and online store, you can safely purchase hinge closers and components for retractable systems at affordable prices.
Mechanism of action
According to the principle of operation, closers are:
- Gas (pictured). The door closes freely until it touches the stem. The rod penetrates the dense gas environment of the sealed chamber, slowing down the movement of the door. Air or nitrogen is used as a filler. The average service life of gas devices is 5 years.
- Polymer. The mechanism of action is similar to the gas version. Instead of gas, a liquid polymer filler based on silicone is used. In terms of durability, they do not exceed gas ones.
- Oily. From the beginning of movement, the door or drawer immediately acts on a spring enclosed in a capsule with oil. The oil slowly flows into the adjacent chamber. The speed slows down and the entire closing cycle occurs smoothly. Oil shock absorbers are more durable, lasting up to 10 years. They are more expensive than gas or polymer ones.
Gas-filled closers are used for folding structures. Oil devices are used for drawers, swing and sliding doors.
Important! When using oil devices in unheated rooms, difficulties may arise in the operation of the closer. Oil becomes thicker at low temperatures.
Lifting mechanisms
Furniture closers for the kitchen, used for hinged doors, are included in a separate category. Such doors can drop down or swing up.
There are four types of kitchen lifting mechanisms:
- Spring. A metal spring helps to pull or push the door. The design of the device is simple and rarely fails. It is not possible to leave a door ajar with a spring shock absorber; it must either be closed or completely open.
- Spring-oil. There is a spring in a sealed chamber filled with oil. By contracting, it overcomes additional resistance and ensures a slow, even opening of the door.
- Pneumatic (gas). Smooth running is achieved by displacing air from a closed, impenetrable capsule with a special rod. A pressure difference occurs in different parts of it.
- Electrical. Complex programmable mechanisms with electric drive. Allows you to set the opening speed and maximum angle. The doors close automatically after a specified period of time. They open by pressing the facade or touching the handle.
Updating facades using improvised means
If the listed measures are insufficient and the question arises of how to update the kitchen, take more decisive action.
- You can make a new door from a chipboard panel with your own hands. To do this, select a shield of the same color and pattern, which is not difficult. The shield should have a thickness of about 20 mm. Then the chipboard panel is cut exactly to the size of the old door, the door is cut out, and sockets for the hinges are drilled into it using a milling cutter with a diameter of 35 mm. Then you need to glue the edge to the ends of the sash, attach the hinges and install the cabinet door back.
- Making a door from MDF is a little more difficult, but it is possible (the same as updating an MDF facade). It is impossible to make a facade with an acrylic panel or photo printing - this requires special equipment.
- A great way to update a cabinet with your own hands is veneering. The material is produced on an adhesive basis, and to repair the sash, it is enough to cut out the part of the required size with a craft knife and attach it to the chipboard panel. The material holds up well if ironed.
- Self-adhesive film is a more than affordable method of updating furniture; it can serve as an alternative to photo printing if you stick a film with an image on it. The old film is removed and the new one is glued to the surface. The coating is adhesive-based, so you just need to smooth the material to prevent bubbles from appearing.
You can use paper impregnated with urea resins. The technology is the same, but in this case it is recommended to cover it with furniture varnish.
- Painting the facade: the facades are removed from their hinges, handles and closers are dismantled, and sanded.
8. articles: 5.00