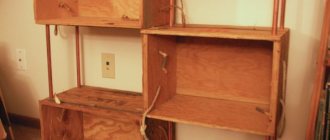
Calculation, production and assembly of drawers "
Assembly is assembly, but in order for hand-made furniture to please the eye and soul, it is necessary not only to assemble it efficiently, but also to correctly calculate the dimensions of the parts. If we talk about drawers, then it is very important that a well-assembled structure slides easily and naturally along its guides, without the irritation of having to make an effort to pull out the drawer. Also, it’s not very pleasant when a drawer falls through because the opening is somehow wider than it should be. Of course, it becomes a little sad when the drawer does not slide in completely because it is longer than necessary. All these problems can arise if you incorrectly calculate the dimensions and indentations during the design process of furniture, namely drawers. Therefore, let's first figure out the dimensions and indentations, and only then we will proceed directly to the manufacture and assembly of drawers.
Even though roller guides and ball guides are “two big differences,” they have a lot in common. For example, they have common size ranges and also have the same installation clearances. Simply put, calculating the dimensions and offsets for installing drawers on roller guides has the same parameters as for ball guides.
Calculation of the external dimensions of the box
- Height
There is no clear approach to calculating the height of a drawer.
Typically, the height of the drawer is calculated relative to the total height of the cabinet and the number of drawers, the height of the facade, or based on the characteristics of the furniture design. However, there is a generally accepted standard for calculating the height of drawers. And if you want to have an additional chance to make high-quality furniture with your own hands, then it is better to use the formula: Front height - 40 mm = drawer height
This will provide additional opportunity for “maneuver” during the installation of drawers and adjustment of facades.
- Width
The width of the drawer is calculated using the formula:
External width of the drawer = internal width of the cabinet - clearance on the guide *2 (two guides) where,
Internal width of the cabinet = external dimensions of the cabinet – chipboard thickness*2 (two walls)
As a rule, the gap for the guides is 13 millimeters (on each side of the drawer).
- Depth
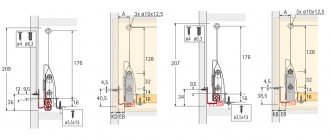
Drawer depth = guide length
Standard guide lengths: 250 mm, 300 mm, 350 mm, 400 mm, 450 mm, 500 mm, 550 mm and 600 mm. The length of the guide cannot be greater than the internal depth of the cabinet. That is, if your cabinet has an external depth of 500 mm, and the chipboard thickness is 18 mm, then the internal depth of the cabinet = 500 mm - 18 mm = 482 mm. This means that a guide with a length of no more than 450 mm must be selected. But in this case, the loss of “usable space” will be 32 mm. Therefore, the external depth of the cabinet is always designed taking into account the length of the guide. The diagonals of the box must be equal.
Read the article “Types of guides”
How to calculate the dimensions of cabinet doors and drawers
The front part requires utmost attention - after all, it is the quality and finishing of the doors that determines the design and “status” of the furniture. It is important not only to choose beautiful facades, but also to correctly calculate the dimensions of the cabinet doors, with uniform gaps for trouble-free opening. Errors in calculations are unacceptable, because most often it will not be possible to redo the facade, you will have to order it again. This means time and additional costs.
You can read how to calculate the fronts for a wardrobe here. This article will describe the process of calculating the sizes of swing doors and drawers for cabinet furniture (including kitchens).
Calculation of bottom dimensions and groove dimensions
The bottom of the boxes is most often made of LDVP or HDF with a thickness of 3 - 5 mm.
The smooth side of the sheet should face the inside of the box. For large boxes it is better to use 10 mm chipboard. When attaching the bottom, the question usually arises - which bottom is better: overhead or in a groove? A false bottom is a cheaper, simpler and faster method. But if you spend a little more time and effort and insert fiberboard into the groove, it will immediately improve the appearance of your furniture. Fastening on the external surface spoils the appearance, and the absence of external fastening is good form when making furniture. So, if you want your furniture to always please your eyes, then insert fiberboard into the groove. To attach the bottom of the drawers, you need to prepare a groove in all 4 walls. Groove width 4 - 4.5 mm, depth 8 mm. A high-quality groove is made using milling equipment. You can order this service from us. You can find out the cost of the service here.
Calculation of the dimensions of the bottom of the box:
Bottom width (mm) = outer drawer width (mm) – chipboard thickness (mm) × 2 + 15 mm, Bottom length (mm) = outer drawer length (mm) – chipboard thickness (mm) × 2 + 15 mm
How to choose the right guides?
When choosing guides for your furniture, you should pay attention to a number of factors. Due to them, the design ensures silent and smooth opening/closing of the drawer, which can be installed in a wide variety of furniture. When choosing guide structures, pay attention to the following recommendations:
- Installation will be significantly more complicated if the dimensions of the guides do not match the dimensions of the furniture.
- When purchasing guides, pay attention to the thickness of the metal structure (at least 1 - 1.2 mm).
- The appearance of the part must be perfect, without scratches or deformations.
- Make sure that all necessary accessories are included in the kit.
- When choosing tandem boxes, make sure that you can handle the installation yourself. This is a specific design that is installed by specialists.
The choice of guides should be taken seriously, since not only the service life of furniture elements, but also safety and ease of use will depend on your choice. Take our advice into account and choose quality items.
How to attach a front to a drawer
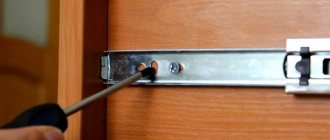
The first thing to do is to connect the front and the drawer together. To fix the front on the front wall of the box, it is better to use 4 pieces of double-sided tape measuring 20 x 20 mm in each corner of the wall.
The façade should not be glued to a larger size adhesive tape, because... When you subsequently separate the front and drawer, you may damage them.
Secure the facade with tape. To more accurately fix the facade to the drawer, it is better to apply markings to the inside of the facade.
Screw the front to the drawer from the inside of the drawer using fasteners. It is best to use self-tapping screws (with a countersunk head) or confirmats. If you use self-tapping screws, you should first prepare holes for them. The holes should be less than the thickness of the fastener - usually 70% of the diameter of the fastener. For laminated chipboards with a thickness of 18 mm, self-tapping screws 3.5 x 30 are used. When using confirmats, pre-drilling holes for them is not required.
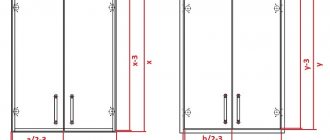
Dimensions of beveled end cabinet doors
Often a row of kitchen or wardrobe cabinets ends with an end module with a beveled door. Its width is calculated by analogy with the previous option with the only difference.
wailing wall temple mount
Initially, you also need to calculate the width of the opening. Here you need to be prepared that the basis will not be a regular triangle with equal legs.
Add 8-10 mm to the resulting opening width, depending on the thickness of the sidewalls. This is necessary so that the facade is covered by the end and it does not “look through” against the general background of the single façade part.
Advice! Do not try to calculate the dimensions of the radius front for a cabinet with a concave or convex shape. As a rule, this is useless - most manufacturers limit themselves to producing standard shapes of certain sizes. Here they act from the “opposite”: they find out the dimensions of the door and design a cabinet for it (or use ready-made diagrams, usually developed by the manufacturers themselves). And the remaining modules are “adjusted” to the resulting corner.
Assembling the box
The process of assembling a drawer may vary. For example, we offer the following scheme:
- Attach the side walls to one of the front walls of the drawer,
- Insert the bottom of the drawer into the groove,
- Attach the second front wall,
- Attach the facade to the front - front wall,
- Attach the handle to the facade,
- Attach the guides to the side walls of the groove. Roller guides need to be attached at the bottom of the drawer; ball guides can be attached both at the bottom of the drawer and in the middle.
See further article “Installing roller guides“
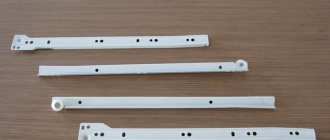
What types of drawer guides are there?
Guides are special mechanisms used to remove drawers from furniture. Today you can find a huge number of varieties of guides, with various accessories: handles, hinges, legs, etc. All accessories for guide structures can be divided into 7 types:
The guides themselves are also divided into several types. They differ in the principle of operation, method of fastening, design and, of course, price.
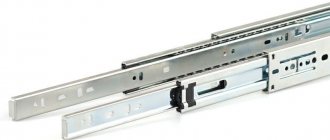
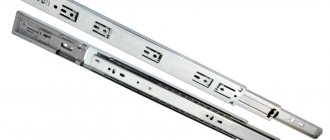
Roller guides
One of the most popular and cheapest guide options. Roller guides for drawers were developed more than 20 years ago, but this design is still in great demand today. They have a number of advantages:
- The roller does not require special care - the design does not require lubricants.
- The drawer slides out smoothly and silently.
- There are no problems with installation - you only need a few screws and a screwdriver.
The design is based on a mechanism of two strips, one of which is attached to the inner side of the furniture, and the second directly to the drawer. This mechanism is made of plastic, so the roller will not withstand massive structures and will quickly fail. The heavier the box, the worse the smoothness. The main advantage of this design is that it is inexpensive and easy to install. There are several popular reasons why the mechanism quickly fails:
- The top screw does not tighten. Oddly enough, this is a very popular mistake and it occurs very often. As a result, the plank is deformed and the structure completely or partially fails.
- The gap between the drawer and the guide is not made correctly. If you do not fix the bar well, then at one wonderful (or not so wonderful) moment the box may simply fall.
Today, roller guides are used only in economy-class furniture and only in furniture that will be subject to minimal loads. The range of roller guides is shown in the image.
Ball guides
The sizes of ball guides for drawers vary from 17 to 45 mm. They, like the roller mechanism, provide a smooth ride, but are able to withstand much larger loads (up to 36 kg). Ball-type telescopic guides can be equipped with closers. There are no special notes on the installation of the structure, but to disconnect it, you will need to press a special latch.
ball guides
Guides with closer
A unique technology, which, in fact, is an improved version of ball guides. But compared to the previous design, this mechanism is equipped with a closer and dampers. The closer is needed to pick up the drawer in a certain position, after which it will automatically close smoothly.
In essence, the damper guarantees that the drawer will close smoothly and silently, in addition to acting as a shock absorber. Withstanding significant loads, the design with a closer is considered one of the most reliable among guides.
Full extension design
This design is based on a special ball bearing, which ensures smooth opening of any drawer cabinet. But if we compare it with the previous design, which essentially closes on its own, in this case you will have to apply some effort.
This design should be installed very carefully, because if you make mistakes during installation, you can damage the integrity of various parts, as a result of which the mechanism will simply fail. The thickness of the drawer guides should not be less than 1 mm. Planks of size 0.7 do not last long.
Concealed design
Installation of this structure, even for experienced craftsmen, takes a lot of time. But the demand for this fittings continues to grow, as it is convenient to use. Especially if it is equipped with a closer.
Thanks to the fact that the guides are installed under the bottom of each drawer, the effect is created as if the structure is floating in the air. In addition, the design is reliable and is particularly smooth and free of unpleasant sounds.
This fitting is installed only on wood products, but today you can find products made from chipboard and MDF that are equipped with this mechanism. The design can withstand loads of up to 50 kg.
Reverse action guides
The design is similar to the fittings. which is equipped with closers. But the difference is that the drawer opens with a light hand press on the front. The guides are not equipped with handles or recesses for control, which allows you to install the box in any part of the furniture. Most often used in modern furniture.
But this design is not suitable for equipping children's furniture. The fact is that a drawer equipped with reverse-action guides will pull out abruptly and can injure the child. In turn, pushing the drawer will require some effort.
Metaboxes and tandemboxes
This design appeared on the market recently, but the demand for it is only growing every year. The peculiarity of these guides is that they are mounted inside the metal side wall and are equipped with a closer and dampers.
The design of the structure will fit into any interior, and due to its reliability it can last for many years. Without marking devices, difficulties may arise during the installation of the structure. The fact is that if it is not possible to accurately determine the location of the guides, the box will be positioned crookedly.
Tandem boxes are used, most often, in luxury interior items, which are made of natural wood or other expensive materials.
Corner sets
Such kitchens require a special approach when installing and choosing furniture. There is a wide variety of sizes of corner facades and cabinets, but they need to be chosen in such a way that they coincide with straight ones in terms of the main parameters.
Characteristics of mounted models:
Main properties of floor cabinets:
A special feature of the lower row of the headset is its installation, which is carried out after the installation of the upper elements. At the same time, you need to ensure that the placement is symmetrical so that the floor products do not go beyond the wall-mounted ones.
Types of kitchen fronts
Before purchasing furniture for your home, you need to decide on the type of facades that will be used. Today, manufacturers offer two types of fronts - standard and non-standard. Each of them has its own advantages, so it doesn’t hurt to understand how these categories differ.
Facades made according to individual calculations are a more flexible solution for renovation. They allow you to realize the customer’s own ideas, use the space in the room more intelligently, and also fit better with non-standard-shaped furniture. However, you should be aware that the cost of such work may be a third more expensive, and the production time will increase by several days.
Standard facades are quite suitable in most cases when there is no need to make any special design for the room. They are cheaper, easier to design, and easy to add components and other parts to. Modern furniture companies try to take into account the needs of users, so they produce products for various types of premises - with different arrangements of walls and ceilings, the presence of niches and recesses, large or small dimensions. Therefore, for a kitchen with a conventional layout, it is enough to simply purchase ready-made factory facades.
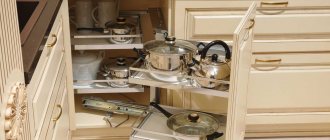
If the cabinets in the kitchen cling to each other
What to do if the cabinets in the kitchen cling to each other and the fronts of the drawers rub against each other?
This problem is often encountered among kitchen furniture customers and causes a lot of trouble for homeowners. When opening or closing, retractable drawers cling to the edges of the drawers located above or below and do not allow full use of these convenient and irreplaceable kitchen modules. Indeed, in narrow cupboards (front height 140-176 mm) we place various small kitchen utensils: for example, cutlery, which we use most often. Such kitchen drawers usually contain a tray for forks and spoons. In large cabinets (176-356 mm) we usually store dishes that we need in everyday cooking. Cabinets touching each other can render kitchen facades made of solid wood, kitchens made of plastic and any other material unusable in a short period of time. Chips and abrasions appear especially quickly on the ends of rather vulnerable kitchens made of painted MDF. And if you look at this problem on a global scale, who would like to pay a significant part of the family budget for kitchen furniture, and then experience significant inconvenience due to facades rubbing against each other. This article is devoted to solving this problem; here you will find tips on how to prevent such unpleasant situations even at the stage of ordering a kitchen. Many people believe that the gaps between kitchen facades should be minimal. They say that in cabinet furniture - cabinets, sets for hallways and sideboards (chests of drawers) for clothes, the gaps between the cabinets are made minimal, almost imperceptible. However, compare the weight that is applied to drawer systems for wardrobes with the weight that is applied to roller or ball guides, metaboxes or tandem boxes in the kitchen! In kitchen modules we store massive dishes, packages of cereals and other heavy items. Accordingly, all guides of the cabinets must be secured especially carefully. Unfortunately for ordinary people, many kitchen furniture manufacturers adhere to the principle of maximum savings. In fastening the guides, which require screwing in five screws, many hurrying and economical furniture makers prefer to screw in only two screws. And Kitchen.bel masters encounter this problem everywhere when providing the service of replacing kitchen facades. Many entrepreneurs do not care about ensuring the long service life of their product, pursuing, alas, very mercantile interests. When customers have questions about rubbing cabinets, such furniture market figures are very reluctant to respond to complaints, trying to blame consumers for improper use of kitchen furniture.
Chest height
The chest of drawers is a low cabinet with drawers. The standard height of this piece of furniture is from 85 to 160 cm. Products exceeding these dimensions are called a cabinet. This height of the chest of drawers allows you to place vases, photographs, table lamps and other decorative items on it. Drawers are great for storing linen, children's clothes, toys, dishes, towels, shoes and other things.
Standard sizes
Typically, a chest of drawers has a depth of 50 cm, a height of about 130 cm and a length of 85-130 cm. From the point of view of practicality and functionality, these dimensions are ideal.
Advantages of a chest of drawers of this size:
- Thanks to the standard height of the chest of drawers, maximum stability is maintained when opening the top drawers.
- The drawers are comfortable to use: they slide out easily and contain all the necessary things. It is worth keeping in mind that the depth used is reduced exactly by the thickness of the rear wall.
- A standard chest of drawers includes from 2 to 5 drawers, but their number can increase, and the height of the drawers may vary. Products with 4-5 compartments are the easiest to use - this number of drawers allows you to get convenient access to all things placed inside. Sometimes designers prefer to divide the compartments lengthwise, rather than increasing their number in height. Thanks to this solution, it is possible to place 2-3 drawers on the same level.
- One hundred and twenty centimeters is enough to place a TV, photographs, useful gadgets, accessories and decorations on the tabletop. The traditional height is comfortable from an overhead viewpoint for a person of average height.
- A dresser length of less than 0.5 m is not very convenient, and if the figure exceeds 1.3 m, then it becomes necessary to purchase a modular design. Such dimensions can cause difficulties when placing furniture in an apartment with a standard layout.
Standard sizes of kitchen cabinet fronts
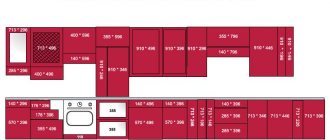
It is always cheaper to buy facades of standard sizes than to order non-standard ones. It's also faster: custom ones will have to wait for them to be made, while standard ones can be purchased in stock. Therefore, when designing a kitchen, we start from a table of standard sizes of facades. The result will be significant savings. With the right approach, non-standard facades will only be needed for end modules. Which, however, can be made in the form of open shelves.
The layout of standard sizes of facades on kitchen cabinets can be more clearly represented in the drawing.
It is also recommended to take a tabular form from the manufacturer in advance - for example, Ikea’s standards differ significantly from the generally accepted ones. And already design the kitchen based on what you have.
By the way, kitchen facades can be equipped with almost any furniture in the house: good options can be selected for making children’s rooms, wall slides in the living room and other low cabinet furniture.
Source