Skinali is a very broad concept. This includes all decorative panels - for walls, ceilings and furniture, which use glass and photo printing. In addition, the Russian consumer is accustomed to classifying any glass wall panels in the same category - plain, covered with film, painted, etc.
But no matter what design option is chosen, you can install the panels yourself.
Installing skins: rules and nuances of installation in the kitchen
Skinali is a very broad concept. This includes all decorative panels - for walls, ceilings and furniture, which use glass and photo printing. In addition, the Russian consumer is accustomed to classifying any glass wall panels in the same category - plain, covered with film, painted, etc.
But no matter what design option is chosen, you can install the panels yourself.
Varieties of skinali
You need to choose a material for a kitchen apron taking into account not only the design, but also the characteristics of the room itself.
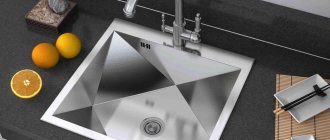
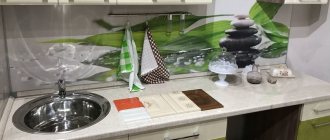
- Glass panels - this means they are made from tempered glass, since regular glass is too fragile and dangerous: if damaged, it crumbles into sharp fragments. Hardened is much stronger, and fragments, if any appear, have rounded edges and are much less dangerous. In the photo they were made of tempered glass.
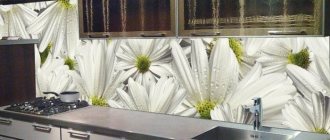
Photo printing on such glass is extremely durable and perfectly conveys color. The image is chosen to suit your taste - in the company catalog or on a video with samples of work.
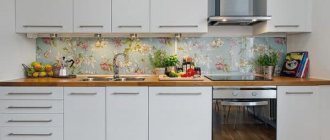
- Plexiglas - more precisely, panels made of acrylic and polycarbonate. Photo printing on them has the same advantages, but the material itself is somewhat different. While superior to silicate glass in strength and safety, plastic tends to deform when heated. This option is recommended for kitchens with an electric stove or induction hob. The photo below shows acrylic panels with photo printing in the kitchen.
- MDF. Making an apron from laminated MDF or with photo-printed material is a fairly popular option. MDF is relatively resistant to moisture and is not prone to swelling like regular wood. However, the service life of such panels is much shorter.
- Chipboard is not the best option for sheathing boards, as it is noticeably more sensitive to moisture. For the skinali, chipboard laminated on both sides is used. This is a budget, but short-lived option, and you can only choose it as a temporary solution.
- Laminated plywood . A material is used that is laminated on both sides to prevent the absorption of condensation that appears in the gap between the wall and the panel. In the next photo it was made from laminated plywood.
Plywood is even more resistant to moisture than MDF, but images are rarely formed on it. As a rule, this is an option for kitchen interiors in rustic, rustic or classic styles.
Skinals are attached in several ways. The method is determined by the size of the apron, the condition of the wall and the desire of the kitchen owners. Installation depends little on the nature of the material.
Some restrictions
Real skinals are made to order, as they involve photo printing. Sometimes they try to replace the panels with ordinary glass, with a vinyl film glued to the inside. The appearance of such an apron is quite decent, but the durability is much lower. On the other hand, this option can always be updated by replacing one image with another, while photo printing can no longer be removed from the surface of the glass. The photo shows vinyl film under glass.
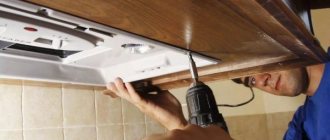
- Installation of the skin is possible only after installing the headset. Moreover, it is desirable that the dimensions of the product be determined after assembling the furniture. The following video looks at how to take measurements for panels.
- Before ordering, it is necessary to determine exactly how the skins are supposed to be mounted: whether the railing will be installed (the latter is attached to the wall through the glass), whether there are sockets and switches in this area. All holes for fastenings and accessories must be made in advance at the manufacturing stage.
- Triplex, that is, two- or three-layer panels, where the film with the image is located between layers of glass, does not allow the formation of holes. In this case, the skinals can only be attached with glue or in a profile, and the sockets and switches will have to be moved to another part of the wall.
Preparatory work
Glue installation requires a perfectly flat wall. Installation using a mount or profile is less demanding. But still, height differences of more than 1 cm on the wall are unacceptable.
- The surface of the area is carefully leveled. If the apron is angular, you need to make sure that the angle between the walls is 90 degrees.
- Covers for sockets and switches are dismantled. The rosette cups are extended to a length equal to the thickness of the skinal – 6–10 mm. It is preferable to leave this work to a specialist.
- The width and length of the panels are quite large, especially when the apron is made as a single structure. Care must be taken to remove pieces of furniture from the “path” and, if possible, empty the kitchen. You need to be especially careful when delivering the apron.
Installation skinned
Most often, the panels are mounted on special glass holders. Firstly, in this case there is no need to level the walls so carefully. Secondly, dismantling is much easier than installing with glue.
Installation of kitchen apron panels.
- The glass or MDF plate is pressed to the area where it is attached, and the fixation points are marked, which will facilitate subsequent installation.
- Holes are drilled in the wall for a plastic dowel - 6 mm. If the apron in the kitchen is mounted on drywall, then use a butterfly dowel.
- The dowels are driven into the holes.
- The panel is pressed against the wall so as to align the holes and places where the dowels are attached. The glasses of sockets and switches must fit exactly into the holes intended for them.
- Installation of a corner kitchen begins with the fragment that is placed end-to-end against the wall, and then a slab is attached that rests on the first one.
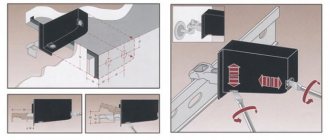
- Silicone bushings are inserted into the holes to prevent contact of the screw with the glass, and then a brass bushing with threads is inserted. Screw in the self-tapping screw to its full length. Do not tighten the fasteners: the glass may be damaged. Pay attention to how the panels are secured in the video.
- Self-tapping screws are masked with decorative caps.
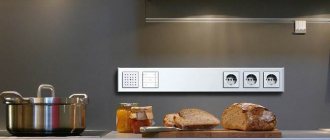
The seams between the panels, if any, are sealed with silicone sealant. The photo shows the fastening of the caps. - A glass apron is often combined with lighting - this adds glamor.
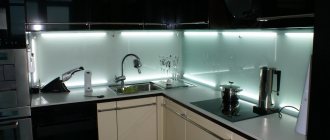
The backlight is LED and should be mounted following certain rules. The distance between the diode strip and the panel with photo printing must be at least 70 mm, between the backlight and the triplex - at least 30 mm. - Install removed covers for sockets and switches.
The installation of the skin is presented in the following video with all the details.
Installation with glue is technically very simple and boils down to uniform application of silicone glue or liquid nails to the surface of the slabs. The difficulty is that the glue must be applied during the process, and not in advance. Therefore, first, the skins are placed on the tabletop, checked to see if the dimensions match, then the product is tilted at a certain angle and glue is applied to the entire surface. The panels are then pressed down and left to dry.
The following video provides more information about this method of fastening, however, even after watching the video, you will not be able to become a good installation specialist.
Installing a glass apron is not particularly difficult, especially if you watch the video instructions, but it requires accuracy and the participation of at least one assistant. The panel is quite heavy, and when fastening it must be held tightly to prevent slipping or damage.
10. articles: 5,00
Source: https://idealkuhnya.ru/steni/fartuck/ustanovka-skinali.html
Sequence
Installing security panels is a complex process. Therefore, before installation and selection of surfaces, you need to familiarize yourself with the basic rules:
- After tempering, glass cannot be cut. Therefore, pictures for kitchen skins are chosen for a long time. You cannot change them if you wish.
- Mounts for illuminated skins cannot be drilled. The panel is put on with self-tapping screws, since the glass is destroyed by the drill.
- The glass apron is installed last. Initially, the room is decorated, furniture is brought in, wall cabinets are hung, the bottom row of furniture is installed, and only then the panel is glued. This sequence is very important. With a pre-installed backsplash, the kitchen may not fit into the parameters. And the already installed set allows you to choose the correct placement of the decorative panel.
- If you want to replace the old protective zone with a glass apron, you do not need to make preliminary repairs, change the design or remove furniture. The panel is attached to the place of the old apron.
Installation was thrown onto the kitchen apron
The wall in the kitchen at the point of contact with the hob and the worktop area is traditionally covered with a decorative kitchen apron.
Since during cooking, splashes of oil and fat fly from the stove in different directions, this decorative element should also perform the function of protecting the wall from contamination. At the same time, the kitchen apron itself must fulfill the requirements that are placed on it. It should be:
- Heat-resistant - in the hob area it will have to withstand high temperatures.
- Environmentally friendly - when heated, some materials emit harmful or even toxic substances.
- Non-porous - oil and grease, as well as other types of contaminants, should accumulate on the surface of the kitchen apron, and when washed and cleaned, they should be easily washed off, leaving no traces of their presence, thereby preventing the development of bacteria and fungi.
- Beautiful - it should fit perfectly into the furniture set and into the entire kitchen as a whole.
A wonderful decorative element meets all these requirements.
Glass apron for the kitchen
Sufficient detail about decorative glass protection is written in the website article “Glass thrown onto a kitchen apron.” Glass kitchen skins - this is what this type of finishing is called.
In this publication we would like to offer you step-by-step instructions on how to install an apron in the kitchen.
Let's start with the fact that the installation of kitchen skins begins after the furniture set, appliances and fixtures are finished. In general, when all the things necessary in everyday life take their rightful places.
The wall in the planned location for installing the glass splashback in the kitchen should be smooth, dry and without visible damage. If something does not correspond to the parameters described above, bring them to these.
Now you need to decide on the fastening method. Installation of a glass apron can be done in several ways:
- Direct gluing.
- Installation on frame.
- Fastening with special screws with decorative plugs.
The first method of installing the skinal requires ideal evenness of the base - an error of 2 mm is allowed at a distance of 2000 mm. The other methods are not so demanding and will not even require dismantling the old coating if its thickness does not interfere with the installation of the kitchen skin.
Step 2, measuring the space for installing the kitchen apron
This operation is the most important in the entire installation process, since the overall appearance of the kitchen after completion of work depends on it. Therefore, I recommend approaching this event with a high degree of responsibility.
To be more precise, write down the measurement results on the sketch of the future product, this will make it easier for both you and the manufacturer to navigate the manufacturing process.
Take measurements using a tape measure. Transfer each result to paper and do not hesitate to measure one area several times. This way, you will avoid mistakes and waste of money on re-production.
Measure the locations of electrical outlets and all kinds of wall-mounted fixtures with special care. Make a mistake by a few millimeters and all is lost - the shelf, for example, will no longer take its place on the kitchen apron.[adsp-pro-25]
Having determined the dimensions of the glass frame, think about how this or that image will look on your wall.
The manufacturer can offer a lot of options, but you will also have decent still lifes and landscapes in your personal photo album. The only condition for transferring personal images to a kitchen apron is the high resolution of the images.
Step 3, installation of an apron in the kitchen
The first thing you should do, regardless of the method of attaching the apron in the kitchen, is to try on the kitchen apron delivered to you at the installation site. If the holes you ordered on the glass coincide with the corresponding technological holes in the wall, we proceed to the next stage.
For any installation method, without exception, turn off the power from the electrical outlets, remove them from the mounting cups and dismantle them, leaving only the wiring outside.
The principle (once a year and the stick shoots) has not been canceled, so I recommend insulating the exposed wires.
Now the installation for each method will be individual.
Direct gluing
This method is not suitable for all types of images printed on glass. In some cases, the glue may be visible from the outside, and this, as you understand, is not very cool.
In any case, you should consult with the manufacturer whether this or that type of glass can be attached to adhesives.
Apply the glue not to the kitchen aprons, but to individual sections of the wall in small tubercles. Bring the glass sheet to the surface of the wall, pull the electrical wiring out and, pressing lightly, press the kitchen apron to the adhesive.
It is more convenient to lift the glass using special suction cup handles. However, they must be used for any installation method.
Frame installation
This installation method will be appropriate if you plan to make lighting behind the glass surface or end lighting. A separate article on our website, “Installation of a backlit glass apron,” will be devoted to this method. I recommend that you familiarize yourself with the sequence of work in this article.
Fastening with self-tapping screws with decorative plugs
This method is the most popular.
Additional holes are made in advance in the glass prepared for this fastening method. When you first try on the kitchen apron for installation on the wall, make marks through these holes.
According to the markings, drill technological holes in the wall and mount the plastic part of the dowel in them. Insert silicone seals into the holes, which are included in the fasteners for the skin. They will not allow the glass to come into contact with the metal of the screw.
Otherwise, any careless movement or excessive zeal when fixing the skin on the wall can lead to the formation of chips and cracks on the glass kitchen apron.
Now put the kitchen apron in its rightful place and fix the canvas with self-tapping screws, and mount decorative plugs on them.
The end of the installation process will be the return of electrical sockets and any shelves with hooks to their places. Accordingly, light cleaning with trial household chemicals won’t hurt either.
Congratulations, you have installed a glass kitchen splashback yourself. Enjoy its magnificent appearance, and if you get tired of it, dismantling it won’t take much time. And the question they asked about how to install it is closed for you today.
Source: https://remlegko.ru/ustanovka-skinali-na-kuhonnyj-fartuk.html
Necessary tools and wall preparation
Of course, repairs and finishing of the kitchen interior can be ordered from a specialized organization, but many apartment owners prefer to do this work themselves.
To mount a glass apron you will need:
- electric drill;
- screwdriver;
- vacuum handles for carrying glass;
- pencils or markers;
- building level;
- glue or liquid nails if installation is done using the adhesive method;
- fasteners similar to those used to install a wall mirror - screws, dowels, spacers and decorative plugs;
- hammer;
- wooden slats, measuring about 2x4 cm.
The surface under the glass apron must be absolutely flat. If installation is planned mechanically, the wall may have some roughness, not more than the size of the gap.
Installation of kitchen skins
The area between the countertop and wall cabinets is called the work area. This place is most susceptible to contamination, so not every finishing material will be suitable. To protect and emphasize the design of the room and furniture, a so-called MDF kitchen apron is used.
Advantages and disadvantages of MDF skins
MDF is a medium density fiberboard. It is produced in the form of slabs made from the finest shavings mixed with thermosetting resins - it is from this material that kitchen aprons are made.
Externally, they look like a kind of kitchen MDF panel with a thickness of 3 to 12 mm, which is also called skinali. It has good quality characteristics: the plate is tensile strength, withstands pressure up to 29 MPa, moisture resistant, practical, durable.
It is also used in the production of furniture and packaging, in repair and construction work.
Skinals are also produced from glass, chipboard and other materials, but it is the MDF surface that can be milled, three-dimensional patterns and geometric shapes cut out, covered with decorative protective films, varnished and subjected to other types of finishing. For example, varnish treatment not only gives it a glossy look, but also protects it from direct exposure to water.
In addition to external advantages, a kitchen apron made of MDF has the following advantages:
- Resistance to temperature and humidity changes;
- A wide range of colors and decors for natural stone, marble, textiles, wood, ceramic tiles and others;
- Ease of cutting and installation;
- Easy to care for;
- Low cost.
A dark apron goes well with light furniture
Of the minuses, we note:
- Excessive flexibility. If the fastening is done poorly, the panel may bend or become deformed.
- Instability to some chemicals and high temperatures, as well as mechanical damage.
- Non-repairable. Scratches caused by sharp objects are almost impossible to remove. In addition, if severe damage occurs or defects appear, the entire slab will have to be replaced.
Features of selecting an MDF apron
Kitchen panels can be purchased both from furniture manufacturers and furniture sellers. As a rule, buyers are offered either a solid MDF board up to 3 m wide, or cut into strips of 25-30 cm. But it is better to select the height individually.
I want a kitchen like this
Source: https://stroyvolga.ru/%D1%83%D1%81%D1%82%D0%B0%D0%BD%D0%BE%D0%B2%D0%BA%D0%B0-%D1% 81%D0%BA%D0%B8%D0%BD%D0%B0%D0%BB%D0%B8-%D0%B4%D0%BB%D1%8F-%D0%BA%D1%83%D1% 85%D0%BD%D0%B8/
Varieties
At first glance, the skins do not differ from each other. But that's not true. Mirror aprons are divided into types depending on the material of manufacture and the method of applying the pattern:
- Thick glass. A self-adhesive film with any ornament or design, which is selected based on the style of the kitchen, is applied to the back side. A glass kitchen apron can be made without film. But in this case, a drawing is written on the back side using oil paints.
- Tempered glass. In this case, the ornament or design is applied using photo printing. It is extremely difficult to do this at home due to the scarce material. To apply a picture, ultraviolet paints are required, the use of which allows the picture not to blur.
- Triplex. The drawing is protected by glass on both sides and is located “inside”. An apron made using this technology is the most durable.
- Mirrored. Organic in small spaces. Mirrors visually enlarge the space.
- Matte. They are practical and mask traces of dirt.
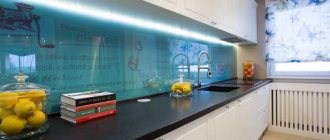
- Illuminating. Unusual panels. Additional lighting in the kitchen adds coziness and comfort.
- Transparent.
- Painted.
- Colored.
- With photo printing.
Choose any design you like or make it to order
They told me how to mount it
Skinali (glass panel) can be made from 260x260mm to 3300x2140mm.
What kind of glass is used to make the skinali?
Our company prefers to use tempered glass. Thanks to special heat treatment, such glass increases its strength by 5-7 times. Skins made from such glass are not afraid of temperature changes. And in the event of destruction, they break up into hundreds of small and safe fragments without sharp edges. Often, when creating splashbacks for the kitchen, we use clarified Optiwhite glass.
Optiwhite glass differs from its analogues in that it does not have a characteristic greenish tint - it is completely transparent. Thanks to this, the panel provides the highest quality color rendition of the design applied to it, and also emphasizes the natural color of the image.
How thick can a skinal be?
The selection of thickness is directly proportional to the size of the apron. If the panel is up to 1 meter long, then glass with a thickness of 4-5 mm is suitable. For longer panels we recommend using 6mm glass.
How are the skins attached to the wall? Which option is better?
- Mounting the panel with stickers - this method of fastening is undesirable for a number of reasons (the wall must be absolutely flat, high-quality dismantling of the skin will be impossible).
- Fastening the panel with glass holders - this type of fastening is considered the most reliable. In this case, you will not need a flat wall, and dismantling such a panel will be as quick as possible.
What is the difference between UV printing and printing on self-adhesive film?
Our company uses only UV printing, since the design applied in this way is not afraid of overheating, does not fade in direct sunlight, and is practically impervious to moisture.
DIY installation and production of a glass apron
Self-adhesive film is subject to all of the above factors.
When can a glass splashback be installed?
The kitchen apron can only be installed after installing the kitchen wall cabinets. Until this moment, you need to decide on the size of the apron and the places where the fasteners and sockets will be located. Cutouts for sockets or switches are formed at the stage of creating the skin.
How to prepare walls for installation?
No special preparation is required to install the skin. The only condition is a flat wall. The apron can be installed on top of wallpaper or even tiles.
Is it possible to install sockets or fittings on the skinali?
This option is possible. When creating an apron, various cutouts are made on the panel for attachments or sockets.
How are sockets installed?
The cover from the mounting box is installed on top of the glass
Is it possible to measure the skin yourself or should you call qualified specialists?
We recommend using the services of professional installers. Our employee will not only be able to take accurate measurements, but will also assess the possible difficulties of subsequent installation.
If you have the necessary technical skills, you can take the measurements yourself. The permissible error is no more than 1mm. The measurement must be accompanied by a kitchen plan (top view). In this case, the designer will be able to evaluate all the nuances.
Also, do not forget to mark the holes for the railing or sockets.
What is railing?
Railing English - crossbar. This is a long thin pipe on which you can install small shelves or hang kitchen utensils.
What are the requirements for images applied to a glass panel?
We accept image mockups created in Photoshop or Illustrator in TIFF, EPS, JPEG formats; scale 1:1. Color scheme: CMYK.
The file size is at least 1.5-2MB but not more than 300MB.
The image resolution when printing must be at least 150 dpi.
Is it possible to slightly modify the selected image?
You can make any adjustments you like, we will mirror the image, render it in black and white, change the background and much more.
Can the color scheme on the finished panel differ from the image on the computer?
Of course, the color of the kitchen apron differs slightly from the image on your monitor. It all depends on the color gamut of the image and monitor settings. In any case, we recommend doing a color proof.
Why do you need a color proof?
The color proof serves as a sample for reproducing the color of the skin. Its dimensions are 300×200mm
How long does it take to complete an order?
After the surveyor arrives and a 50% prepayment is made, the production time for the kitchen panel is 8-10 working days.
How to place an order?
Choose an image (individual or from our catalog), then leave a request on the website or call us. Our specialists will coordinate with you the date and time of the surveyor’s arrival or clarify your order.
The quality of the future glass panel for the kitchen is, of course, determined by the type of source material and the image application technology. But even the highest quality skins will not last long if they are not securely attached to the wall.
There are two main types of attaching a glass apron to the wall:
- Fastening the panel with standard glass holders;
- Installing the panel with glue.
As for the first option, this is the most common method of installing a glass kitchen apron and this is what our specialists use when installing the splashback. Its essence is that through holes are drilled along the perimeter of the panel.
Typically, such holes are made in the four corners of the glass sheet. The exception is panels that are too long, for reliable fastening of which you need to drill a few additional holes, or an apron of an unusual shape.
Using self-tapping screws, the skins are screwed to the wall, and the top of the screws is closed with decorative plugs.
This type of fastening of a glass apron has three significant advantages. Firstly, it is considered the most reliable and allows you to securely fasten a glass panel of any size and shape. Secondly, this method does not require a perfectly flat wall; you can even install an apron on top of old wallpaper or peeling paint (of course, if this does not distort the color of the skin). Thirdly, such a panel can be easily dismantled if necessary.
The only downside is the protruding parts of the plugs. But, as a rule, they have a beautiful shape and add an additional decorative accent.
Kitchen skinali can also be placed on glue. In this case, there is no need to drill any holes in the panel, which greatly simplifies and speeds up the work. But at the same time, it is necessary to have a perfectly flat wall, painted in light neutral colors.
How to install skins yourself?
Glue is applied to the back of the apron and the sheet is glued to the wall using a special suction cup. The panel remains perfectly flat and smooth.
But our experts strongly do not recommend using this installation method. The thing is that, if necessary, a glass apron attached to the wall with glue cannot be dismantled without damage.
All of the above methods for installing a glass panel have their advantages and disadvantages; they differ in the appearance and functionality of the finished product. It is up to the buyer to decide which method to choose. And our specialists will quickly and efficiently carry out installation or give individual recommendations for installing a kitchen apron.
Installation of kitchen skins
Along with the appearance of your new kitchen, the task arises of correctly designing the kitchen hose.
.
Our company offers the most practical and modern option - glass skins
.
Skinali
– this is an opportunity to make your kitchen comfortable, and at the same time unique.
After all, a design for the skinali
either from our catalog or place your image on the glass apron for the kitchen. This could be a photograph or a drawing.
One condition: the image for the glass skinal must be vector.
Glass aprons for the kitchen are very practical to use; you only need to wipe them periodically and that’s where all maintenance ends.
In this article we will not tell you about the advantages and advantages of glass frames for the kitchen
, although they are enough for several articles. The purpose of this article is to tell you how you can install skinali in the kitchen yourself.
We do not only manufacture kitchen aprons
, nor their installation.
However, if you want the overall price of kitchen skins
to be lower. You can take care of the kitchen splashback installation yourself.
There are several options for installing skins.
1) The skinali is installed 1-2 cm below the tabletop.
2) The skinali is installed end-to-end with the tabletop.
3) The skinali is attached to the wall using special fasteners - hardware.
4) The skinali is attached with glue.
In this article we will show and tell you how to attach a kitchen hose made of glass with fasteners butt-to-the-table.
Step-by-step guide to installing a glass frame in the kitchen
1) You need to start the installation by preparing the wall for installing the kitchen apron. The wall should not be lumpy, uneven, or with bends.
Manufacturing
Glass skinals are sold ready-made and made to order. But the option to order is more relevant and in demand, since you can choose the desired color and pattern.
At home, only protective zones are created from thick glass using self-adhesive film.
Initially, measurements are taken and glass of the required size is cut out. There is no need to squeeze additional glue onto the surface. This is the most common mistake many beginners make. A film is applied to the glass and slowly glued. Using a rag, the pattern is smoothed to avoid the appearance of bubbles under the film.
Glass kitchen skins are made using photo printing. Before printing, measurements are taken from the working area. This is an important aspect, because after tempering the glass, it can no longer be cut.
Next, the design chosen by the person is printed. A photo pattern is glued onto the pre-tempered glass using glue. After this, the skins are considered complete and ready for installation. In order to complement the apron, you can attach glass crafts with your own hands to the front side. But it is worth considering that the glued elements cannot be heavy or massive. Otherwise, they will interfere with the cooking process.
Regardless of what material was used, a self-adhesive film for glass with a pattern or a printed pattern on a special printer, liquid metal nails will be required to attach the mirror surface.
Installation was easy - you just need your hands and liquid nails
Making a protective surface with your own hands requires having the skills and abilities to work with glass. This is a complex and time-consuming process that requires patience and endurance. Initially, the glass is cut and tempered, and only then ornaments and designs are applied to it.
Disadvantages of MDF
Before you start purchasing and installing an MDF apron in the kitchen, you should consider its shortcomings.
Perhaps they will become an obstacle to purchase. So:
- Negligence in care will affect the MDF board. She will be led or bent. The same applies to high humidity - you cannot mount MDF panels directly near the sink - it is better to install tiles there. The stoves must be equipped with hoods to prevent drops of condensation from settling on the surface of the apron.
- Material is flammable. This is important if the owners are planning to completely cover the wall from the edge of the set to the edge. Mandatory external control is required if a heat supply source is mounted on the wall - a gas boiler, for example.
The disadvantages are serious and should not be neglected. If, nevertheless, there are no prerequisites for future damage, then it is worth trying to create something new in the interior.
Dark furniture with an original pattern on the apron looks beautiful
What are the benefits of MDF decor panels, disadvantages and advantages
The MDF wall top is a thin, flexible sheet covered with decorative plastic or PVC film. Most often this is an imitation of the texture of stone, textiles or a fantasy design.
Manufacturers of postforming produce MDF decor panels for kitchen aprons with a standard width of 600 mm and a length of 3050 mm. The material can be easily cut to the desired length. The ends of such false panels remain untreated. It is difficult to glue them with an edge due to their thin thickness (usually 4-8 mm). Therefore, if the kitchen design project involves an open edge of the wall panel, you need to provide some design option. The easiest and cheapest way is to use plastic genesis for laying tiles. It can be matched to the color of the kitchen false panel and pasted during wall mounting.
The obvious advantages of wall-mounted kitchen decor panels include:
- Easy to install . Thanks to the flexibility of the material, it can be easily installed even on not very smooth walls, smoothing out finishing imperfections.
- Availability. MDF kitchen false panels are inexpensive. But this is a bit controversial. Since they are sold in “pieces” of 3050x600, it is important that the material consumption is as waste-free as possible. If a kitchen requires, for example, 4 linear meters of a kitchen apron and the remaining 2 meters cannot be used anywhere, then the savings are very doubtful. Budget tiles will cost less.
- Durability. Like plastic countertops, kitchen aprons are quite practical: easy to clean, reasonably resistant to moisture, heat and mechanical stress.
- Variety of decors. The assortment allows you to choose a kitchen false panel to match the color of the countertop, or to play with some other option. For example, use imitation wood to match the color of the cabinet or kitchen facades. Or choose an interesting design.
- Easy to care for . MDF wall tops with plastic and PVC lining are easy to clean and keep clean.