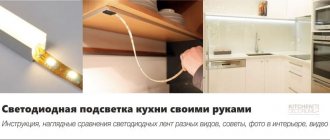
Strip lighting
The convenience of work and the appearance of the interior depend on the correctly selected and positioned lamp. LED lighting for the kitchen work area is becoming increasingly popular. It is a continuous flexible tape dotted with small point diodes, on which the degree of illumination of the room depends. The optimal number of points is considered to be 100-120 diodes per linear meter.
Decorative lighting for the kitchen space
If the functional task of the main and additional light in the kitchen is to provide comfort while staying and preparing food, then decorative light serves to diversify and create additional comfort in the interior.
When choosing the light temperature, you should focus on the purpose of the room being designed. So, for kitchens, “cold” light should be provided for the work area and the main source. It's invigorating.
Warm yellow light is a theme for relaxation. If the kitchen space is spacious enough, then this light can be used to designate an area for relaxation and coffee.
Thanks to innovations and design solutions, decorating a kitchen with light can be both familiar and creative.
- A glass table or shelves with backlighting can be obtained by running a white or colored LED strip along the contour.
- Tempered glass cabinets with lighting around the perimeter of the doors will create the illusion of another window or stained glass window.
- The texture of the wall, emphasized by light, according to lighting designer Polina Gubonina, will create an unforgettable and unexpected effect. If the kitchen has walls with imitation brickwork, panels or decorative stone, then it is easy to lay a thin LED thread in the grooves between them. Then the decor will have an additional function - lighting, like a linear lamp.
- Emphasis on details - this can be easily achieved if a mounted or built-in point source is placed above an art exhibit. The light beam will seem to snatch an object from the general space.
- Built-in light in drawers and cabinets can be correlated with both functionality and decor. And this is also a nuance that will definitely surprise guests.
- Nika Kryzhanovskaya (director of NK Interior Design) recommends emergency lighting, which will be located along the path from the kitchen to the room or to the corridor. It is worth equipping such a source with a motion sensor, and it will light up and go out at the right moment.
Advantages of using diode lamps
Modern types of lighting are superior in their parameters to outdated incandescent lamps, energy-saving lamps and other lighting devices.
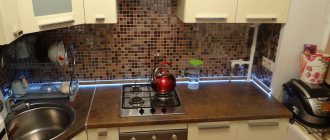
Storage area lighting
Storage areas include: refrigerator, cupboards, pantries, built-in niches, etc. - everything that is used for storing kitchen utensils and food.
Here you can also use various lamps (ceiling and wall), sconces, and LED strip.
Product selection
Wide range of colors. Lamps for illuminating the work area in the kitchen are produced in all colors of the rainbow palette, from milky white to muted yellowish and cold blue.
At the customer's request, the flow of emitted light can be static, programmable depending on the time of day and daylight.
Step-by-step instructions for connection
As an example, we will look at one of the many options for installing an LED strip. If you understand the principle and sequence of actions, then any other types of lighting will not be a problem.
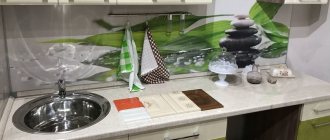
Illumination of the work area in the kitchen
For installation, an LED strip with a power of 9 W/m is used. linear
Tape and power supply
The power of the power supply is selected depending on the length of the tape. To protect against mechanical damage and contamination, the tape is inserted into a special corner profile, which has a matte screen for uniform dispersion of the LED light flux along its length and a wire for power supply.
Profile with diffuser and wire
The tools you should prepare are an electric drill or screwdriver, a grinder with a metal disc, a soldering iron with all accessories, a degreaser, wire cutters, a screwdriver, a mounting knife, self-tapping screws and measuring tools.
Tools
Prices for popular models of screwdrivers
Screwdrivers
Step 1
. Remove the plastic light diffuser from the profile and drill holes for hardware on one side.
Drilling holes for hardware
The diameter depends on the fastener, the distance is approximately 40–50 cm. We specifically chose the option of fixing the profile to hardware; it is very reliable, although it requires more effort.
The profile will be fastened with hardware
Professional electricians categorically do not recommend mounting it with liquid glue; there is a high probability that over time, due to the influence of high humidity, the structure will come off with all the unpleasant consequences.
Step 2
. Screw the profile to the bottom of the wall-mounted kitchen furniture.
Fixing a profile
Practical advice. A little longer, but much more effective, before screwing it into the bottoms, drill holes of a slightly smaller diameter than self-tapping screws.
The fact is that the vast majority of furniture is made from laminated chipboard, and these boards crumble when screws are screwed in; you cannot install a self-tapping screw twice in the same place. If it becomes necessary to correct minor errors, problems will arise. It is much easier, after drilling holes in the profile, to place it in place, transfer the pitch of the holes to the furniture, and then make holes along them.
Step 3
. Prepare the profile for a corner connection, if such a need is caused by the design features of the furniture above the desk.
How it's done?
- Accurately measure the length of the required profile. Be sure to take into account the size of the plug, otherwise it will protrude slightly beyond the plane of the cabinets.
- Carefully trim the element. When cutting, do not overheat the metal and do not allow the decorative coating to burn.
- Prepare a hole of the appropriate diameter at the location where the power cable is connected.
Profile measurements and markings
Profile cutting
Drilling a hole for the wire and attaching a section of profile to the cabinet
Continue installing all remaining profiles using the same algorithm.
Step 4
. Solder the LED strip to the power cable, be sure to pay attention to the polarity.
Soldering the tape
There are special marks on the tape, and the wires have different insulation colors. Standards regulate the color of only two wires: ground (green with yellow streaks) and neutral (blue). Phase wires can have different colors, they are established by industry regulations.
How to solder LED strip
Wires are soldered to the tape
The current supply wire must be hidden behind the back walls of kitchen wall cabinets.
Step 5
. Glue the tape to the inner surface of the profile.
Important. Despite the fact that the profile seems clean and does not require preliminary preparation before gluing, it must be degreased.
Profile degreasing
The fact is that the technology for producing rolled products in bending machines uses technical lubricant. If it is not there, then microcracks and roughness will form on the metal surface. The lubricant layer is very thin, invisible to the eye, but it has a negative effect on adhesive compositions - adhesion indicators decrease by an order of magnitude. There is a risk that the tape will peel off and fall onto the diffuser; in some places its glow will become much brighter than the average length. This position does not have a negative impact on the performance characteristics of the lighting, but the appearance suffers.
Step 6
. Glue the tape to the profile.
Gluing tape
Remove the protective tape step by step and press the lamps tightly. The excess length must be cut off. Keep in mind that you only need to cut according to the marks. If it's a little longer, that's okay, bend the excess.
Step 7
. Reinstall the diffuser and install the plugs.
Diffuser installation
The plug is on
Step 8
. Connect the power supply. It can have different sizes and appearance; such factors do not influence the installation process. The power supply is connected in several stages.
- Remove the front housing cover. Behind it are terminals indicating the polarity of connecting the LED strip power wire.
- According to the polarity, firmly connect the wires to the terminals.
- On the other side of the power supply there are three terminals: ground, neutral and phase. Screw the power cable wires to them.
- Install the device in an unused space of the kitchen furniture. Most often it is placed next to the hood fan.
power unit
Turn on the backlight, if everything is normal, then you can safely use the device.
Using lighting in the kitchen work area
LED lighting is used not only in the kitchen. For example, tapes are used to create the effect of a floating stretch ceiling. You can make such a design from different materials, and which ones you can read on our website.
Video - Installation and connection of LED strip
Varieties of the latest lighting
Flexible designs and ready-made modular frames of lighting fixtures are conveniently built into any interior and have a directed beam of light, which greatly facilitates the work process. Among them are ready-made and locally assembled structures used indoors and outdoors.
Design of modern lamps
A precisely selected lamp will help solve the problem of lighting and kitchen decor. Today you can focus on different styles and designer items. Thanks to the eclecticism in the kitchen space, it is easy to combine several design lighting solutions at once.
A 50-light chandelier is a current option for kitchen lighting, developed by the Flos brand 60 years ago. It is made either in black chrome or gold. Fits into high-tech and minimalism styles.
Hanging chandelier "hemisphere". The inside of the lampshade is plaster stucco, the outside is black metal. Impressive combined with modern classics.
A series of table lamps-balls belongs to designer Michael Anastasiades. It will fit organically into the lounge area of a kitchen space in a high-tech or modern style.
A sample of the ARKO floor lamp can be found in other interpretations, for example, at IKEA. Such a light source will fit well into the graphic design of the kitchen interior, if its square footage allows. The width of this “monster” is 2.2 meters. The marble base weighs about 65 kg.
And finally, the “grandfather” of many similar table and pendant lamps is an example of Danish production from the late 19th century. This is a lamp with a modern complex shade from the Louis Poulsen factory. It will neatly and without pretentiousness decorate any part of the kitchen - dining room, work room, or become the main source of light.
Directional light systems
Spotlights are convenient because they allow you to adjust the illumination of a specific area. Acting with direct directional light, they provide the workplace with sufficient light.
Depending on the power of one spotlight, their number per unit area varies. They allow you to make light accents not over the entire area of the room, but in separate areas.
The range includes options in metal and plastic housings for manual and remote control for smart home systems.
Note!
Linoleum for the kitchen - master classes on installing linoleum in the kitchen interior. The best design ideas and color schemes (120 photos)- Stretch ceiling in the kitchen - TOP-130 design options for stretch ceiling in the kitchen + photo examples
Photo wallpaper for the kitchen - TOP-170 photos of new wallpaper designs. Types of materials, options for modern pictures for the kitchen
Indoor luminaires
Built-in (mortise). The most labor-intensive systems require certain skills and tools to install. They stand out due to their inconspicuous structures that are hidden inside cabinets, plasterboard or suspended ceilings.
Kitchen lighting design
Despite the variety of types of lamps, solving the problem of illumination of only the working area is not entirely correct. Proper lighting will allow you not only to cook comfortably, but also to spend time with family and friends.
Light sources can be divided into three types according to location: countertop, stove, kitchen set.
Decorative - lighting of cabinets or plinths. They can be easily decorated using fluorescent lamps or diode strips. Drawer lighting is usually done using spotlights.
Fig.22.
Illumination of various elements of the kitchen unit not only makes the work area comfortable, but also becomes a decoration.
Kitchen lighting is no less important than other types. This type covers much more space and compensates for the disadvantages of directional light from other sources. So it can be turned on when bright lighting is not required.
Product range
The photo of the lighting of the work area in the kitchen shows a catalog of various models of lighting fixtures. Our experts advise that before purchasing, be sure to familiarize yourself with the characteristics, the effect of lighting the room in different interiors and styles, and decide on the color of the lamp.
On the website you can order a computer model of the location of the selected lamps, taking into account the individual parameters of the room and the wishes of the customer. Lighting can completely transform the kitchen environment, making it unique, bright and comfortable.
Principles and requirements
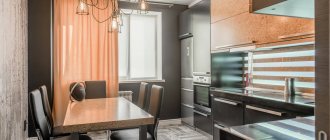
A kitchen is a room in which there are at least two zones with different purposes - a work area for cooking and a dining area. Different purposes also lead to different requirements for kitchen lighting: the work area should have bright lighting, allowing you to see everything clearly, and the dining area should have softer lighting.
It is better to make lighting in the kitchen zoned
But zoned kitchen lighting does not exclude the presence of a chandelier. Its functional significance is small, since the light spot is obtained in the center of the room, which remains mostly empty. But from the point of view of leveling out uneven illumination, this method is very good. As an option, you can use several spotlights, as in the photo above, or install built-in ceiling lights if the ceiling is suspended or suspended from plasterboard.
You need to think about kitchen lighting at the renovation stage, when the electrical panel is being assembled, the wiring is being installed, and the installation locations of sockets and switches are marked. Later, after the repair is completed, this is very problematic - you have to lay the wiring on top or in cable channels.
Illumination standards
When you are just planning lighting in the kitchen, the question arises of how many lamps are needed and what power. It's simple: there are lighting standards for each room for the kitchen - 150 Lux per square meter of area. Calculating illumination in Watts is no longer relevant, since a 7 W LED lamp can produce light like a 50 W incandescent lamp or 650 lm.
For example, let’s calculate how much light is required for a kitchen with an area of 12 m2. To do this, we multiply its area by the norm: 12 m2 * 150 Lx = 1800 Lx. And since 1 Lux is equal to 1 Lumen, it is necessary to install light bulbs that in total give at least 1800 Lm.
With zoned lighting, the amount of light required is calculated separately for each zone
If you decide to do zoned lighting, that is, the work surface will be illuminated separately, there will be a light source above the table, it makes sense to count everything separately. To do this, the kitchen plan must be divided into zones, the area must be calculated, and based on these figures, the number of lamps and lamps for them must be selected. Just keep in mind that two 50 W lamps in total will not give as much light as one 100 W lamp, but about 1/3 less.
Lamp type, color and light
Another important point. When selecting lighting, it is best to choose lamps of the same type: halogen, LED, daylight. As a last resort, you can combine two types, but it is better not to use all three. They provide different lighting and it is almost impossible to get a sane result. We are not talking about incandescent lamps, since they are used very rarely: they require too much electricity, producing a small amount of light.
When choosing lamps, it is necessary to take into account their color temperature
In addition to the type of lamps, you need to choose lamps that produce light of the same color, which is also called the color temperature of the lamps. They can produce light with blue, yellow, and white tints. Basically, it’s up to you to choose, but the best option is natural or neutral. It is better for the eyes and for color perception.
Photo of work area lighting in the kitchen
Types of lamps
When choosing lamps for the kitchen, you need to take into account the type of lamps used in the lamps. Lamps are:
- The incandescent lamp is the cheapest, but also the most short-lived, gives a soft, dim light, and gets very hot.
- A halogen lamp is more efficient than an incandescent lamp, but is not suitable for all types of lamps.
- A fluorescent lamp can produce soft yellow and bright white light, and is more energy efficient than halogen and incandescent lamps.
- An LED lamp is expensive, has a service life of up to 20 years, and is highly energy efficient.
By choosing different types of lamps for the kitchen, you can diversify the interior; it is important that they are combined with each other and meet the operating conditions. Good lighting is important, but do not overload the interior.
Before you start organizing the lighting in your kitchen, in search of inspiration, you should look on the Internet for photos of kitchen lighting options.
When choosing from ready-made solutions, it is easier to imagine the end result and make the right choice. Proper, well-organized lighting will make any interior fresher, lighter, brighter - spending time in such a kitchen will be a joy.
Basic mistakes when installing lighting
Our experts warn against making mistakes that will later result in discomfort and the need for drastic alterations. Which ones are the most common?
- Planning lighting first. Yes, you can roughly estimate where and what will be located. But these will be rough calculations to which adjustments will have to be made. Correctly install the wiring after the complete project of the kitchen set is ready, all the other furniture has been taken care of, including a seating area, TV and dining area. Only then will the owners know absolutely exactly where lamps will be needed, and in which places they can be dispensed with.
- Standard lighting brightness. The kitchen is the most multifunctional room in the house. And you can’t do without adjusting the brightness of the lighting. In the process of preparing your favorite dishes, bright illumination is necessary. If you want a romantic atmosphere, you need the ability to dim the blinding light to a comfortable twilight. Therefore, experts recommend installing switches with a dimmer.
- One lamp in the center of the ceiling. As already mentioned, the kitchen performs many different tasks. And dark corners in it are unacceptable. This is especially true for the work area - the countertops on which food is prepared, the hob, and the sink. In addition, the central part of the room, as a rule, remains free of furniture. And the only central lamp, in fact, illuminates nothing, wasting electricity. And the owners experience noticeable discomfort when trying to see the right thing in the dark or cut vegetables evenly.
When arranging your kitchen, don’t forget about natural light. To give free access to daylight into the room, the owners are remodeling, demolishing partitions and expanding window openings. Instead of thick curtains, which have no place in the kitchen, light curtains made of cotton, linen or silk fabrics are hung on the windows. Roman blinds and blinds are also in fashion. Walls decorated in light colors effectively enhance the flow of light, creating a mood of lightness and airiness in the kitchen.