Before installing a plastic apron in the kitchen, you should understand the process and types of installation, and choose the method of joining to the wall. This is important to do so that during operation the structure does not change shape, move away or lose its presentable appearance.
The apron protects the surface around the stove and first you need to understand how to attach a plastic apron in the kitchen.
Features of a plastic kitchen apron
During the cooking process, splashes of water, fat, and pieces of food fly from the stove and sink. This spoils the overall appearance of the walls. To avoid such troubles, install a special apron along the working surface.
It can be made of tiles, glass or plastic. The latter option allows you to quickly and easily change the look of your kitchen and freshen it up.
Advantages
A plastic apron has a number of advantages, which makes it attractive compared to other materials.
Advantages:
- Low cost. Compared to ceramic tiles, plastic costs several times less. The opportunity to save money and maintain a budget is a good advantage.
- Easy installation. You can attach the panels to the wall even without special skills and tools.
- Easy to use. If dirt, grease, etc. debris has stuck to the surface of such an apron, it can all be quickly removed with a rag.
- Minimum number of cracks and joints. The panels can also be solid, then there will be no gaps where dirt often collects.
- Quick replacement. If you want to refresh the kitchen interior, this can be done in 1 day.
- Light weight. The panels do not create a significant load on the wall.
- Heat and moisture resistance. If the plastic is of high quality, the apron will not be subject to deformation due to temperature or water.
- A variety of patterns, shades, textures. The market offers a large number of color solutions to suit any interior.
Advantages and disadvantages
The advantages of this method include:
- there is no need to strip the wallpaper down to the plaster, clean the putty (the tiles don’t stick to it), or prime;
- With high-quality liquid nails, the apron holds very tightly;
- as mentioned above, the method is quite convenient, fast and clean.
Flaws:
- difficulties when dismantling such an apron. The glue penetrates deeply into the structure of the surface, and is often removed directly from the putty, plaster, or pieces of chipboard;
- high price of high-quality liquid nails (150-250 rubles for 1 bottle). Tile adhesive, for example, is cheaper;
- The glue is not applied to the entire surface, and voids remain in the apron. Therefore, it is better not to glue tiles in this way on surfaces that come into contact with water (in the bathroom, swimming pool, shower). Even if you cover all the seams with silicone grout, moisture will accumulate in the voids due to condensation, which can lead to mold. Due to the voids, this method is also not recommended when laying tiles on the floor (they may burst).
Main types
There are only 3 main types of plastic aprons. They differ in performance characteristics.
From ABS
These are flexible panels that are made 600 mm wide, 1.5 or 2 mm thick, 2 or 3 m long. The sheets are made of polymer material, the abbreviation stands for: A - acrylonitrile, B - butadiene, C - styrene.
Most often, the design is applied to the panels using photo printing. Firms either provide their own design options or adapt to customers. At the individual request of the client, a drawing can be made and the size of the panel selected.
Advantages of ABS sheets:
- strength;
- low cost;
- flexibility;
- resistance to scratches and detergents;
- heat resistance (withstands temperatures up to +80°C);
- the ability to apply any design.
Disadvantages of ABS:
- deforms when exposed to high temperatures for a long time (+90...+100°C, i.e. near a gas stove);
- may fade in sunlight;
- short service life;
- may lie in waves if the wall is too crooked.
Kitchen apron made of ABS plastic.
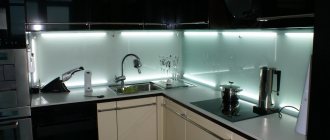
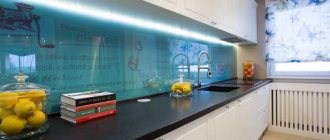
Acrylic glass
This material looks just like glass. Such panels come in glossy and matte. The sheets are flexible and smooth. Most often, such aprons are sold ready-made.
Images are applied using photo printing on the inside. The dimensions are standard: width is 600 mm, thickness – 3 or 4 mm, length – 2 or 3 m.
Advantages of an acrylic glass apron:
- the product is more transparent than ordinary glass;
- impact resistance;
- ease of installation;
- fire resistance;
- does not fade in the sun.
Flaws:
- unstable to the aggressive effects of household chemicals;
- high cost compared to plastic counterparts.
Acrylic glass apron.
PVC
These are sheets of their polyvinyl chloride. This option is the most economical. The products are produced in 2 formats: slatted and sheet. Panels are most often sold in sizes 950*480*3 mm. Rack material can be 3000*100*10 mm, 3000*195*12 mm, etc. PVC apron can be glossy or matte. The design is applied by photo printing and varnished on top.
Advantages:
- low price even compared to ABS;
- lightness of the product;
- ease of installation.
Disadvantages of a PVC apron:
- unstable to mechanical damage;
- fades when exposed to sunlight;
- unstable to temperatures, deforms near a gas stove, releases toxins when heated (if the material is of poor quality).
PVC kitchen apron.
What to look for when choosing
A kitchen apron made of plastic has many advantages, but they are only relevant if high-quality products are initially selected.
The modern building materials market is full of fakes and low-quality goods, so when choosing high-quality plastic, you should definitely take into account the following nuances:
- Thickness. The larger this parameter, the stronger and more durable the material.
- View of the front surface. The color of the plastic product should be uniform without blurry spots or streaks.
- Availability of quality certificates. It is best to purchase products only from trusted manufacturers, since well-known companies usually value their reputation and are unlikely to produce products of poor quality. Uncertified facing materials may contain a large number of toxic and hazardous components to human health.
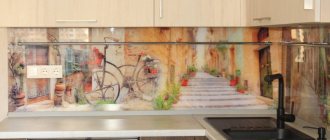
In the interior of any kitchen, an apron not only performs very important protective functions, but also plays a unique decorative role. Therefore, when choosing a plastic coating, it is necessary to take into account not only its operational and technical characteristics, but also its decorative and aesthetic properties.
As a rule, the facing material for the kitchen work area is selected to match the color of the countertop or kitchen unit, but if you wish and have good taste, you can experiment a little and choose a more non-standard solution.
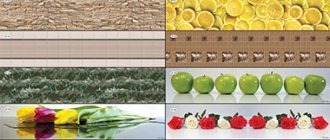
External diversity: examples
There is a wide range of plastic aprons. They can complement the interior of the kitchen or, conversely, be an accent part.
Examples of combinations:
- Plain products will fit well into any kitchen. You can match them to the color of the facades or play with contrast.
- Textured options made to resemble wood, tiles or marble can be a good accent against the background of a plain set. Such panels perfectly imitate different materials.
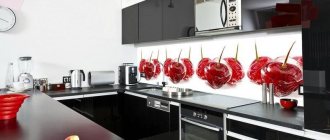
- Models with patterns will fit well into a monochromatic design. For example, an image of a forest against a green background will look harmonious. Juicy oranges next to orange furniture will add brightness. Against the background of blue or dark blue facades, you can use images of the sea or sky.
Panels can also be matte or glossy, the choice depends on customer preferences. It is believed that the first option is more durable and neater, since drops of water and fat are less visible on it.
INVISIBILITY OR THE CHERRY ON THE CAKE
The range of the apron is chosen by comparing it with color samples of the facade, countertops, wallpaper and even flooring.
Small kitchen. For small rooms, designers recommend light-colored aprons. The ornament or photo should seem to merge with the overall tone of the headset. This will add light and visually increase the volume of the room. Glossy, metallic and mirror surfaces successfully cope with the same task.
An apron can be dressed up in a white or plain kitchen - rich colors are ideal for this role, but in small rooms it is better to choose a smaller print or pattern. In spacious kitchens, macro images are also appropriate.
For a color set. In this case, you should take into account the color and texture of all kitchen surfaces, including the dining area
Even textiles and medium-sized decorative details are taken into account. A simple solution is an apron that matches the color of the largest surfaces in the kitchen or the color of the furniture, but in lighter or darker colors
Options for basic solutions:
- An apron is chosen to match the color of the walls when creating an interior in soft pastel colors, or furniture and walls of different colors.
- Under the countertop and flooring. The inclusion of these three elements in the same range is widely used in the minimalist style. Requires support for a small number of bright and stylish items (coffee maker, electric kettle, etc.)
- To match the facades or countertops. These solutions may exist in different versions. When a prefabricated apron is made from different structural elements, the facades and the accent part of the apron will combine well with each other if the tone of the remaining apron walls remains neutral. A similar combination technique is when a light apron in the stove area or at the sink is decorated with ornaments. Looks best with a linear and U-shaped kitchen layout.
- A bright apron, not connected by color with the overall interior, must be supported by color allies: an ornament on the curtains, a vase, a tablecloth. They can be chair upholstery, a rug or a teapot. But you shouldn’t overuse it and spray decorative additions all over the space; it will create a feeling of disorder and sloppiness.
Basic fastening methods
The main advantage of plastic aprons is quick, easy installation with your own hands.
On the guides
The first method of fastening is using guides. It will be appropriate if the panels are planned to be replaced after some time. Guides are special metal slats. They are attached to the wall horizontally using self-tapping screws. The sheets are simply inserted into the guides, creating a “rails” effect. The panels can be easily moved.
For self-tapping screws
This method implies that the panel is attached to the wall for a long time. Plastic is a thin and flexible material, so it is easy to drill through. Then the screws can be hidden with special plugs. But it is important to take into account that the wall must be flat. In addition, there will be a distance between it and the panel, i.e. the connection will not be tight. This can be used to hide wiring.
Fastening the kitchen apron with self-tapping screws.
On the sheathing
Sometimes, to save time, sheets are attached to the rough wall without leveling the surface. In this case, lathing will help. It is a system of metal or wooden bars that are attached in a vertical and horizontal plane. Thanks to this, the structure is rigid and stable.
The bars are attached to the wall with self-tapping screws. First you need to line up the slats along the contour, observing the dimensions of the sheet, then install horizontal and vertical slats. After this, the panels are again attached using self-tapping screws to the sheathing. This method also does not require frequent replacement of the apron.
Lathing for attaching a kitchen apron.
On glue
This method is the fastest, simplest, and most understandable. Use special glue or liquid nails. The composition is applied in thin strips to the wall, then the apron is pressed tightly. The caveat is that the surface must be flat. No bumps, dents or traces of old finishing are allowed. In addition, it is important to use high-quality glue so that the sheets do not fall off.
Attaching a kitchen apron with glue.
Stage 3 – assembling the frame
There is an important point to be made here. Before you fasten the slats, treat them with moisture-proof impregnation
When you plan repairs and purchase consumables, purchase such a product in the store. Impregnation will extend the life of the frame and protect the wood from swelling and deformation. So, you have already calculated the length of the slats and their number.
Let's start installing the frame with our own hands.
- Cut the wooden planks with a hacksaw.
- Take the slats that will be installed around the perimeter. Using a hammer drill and self-tapping screws, attach them to the wall. Remember that each vertical rail must be adjusted and checked for level with a tape measure.
- We continue the installation and insert jumpers. No need to screw it in yet.
- We take the construction thread and stretch it from the right batten to the left. This way you will understand where to fix the jumpers in order to get an even frame for the wall panel.
- Now you can screw the jumpers.
So you have assembled the frame for the panels with your own hands. In the next photo you can see what a structure made of wooden slats looks like.
Also during the installation process, the video at the end of the article will help you, where experienced craftsmen show you step by step the entire process of installing the frame. If this is your first time renovating, every piece of advice will be valuable.
Step-by-step DIY installation instructions
Installation on your own will not take much time, and you will need the simplest tools.
List of required materials and tools
A general list of what may be required in the work:
- screwdriver;
- hacksaw;
- perforator;
- stationery knife;
- roulette;
- liquid nails or glue;
- dowels;
- level;
- self-tapping screws;
- putty knife;
- primer;
- pencil or marker.
Preparation
At the initial stage, you need to perform preparatory work:
- Dismantle the old covering.
- Apply primer.
- Level the wall with plaster.
Installation of the structure
First you need to calculate the dimensions of the sheet that will be used. They directly depend on the design of the kitchen, the location of the hood, etc. It is necessary to measure all distances: from the edges, between sockets, to devices.
The apron should extend beyond the tabletop by 2-3 cm. You also need to cut holes for the sockets, this is done with a stationery knife. Further actions depend on the chosen mounting method.
When gluing the apron, the algorithm is as follows:
- Mark the upper and lower boundaries of the product on the wall.
- Apply glue or liquid nails in thin lines to the wall or splashback.
- Press the product firmly against the wall, especially at the edges and in the center.
- Cover the cuts with decorative skirting boards and disguise the joints.
Installation algorithm using self-tapping screws:
- Mark the surface, indicate the places of fastenings on the wall, on the product.
- Make holes for the dowels and insert them.
- Remove dust generated during the process.
- Place the sheet against the wall, secure it with self-tapping screws using a screwdriver.
- Attach plugs to disguise fasteners.
Wall requirements
It is better to remove wallpaper and other old finishes, smooth out uneven areas with strong putty, then dry.
In order to assess the evenness of the wall, if possible, apply finishing material to it and see if there are any bends or dips.
If they are not there, you can start gluing the apron. Otherwise, you will have to level the surface, or at least add leveling pads - plastic, cardboard, hardboard, etc. - to problem areas. - and only then glue the trim.
Installation of the apron is the final stage of finishing the kitchen, so by this time all construction, electrical and finishing work must be completed. Take care of installing electrical wiring, sockets, switches, and connecting household electrical appliances.
Negative sides of a plastic apron
Like any product, the plastic panel has disadvantages:
- Susceptibility to deformation. If exposed to temperatures for a long time, the product may change shape.
- Mounting to a flat wall. Most often, aprons cannot be installed if there are defects on the surface.
- Fragility. The average service life of panels is 5 years.
- Susceptibility to scratches. The surface is easily damaged during cleaning.
The number of advantages of the material exceeds the number of disadvantages. A plastic apron allows you to refresh your kitchen design without much effort, which is why it is often used.
Useful tips
- To make the cladding look neat, cover the edge of the kitchen apron with special slatted plugs or corners.
- You can close the gaps between the working surface of the table top and the adjacent wall with decorative skirting boards.
- After securing all the screen parts, treat the joints and corners with transparent sealant.
- Start laying elements from the corner.
- Sockets and switches are installed after all installation work is completed.
- When cleaning your kitchen apron daily, avoid using powders or hard sponges. Abrasive materials scratch and damage plastic panels.
We recommend watching the video instructions:
Can liquid nails be used instead of sealant?
The sealant can replace “liquid nails”, demonstrating fixing and adhesive properties. But “liquid nails” differ in this from sealant and cannot be used instead in a heating system or pipeline. When working with liquid sealant, do not allow it to come into contact with the skin or mucous membranes.
Interesting materials:
Who called MTS? Where do they give Schengen for a long time? Where did the contacts on the iPhone go? Where did all the contacts from the iPhone go? Where did Serduchka go? Where to fly cheaply in winter? Where to put a ladybug in winter? Where to put toys in the room? Where to put leaves in the garden? Where to put the leftover sourdough?
Preparation of panels - layout, cutting
Circumstances do not always allow you to attach the entire apron to its rightful place - this may be due to insufficient space prepared for the height of the canvas. In other cases, in order to save money, potential consumers assemble a new coating from fragments of previous ones, or purchased on favorable terms.
The bottom line is that you have to cut it. You can do it with one knife, but the smoothest result will be using an angle grinder, better known as an “grinder.” The most sophisticated option is to contact specialists who practice laser cutting.