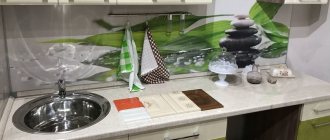
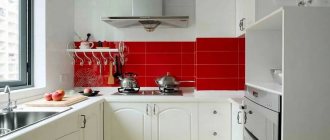
Samples of MDF wall panels for a kitchen apron
The front side of MDF panels is covered with polyvinyl chloride film, imitating various types of wood or a cut of natural stone. The panels can be plain or with any pattern applied. The surface can be either matte or glossy.
Often, wall panels are finished with natural veneer of valuable wood species, which in appearance do not differ from those made of natural wood. It is the cladding that gives MDF a decorative look and provides protection from moisture. Polyvinyl chloride film is easy to clean and does not change its original color for a long time .
MDF wall panels can be used in the kitchen to fully or partially cover walls, as well as aprons between the work table and wall furniture.
An MDF kitchen apron performs the main functions: protects walls from moisture and food waste, covers the gap between the table and the wall, preventing kitchen items from falling, and serves as a decorative decoration.
An MDF kitchen apron is almost no different in appearance from panels made of glass, tiles, mosaics and other materials.
What should an apron be like?
An apron, as an interior element, not only decorates the space between kitchen cabinets.
It is designed to protect walls from liquid, grease, dirt and soot. In order for the coating to fulfill its function, it must be made practical, easy to clean, resistant to high temperatures and chemical detergents. The wall cladding near the work surface should have a pleasant appearance. Nowadays, aprons are made of ceramic tiles, mosaics or glass. For those who want to make a renovation that will last forever, cladding made of natural stone, metal or brick is suitable.
What requirements must a kitchen apron meet?
A kitchen apron is an integral part of the interior of the kitchen. This part of the design must have several basic qualities:
- Practicality.
- Resistant to chemicals and any cleaning agents. When washing dishes, a cleaning solution gets onto the surface of the kitchen unit. If the apron is not protected, it will lose its attractive appearance after just a few months of use.
- Resistance to humidity and temperature changes. Furniture and accessories without a protective coating will deteriorate in a short time.
- Long service life. Since the apron is mounted to the wall, it is inconvenient to often change the structure to a new one, especially if holes for fastening are drilled in the wall.
The requirements are due to the fact that the element is located in the working part of the kitchen - near the stove, sink and countertop. Food is prepared in this area, so the main task of the apron is to protect against all kinds of splashes, food particles and any kind of contamination.
How to secure a plastic apron in the kitchen with dowels: instructions
Installation using the mentioned fasteners should not cause any problems. This installation method is best used on panels that have a pattern on them, as the same adhesive may cause some damage to the image. It is not necessary to move the furniture set during the work. Installation should be carried out according to the following plan:
- Use a drill or hammer drill to make holes in the wall and apron for the dowels. At this stage, a building level will be useful, with which you can make accurate markings.
- Clean the surface from any dust that has formed.
- Place the prepared apron against the wall and secure it with dowels.
- Mask the caps with furniture plugs, the color of which should match the plastic.
An apron installed in this way can be easily dismantled: to do this, you need to unscrew the dowels and carefully remove the product. In addition, dowels (concrete screws) or anchor bolts can be used for fastening.
Some features of using glue
To achieve the maximum level of fastening, it is necessary to prematurely treat the surface on which the glue will be applied; it must be dry and smooth.
Regardless of the chosen glue, it must be applied to the product in dots in fairly large drops, then wait a certain amount of time (this information is always indicated on the glue packaging), after which the panel can be applied to the wall.
Be sure to tap and press the stump well against the wall covering to secure the hold. Remaining glue can be removed immediately; for this you can use a cloth or regular alcohol; if the glue has already hardened, then remove the glue with a knife.
Varieties
The following materials are used in the manufacture of plastic aprons:
- PVC panels, the standard width of which is 25 cm and thickness - 0.8–1.2 cm. They are produced in lengths from 2.6 to 3 m. Their main feature is the presence of special locking fasteners on glossy or matte parts for seamless connections. Therefore, with proper installation, you can independently make a kitchen apron for the kitchen on the wall in the form of a monolithic surface from individual elements. The main thing is that there are no cracks, otherwise water and debris will get into them. PVC is used to make plain, thermo-film-coated or varnished aprons.
- ABS sheets are single-layer plastic materials decorated with photo printing or designs. A finished kitchen apron made of ABS plastic is usually produced in dimensions of 200 x 60 x 0.15 cm. Its main advantage is its high resistance to mechanical damage and the absence of deformation during bending. Aprons made of sheet plastic are produced in a wide variety of designs, since high-quality images are applied to the surface of the product. In addition, you can order an apron with an original design.
- Cast polycarbonate is a refractory plastic material that looks like ordinary glass. The surface can be glossy or matte. Kitchen aprons made from this material are sold ready-made. Images imitating tiles, decorative stone, brick and other materials are applied to the inner polycarbonate coating. In addition, such an apron can be equipped with lighting elements (for example, LEDs) that will highlight the product.
Taking into account the size of the kitchen wall that needs to be tiled, you need to calculate and select the appropriate model.
Types of plastic aprons
Before making a decision on the choice of panels, you should familiarize yourself with the main materials from which they are made.
PVC panels
The panels are offered in the form of sheets, the width of which is from 150 to 500 mm, length 2600-3000 mm, thickness 5-10 mm. Panels of greater thickness have increased coating stability. The drawing on the surface is applied at the production stage. This can be an ornament, pattern, geometry or imitation of natural materials. In the manufacturers' catalogs you can find interesting photos of kitchen aprons made of PVC panels.
Advantages:
- Simple and quick installation;
- tolerates high humidity and temperature well;
- variety of patterns, shades;
Disadvantages of PVC:
- Rapid abrasion of the design with frequent use of detergents and direct exposure to sunlight;
- loss of strength over time;
- If the sealing is poor, water may enter, which contributes to the formation of fungus;
- cannot withstand increased temperatures, there may be a risk of fire. Only products with a certificate of compliance with fire safety standards can be used on walls near stoves.
PVC cityscape
Solid sheet plastic
Solid sheet panels are the fastest to install aprons
It is important to choose the right size. Thanks to the minimum number of seams, the risk of fungus and mold appearing behind the apron is reduced
It is recommended to install using any adhesive composition, and there should be no voids left.
Upon completion of installation, all seams should be filled with transparent sealant with special care. The color scheme is selected to match the main direction of the kitchen. Before choosing, it is recommended to familiarize yourself with the new collections of manufacturers in the kitchen photos. Plastic comes in a wide variety.
Fruit paradise made of solid sheet plastic
Polycarbonate
Polycarbonate as a panel for a kitchen backsplash has a number of advantages:
- Not afraid of sunlight;
- resistant to mechanical stress;
- transparent, looks like a glass surface;
- resistant to fire.
Related article:
Polycarbonate is easy to scratch, so you should be careful when choosing care products and items. The disadvantages include high cost.
Unobtrusive design
ABS plastic
ABC sheets are single-layer plastic of standard sizes with a width of 600 mm, while the length can be 2000 or 3000 mm. The thickness of the panels is 1.5 mm. Aprons made from ABS panels are made in a wide variety of colors; entire collections of various patterns are produced. You can also make an individual design; in the catalog of photos of plastic aprons for the kitchen there are many interesting ideas.
The main advantage of the material is its resistance to mechanical shocks; the panel does not deform when bent. Withstands short-term temperature increases up to 100° and long-term up to 80°.
Advantages of ABC panels:
- Resistant to aggressive environments, fats, oils;
- surfaces can be matte or glossy;
- do not emit toxic substances;
- recommended temperature range from -40° to +90°.
Disadvantages of ABC panels:
- In direct sunlight, the design may lose its original color;
- Do not use acetone or solvents when cleaning;
- The original plastic has a yellowish tint.
Floral print on an ABC plastic panel
You can watch a video of beautiful ABC panels and the method of transporting the product.
Watch this video on YouTube
Composite materials (MDF, chipboard)
Kitchen splashback panels are made from MDF and chipboard with laminated surfaces. Manufacturers offer products with a variety of designs and colors, as well as photo printing.
Laminated surfaces are more environmentally friendly than PVC. Ready-made products of standard sizes are available for sale.
Positive qualities of the slabs:
- The laminated coating is resistant to moisture; you can choose special moisture-resistant boards;
- high strength, resistance to mechanical damage;
- installation does not require special preparation of wall surfaces;
- easy care;
- wide range of interesting designs;
- low cost;
- installation is possible on the frame, which will allow wiring behind the panel.
Disadvantages of MDF and chipboard:
- Limitation in temperature conditions; at high temperatures, deformation of the panels is possible;
- the untreated ends of the panels must be edged or treated with sealant. If moisture gets in, the panels may delaminate.
MDF panels
Wall mounting methods
The method of fastening will largely depend on the weight of the apron or its individual elements. Here are the different possible options:
Glue
One of the most popular is liquid nails. Liquid nails can be used to glue plastic, fiberboard, lightweight MDF panels, ceramic tiles and mosaics, artificial stone, and mirrors to a flat, grease-free wall. The main thing is accuracy: the glue should not be applied too close to the edge of the panel.
Installation of sheathing
This method is used when there is concern that the panel may fall due to its own gravity. The second reason is that the wall is too uneven. Third, it is much easier to dismantle and replace with another apron using sheathing rather than liquid nails. Both fiberboard and PVC panels can be mounted on the sheathing. But one of the heaviest materials is a thick MDF board.
Using lathing, you can install panels in several ways:
- installation of wooden beams to the wall (using self-tapping screws or glue), fastening panels to the timber with glue;
- fastening the panels to the timber using self-tapping screws or dowels;
- installation of an aluminum profile as a beam, fastening the panels to the profile with self-tapping screws.
Let's take a step-by-step look at how to install an MDF model with your own hands using self-tapping screws.
- Before starting work, the furniture must be moved away and the wall carefully leveled.
- A frame made of timber and metal profiles is mounted according to the level. The thickness of the timber should be no more than 0.5 cm so that the apron fits behind the tabletop.
- The wooden beams are treated with bioprotection.
- The apron is applied to the wall and markings are made for the holes. Holes are drilled on the MDF board - blanks for self-tapping screws.
- Only after this the apron is again applied to the wall and tightened with self-tapping screws. They begin to screw in the screws little by little: first in the corners, then closer to the center.
- For aesthetics, you can install caps on the screws.
Standard fasteners
Suitable for not too heavy panels. Loops are glued onto their reverse side using a suitable method (available in different versions). Markings are made on the wall where the hooks will be screwed under these loops. Using a drill, holes are drilled into which dowels with hooks are inserted. After which the panel is hung.
If hooks are made only along the top edge, then the panels will hang at different levels from the wall - the gap will be larger at the top, and the bottom will fit snugly against the wall. Not very beautiful, but easier to install the apron. Hooks in two rows will make the appearance more harmonious and attractive.
Using furniture glass holders
There are a great variety of them sold: in metal, plastic. To attach the entire apron you will need a large number of holders. In addition, it is worth considering that they will not withstand heavy material (thick glass or MDF) and will be visible after installation. But this is not a problem at all: nice mounts do not attract unnecessary attention. But the mounting method is simple - the holders are fixed on the wall (with glue or screws), and the apron is inserted into the holders.
Metal U-profiles or U-profiles
Such profiles are installed at the top and bottom of the apron, after which the wall panel is simply inserted and pushed forward, like a wardrobe door. In this method, the main thing is a clear calculation, otherwise the light canvas will warp, and the heavy one simply will not fit into the grooves.
Laying tiles and mosaics with cement mortar
The method is considered outdated, but properly installed tiles will last for decades. This method is chosen mainly because the cement itself is cheap compared to glue.
To learn how to install an MDF apron in the kitchen, see the following video.
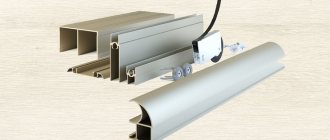
Apron fastening with aluminum profile
MDF panels are installed in the groove between two aluminum profiles
Important. Using an aluminum profile as an apron fastener eliminates the process of drilling panels, which ultimately simplifies installation, but slightly increases the cost of consumables.
The profile is attached to the wall with dowels around the perimeter of the apron. Corner joints are made with an internal angle of 45 degrees. The profile has mounting grooves with a silicone seal, ensuring tight installation of the panel.
MDF apron: installation methods, advantages and disadvantages
An MDF apron is usually made to match the color of the furniture or countertop.
As a rule, such aprons are made to match the kitchen furniture or worktop, thus creating an imitation of a single surface. No one excludes the possibility of purchasing panels that contrast the tone of the furniture. Using photo printing, MDF panels can be decorated with various designs and patterns.
The main factor that influences the choice of this option is the low cost of such aprons in comparison with tiles, tempered glass, and porcelain stoneware. In terms of its performance properties, MDF is not inferior to natural wood, and in terms of strength it even surpasses it. In addition, MDF boards are protected from the effects of fungus and mold. Also, the advantages of such an apron in the kitchen include the simplicity of installation work and the absence of the need to use special tools. MDF panels can be mounted on any surface; there is no need to make the walls perfectly flat. In addition, such an apron is easy to replace.
https://kuhnyamoya.ru/youtu.be/PriooPaTp6Y
The disadvantages of such aprons include:
- instability to chemicals and water, which over time will negatively affect the appearance of the apron;
- frequent separation and sagging of panels;
- MDF is not a fire-resistant material, so it can catch fire, releasing toxic substances.
Installation of MDF panels on the surface is done using “liquid nails” or self-tapping screws. Before this, it is necessary to carry out work on marking the surface. Finally, you should install shaped skirting boards that will cover the outer and inner corners.
Disadvantages of MDF
Before you start purchasing and installing an MDF apron in the kitchen, you should consider its shortcomings.
Perhaps they will become an obstacle to purchase. So:
- Negligence in care will affect the MDF board. She will be led or bent. The same applies to high humidity - you cannot mount MDF panels directly near the sink - it is better to install tiles there. The stoves must be equipped with hoods to prevent drops of condensation from settling on the surface of the apron.
- Material is flammable. This is important if the owners are planning to completely cover the wall from the edge of the set to the edge. Mandatory external control is required if a heat supply source is mounted on the wall - a gas boiler, for example.
The disadvantages are serious and should not be neglected. If, nevertheless, there are no prerequisites for future damage, then it is worth trying to create something new in the interior.
Dark furniture with an original pattern on the apron looks beautiful
How to glue a plastic kitchen apron with your own hands
The installation process itself is not difficult, but requires care.
At the marking stage, you should take several horizontal measurements, since walls are not always perfectly level.
How to properly glue an apron?
The process consists of several successive stages:
- Surface preparation. If there is wallpaper on the walls, it should be removed. The wall is cleaned of peeling plaster and various contaminants and covered with a primer. It is better to choose an acrylic primer for rooms with high humidity - it contains antibacterial and antifungal additives.
- Applying glue. Liquid nails LIQUID NAILS and any others are applied using a special gun only to a dry, grease-free surface. This should not be done in a continuous layer, but dotted or in a snake pattern.
- Gluing. The surfaces to be glued are pressed tightly against each other and immediately separated to ensure that there is enough glue. After 3-5 minutes, final gluing is carried out, pressing the panel tightly against the wall. The adhesive sets almost instantly, but the greatest adhesive strength is achieved within a day.
VIDEO INSTRUCTION
We glue an MDF apron in the kitchen
This procedure differs little from working with a plastic panel; it also consists of three stages:
- Surface preparation. The wall is cleaned and, if necessary, leveled. Highly absorbent surfaces are treated with a primer.
- Application of liquid nails. The workpiece is tried on in place and cut to the required size. A layer of glue is applied pointwise or in a snake pattern to the MDF panel.
- Gluing. The panel is applied to the wall and pressed lightly, after which it is removed and a technological pause is maintained (3-5 minutes). Then the panel is finally glued. For greater reliability, a heavy apron can be supported in several places with slats; after the glue has completely dried, they are removed.
VIDEO INSTRUCTION
Useful tips
Do not try to glue a plastic panel or MDF apron the first time, as this is not always possible. Place the panel against the wall, then lightly tap it and remove it.
After pausing for a few minutes, you can begin the final gluing. In most cases, it is enough to firmly press the surfaces at the joints once to achieve rapid setting of the adhesive.
Visible parts of the edge of the apron should be additionally refined with MDF corners of a suitable color.
Fastening and installation of a kitchen apron
Installing a faucet in the kitchen
To understand how to attach a kitchen apron, you should read the instructions from the manufacturer of the selected coating. It provides a list of fastening compounds and gives advice on how to install the apron as securely as possible. There are several general recommendations:
The wall needs to be cleaned of everything that can fall off: old paint, remnants of wallpaper, dust and dirt, small stones and other defects. When attaching the sheathing, it is important to make sure that the upper edges of the slats lie in the same plane. This can be done using a laser level or a stretched thread. The primer helps improve the adhesion of the adhesive to the wall.
To be reliable, it needs to treat the surface at least 2 times, drying the wall well at each stage. This takes time, but if, due to haste, the apron comes off the wall, then much more effort and time will have to be spent on correcting the defect.
Installing the apron yourself
Although the process of installing a kitchen backsplash is quite simple, there are several problems that a novice worker may encounter. First of all, you need to decide on the placement of the facing covering and the method of its fastening. Everything else depends on the type of kitchen apron itself.
Working with sheet plastic
When installing a plastic apron, you need to decide in which direction the panels will be located. If the plastic sheet is wide enough, it is better to place it horizontally so that there are fewer seams on the apron. Narrow panels should be cut into pieces and mounted vertically.
The plastic cladding is attached to the wall using liquid nails. For greater reliability, self-tapping screws are screwed into the edges of the apron. Sharp sections of plastic are covered with decorative skirting boards or starting strips. The joints should be masked with strips of a suitable color.
Using chipboard
Chipboard (chipboard) is a material that is often used to cover the walls of the kitchen work area. The chipboard apron is mounted only on a flat surface using glue. Before installation, the slab is cut into pieces of the required size. Large and heavy chipboard sheets should be additionally secured using self-tapping screws with decorative caps.
Application of ceramic and mosaic tiles
When covering the walls in the kitchen with ceramic tiles or mosaics, you must first prepare a special adhesive solution. The mixture is applied to the wall with a narrow spatula and distributed evenly over its surface. The tiles are installed with slight pressure.
The tiles are laid evenly and neatly in horizontal rows from bottom to top. When attaching each row, check the horizontal position using a level. The mosaic should not be laid individually, but in matrices. Each forms a slab measuring 30x30 cm, containing several dozen elements. Otherwise, installation is similar to tiles.
Glass requires care
Glass splashbacks are mounted to the wall using supporting clamps or adhesive. The supporting fasteners prevent the glass from fitting tightly to the countertop and cabinets. A gap forms between the wall and the glass panel. The advantage of this type of fastening is that it does not require drilling holes in the glass that compromise the strength of the structure.
Installation with glue is only possible if the glass apron is made of triplex. Since glue is a chemically active substance, it will most likely corrode any simple glass over time. To attach glass panels made of artistic triplex, glue-sealant for mirrors is used.
Stone apron originality and practicality
An apron made of monolithic artificial stone is pre-cut to the required dimensions. Its installation should include fastening not only with an adhesive solution, but also with anchor connections. To screw them in, you need to make holes in the wall about 10 cm deep. This will allow you to securely fasten the massive structure.
Using an uneven spatula, apply an adhesive solution to the back surface of the slab. With a gentle tap of the mallet, the apron is pressed against the wall. After this, anchoring begins.
The anchors take their place and are carefully twisted. Do not over-tighten the fasteners as this may damage the structure of the stone slab. After tightening the anchors, the holes in the slab can be closed using special pads.
Tile processing
After installing tiles in the kitchen, it is important to treat them. If it is necessary to make a hole for an electrical outlet, then the outline is outlined from the back side, after which the hole is cut with a diamond drill
If you just need to cut kitchen tiles to fit a non-standard shape, just mark the cut with a pencil and use a tile cutter.
- After laying, you need to wait a day and carefully tap the tiles to identify potential voids that sometimes form behind them. Tiles with voids must be re-glued.
- Next, it is necessary to grout the joints, which is carried out strictly after all surfaces have been washed with warm water and a selective detergent.
- The grout is diluted and rubbed into the seams using a rubber spatula. Wait a little until it dries and remove its remains. Next, you need to wait another two days and wash everything thoroughly again.
How to install an apron in the kitchen from MDF
There are several ways to install an MDF apron yourself, especially if the kitchen furniture is already installed.
When installing on a clean wall, you must follow the tips below step by step:
- Clean the wall, remove rough irregularities, treat with antiseptic and primer.
- Determine the exact location of the apron, align the horizontal bottom and top lines using a building level.
- Apply clearly visible markings to the wall.
- Under the bottom line, screw a mounting strip to the wall, which will serve as both a support and a reference point.
Using glue during installation
The easiest way is to install the apron using mounting adhesive. In this case, there is no need to drill holes, but dismantling will be labor-intensive. It will not be possible to reuse the removed apron.
The glue is applied directly to the MDF sheet around the entire perimeter. The central part is covered with horizontal or vertical stripes every 10-15 cm. The treated apron is applied to the desired location and pressed. The approximate drying time for the glue is 14 hours.
Fastening with dowels and screws
In order to secure the apron using self-tapping screws, you first need to drill holes on the panel itself at the fastening points. To seal the material in the holes, silicone liners and metal inserts with threads for screwing in decorative chrome caps are used.
Then the panel is applied to the wall and marks are applied. Drill holes and install dowels. At the end, the MDF apron is attached with self-tapping screws. The attachment points are hidden with caps.
Aluminum profile fastening
When kitchen cabinets are installed, installation of a kitchen apron can be done using aluminum profiles, which are thoughtfully equipped with silicone seals to firmly hold the MDF panel.
First, a lower profile is attached to the wall using self-tapping screws, into which parts of the apron are inserted. Then the panel is tilted slightly, the top profile is put on, pressed against the wall and screwed to the cabinets.
The ends of the planks are hidden with decorative overlays. If necessary, a special plinth is attached directly to the profile.
Prefabricated Panel Installation
Sometimes the panel is created from several parts equipped with special grooves for reliable connection with each other. Before installing a prefabricated apron, a sheathing is assembled on the wall with a jumper spacing corresponding to the size of the component elements. To attach these elements to the bars, clamps are used - special metal parts that are placed on the internal groove of the panel and screwed to the sheathing.
Cutting MDF sheets
MDF is cut quite easily with any tool designed for cutting wood with a small and sharp tooth. The use of a large tooth leads to crumbling and delamination of the material, as well as unevenness of the cut end. Recommended Tool:
- Hacksaw for metal.
- Hacksaw for wort.
- Electric jigsaw.
- Hand-held electric circular saw with fine pobedit teeth.
Cutting MDF sheet with a circular saw
If there is an image on the panels, you should carefully adjust the details of the picture, both horizontally and vertically. The joint of a correctly fitted pattern will be less noticeable and, conversely, the displacement will introduce an imbalance in the image, which will be noticeable at first glance.
Choosing an apron: useful tips
Before purchasing or ordering a product, you need to consider a few points:
- The edges of the apron should extend beyond the kitchen unit, so you need to take all the measurements first.
- To prevent water flowing from the countertop from getting under the product, it is recommended to install a border for the joints, the purpose of which is to prevent the penetration of moisture.
- For small rooms, the best choice would be a white kitchen apron that matches the overall design of the kitchen. You can choose a light-colored product decorated with a discreet pattern.
- Covering a wall with a small backsplash with an image printed by the manufacturer using heat printing is a bad idea because it will not be noticeable.
Recommendations
Be sure to combine the apron with the interior of the room. If the main surface is matte, then it should be matte. Light colors will help visually expand the room, while bright colors will help refresh it. The layout can be carried out in rows, when each row is installed following the previous one, as well as the square-cluster method, when the emphasis is no longer on the rows, but on small areas.
You can make interesting patterns using special tiles with decorative elements, as well as paintings, drawings, and so on. Then the process of how to stick corner or other tiles to the kitchen will become even more interesting.
latest comments
Types of decorative coating for MDF panels
MDF is made by pressing wood chips with an adhesive composition. The resulting slab is subjected to further decorative finishing using various technologies. The result is: laminated, painted, laminated, veneered MDF boards.
Laminated coating is made by treating panels with PVC film or melamine paper. Laminated MDF panels can withstand various adverse influences without damage. They are used in furniture production, including for making kitchen facades.
MDF panels are also painted. And then they make furniture for bathrooms or kitchens. However, painted panels have a significant drawback: such a coating does not withstand temperature and mechanical factors.
Gluing plastic to a panel is called laminating. Such a panel becomes more moisture-resistant, wear-resistant and temperature-resistant. Due to their practicality, such panels are often used to make kitchen splashbacks and other kitchen elements.
By veneering MDF panels, they acquire the appearance of natural wood.
There is another way to decorate MDF panels. This is the application of various drawings and photographs to the surface using photo printing. Such panels are called skinali. Initially they were made of glass. Skinals are very popular and are used to decorate kitchen aprons.
Do-it-yourself preparation for installation of MDF and PVC wall panels
First you need to choose the material. Let's talk a little about the capabilities of each of them. You already know about the advantages: moisture resistance, cost-effectiveness, lightness, simple installation. But cheap types of plastic may not withstand temperature changes and may melt or be scratched by an abrasive sponge or cleaning agent. It is not recommended to install them above the stove.
The same applies to MDF, but to a lesser extent. There are improved models that do not have these shortcomings. For example, postforming products. This is a more durable type of chipboard with increased moisture resistance and heat resistance. As for decorative items, the choice in stores is quite large. Everyone will find a pattern and texture to their liking.
How to calculate the required amount of materials
Finding out how many elements will be needed for interior decoration is quite simple. You need to calculate the total area of the walls and subtract the square footage of windows and doors from it. Then multiply the width of the selected part by its height. Divide the first value by the second and add 10% for the margin.
Rules for using plastic strips
There are not many restrictions.
- if the PVC was at a temperature below +10°, warm it up before attaching it to the surface. This will take at least half an hour;
- the temperature in the room during installation should also be above +10°;
- do not remove all the sheets at once to preserve their presentation.
Calculation of the width and height of the apron
The width of the apron depends on the size of the kitchen space. With height the situation is somewhat more complicated. This parameter is influenced by the following factors:
- the distance between the lower and upper tier of the headset. The height of this gap is most often no more than 112 cm;
- the presence of a domed independent hood - in this place the apron is laid out at a higher height, and if a skinali is used, the hood itself should be placed at a lower height;
- design features of the upper cabinets - if the facades are equipped with lifting mechanisms, a low apron with dimensions of 45-55 cm looks great.
Standard sizes
The minimum is 40-45 cm, and above the stove it grows to 60-75 cm. In the case of electric hobs, 60-65 cm is enough, but for most gas hobs, the passports say 75 centimeters or more. The bottom edge of the top row is usually 60-65 cm above the working surface, sometimes in one straight line. For housewives below 155 cm, the standard height is 45 cm - there will be no smooth edge with a hood.
Most aprons have a height of 48 to 60 cm. Small and medium-sized household appliances and tableware storage systems can easily be placed there.
The length of the apron depends on the configuration of the kitchen. In Khrushchev-era buildings the room is usually square, while in Brezhnevka-era buildings it is elongated. In rooms with equal sides, the aprons are L-shaped, and the length of most of them is about 1.8-2 m. In elongated kitchens, the length of Brezhnevok reaches 2.5 meters. In spacious kitchens, 3.5-meter options are common.
First, you should draw a marking and measure the distance from its different points to the floor - if the floor is uneven, installation of the panel may become more complicated.
What is the difference between chipboard and analogues
It is necessary to distinguish chipboard from fiberboard - wood-fiber board, which has low mechanical stability, is fragile, breaks easily and is a dense cardboard of varying thickness. On one side, the fiberboard sheet has a flat and smooth structure, and on the other, it has a rough, loose and corrugated surface, with notches applied. Not used as a decorative material.
Boards made from chipboard, MDF and HDF are similar to each other both in production method and in quality characteristics. However there are a few differences:
- The chipboard structure is less dense than MDF and HDF;
- Chipboard boards are more susceptible to moisture than MDF and HDF;
- Chipboard boards are cheaper.
A common disadvantage of the products is poor resistance to high temperatures and susceptibility to fire.
Made from MDF - what is it?
Most often, the word “skinali” is applied to aprons made of tempered glass with photo printing. According to reviews, moisture-resistant MDF panels can decorate the interior no worse than expensive glass. Kitchen skins made of this material will have one feature - the front side of the product is treated with a laminated plastic coating. Due to this decor, the panel becomes not just an MDF sheet, but a decorative skinnel, the surface of which can have the most daring colors, patterns and ornaments.
In the photo below you will see examples of MDF skins of various colors and with interesting patterns.
Most often, such skins are chosen when you need to complement the interior of the kitchen. For example, the room is decorated in country style. In this case, a regular MDF sheet will look unsightly.
But the glossy look of the wood-effect coating applied with will transform the interior. MDF skinali can be decorated with UV printing - you can choose an image of juicy fruit or an antique pattern.
Preparatory work
The wall is being dismantled. They operate with a hammer drill, spatulas, nail pullers - depending on the interfering elements
It is important to leave it absolutely clean, otherwise you will not be able to attach the wall panel for the kitchen. After dismantling, the wall is washed and impregnated with a primer for future plaster.
If the surface requires significant repairs - a large number of chips, whole pieces falling off, then sealing alone will not do - you will have to completely level the walls, that is, do the entire cycle of plastering work, including laying reinforcing mesh and placing beacons.
A beautiful apron made of flowers looks fabulous with light furniture
When the wall is ready - dry, soaked in antiseptic - a starting profile is attached to it. This is an ordinary wooden lath or aluminum profile for drywall. The guide is placed according to the level, otherwise the entire apron will become skewed. Subsequently, if it interferes with the tight connection of the headset to the wall, it is removed. Further:
Fastener selection
The following types are used for work: liquid nails for plastic, wood or self-tapping screws. Advantages of the first option:
- Ease of operation. Even a child can use a liquid nail gun.
- Speed. There is no need to drill holes for self-tapping screws or maintain the required level - after fixing, it is possible to immediately level the slab with the liquid composition. Liquid nails dry from 20 to 40 minutes, the total setting time is 24 hours.
- Ease of use. A liquid nail gun is the same device that installers use when sealing cracks with polymer foam. All that remains is to press on the handle and close the hole as unnecessary.
The use of self-tapping screws is not without its own advantages. In particular, the home master is confident in their strength and the fastening of the wall panel in the kitchen is reliable. However, the appearance of MDF will be spoiled by microchips. Deciding whether liquid nails are better or self-tapping screws can only be done experimentally.
Beautiful furniture goes well with an apron made from nature
Installation of panels: using skirting boards and more
There are two ways to independently attach a wall panel in the kitchen.
In this case, the MDF kitchen apron will not wrap its edges behind the upper cabinets and countertop. Do this:
- Move the set close to the wall and mark the places for attaching the baseboards. The walls must be prepared - cleaned, puttied and primed.
- Measure the resulting distance from the bottom of the cabinet to the countertop and place it on MDF kitchen panels. Cut off the resulting piece.
- A manual gun for liquid nails is charged with a tube of the composition and applied around the perimeter of the wall and the cut piece. It is advisable to spread the glue with a spatula if the MDF board is thin.
- Immediately strengthen the baseboards. Liquid nails for wood or plastic are applied to them, depending on the texture, and pressed against the edges of the installed apron.
The good thing about this method is that the installation is carried out without removing the furniture from the kitchen. The work takes several hours. Install sockets and other components, perhaps a day after the MDF apron was attached to the kitchen.
A glass apron looks perfect in a kitchen with furniture
For self-tapping screws
The panel is mounted on a frame made of metal profiles or wooden slats. In this case, the set is removed from the kitchen - it will interfere. The wall is prepared in a similar way as described above. Then, checking the level, install the frame box. The thickness of the profile is no more than 0.5 cm (the panel parameter is also taken into account), otherwise it will not be possible to install an MDF apron in the kitchen under the cabinets and countertops.
The formed frame of wooden planks is subject to mandatory antiseptic treatment - a humid environment can reach the natural material and develop favorable conditions for the growth of mold . Therefore, the choice of a metal profile is dictated by necessity.
How to attach correctly:
A measured MDF board is drilled for inserting self-tapping screws. If you screw them in right away, there is a risk of getting chips around the fastening - this is noticeable on a dark panel. Then they begin to symmetrically attach the laminate to the wall, gradually tightening the screws. The work takes a long time, however, the durability of the kitchen apron is beyond doubt.
Useful tips
- To make the cladding look neat, cover the edge of the kitchen apron with special slatted plugs or corners.
- You can close the gaps between the working surface of the table top and the adjacent wall with decorative skirting boards.
- After securing all the screen parts, treat the joints and corners with transparent sealant.
- Start laying elements from the corner.
- Sockets and switches are installed after all installation work is completed.
- When cleaning your kitchen apron daily, avoid using powders or hard sponges. Abrasive materials scratch and damage plastic panels.
We recommend watching the video instructions:
Features of a kitchen tile apron
The glue under the ceramics should lie evenly, without air cavities. A beautiful, but very fragile material will have to be washed repeatedly, sometimes with effort. It's unlikely to fall out, but it will definitely crack.
And the stripe above the work surface should decorate and delight. The process of cooking is labor-intensive, something needs to invigorate. Choosing beautiful tiles is half the battle. They harmonize the top and bottom of the set and are an important part of the interior. Can't go wrong with the design!
Ceramics – three thousand years or more
Designers insist to pay attention to the following points:
- You can’t put them without seams, 2 mm, 1 mm, but there should be;
- It is necessary to bring part of the tile down, under the table level;
- We place the edge of the top row under the top cabinets;
- We place it higher above the hob; if the exhaust hose does not have front covers, we place it under the very exhaust hatch;
- In the corners of turns, on the turns of the apron, small cuts cannot be made;
- From the corner to the left/right - there should be identical pieces of tiles;
- 2/3 of the length of the tile is a good cut, half a tile is tolerable, it is better to exclude smaller sizes;
- The main thing, the most difficult thing, is to combine the pattern of the apron with the structure of the kitchen furniture.
Preparatory work and installation of the apron
Taking measurements
Before installing the apron, of course, it is necessary to measure the area that it should cover. Some prefer to cover the entire wall with panels from the floor to the wall cabinets or behind them. Others only cover the space between the countertop and cabinets. Decide which option suits you best. And measure the height of the kitchen apron.
Count the number of sockets that are in the apron area. You will need to cut holes for them. Please note that where the hood hangs, the height of the apron will be greater. The length of the panels will be the same as the length of the working area.
If your kitchen set is corner or U-shaped, then it makes sense to cover the wall adjacent to the work wall with an apron.
Preparing the surface
Once you have decided on the dimensions and purchased the material, you can begin preparing the surface. The main thing to do is to level the wall. Perhaps a perfectly flat surface is not needed. But, if there were tiles on the wall and after dismantling it there were pieces of mortar left, this needs to be removed.
You also need to remove protruding screws and nails. Fill holes, cracks, chips. Go over the surface with putty and, when it dries, apply an antiseptic. This kind of wall preparation does not require very much time.
For ease of installation, you can install an auxiliary rail as a support for the apron using self-tapping screws. After its installation, the rail is removed.
Installation of an MDF apron
Installation of a kitchen apron to the wall can be done in different ways:
- With the help of clamps. That is, “ears” are attached to the back side of the panel and simply hung on the wall. The same technology is used here as when hanging cabinets. The wall should not have large differences.
- On construction staples using a construction stapler.
- On an aluminum profile. A profile structure is attached along the entire perimeter of the panels and MDF is inserted into it.
But probably the most common methods are: fastening with self-tapping screws or “liquid” nails. Let's take a closer look at them.
To secure the kitchen apron with self-tapping screws, you need to make a frame of wooden slats on the wall. The slats are attached to the wall with dowels and aligned in the desired position. Don’t forget that they, like a wall, need to be treated with an antiseptic. After this, you can attach the MDF apron to the screws.
To hide the screws, put decorative caps on them to match the panels. Correctly selected hats are almost invisible on their surface.
Also common is the method of attaching panels to “liquid” nails. In this case, a more even wall is needed, since differences will be noticeable. If the apron will go behind the cabinets, then you need to install it first, and then hang the cabinets. If the height is up to the cabinets, then it doesn't matter what you hang first.
So, “liquid” nails are applied to the entire surface of the MDF panel. First along the perimeter, and then in stripes in the center at intervals of 30 cm. After application, press the panel against the wall. This method is even simpler than fixing it with self-tapping screws. The main thing is to close the joints where moisture can get under the panel. As you can see, installing a kitchen apron is not that difficult.
But some experts say that over time, due to the composition of the “liquid” nails, the panels may become deformed. Therefore, choose your product carefully.
How to care for an MDF apron
MDF panels are not a capricious material, but there are still some nuances in care. It is strictly forbidden to wash an MDF apron so that water flows over it. Be especially careful around the edges. Moisture getting under the panel can lead to peeling (if secured with “liquid” nails) or deformation (if secured with self-tapping screws). And the surface itself can absorb moisture. Therefore, only a slightly damp cloth.
Do not use coarse abrasives. Over time, they will erase the top decorative layer. Also exclude any acids or alkalis. They can delaminate the panel, then only replacement will save you.
And lastly, try to place hot household appliances away from the apron. Constant exposure to high temperatures leads to damage to the panels.
If you follow the rules of care, your kitchen apron will last you a long time.
How to mount it on the wall?
It is quite possible to install a kitchen apron yourself. Let's take a look at several ways to secure this finish.
On the guides
As mentioned above, a plastic kitchen apron is inexpensive. That is why such finishing is often replaced as soon as the old one becomes boring. If you assume that over time you will want to install new plastic parts, then you should install them on the wall using guides, which are metal slats.
The guides must be attached to the walls using self-tapping screws. Plastic panels are simply attached to these guides like rails. If necessary, they can be pulled out and new elements installed.
Self-tapping screws
If you want to install a plastic kitchen apron thoroughly and do not intend to replace it in the near future, then you should turn to securing it with self-tapping screws. You can drill right through the plastic without any problems. But you need to take into account that for this installation method you will need to prepare the walls - they must be perfectly smooth, without potholes or drops. Do not be afraid of marks from self-tapping screws that appear on plastic decorative coverings. If desired, they can be easily and quickly closed using special color-matched plugs.
With this method of fastening, the plastic apron will not fit tightly to the wall base. There will be a small free space behind this part. Many craftsmen hide unattractive electrical wiring there, making the interior more aesthetically pleasing and neat. In addition, the apron installed on self-tapping screws can also be easily removed whenever you want.
On the sheathing
This is another popular way to install a plastic splashback. It should only be used if the kitchen area is not too small. Many users prefer not to waste time by installing the apron directly on the rough base of the wall, but here you can encounter significant unevenness. In this case, installing the sheathing can save the situation.
The lathing is a set of metal slats or wooden blocks that are attached to the wall base along the perimeter of the future kitchen apron. First, a kind of square is formed on the wall, which has the same dimensions as the plastic part. After this, vertical and horizontal strips are installed inside this square using self-tapping screws. These parts are needed to make the structure stronger and more reliable. A plastic panel is also attached to the resulting sheathing using self-tapping screws. In this case, there will be a small free space between the apron and the wall, where it will be possible to place electrical wiring or build beautiful lighting.
On glue
You can attach a plastic apron using high-quality adhesive. This installation method is rightfully recognized as the simplest and most understandable. Even a beginner can handle its implementation.
In this case, you can use special high-quality glue or good liquid nails for fastening. Of course, it is better to turn to the second option. The glue will need to be applied to the prepared wall base in thin strips, leaving a very small gap between them. After this, the selected plastic panel simply needs to be pressed against the applied adhesive.
The main advantage of this installation method is its simplicity and speed. However, we must take into account that gluing a plastic apron will only work well on a properly prepared base. The wall must be perfectly flat and neat. There should be no traces of the old finish on it. Potholes, irregularities, chips and cracks are also unacceptable.
Varieties
Today, there are a large number of varieties of kitchen aprons made from a variety of materials. They expand the possibilities for renovation, allowing you to bring bold design solutions to life.
PVC panels
PVC panels used to install a splashback in the kitchen have the following competitive advantages:
- easy to install;
- affordable for any family;
- they are easy to care for;
- high moisture resistance;
- nice appearance.
Flaws:
- the area of the apron located in close proximity to the stove needs additional protection;
- During use, scratches and abrasions quickly appear on the surface of the apron.
ABS
Advantages of using an ABS apron:
- a wide variety of colors and patterns;
- low weight of material;
- resistance to moisture;
- hygiene.
Flaws:
- poor protection from mechanical damage;
- poor fire resistance;
- with prolonged exposure to sunlight, the material begins to fade;
- quickly deteriorates with constant contact with aggressive detergents.
Polycarbonate
Polycarbonate is an inexpensive material, thanks to which apartment owners can decorate their kitchen without spending large sums from the family budget. Despite its apparent fragility, polycarbonate is resistant to various types of damage. The polycarbonate surface is easy to clean from dirt, and its water resistance allows you not to worry about the safety of the repair during the operation of the room.
All-sheet
Kitchen aprons made from a single sheet of plastic are more practical than their competitors, as they do not have connecting seams. You will get a smooth, uniform surface that is easy to clean. Disadvantages include large dimensions, as well as the need to cut out recesses for various kitchen decor elements before direct installation.
MDF
By choosing MDF as the main material for the apron, you get:
- material resistant to mechanical damage;
- high protection against high humidity;
- quick and easy installation;
- the material is cheap, which saves money.
Note! It is not recommended to install an MDF apron behind the stove, as under the influence of high temperatures the material begins to deform
Chipboard
Chipboard has a denser material structure, in contrast to panels made from MDF. They are very cheap, but they are not exposed to moisture. The material also reacts poorly to high temperatures, easily flammable during prolonged contact with fire.
Glass
A glass splashback is considered the best choice for any modern kitchen, and its only serious drawback is its high price. Otherwise, the material has a large number of advantages, expressed in:
- quick installation;
- ease of operation;
- beautiful appearance;
- a wide range of possibilities open to the interior designer.
Advantages of wall panels
Main advantages:
- Easy to install. One piece covers a large area.
- Save time. Many people value these materials for their speed of installation.
- Wall defects are masked.
- Acceptable price. Cladding is cheaper than tile adhesive.
- The surface is quickly washed and protects the base from water.
Panel selection criteria
Features of the room are taken into account when purchasing panels:
- Humidity indicator and optimal temperature. The microclimate in the room affects the condition of the furniture. Finishing materials must withstand aggressive influences well.
- Plaque on surfaces appears due to the constant adhesion of fat. These components make maintenance difficult and negatively affect various surfaces.
- Various chemical compounds are formed during use. Aprons can withstand such exposure and do not corrode.
Products must be visually attractive and durable
This makes it possible to create an interesting design that is practical.
Types of wall panels:
- Natural wood with an unusual design. They fit into any interior and can withstand heavy loads.
- MDF panels for the kitchen, like chipboard and fiberboard, resist external factors well.
- PVC is a durable and versatile coating with a wide range of textures and colors.
Wooden aprons are treated with moisture-resistant material for protection
Mounting methods
It is not necessary to involve specialists to install the apron. This process is quite simple, so you can do it yourself. There are various ways to install an apron. The choice of a specific technology and the complexity of the work depends on the specific material.
On slats
Alternatively, the apron can be mounted on a wooden frame made of slats. The lathing will allow you to ignore even significant unevenness of the walls. For work you will need wooden planks with a section of 10x40 mm. The slats are mounted every 40 cm. It is necessary to ensure that the frame elements do not protrude forward and that their surface is in the same plane. The apron is attached to the slats using self-tapping screws. As an alternative to slats, you can use a metal profile. Almost any materials can be attached to the lathing - MDF or chipboard boards, sheets and panels made of plastic, metal options.
To the kitchen baseboard
The easiest way is to secure the apron using a plinth. The element is built between the apron and the work surface, as well as between the upper cabinets and the apron, closing the gaps and turning the structure into a single whole. It prevents moisture and dirt from penetrating into the gap between the wall and the countertop. Installation of the apron is carried out after installing the headset. It is temporarily fixed, after which the baseboards are installed. These elements are fastened to adjacent surfaces using self-tapping screws, which are subsequently closed with decorative plugs.
For liquid nails
This fastening method is suitable provided there is a perfectly flat base. If the previous apron was made of tiles and the elements of the old covering do not fall off, you can glue the new material directly onto it.
At the preliminary stage, you should prepare the wall. You can remove dust and strengthen the surface using a primer.
In order to secure the apron, you need to apply liquid nails to it or to the wall, then attach the finishing element to the base and hold for a few seconds. It is more convenient to apply the adhesive to a horizontal apron rather than to the wall.
If the size of the panel is larger than the planned distance between the countertop and the upper cabinets, then it must be secured before installing the set. To do this, liquid nails are distributed on the back side of the panel and glued to the wall. To prevent the panel from sliding, you need to make a support from a metal profile or wooden slats.
If the apron is smaller, install the cabinets first. After gluing the apron, you need to install the baseboards. They will protect the joints from moisture penetration into the material. If there is no skirting board of the desired color on sale, you can choose a contrasting option.
Preparing the kitchen wall for installation
Considering the large size of MDF boards, as well as their density, it is not worthwhile to align the walls particularly precisely, even if they are fastened with adhesive. The surface must be cleaned of the previous finish and treated with a liquid primer.
Might be interesting! Follow the link for step-by-step instructions for attaching wall panels
One of the options for installing an apron
Options for work wall
Plain
MDF aprons are incredibly varied in their color scheme. Single-color options are produced in a wide range and are suitable for both light and black interiors, bright and pastel, matte and glossy. You can choose a panel that exactly matches the kitchen unit, opt for a contrasting solution, or purchase an apron that is just 1-2 shades lighter/darker than the existing furniture. Read our tips on how to choose an apron for a white kitchen at this link.
Colored
A one-color solution is not for you? Pay attention to the colored aprons. Panels with imitation wood, cork, stone, parquet boards, ceramic tiles... The range is limitless
At the same time, there is no point in choosing a panel according to the principle “dark colors show less dirt,” because the MDF surface of any shade can be easily washed with water.
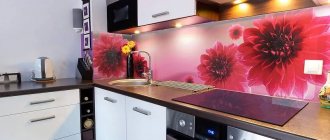
Photo printing or artistic drawing
This option is suitable for connoisseurs of non-standard solutions. A real painting will appear in the kitchen area, a canvas that will become a bright accent. You can choose panels with floral patterns, panoramas of metropolises, still life, picturesque landscapes of mountainous areas, or one of hundreds of thousands of other options. Read how to choose an apron for a white kitchen with a black countertop in this material.
For an interior decorated in red and black shades, a Japanese-style panel, options with imitation animal skins, black and white panels, white panels with large photographs of red berries, etc. would be acceptable.
For a kitchen in soft colors and with floral wallpaper, panels depicting fruits, a spring meadow, and bright butterflies would be appropriate.
Style and colors
Landscapes and natural motifs are popular. They transform boring rooms beautifully and inexpensively. Aprons are made with drawings and mosaics on sea, forest, and Mediterranean themes. The style is also more complex, for example, in the spirit of loft, English interior, techno, hi-tech, eco. Treated wooden boards with a Provence, Western, or Loft look are sometimes used as an apron.
You need to experiment with color. The apron is finished with a different approach: at odds with the furniture and in color, consistent with the wall decoration and in contrast. White, blue, green tones look ideal - with any shade of the kitchen set. Softness is added with pink, orange, and purple colors.
Surfaces are chosen with any texture. For a kitchen, a glossy one would be best: a reflective coating diffuses light well and improves aesthetics.
Rules for caring for an apron
The apron should be washed periodically with soap and water using a soft sponge or cloth. Instead of soap, you can use dishwashing liquid, but it may leave streaks if you don’t wash it off well enough. It is better not to use abrasives, and if there is frozen fat, try to soak it with soap. As you use it, you need to make sure that children do not scratch the material, and also prevent its sudden overheating, although expensive panels are quite resistant to this type of damage. You shouldn’t skimp on the quality of the material, because it should serve you faithfully for a long time.
Advantages
How to fix a countertop in the kitchen
Plastic has a number of advantages compared to other products:
- Easy panel mounting.
- When attaching products to a frame made from a guide profile, no preliminary preparation of the base is required.
- Absence of construction debris and dust during installation work.
- Low cost of lamellas and fasteners.
- Wide range of colors and shades of plastic. The selected products combine well with kitchen furniture and other finishing materials.
- Easy surface care. You can clean dirt using detergents and a regular kitchen sponge.
Self-tapping screws
In this case, there is no need to ideally prepare the wall surface. For installation, you will need screws, dowels, bushings and decorative covers that match the design.
How is the apron attached?
Step 1. The panel is applied to the wall to transfer the mounting location to it (through the mounting holes).
The apron is carried using suction cups
Marking the places where the apron is attached
Step 2. Recesses are drilled in the wall into which dowels are inserted.
Drilling holes for fasteners
Dowels are inserted into the holes on the wall
Step 3. Bushings are inserted into the holes that were made in the apron.
A bushing is inserted into the apron hole
Step 4. The glass is again installed on the wall. Self-tapping screws are screwed into the holes.
Self-tapping screws are screwed into dowels
Step 5. Decorative caps are installed.
The fastening points are covered with decorative overlays
And they install sockets, switches, etc.
Installing a glass splashback can significantly decorate your kitchen space. The product itself will serve for many years without losing its external qualities.
Replacing an old apron
If there is a need to replace the old apron without redoing the entire repair, it is quite possible to do this. To do this, you will need to temporarily remove the kitchen unit.
If the new apron is made of MDF panels or polymer materials, then the material can be installed using the adhesive method directly on the old finish. This technique is suitable if the old apron was made of tiles.
For other materials, dismantling the old apron is necessary. Otherwise, the new finish will either look sloppy or simply fall off.
Gluing a plastic apron to the wall with liquid nails
Before gluing the kitchen apron to liquid nails, you need to select an adhesive composition. Let's look at the most popular options:
- Glue Titan. The product resists high humidity and sudden temperature changes well. It is used to secure products made from MDF, plastic panels and other finishing materials.
- Liquid Nails. A special mounting composition ensures maximum adhesion of plastic panels, decorative strips and moldings with various types of bases (wooden, plasterboard, concrete or brick). The solution resists moisture and sudden temperature changes well.
- Glue Moment. Used for fixing decorative products made of PVC or MDF on different surfaces. This solution has good adhesion, can be applied to uneven substrates, and retains water resistance and plasticity after drying.
Next, we’ll learn how to glue a plastic panel to the wall in the kitchen. Installation of decorative elements is not difficult, but you need to be extremely careful: glue residues are difficult to remove from the surface of the finishing material.
At the preparatory stage, the wall is marked to finish the working area. At the same time, the verticality of the enclosing structure is checked using a building level.
The panels are glued in the following order:
- We prepare the base, remove old decorative material from the surface, remove wallpaper or glue residues from ceramic tiles. We remove the peeling plaster from the wall and clean the surface of dirt. We repair all chips and cracks with glue, cement-sand mortar or putty (it all depends on the nature of the unevenness). When the mixture dries, apply two layers of deep penetration primer - this will promote better adhesion.
- Apply glue to the wall using a notched trowel. Instead of this mixture, you can use liquid nails. This solution is applied in a snake onto the inside of the plastic panel. To facilitate the work, use a special gun.
- The installation is completed by gluing the planks. The panels are pressed tightly against each other, then removed, the amount of glue under the base is checked, if everything is fine, the elements are finally fixed. For the initial hardening of liquid nails, 3-5 minutes are enough. A decorative strip is installed in the corner part of the apron.