Back wall decor
If the shelf is not completely filled with books and its back wall is visible quite clearly, this method will help give the structure a new appearance. For decoration, you can use pieces of wallpaper that are pasted on the walls of the room, bright images and even thick fabric. First of all, the surface must be thoroughly cleaned of dirt and dust, then select the appropriate size of the decorative element and glue it using liquid glue or a construction stapler.
Restoring an Old Shelf Using Homemade Chalk Paint
Almost every home has an old shelf that has been an eyesore for a long time, but it was a pity to throw it away. What can be done with it so that it fits harmoniously into the interior? Let's try to decorate it using homemade chalk paint.
First of all, we need to decide on the functionality of our shelf: where it will be located - in the kitchen, room, hallway, or in the country house. This will determine what materials can be used. For example, country wooden furniture must be treated against fungus and mold and must have a moisture-resistant coating; if the shelf hangs in the kitchen, then it should be ready for intensive cleaning using detergents and so on. I decided that my shelf would be more useful in my fifth-grader’s room so that he could put away his school textbooks and sheet music without fear of being “read” by his little sister.
So, the image begins to gradually take shape - we will make a shelf for books in the room of a teenage boy. Now you need to decide how the shelf will look, that is, create a design project. To be honest, I can’t work if I don’t imagine the future product. A certain image, a photograph, should form in your head. Although I know that many masters work on inspiration, and they produce excellent work. But I still live by the principle, which is expressed in one quote: “If we do not know where we are going, we will be very surprised if we arrive in the wrong place.” After consulting with my son, we chose the “Journey” look and the “Old Attic” style. It is not intrusive, it suits his character well and does not depend on teenage fashion. I select the color scheme, focusing on harmonious color palettes. The following palette suited the interior of the room:
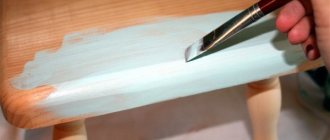
Not long ago I became interested in working with chalk paint; it has many advantages for painting furniture, especially old ones - it goes on almost any surface, does not require a primer, and is very opaque. Despite all the advantages, one very big problem arises - in our country the range of chalk paint for decorating furniture is not large, and the prices are very steep, taking into account delivery to the regions. Therefore, there is only one way out - to make the paint yourself. If the paint turns out to be of high quality, then you can get any quantity and almost any color. But first, let’s tidy up the surface of our shelf and prepare it for decoration. Of course, chalk paint applies to almost any surface, but do not forget that old furniture has dirt - grease stains, traces of cosmetics, etc. In addition, it can be coated with some kind of “super-resistant nitro varnish,” as in my case. Therefore, before painting, be sure to degrease the surface, you can even wash it with detergent, and lightly sand the old coating for better adhesion.
Now we’ll use putty and smooth out all the knocked out knots and broken joint tenons. In order to get the desired consistency, I mix two putties - I saw this technique at Tatyana Chimbir’s master class. One "Tex" for wood - it is very dense, but finely dispersed and will not close large holes. I don’t remember the name of the second putty; it has a loose, voluminous consistency, but, unfortunately, it quickly chips off when using a sander. By mixing these two putties (1:1) I got a mixture that was both voluminous and durable.
Now I need my favorite thing when working with wood, plywood, especially prefabricated products - a sanding machine. Use 80 or 100 grit sandpaper to smooth out the putty. Then, using sandpaper No. 150-200, we go over the entire shelf from the outside and inside. In summer I sand on the balcony, and in cold weather in the bathroom.
Now is the time to start making your chalk paint. On the Internet I found several recipes for chalk paint, with grout, plaster, tooth powder, calcium carbonate, soda, starch, etc. And what I want to say is that the quality of the paint will depend on the ingredients that you have available. Basically, a chalk paint recipe includes 3-4 main components: 1) water-dispersion paint (latex or acrylic); 2) gypsum, grout, starch, soda, and so on; 3) water. The quality of chalk paint will depend on the composition of each component. When I first became interested in chalk paint, I took the most common recipe, which is in Svetlana Shamshina’s book, but the paint turned out to be of disgusting quality. I believe this is because we do not have latex paint from the companies that craftsmen use to make chalk paint. If I add grout in the proportions specified in the recipe, then the latex paint curls up into a lump, and if it is less, then when varnishing, the paint is washed off with varnish. Then I decided to look into this issue, what was wrong. It turns out that the composition of latex paint for walls and ceilings is very diverse, from acrylic to carbonate base. Accordingly, the result of applying paint will be different. The same goes for the second component, especially if you use plaster. The fact is that gypsum comes in different consistencies. I tried to use architectural plaster and plaster for children's crafts - the paint did not work out, since the gypsum was ground too coarsely, in addition, the quality of the gypsum itself may be low. On English-language sites, the so-called “Gypsum of Paris” is mainly used to prepare chalk paint, which many consider to be the standard of quality.
What else would I like to say about preparing chalk paint? Never take a recipe thoughtlessly; try to understand the ingredients. This will give you more room to experiment. Think about what role each component plays in the composition. For example, carbonate latex paints are more fragile; using chalk paint based on them can very successfully emphasize the structure of the wood in a product. To do this, apply the paint, let it dry, and then sand it with a soft sanding sponge. If you need a durable base, then try latex paint for exterior and interior use. I also tried making acrylic-based chalk paint for exterior and interior use, and the result was also good. As for the second component - grout for joints or dry gypsum putty, the consistency of the paint, the strength of the coating, and resistance to external influences depend on them - the more of the second component, the thicker and harder the coating will be.
Another point is why I don't like using just acrylic paint to paint furniture. I read a lot of master classes at the Crafts Fair and many people use simple construction acrylic paint. But I don't like that it doesn't give an even coverage, leaves brush marks and comes off quickly. Chalk paint is multi-component and can have as many functions and effects as you want. You need to try, don’t be afraid to experiment. As a result of numerous experiments, I have developed my own recipe for chalk paint, which is not inferior in quality to industrial paint, but for now I will not publish it until I test it with various decorating techniques.
Now a few words about the selection of colors for tinting. When tinting, I use color combinations for Annie Sloan chalk paints, which are widely published on the Internet. I really like the color palette of these paints - there are bright colors, but they are very comfortable to read, they don’t hurt the eyes, there are a lot of pastel shades. I printed out a color chart and color based on it.
Now from theory and preparatory work, let's return to the book shelf. I mix the paint in small jars with a wide neck. We have a hard time finding good brushes for painting furniture, just like with paint. Brushes with natural bristles sold in hardware stores are hard and liquid, not at all what we would like. Good quality Matrix and Bison. But probably the best brushes are professional paint brushes, which can be bought in online stores.
We paint the shelf in two layers with intermediate drying.
This is what happened. The coating is very dense, two layers of paint are enough. I painted the inside of the shelf with Emperor Silk, sanded it with a soft sanding sponge (you can use 500-1000 sandpaper) and covered it with two layers of acrylic parquet varnish.
Now let’s decorate the outside of the side walls using napkins and implantation. I chose napkins with black and white photographs, and for implantation I took drawings of vintage postage stamps printed on a laser printer.
Cut out a picture from a napkin and glue it in the usual way. By the way, the napkin sticks perfectly to chalk paint. After drying, sand the entire surface with a sanding sponge and wipe with a dry cloth.
Then we cover the entire outside of the shelf with two layers of varnish. By the way, after varnishing, a very interesting decorative effect was obtained. Dry the surface and implant the picture. To ensure that the edges of the picture are not visible, we apply varnish only to the stamp itself, and not to the entire sheet of paper. After drying, wet the paper and roll it up. If the edges of the picture are still noticeable, then you need to carefully sand them with sandpaper No. 320-500. We cover it with a finishing varnish, acrylic, acrylic-urethane or another one that you like.
After drying, I decided to add hooks to the shelf so that the child could hang some of his small things. The hooks I had were the color “Old Bronze”, but I had no luck with the self-tapping screws; I couldn’t find any bronze ones. But it doesn’t matter - they can be coated with bitumen varnish and they will take on an old look.
It is better to choose stronger hinges, knowing the weight of school textbooks.
This is what we ended up with: “A shelf from the old attic,” that’s what we called it. In my opinion, it is quite interesting and functional. You can hang it on the wall and stack textbooks.
I hope my master class will be useful to all lovers of alterations. Thank you for your attention.
Coloring
This method is universal. Here you need to choose the right composition and color of the coating. For example, you can use acrylic-based paints to give the surface a matte, rich shade, or a special varnish to make it glossy and shiny. As for color, there are no special recommendations; it all depends on taste preferences. The shade can either match the overall color scheme of the room or be contrasting with it.
Self-adhesive film
This method allows you to quickly and easily change the appearance of the structure, mask abrasions and small defects on its surface, if any. In this case, the shelf must be thoroughly rinsed from dirt and dust, and then proceed to pasting. For greater convenience, it is recommended to pre-measure each part, cut out pieces of film of the appropriate diameter, carefully glue them to the surface, pressing firmly with a soft cloth to avoid the appearance of bubbles and bruises. If you don’t want radical changes, you can use decorative stickers instead of such film, placing them on visible areas of the structure.
If you have the opportunity to spend more time, you can show your imagination and decorate the shelf in a more original way, using artificial and natural decorations, for example, fabric flowers, stones, beads, stencils for drawing or decoupage techniques.
- Author: Natalya32
Rate this article:
- 5
- 4
- 3
- 2
- 1
(3 votes, average: 3.7 out of 5)
Share with your friends!
How to give new life to old furniture: 10 ideas
peacockdreamdesign.com
An armchair with shabby upholstery, a chest of drawers that is out of date in design, or a boring chair can be sent to the dacha or taken to the trash cans, or you can give them a new life by redoing and modifying them. There are several advantages to such a change. Firstly, this way you get an updated item at a lower price than if you decided to buy a new one. Secondly, you can choose a new design, color, upholstery material yourself and get exactly the result you need. And thirdly, the remodeling process itself is certainly exciting!
So: 10 ideas on how to repurpose old furniture:
Wooden furniture can be repainted
Photo: @withlovefurniture
Similarly, repainted furniture is in fashion today and is sold in stores and showrooms for impressive sums. Meanwhile, an old wardrobe or chest of drawers can be turned into a similar designer piece of furniture with your own hands. We talked in detail about how to paint furniture in this master class:
Painting furniture: 5 main rules and master class
There you will find a lot of ideas for inspiration.
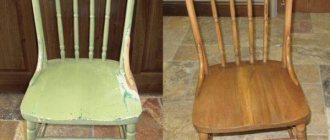
Wooden furniture can be sanded and re-varnished
This is what this table looks like after restoration work, and in the photo below is what it looked like before:
If you want to update such a piece of furniture, stock up on sandpaper (coarse and fine), a lint-free rag, stain of the desired color, varnish that provides a durable coating, and a brush.
First, the item must be prepared for coating. Read about how to do this in the master class on painting furniture (link above).
Then you need to apply the stain with a brush, and then walk over the surface with a cloth, evening out the color.
After the stain has dried, coat the wood with varnish. Up to 6 coats may be required (check the instructions for your varnish), and before applying each new coat, dry the previous one. Between layers, you can sand the wood with very fine sandpaper - this way the final surface will be as smooth as possible.
Photo and source: apartmenttherapy.com
How to create comfort at home: 10 simple ways
Furniture can be covered with self-adhesive film
Photo: roguevalleyguide.com
“Self-adhesive” is a fairly simple way to change the appearance of furniture. Self-adhesive film can be glued, for example, to the doors of kitchen cabinets or bedside tables, to a closet, table or chest of drawers. The range of films is very wide: you can find wood or metal material, plain and patterned, smooth and textured. We talked about what kinds of self-adhesive film there are, which types are better suited for different purposes, and how to properly stick the film here:
How to cover furniture with self-adhesive film: master class + tricks and tips
You can replace fittings on furniture
Ikea
First of all, this applies to handles - on cabinets, cupboards, doors and drawers of chests of drawers or shelves. New handles can be picked up in a store or made yourself, for example, from thick leather. Unusual, laconic or intricate, modern or vintage-style fittings can significantly change the character of your furniture, and if you first paint the item or cover it with film, new handles will complete the transformation.
How to use leather belts in the interior: 9 life hacks with instructions
Add new legs to your furniture
New legs can also make furniture look updated. The alteration will be especially noticeable for things with high legs - for example, a coffee table, bench or chest of drawers with long legs. You can pick up new legs at furniture or construction stores, and installing them is usually not difficult.
Photo: prettypegs.com
How to reupholster the base of a bed with your own hands: master class + tricks and tips
You can add relief decor to the furniture
Figured decor, such as wood, can be found in the store. And for a simple geometric decor - as in the photo above - you can use wooden planks. The planks can be placed vertically or horizontally, parallel to each other, or by laying them out into a frame - as your imagination dictates.
Here the cabinet doors were painted first.
Then the strips were glued to the doors (you need a strong adhesive suitable for wood).
And then two more layers of paint were added. In the same way, you can decorate furniture with figured reliefs.
Photo and source: fallfordiy.com
What to make from a simple coffee table: 13 ideas with instructions
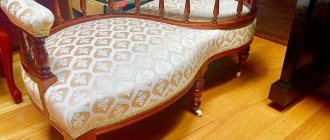
The upholstery of a sofa or chair can be repainted
Photo: 11magnolialane.com
This method is also suitable for upholstered chairs, ottomans, chaise longues and similar items. Please note that repainting will help change the color you don’t like and hide stains, but it will not remove scuffs and holes. One more point: in this way you can change the color of the upholstery to a darker and more saturated one, but not vice versa. For such alterations you need special fabric paint. Read about how to repaint the upholstery of upholstered furniture here:
How to update an old chair: 3 master classes and 25 ideas
Upholstered furniture can be reupholstered
Photo: awesomesauceassashattery.com Of course, this method is more complicated than repainting and will require care and precision. But by reupholstering a chair or sofa with your own hands, you will get a new and fresh coating without defects, plus - in the color and texture you need. Read about how to reupholster a chair here.
We create home comfort: do-it-yourself covers for decorative pillows
You can sew a cover for a sofa or chair
Photo: confessionsofaserialdiyer.com
Sewing covers for upholstered furniture with your own hands is not the easiest task, especially if the chair or sofa has a complex shape. But with due diligence and perseverance, everything will work out! These master classes will help you:
How to sew a sofa cover: 3 master classes
How to quickly sew a chair cover
You can add a new bedspread and decorative pillows to upholstered furniture
Photo: zasteli.com.ua
If you are not yet ready for such large-scale work as reupholstering upholstered furniture or sewing covers for it, you can limit yourself to a new bedspread or blanket and a set of pillows. Textiles change the appearance of furniture - and the entire room - in a radical way! Another advantage of this decor: if desired, it can be easily and quickly replaced with a new one.
Pillowcases for decorative pillows - do it yourself: 7 master classes
DIY interior ottomans and unusual pillows
Faux fur blanket: master class
Simple blanket using patchwork technique: master class