Glass is an excellent alternative to classic tiles, which were used to decorate the kitchen backsplash by our grandmothers, and continue to be used by us. Tempered glass is an excellent material for kitchen surfaces, which withstands moisture and steam and is easily cleaned from any dirt. And given the fact that it has the widest possibilities for decoration, for example, photo printing, glass aprons have become a real trend among interior designers. Skinali is another name for tempered glass with an image. Let's figure out what it is?
Article navigation:
|
You can often hear the following opinion of skeptics: “On shiny glass, small drops of water, grease, handprints, and the slightest particles of dust will always be visible.” All these objections are dispelled by those who have already installed glass surfaces: no more dust and marks remain on the glass than on ceramics, and the absence of seams, like between ceramic tiles, makes cleaning the apron as convenient and simple as possible.
How to choose glass for an apron?
Typically, the thickness of glass for such purposes is 4, 5, 6 or 8 millimeters.
Where glass may be subject to mechanical stress, as well as temperature changes, near the stove or at the sink, it is necessary to install special tempered glass, which is 500% more reliable than usual, but even if it breaks, the fragments will be safe even for small children.
Tempered glass is not afraid of temperature overloads, and fits perfectly next to the stove. Simple glass does not have such reliability, but breaks into large dangerous pieces.
Do not confuse silicate glass with organic glass - these are different materials. At its core, plexiglass or polymethyl methacrylate is an acrylic resin, a thermoplastic transparent plastic known as plexiglas, acrylic, acrylate and others. This material has found its application in many areas of life: the aviation industry, military engineering, plumbing, advertising, medicine, tourism, music, construction and so on. If you want to make an apron for the kitchen from plexiglass, then it cannot be installed next to the stove (it melts under the influence of temperature), it is easily scratched (soft material), it is difficult to clean (compared to silicate glass, it is quite porous), and in general, in the role This type of glass is difficult to imagine for kitchen decoration.
As a starting material for kitchen aprons, two types of glass are common: regular (M1, green, unbleached, standard, transparent) and clarified (optics, optiwhite, clear, luxury, white, bleached, cleared, bleached). They differ from each other in color rendition. Regular thick glass has a slight greenish tint, which is most noticeable against a white or light background. Lightened glass does not have this tint, so printing or painting white or light colors on it looks whiter and the shades are purer. This effect is achieved by reducing the iron content during the production of clarified glass.
The thicker the unbleached glass, the more noticeable the green tint is; for example, on 4mm glass it will be less pronounced than on 6 or 8mm glass. For backsplashes with a light image, cleared glass (optiwhite, clearvizion or crystalvizion brands) is a good option. Ordinary glass has a slight greenish tint, which is difficult to distinguish on a colored backsplash, but is noticeable against a white background (the white color of a kitchen backsplash distorts the greenish tint that is present in the thickness of the glass). In the photo on the left is bleached glass, on the right is normal glass.
Discolored glass, thanks to its unique transparency properties, will make the pattern on the apron bright and rich, and the colors purer, but for this pleasure you will have to overpay about 30%. Apart from color rendition, there are no differences between glasses: both types are equally well processed, tempered, and can be printed or painted.
Methods of applying an image
The cheapest way to decorate a skinali is to stick a polymer film on which a picture has been applied in advance. When ready, the film is glued to the back of the skin.
Advice! The panels with the film must fit very tightly to the wall, otherwise steam will get under them and the pattern will deteriorate.
Other popular methods of applying images:
- Painting. An expensive version of skinali decoration, done by hand by artists.
- Lakobel. The picture is painted on the back of the panels using varnish paints.
- Stencil. Drawings are applied using special devices using stencils.
- Mirror. Using silver paint, the panels are made mirror-like.
Assortment of aprons
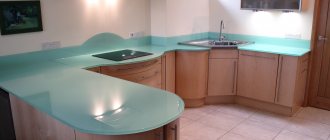
Transparent apron
This version of the apron requires transparent or frosted glass. Its main advantage is its invisibility: it is not conspicuous and does not distract attention. And with the main function - protecting the surface from dirt and splashes - this glass copes with a bang.
An excellent option would be textured glass, for example, satin glass. Solutions with sandblasting glass, with the help of which any designs are applied to the glass, also look interesting.
Apron with ultraviolet photo printing
Aprons with rich designs are called “skinali”. These are the most popular apron models in 2022, and next year their presence on the market will only increase.
The glass apron with UV printing looks beautiful and is very reliable. The picture is applied to the back of the glass using a special printer. Under the influence of ultraviolet lamps, the ink instantly hardens on the surface of the glass, which is why the technology is called: UV printing. As a result:
- the ink will not fade;
- temperature loads up to 250 degrees Celsius;
- protection from moisture.
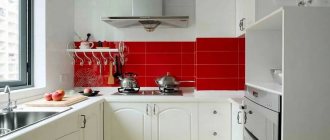
Plain apron or painted glass
A monochromatic solution is a good option for stylish housewives, making your kitchen bright and unobtrusive. Thousands of different shades can be applied to glass using the Stemalite method.
The inner side of the coating is treated with special paint and can be heat treated. This method of painting will not fade and will last you for several decades.
Triplex apron
Triplex is two sheets of glass glued together using a special polymer. Its huge advantage is that it provides high-quality protection to patterns and designs. Essentially, this is a “sandwich” of two glasses, between which a picture is “baked”.
This is the safest option: such glass cannot be broken - it can only become cracked under a strong mechanical shock.
Triplex is rarely used in kitchens because it is thicker than regular splashback glass and is much more expensive.
Apron from a mirror
A stylish option that visually expands the space in the kitchen. The disadvantages include the need to constantly monitor “your loved one” in the mirror, which not everyone will like. Alternatively, the mirror splashback can be engraved, sandblasted or completely matted.
The mirror splashback is not tempered - this is the only glass splashback that is not made of tempered glass. The reason for this is amalgam, which cannot withstand high temperatures in the oven. Be careful when choosing this material; compared to tempered glass aprons, a mirror apron is less durable and is susceptible to sudden temperature changes. Beauty requires sacrifice - you will have to forget about using burners located closer to the mirrored apron.
Note to the designer:
A glass apron is an ideal solution for a small kitchen, where it will expand the space and make the room brighter.
Nature or city photography will give the kitchen depth and expand its boundaries - also an excellent solution for a small room.
Good glass panels, tempered and made using modern technologies, are very reliable and can last for decades.
Materials and calculation rules
To finish the apron, experts use a wide variety of materials. Possible options include:
- ceramic tiles or mosaics;
- MDF;
- glass panels, mirror elements that are protected from steam and fire;
- polymer materials, PVC;
- brick or stone;
- metal.
Any of the materials described has advantages and disadvantages, its own characteristics, but they all make it possible to protect kitchen walls. They are easy to care for, clean from dirt, and you can create an unusual design. The choice of finish depends on the personal preferences of the owners, but the dimensions must be clearly calculated.
It is very difficult to say specifically which standard to choose for an apron, since for calculations it is important to understand and know the parameters of all the furniture and other features. To begin with, the design of the kitchen space is carried out, the height of the tables, the level of wall-mounted furniture are measured, the kitchen set is selected, and its location in the kitchen.
To correctly calculate the height from the floor to the apron, you need to take into account the distance from the floor to the floor cabinets.
To do this, it is important to consider the rules:
- choose tables according to the height and other parameters of the owner or all family members who will sit at it;
- the height of the slab is taken into account;
- additional equipment is taken into account, whether it will be built into the furniture;
- To simplify the process, it’s easier to buy a ready-made headset made according to standard parameters.
Let's look at the standard and optimal values for an apron.
How to install a glass splashback?
Installation of a glass apron by a team of experienced craftsmen will take no more than 60-90 minutes. This process is much simpler than laying ceramics or mosaics.
The skin is attached in one of 3 ways:
Special fasteners
This is the best and most reliable way to fix glass of any size and weight. It is also important that the wall does not need to be leveled or prepared before mounting, and if necessary, you can very quickly dismantle the apron.
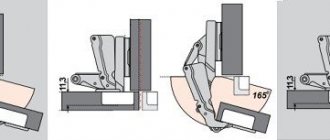
Pass-through (through) fasteners require the presence of holes for self-tapping screws in the glass. They are made even before the glass is tempered. After installation, such holes are closed with decorative caps measuring 16 (optional 22) millimeters. Transparent wall panels can only be installed in this way.
Profile systems for glass fastening
This method of fixing glass aprons involves the use of special aluminum profiles to attach tempered glass to the wall. The profile is installed to the wall using dowels and self-tapping screws, and the glass is clamped into a special groove through sealing elements.
In the profile, you can install LED glass backlighting at the end, as well as run wires for additional switches and electrical sockets without cutting into the walls.
Liquid nails (polyurethane adhesive-sealant)
This fastening method requires surface preparation: leveling, plastering, and priming. Gluing the skins is a simple operation - you don’t have to bother with fasteners, mark and drill holes, but you do need good preparation of the walls. Installing a glass apron with glue is a less reliable method of fastening.
After the panel is installed, a wall edge (plinth) is placed between the apron and the tabletop.
Skin design
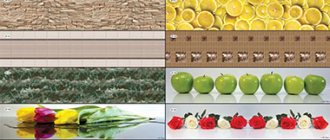
The design on glass skinals can be anything: a plain surface, some kind of texture, landscape, abstraction, still life, and even your own photos. But it is important to remember that this element of the kitchen should not exist separately, but in harmony with the rest of the interior. The simplest and most stylish solution is to use the same shades in the skin as for furniture or kitchen decoration . Almost everyone can cope with this task. If, for example, the walls are decorated in shades of green, then the glass panel can be decorated with an image of grass or apples.
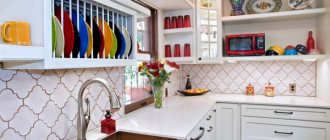
If you want to decorate the kitchen in a non-standard way, then you can choose the skinali in a contrasting color in relation to the rest of the interior details , or you can decorate the work area along with the kitchen set in one color, and the dining area in another: you will get effective zoning. But when working with contrasting colors, it is better to ask the designer for advice so as not to end up with a tasteless kitchen. It is also worth noting that for small kitchens it is better not to use dark colored skins, and landscapes of night cities will not be entirely appropriate - it is better to stick to light shades.
think in advance not only about the color scheme and image on the skin, but also about the location of sockets and other openings , if you need to organize, for example, a roof rail in the kitchen apron area. It is important to inform the company manufacturing the skin for you about all this. Holes of the required size and shape are created in the glass even before tempering, and then no problems will arise, but only later, when the skins are installed, it will be impossible to create additional holes. But you shouldn’t overdo it: volumetric railing, for example, can cover most of the skin.
Illuminated apron
You can make your apron even brighter and more attractive if you choose its lighting wisely. Often, LED strips are installed around the perimeter of the apron, and even under it, which are spectacular and effective in illumination. They can be white or colored, depending on the preferences of the owner. Colored ones allow you to create your own mood by changing the colors of the lighting in the kitchen. At the customer's request, the light can be controlled using a regular switch, touch sensor, button, remote control and even a smartphone via an application.
LED strips can be installed either in a special profile or simply glued to the upper kitchen cabinets. If the use of a profile is not intended, use sealed tapes.
Leveling walls before installation
If the curvature is obvious, alignment is indispensable. If it barely shows up, just apply a layer of plaster and start installation. The installation of the skin must be done exclusively at the final stage of repair, and after the set is assembled.
The dimensions of the glass panel cannot be “adjusted” or slots for fasteners can be made in it. Therefore, it is better to measure everything to the nearest millimeter. Any kitchen will look impressive with a natural landscape or a photograph of a night metropolis: the most modest space expands its boundaries.
Glass splashback dimensions
Let's look at the vertical size. The classic height of the apron is 60 cm. The design of a modern kitchen makes its contribution, and the distance from the countertop to the upper cabinets can be from 40 to 90 cm. The height of the apron is determined by the convenience of the kitchen user. If the housewife is short, then the countertop and upper cabinets are installed lower than the standard. If, on the contrary, the height is above average, then the cabinets are mounted at a greater distance from the working surface. In any case, you need to consider the ease of use of the kitchen, so the size of the glass apron will be determined by the distance between the countertop and the upper cabinets.
Horizontal size. Everything is simple here: how long is the kitchen - so long is the apron. For small rooms, one wall panel is enough. If you are the happy owner of a large kitchen, you will need to make an apron from several parts. If the work is done efficiently, the joints will be invisible even to a person with 100% vision.
Experts recommend:
Apron made of 5mm glass - the length of one wall panel should not exceed 2.5 meters.
An apron made of 6mm glass is suitable for a length of more than 2.5 meters and very uneven walls
An 8mm glass apron is an uncompromising solution with a fair margin of safety; in some cases it can act as a self-supporting structure.
Manufacturing technology
Kitchen skinals are made from various materials and with different techniques for applying pictures.
More: Repair of plastic windows - features
Operating procedure:
1). The material for the base is selected.
2). Preparing the slab: cutting to size, finishing the edges, sawing or drilling for sockets, switches, hooks.
3). The image is drawn.
What about the apron under the hood?
In modern kitchens, it happens that the hood is installed above the bottom edge of the wall cabinets. In such cases, in order for the glass apron to look like a solid composition, it is necessary to cover the space under the hood with glass. There are several ways to do this. In each specific case, the InterGlass company’s craftsmen will offer a choice of at least 2 manufacturing options: solid glass or a separate piece, and will give their recommendations based on the customer’s experience and budget.
An apron under the hood is a matter to be resolved individually. There can be many pitfalls here, ranging from the size of the gaps and internal cutouts in the glass to the location of gas pipes and the overall length of the apron.
In conclusion
Glass skins are a suitable material for the kitchen in terms of appearance and performance, and the high price is more than offset by durability and strength. Such a finishing element will make the kitchen original, add zest and the illusion of additional space. The main thing is to choose the right pattern and think in advance about the location of all possible holes in the work area.
The article was written for the site.
Tags:Kitchen