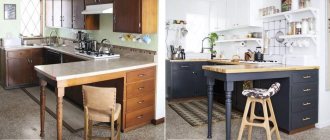
Many people are familiar with the situation when they are already tired of the furniture, but do not dare to throw it away, since the items are well preserved. A fashionable way to transform a boring environment is to remake old furniture with your own hands. Thanks to this, you can change the style of your interior on a budget.
Main possible stages of work
The process is creative, liberating, interesting, requires a certain amount of imagination, and also allows you to save money - after all, buying a new chair will cost more than repainting an old one.
Updated coffee table for the living room
Before undertaking restoration, you need to understand what stages of work generally exist in it. Some of them are optional, some depend solely on what kind of furniture we are talking about:
Inspection
You can’t do without this stage - on it you need to pull out a piece of furniture that you are not happy with into the light, and then with a critical eye estimate what repairs it will need. Is it polished? This means you will need to either renew the polish or remove it. Is it not polished? This means that other means will be required, direct work with wood. Do you want to completely transform it? How exactly - change the color, apply a design, age it? And, of course, does it have legs that break, drawers that get stuck in grooves, or other similar unpleasant things.
Children's room in classic style
Disassembly
Chairs, tables and other simple items are not needed. But if you are going to restore a closet, you will need to remove all the drawers from it, unscrew all the handles, remove all the shelves, otherwise the work will not be completed to the required level.
Cleaning
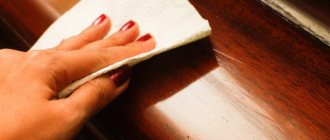
You can’t do without this stage either. You need to brush off the dust from the furniture, wipe it with a damp cloth and detergent to degrease it, and only then begin the repair.
Minor repairs to things
Work with cracks, chips, and other small defects.
Often it is enough to make the item sparkle with new colors. Renewing the polish on polished items complements minor repairs, and removing it prepares the item for further metamorphosis if you are planning to completely change it. Updated white sofa
Creative reworking
This stage is not necessary - you can easily stop at painting over small cracks or polishing the surface. But if you want a chair, table or cabinet to look new, you can paint, age, paint, or glue an additional layer of veneer on top.
Conclusion
The thing needs to be assessed again with a critical eye.
Are there any cracks left in hard-to-reach places, is it well polished, is the fresh paint peeling off? After that you can use it. If you don’t know what item of yours needs repair and whether you want to change it completely, then you just need more information to think about.
Patching
This method allows you to give old furniture nobility. The birthplace of this concept is Italy. It is based on the formation of a specific plaque, similar to formations after the oxidation process on bronze and copper objects.
- Curtains for the kitchen - 120 real photos of new designs. Options for the ideal combination of modern curtains in the kitchen interior
How to diversify your home interior: DIY decor and beautiful design ideas
- How to hang curtains - step-by-step instructions with photo examples and recommendations. Exclusive curtain design solutions from experienced craftswomen
Currently, the main colors used to give wood furniture a distressed look are gold, silver and copper.
Minor repairs
If the item does not shine and its surface is clearly not polished, then it does not need to be refinished - just follow the recommendations for caring for wooden furniture.
New life for the hallway table
To do this, you need to bring the thing into the light and evaluate which of the following defects it has.
Loss of gloss
The first possibility is that the thing has lost its luster . This happens to a tree simply from time to time, from the fact that it stands and gathers dust, from the fact that it is touched with hands. If the surface seems worn and has lost its original color, you need to:
- buy a wood care product with orange oil at any hardware store;
- take a clean sponge, dip it in water and heat it in the microwave for thirty seconds - or treat it with steam, the main thing is that it is almost hot to the touch;
- Spray the product onto the surface using a spray bottle and wipe it with a hot sponge.
Classic is always in fashion
Your hands should be gloved when working, and the sponge, when it starts to cool, needs to be warmed up again.
If the thing is painted - for example, a wooden tabletop - you need to use a different recipe:
- Dilute a teaspoon of baking soda in a glass of water and thoroughly wipe the countertop;
- wait until it dries and wipe with a dry soft cloth to remove plaque;
- Pour two teaspoons of ammonia into a liter of warm water and wipe the countertop again with this composition.
Restored bedside floor lamp
If the wood is not simple and not painted, but varnished, a third approach is needed:
- pour a tablespoon of any dishwashing detergent per liter of warm water and carefully wipe the surface to degrease it;
- wipe a second time, but with a cloth soaked in plain water;
- wait until it dries and wipe with a small amount of vegetable oil.
Instead of vegetable oil, you can use a mixture of linseed oil, turpentine and vinegar. Or butter and beer in equal proportions. Or beer, which was previously boiled with a piece of wax of the desired color and cooled to a warm state.
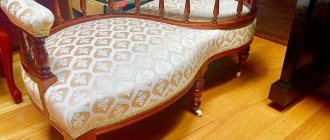
You can reupholster upholstered furniture yourself
As a result, the item will become bright, as if renewed. Often these simple recipes are enough to make the item look good and no further restoration is required.
Stains and dirt
The second is the presence of stains and dirt. You can approach the question in different ways:
- Minor abrasions and old faded stains can be wiped off with a banana peel.
- Simple stains for unknown reasons, which cannot be removed with a banana, need to be removed differently. First clean the surface with water and detergent, and then wipe with alcohol - not completely, but only the affected areas. If the color is not restored, you can paint them over with a furniture marker of a suitable color, or you can try to remember what they are from and bring them together in other ways.
Minor scuffs and faded stains can be wiped off with a banana peel.
- Grease and fumes on kitchen cabinets must first be rubbed with talcum powder so that they set, and then the resulting dirty powder must be wiped off with a rag. Then dilute two teaspoons of ammonia with a liter of water and wipe.
- Whitewash and emulsion paint are washed off with a cloth, which is dipped in a mixture of wine vinegar and olive oil - three drops of the second per glass of the first.
The main thing is that the cloth is barely damp and does not drip the mixture everywhere.
- White water stains that remain when you place a wet glass on wooden furniture or spill something are sprinkled with flour. Then moisten a cloth with oil - corn, olive, palm or regular sunflower - and wipe the surface. Then they wipe it again with velvet.
Grease and dirt on kitchen cabinets should be rubbed with talcum powder, then shaken off with a cloth
- White hot spots that remain if you place a hot frying pan or pan on wooden furniture are wiped with a heated mixture of paraffin and wax of the desired shade in a one-to-one ratio. Then cover with a paper napkin folded in several layers and iron it. The result is polished with felt or other rough cloth.
If the white spots are weak, not swollen, and do not reach deep, they are removed differently. Cover with regular table salt, add a couple of drops of oil and leave for three hours. Then the mixture is removed and rubbed with felt until the stain completely disappears.
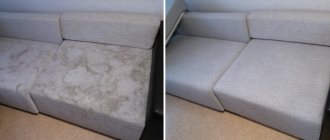
Without stains, the furniture suddenly begins to look much better - beautiful and updated.
Beautiful, updated furniture
Mechanical damage
The third is the presence of cracks, chips and other mechanical damage. There are also numerous recipes here:
- If the furniture is varnished and small cracks have appeared on it over time, a mixture of ethyl alcohol and burdock oil in a one-to-one ratio will help. It must be applied with a white cloth, preferably flannel. Rub with felt.
- If lacquered furniture has a deep scratch from an unsuccessful mechanical impact, you can paint it over with a regular furniture marker or iodine - to achieve the desired shade, it can be diluted with water.
- If there is a scratch on lacquered furniture that has already turned white, you can use shoe polish of a suitable color or a mixture of mastic and wax in a ratio of four to three. The result must be polished.
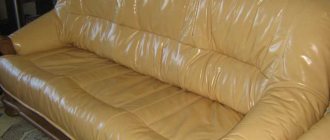
Stylish leather sofa
- If there is a chip on the furniture, you will have to use putty, preferably a special furniture putty. It is better to buy a light tone and achieve the desired color with a color scheme. Then apply it to the chip, spread it so that it is completely covered, and the putty spreads evenly over the surface. Wait until it dries and sand with fine-grain sandpaper.
- If the furniture is swollen from moisture - not completely, but only in one place - it is covered with salt and a couple of drops of vegetable oil. Salt will absorb water, oil will restore flexibility to the tree. The result, again, should be wiped off with a cloth.
All these simple manipulations are often quite enough for the furniture to start looking good and no further restoration is needed.
But if you want the item to look not just updated, but completely new, you can process it additionally.
Modern style office
pros
Saving time and money. There is no need to use the services of cargo taxis, movers and restorers.
Confidence in the result. Cost control, selection of desired materials and the ability to follow all instructions personally.
Implementation of ideas. Furniture can be customized to your personal ideal. In the creative process, new thoughts may arise and a desire to correct what has been started.
For example, add intensity in color or add accessories. And the need to coordinate every change is eliminated. And after accepting the job, it is unlikely that changes will be made.
Modern style office
Removing polish
A layer of varnish is not always needed on furniture, since you will not be able to carry out any additional manipulation with it if there is varnish on it. Neither paint, nor age, nor make a mosaic.
Therefore, if simple cleaning is not enough for you, you can use one of the proven methods of removing nail polish:
- Turpentine, ammonia or denatured alcohol. Dip a layer of thin steel wool into the solution and thoroughly wipe the surface from which you need to remove the varnish. If it is not too old and not too ingrained into the wood, it will come off.
- Acetone . Suitable for removing varnish from a horizontal surface. You need to dip a rag in acetone, spread it over the piece of furniture from which the varnish is being removed, and cover it with polyethylene on top. After half an hour, the varnish will come off and become much more pliable. It can be removed using a regular spatula.
- Specialized compounds . Can be purchased at any hardware store. Before use, be sure to read the instructions - if you over-expose the composition, it will be absorbed into the wood and you will not only be able to varnish it a second time, but even apply anything to it at all.
- Sandpaper . If the polish is old and ingrained, no means will make it soften. The only way is to remove it by hand using sandpaper. First you need to rub with a piece with a large grain until a layer of wood appears. Then you need to take a piece with fine grain and polish it so that you get a smooth, uniform surface. If you have a grinder, you can use it - then it will take about half an hour to clean the varnish, not several hours.
Use the most appropriate methods for restoration
- Glass . An alternative to sandpaper. You need a sharp shard, the edge of which can be used to remove the varnish into thin shavings. When there are depressions, cracks and other small defects, they can be cleaned with a sharp edge. Once the base layer is removed, you can use fine sandpaper to remove any remaining residue.
The paint is removed exactly according to the same principle and the effect after its removal remains the same - a smooth wooden surface that is ready to absorb any coating that you decide to apply to it.
Tip When you start removing the varnish, do it in a separate room, removing all other furniture and opening the window. This will make it easier for you to remove falling chips and allow you to breathe easier.
Children's room with a pirate theme
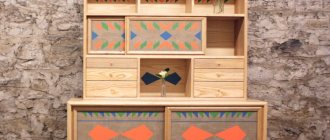
Restoring an old wardrobe
An original design technique is to restore an old cabinet and give it a vintage, expensive look using stucco. You will need sandpaper, wood glue, decorative foam elements, brushes, acrylic paint, and golden patina. Step by step process:
- The cabinet is thoroughly cleaned of the old coating, the handles are removed.
- The dust is removed and the surface of the furniture is primed.
- After drying, the cabinet is painted with creamy water-based acrylic paint.
- Decorative volumetric elements are glued in the right places.
- Cover the furniture with two more layers of paint and attach the handles.
The final step is to apply gold-plated paint to the volumetric parts of the stucco molding. A wardrobe or dressing table decorated in this way will elegantly fit into the classic decor of a living room or bedroom.
Furniture processing methods
Coloring
This idea - to repaint a piece of furniture that is boring - comes to the mind of everyone who one day decides to do restoration at home. And this is logical, because painting a chair is much easier than painting it or doing decoupage.
Wooden hallway
There are several types of paint that can be used:
- Acrylic . Dries quickly, looks beautiful, is very durable, gives a bright color. It can be diluted with water if you need to get a different shade, and it also does not have a strong unpleasant odor - it is enough to ventilate the room after use. In addition, there are acrylic paints in spray cans. They provide an even spray, make it easier to reach areas that are difficult to reach with a brush, and often add more interest to the paint job.
- Enamel . It gives a bright glossy color, like acrylic, and lasts no worse, but at the same time it has a specific pungent odor that does not disappear for several days.
- Oily . Gives a matte color and is not washed off or diluted with water. Typically used when a painting base is needed.
Black and white wall in the living room
- Nitro, glypthal and pentaphthalic paints . They give a bright, glossy, very durable color. Unlike acrylic, oil and enamel, they do not simply form a layer on the surface, but penetrate into the fibers. Until they are soaked to a certain depth, the color will be faded, but as soon as the impregnation is finished, it will be impossible to remove the paint, only with a layer of wood. As a result, they are used for furniture that will be used in difficult conditions - for example, painting them on a garden table that sits outside from spring to autumn is a good idea.
- Wood stain . Translucent paint that highlights the structure of the wood. It comes in a variety of colors, but still does not look completely natural. Forms a layer that can be removed with sandpaper if necessary.
- Potrava . Not paint in the full sense of the word - a special product that penetrates the wood fibers and, interacting with natural tannins, provides a deep natural color. You can't remove it with sandpaper, it doesn't suit every wood.
Before applying, you need to try it on a small area out of sight - the presence of tannins depends on how old the tree is.
Dining area in classic style
Advice: Choose paint depending on what effect you want to achieve.
Before directly applying paint, you must prime the wood so that it is more resistant to moisture, and the applied layer does not come off after a couple of months.
You should choose a color, focusing both on your own tastes and on the properties of the interior:
- Natural . Real wood looks beautiful and noble - these are its main advantages. In classic styles, no painted table or painted chest of drawers will look as good as the same table and chest of drawers, but impregnated with stain.
Interior in loft design
- Light warm shades . Fits into interiors with the same light warm shades. They bring a feeling of comfort and warmth, but make the room feel slightly smaller. The furniture in them is well suited for Provence, for example.
- Light cool shades . They fit into the same cold interiors, making the room visually larger, but at the same time colder and more austere. The furniture in them is well suited for minimalism, for the Scandinavian style.
- Dark warm shades . They go well with each other - the furniture in them can become a simply magnificent bright accent in the room, especially if you paint it not in one color, but in several, combining them. But it may, again, make the room smaller. Well suited for kitsch and rustic styles.
- Dark cool shades . Strict, making the room feel cool, they look good in rooms where you plan to do business - but in the bedroom they will look somewhat alien.
Art Nouveau style
Light shades get dirty more easily, while dark shades show mechanical damage.
Please also take into account that you can paint furniture not only in one color:
- Plain furniture . It looks simple and uniform, perceived as a single array. Well suited for conservative interiors, where there should be no emphasis on it - or it can act as the only bright spot.
- Furniture in two colors . Two colors in one thing is already more interesting. They should be either matching, preferably shades, or contrasting. You can paint the item with stripes, or polka dots - these are solutions either for a creative interior or for a nursery - or you can simply highlight the fittings with an auxiliary color and this will also look good.
White color is difficult to care for
- Furniture in three colors . It’s more complicated, although still interesting. All colors should be either compatible, or shades of each other, or contrasting. Most often, a combination of three is used when doing something colorful for a nursery, or when the item is so large that all three colors have room to combine well.
- Four or more colors is not so much a color as a painting, and it is usually approached with other criteria.
Advice The item should be combined either with the main color of the interior, or with its auxiliary color, or act as the main bright contrast. It shouldn’t be there by itself—it looks unnatural.
High tech style in the bedroom
Making a designer chair
To transform your chair in a stylish and creative way, you can update the upholstery and repaint the base of the furniture. The style of alteration is selected to suit the interior of the room and depends on the design and appearance of the chair.
Furniture with simple rounded shapes will fit perfectly into the design of Provence. It is repainted in light colors and artificially aged. The fabric for upholstery is selected natural, plain or striped or floral.
For a classic interior, you can paint a chair with curved legs and soft armrests pale gold. The upholstery is selected from printed jacquard or plush.
A chair of simple straight shapes is perfect for a loft interior. It is enough to repaint the product dark brown or rich gray. A good choice for upholstery would be deep blue genuine leather.
Painting and decoupage
Painting is actually the same painting, only requiring slightly more skill. Usually used for it:
- Gouache . Standard paint for painting on anything, even a sheet of paper. It does not give a clear, bright color on wood, so it is usually painted over either stain or oil paint. Does not require dilution with water, allows you to perfectly imitate Russian crafts of past centuries.
- Oily . The same paint that can be used to paint the base is also suitable for drawing a pattern. Gives matte, beautiful, clear color.
- Aniline . They are usually used to paint fabrics, but they are also suitable for painting wood.
Everything is possible
The design on the tree can be anything.
For example, imitation of Russian folk crafts is very popular:
- Mezensky . One of the oldest crafts, which originated a long time ago near the Mezen River. It combines only two colors - black and red with an ocher bias. Its elements are simple: crosses, dashes, leaves, circles. Sometimes there are figurines of deer, horses and birds, very simple and consisting of only a few geometric shapes. The ornaments are static; even a person who does not know how to draw can depict them.
- Gorodetsky . The middle of the nineteenth century, already more complex than the Mezen. The colors are varied, usually light tones, all designs have a white or black outline. Not the simplest simple ones: flowers, leaves, genre scenes with people celebrating, walking, gathered around a samovar, sometimes lush-tailed roosters, horses, lions or leopards, most often opposite each other.
Floral interior
- Zhostovsky . Mid-nineteenth century, city of Zhostovo. Most often used for
- painting trays, but no one will stop you from painting a chair in the same way. The background is black or red, the main motif is a bouquet of flowers, made in a realistic style. Sometimes it is supplemented with fruits.
- Khokholoma . Seventeenth century, Novgorod. The background is black, the colors are green, red and gold. Khokhloma does not accept other colors. The main motif is strawberries or wild strawberries framed by intricate leaves. Sometimes you can see birds, but this is rare.
- Gzhel . It is usually used for painting dishes, but it can also be found in furniture. The background is white, the main color is blue, sometimes complemented by a black or white outline. The patterns are usually simple - crosses, squares, flowers with large petals. Sometimes you can see a bird that looks like a heron or crane.
Stylish loft room
Furniture painted with folk crafts fits perfectly into the Russian style - better than any other. Also suitable for a nursery, where you can show your imagination and combine things as you wish, and not according to the canons of style.
The painting can also be:
- Geometric pattern . It is much easier to depict than a folk one; even a person who has never drawn can handle it. You can pre-draw the markings and draw on them.
- Floral pattern . It is found frequently and fits into most ethnic styles.
- Story scene . Good for a children's room, where a scene from a favorite cartoon depicted on the cabinet can delight the baby.
Chair makeover
The image can be anything, depending on your imagination. The main thing is to act carefully, and first try it on a small board so that you are completely confident in your abilities.
An effect similar to that of painting is achieved by decoupage - a thin napkin with an interesting image is glued to the tree. It could be flowers, birds, angels - anything, in fact, as long as you like it.
The technology is simple:
- clean and degrease the surface;
- take out a napkin and carefully coat it with a layer of PVA glue;
- Place on the surface so that no wrinkles remain, smooth out thoroughly.
Advice Both painting and decoupage need to be covered with a layer of varnish on top, otherwise the patterns will quickly be erased.
Creative solution for a sofa
Any colorless furniture varnish will do - to make sure that everything is in order with it and the design will not deteriorate, you can try how it will dry on some unnecessary board.
Restoration items
For the most part, restoration includes old sideboards, chests of drawers, cabinets, tables, high-back chairs, stools and all other items whose lifespan is estimated in decades. It is not surprising that over time they become unusable. Having studied all the restoration techniques, many people come to the aid of their “mute household members”
The old sideboard is cleaned of peeling varnish, freed from all defects and, after carrying out the already familiar operations, returns to a new life. Since the surface is very wide, in such work they sometimes use not only brushes of various widths, but also a roller. The main thing is to ensure that there are no leaks or small bubbles.
other methods
In addition to the simplest and most obvious methods of restoration, there are other, less familiar ones.
Among them:
Scotch tape Strange as it may sound, regular colored tape can help you update a boring piece of furniture. If you take several rolls of different colors, you can make it striped by simply gluing strips of tape onto it - first one color, then another. It can also be made uniform. Of course, the result will not look good in expensive classic interiors, but in modern, democratic interiors it will look fine.
Bedroom in pastel colors
Veneering A method somewhat similar to both decoupage and sizing with tape. You need to buy a sheet of veneer of the color you like, cut parts of suitable sizes from it and, using PVA glue, glue it to the item.
As a result, it will look smooth and similar to real wood, only without all its inherent flaws.
Inlay You can buy a sheet of veneer, but instead of just taking it and sticking it on the item, cut it into small pieces and put them together into a picture. The result will be something like a mosaic - multi-colored, if the pieces are painted in different colors. When they are ready, you will need to take a sheet of paper and stick them on it in a mirror image compared to the picture that should be obtained. Then the sheet is glued with PVA glue to the desired place, and the paper is carefully cleaned off with sandpaper. The result is very impressive.
Waxing If the wood is rubbed with soft wax, it will acquire a pleasant matte shade, characteristic of ancient, beautiful things. The only negative is that the operation will have to be repeated regularly, otherwise the wax will wear off and the item will begin to look shabby.
Dark brown corner sofa
Craquelure One of two ways to beautifully age furniture. Essentially, this is a special paint that, after being applied to a layer of previous, still wet, paint, contracts, resulting in small cracks. The result looks quite impressive.
Furniture patina First, paint a metallic color - usually bronze - is applied to the wood and wait until it dries. Then they begin to apply patina - a drop into the convexity, shade it roughly, and then shade it towards the convexity. If the surface is smooth, paint should be applied to the edges first.
It usually takes several layers of patina for a piece to begin to look truly antique.
Advice: Carry out all work with gloves - this will help not damage the skin on your hands. It is better to work with paints, caustic nail polish removers, and the nail polish itself in a respirator - getting the smallest particles into the lungs is very harmful to health.
VIDEO: DIY decor
Furniture restoration
Second life for the chest of drawers
Craquelure
Here there is a combination of two methods at once: decoupage and varnishing. Furniture is thus finished in an antique style. To do this, apply a varnish layer and leave it until completely dry, then apply craquelure varnish on top.
After drying, small cracks form, very similar to antique ones. At the last stage they can be gilded with gold paint.
Disadvantages of restoration
It is preferable to leave it to specialists to give new shapes to old furniture or work on small details. A person without experience who does not know the nuances of work can completely ruin items.
Saving personal time. By handing furniture over to professionals for restoration work, you can forget about it and wait for the finished result.
DIY work requires an investment of energy in your free time; evenings and weekends will be devoted to the process. If you don’t treat your business as a hobby, then soon the activity will begin to burden you.
- Eurobook sofa - 130 photo recommendations on how to make and assemble a comfortable and compact sofa
- Assembling furniture with your own hands - 105 photos and a detailed video of how various furniture elements are assembled
- Do-it-yourself bookshelves - ideas for building shelves and shelves quickly and easily from scrap materials (155 photos and videos)
Allocation of special territory. Giving new life to old furniture is a dusty task. Chemical compounds, sawdust and dirt will fill the room.
It is necessary to allocate space for freedom of action. It is advisable to carry out work in non-residential areas: street, garage, workshop.
If restoration work is carried out in an apartment, then one room should be completely circled, and the floor should be covered with cellophane or paper.
Time spent
It is impossible to accurately calculate the time spent. For example, you can spend one day on small items. Larger works may take several months to complete.
- Do-it-yourself computer desk: 150 photos of making corner tables and features of the choice of materials
- DIY ottoman - step-by-step guide to the best homemade ottoman options (video + 125 photos)
- Coffee table: simple and stylish design options and design ideas for coffee tables (115 photos)
Deadlines are calculated based on the working material. Each composition has a certain drying period.
It is necessary to carefully read the instructions and strictly follow the advice and instructions for restoring furniture. If the recommendations are not followed, the final result will decrease in quality.
Before each application of a layer of varnish, you need to be sure that the previous one has dried completely. To save time, buy mixtures that do not require long drying. It's a good idea to read reviews before purchasing.
Plan all your purchases clearly. This will help you avoid unnecessary trips to the store. The necessary materials should be purchased immediately and kept on hand.
Damage to the varnished surface
Repairing damaged paintwork at home will not be difficult if you understand what kind of varnish was used by furniture craftsmen when creating a specific piece of furniture.
A 10% alkaline solution will help determine this (it will dissolve alcohol-based varnish), acetone (it will cope with nitro varnishes). If the surface remains unchanged, the varnish is based on polyester substances.
The cracked coating is removed using solvents or sandpaper, and the free space is varnished in several layers. In order not to damage the still good areas, apply a layer of Vaseline to them, cover them with paper or paste over them with masking tape.
How to remove scratches
No one is immune from minor defects. To restore the furniture to its original appearance, there are several proven ways to disguise scratches:
- special pencils;
- wax;
- stain;
- mastic;
- rub with nut;
- tea and iodine.
You will need very little personal time and skill.
Note!
- Do-it-yourself wardrobe: a review of ways and methods on how to build a stylish and original wardrobe (video and 145 photos)
DIY ottoman: how to make it at home. The best ideas, master classes. Photo + video review of beautiful ottomans
- DIY stool: master class on how to make it from wood. Instructions for preparation, assembly and beating (video + photo)
Sequencing
Each piece of furniture has its own step-by-step instructions. To figure out how to restore upholstered furniture with your own hands, you should add a little to the list.
But just like with a set of tools, there is a standard set of actions.
Required materials
An individual list of materials should be selected for each piece of furniture. But there is a standard set of devices that will be universal for almost all ideas.
It is recommended to make a list in advance. You can use equipment rental because professional tools significantly save time, effort and give a higher assessment of the quality result.
- White table: 115 photos and videos describing the selection and construction of cool and easy-to-use tables
- Do-it-yourself tabletop: video instructions for making a tabletop + 140 photos of the most modern ideas
- Corner sofas - 130 photos and videos on how to choose and where to place modern original corner sofas
For DIY work you will definitely need: a sanding machine, a construction vacuum cleaner, an electric jigsaw, a screwdriver and a construction hair dryer.
Small details should include: sandpaper, brushes with rollers, several spatulas of different sizes.
To maintain health safety, buy good protective gloves and a respirator. Don't forget about removers, wax, paint, mixtures for sealing cracks.
Materials for work can be found in specialized stores, or use advertisements. Often the necessary compounds are sold at a reduced price, the remains from repairs do not match the color.
Removing the top layer of varnish
To remove paint and varnish material, use sandpaper, a hair dryer or varnish remover. A smooth surface should be achieved using any convenient method. Methods can be combined. The main thing is to come to a result.
Don’t forget about your health and use a respirator, gloves and goggles. Since the work is very dusty, particles of chemical compounds will fly in the air.
Finish coating
If you want to preserve the original wood pattern, then use varnish, wax or oil as a finishing coat. When completely changing the color, choose paint or enamel for furniture.
When choosing bright and light shades, pre-paint the parts white. With this move, the paint will lay beautifully in the chosen tone.
Recommendations
For quick renovation, there are ways to restore furniture yourself:
Simply sand it with a sanding machine and coat it with clear or light varnish.
Get rid of dirt, sand with light sandpaper and paint.
You can get rid of defects using drawings. If you don't have artistic skills, use a stencil. The patterns are applied with acrylic paints and covered with clear varnish.
Using the decoupage technique.