Articles
All photos from the article
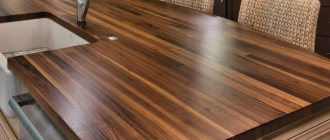
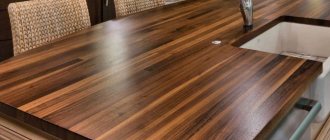
The beauty of wood is that it looks great on its own, you just need to show its texture. Color can be used to obtain the desired shade. Sometimes, for example, light wood needs to be slightly darkened, and it is in such a situation that color comes in handy.
Wood treated with tinted oil
Color for wood: preparation of tinted varnish, oil and impregnation
The beauty of wood is that it looks great on its own, you just need to show its texture. Color can be used to obtain the desired shade. Sometimes, for example, light wood needs to be slightly darkened, and it is in such a situation that color comes in handy.
Wood treated with tinted oil
Properties
Oil extracted from flax seeds is used as a culinary product and a multifunctional technical product. A large number of useful qualities are due to its structure and chemical composition.
The basis of the unrefined plant extract is triglycerides, including from 60% to 90% polyunsaturated (linoleic and linolenic) acids. The biological significance of such acids is multifaceted, which is why flax seed oil is widely used as a food additive.
For production purposes, in particular for coating wood with linseed oil, technical grades with a less thorough degree of purification are used. When dried, the acid residues polymerize, forming a durable film similar to a drying oil coating.
Understanding the terms
Tinting wood varnish (as well as stain, impregnation and other means) means gradually adding dye until it acquires the desired shade. That is, color is a dye that is gradually added to the solution.
Note! For each type of wood treatment product, you should use a different type of color. Otherwise, it may simply not dissolve when stirred, resulting in a suspension that cannot be used for processing.
As for which color to choose, it is recommended to adhere to the color chart when purchasing it. It is also useful to know that colors that use organic pigments are not particularly resistant to light. Therefore, for outdoor work it is better to use a color scheme that uses inorganic pigments.
In the photo - a color map for selecting the desired shade
There can be several hundred shades of color; the common types of tinting wooden stairs alone include about 50-100 shades. But if suddenly the color palette is not enough, then you can always mix 2 different colors and get your own shade.
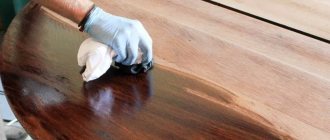
In this case, it is recommended to first experiment with a small amount of color and test the resulting tinted varnish or stain on an unnecessary piece of wood. A sign that everything went well can be considered a smooth surface after drying, the absence of drips and uniform coloring.
First you need to test the tinted varnish or stain on a piece of wood.
Tikkurila Valtti Terrace Oil for terraces base EC 0.9 l
For purchasing this product you get twice as many points!
This material can be tinted in the color of your choice.
Designed for the protection and finishing of new or previously oiled wooden surfaces (terraces, stairs, garden furniture, docks, etc.), impregnated (pressure) and heat-treated wood, hardwood or valuable wood surfaces outdoors. Effectively protects against moisture, mold, fungi and reduces cracking of wooden surfaces. Can be used outside without additional tinting.
Ingredients: linseed oil, wax, UV filter, alkyd varnish, white spirit, targeted additives, biocide, driers.
Consumption: 5-7 sq.m/l., depending on the absorbency of the wood.
Color: colorless.
Gloss level: not determined.
Country of origin: Russia.
Gross weight: 0.77 kg.
How to tint correctly
In a nutshell, the instructions for tinting are that the dye is slowly added to the stain, paint, etc., after which it is simply mixed thoroughly. The dye is added gradually and when the liquid reaches the desired shade, you can proceed to processing the wood. However, there are a number of nuances, depending on what needs to be prepared - varnish, stain or wood paint.
Preparation of tinted varnish
The main purpose of the treatment is to create a durable film on the surface of the wood; after the varnish has dried, it will protect the wood from moisture penetration into it, and the texture will also appear. Tinted wood varnish differs from regular varnish in that after processing the wood texture not only appears, but is also painted in the appropriate shade.
Sometimes even famous manufacturers can make mistakes in the color chart, so it makes sense to take care of preparing the varnish of the desired shade with your own hands. Dyes are usually sold in the same stores as the wood treatment products themselves. You can even try to negotiate with the operator of the coloring machine and the color can be cast into your container. This is just an ideal option, but it all depends on the mood of the employees.
The required color can be obtained from the tinting machine operator
You can try to do tinting using improvised means. For example, there are references to the successful experience of adding water stain to acrylic varnish (a kind of color for wood varnish). The resulting solution is quite pale (even with a high concentration of stain), so it is suitable in cases where strong darkening is not needed.
As for the process of processing a wooden product, it is recommended to adhere to the following sequence:
- the surface is carefully sanded, immediately before applying a layer of varnish, you need to wipe the surface to remove dust;
The surface must be perfectly smooth
- then the first layer of tinted varnish is applied;
Note! The entire product is varnished at once; in no case is it recommended to break the surface into sections. If you prepare the next batch of varnish later, it is unlikely that you will be able to get the same shade, but the difference will be noticeable.
- Wood tinting is done in at least 2 layers. But if the surface is quite porous, and the varnish itself is not very saturated in color, then the number of layers can be increased to 3-4;
- It is recommended to make the last layer colorless.
Tinted oil and impregnations
In the case of wood impregnation oil, color can also be used.
- regular oil paints. They can be mixed at room temperature;
- You can also use gouache, but so that the water does not interfere with the process, you will have to heat the mixture, the water will evaporate;
You can use gouache to tint oil.
- in the past, people also used dyes such as ordinary ash. For example, tinting wood oil with ash will allow you to achieve a dark gray or even black color, it all depends on the concentration of the dye. Soot, colored clay and other natural materials can also be used;
A dark color can be obtained by mixing soot or ash with oil.
- If you buy a dry color and mix it with oil, you will get an analogue of purchased oil paint. Since their prices are comparable, there is no point in messing around with mixing oil and dye; it’s easier to just buy paint.
It should be remembered that when working with oil, too high a concentration of dye gives a more saturated color, but the properties of the oil are lost. That is, it no longer protects the wood from moisture so well and over time the coating will need to be renewed. So the color for wood oil should be added with an eye to the balance between the properties of the oil and the color saturation.
Answers to frequently asked questions
The requirements for wood are directly related to the fact that the oil must be absorbed into the wood.
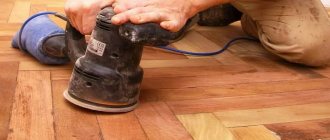
Sanding wood before applying oil serves two purposes:
- firstly, reducing oil consumption: processing unpolished surfaces will lead to a significant increase in consumption
- secondly, color alignment. The oil perfectly highlights the wood grain. But it will also highlight all the defects of the wood: saw marks, burrs, hairiness, pinches and more.
To prepare the wood, it is recommended to sequentially grind the surface, first with abrasive with P100-120 grit, and then with P180-200 grit.
Grinding in one pass (for example, with P150 grit abrasive) is acceptable when processing facades. It should be taken into account that it will not be possible to obtain a perfectly smooth finishing surface with such grinding. In addition, such a surface will absorb oil somewhat more strongly. This will increase oil consumption and make the color appear brighter.
To prepare the wood, it is recommended to sequentially grind the surface, first with abrasive with P100-120 grit, and then with P180-200 grit.
When used for finishing sanding, abrasives with a grain size greater than P200 clog the pores of the wood, and the oil cannot penetrate into the thickness of the wood.
Long drying times may be due to one of 2 factors:
- 1. Oil applied too much. The oil needs to be practically rubbed into the wood. Excess that the wood cannot absorb must be removed with a rag. If the oil is applied to the surface in a layer similar to paint and the excess has not been removed, the oil will take a long time to dry on the surface. And since the oil does not contain any film-forming components, the oil will dry out slowly. Sooner or later, when applied this way, the oil will dry out. However, a fragile layer of pigment and thickened oil forms on the surface, which will quickly lose its presentable appearance.
- 2. For some reason the oil did not penetrate into the thickness of the wood. There may be several reasons: the presence of an old film-forming coating, excessive moisture in the wood. The most common case is an attempt to carry out work in the cold season, when the tree is frozen and ice crystals prevent the oil from entering the thickness of the wood.
Often this issue is related to improper oil application or surface preparation. The normal consumption of glazing compounds is about 60 ml per m² in 2 layers. In this case, about 2/3 of this amount is spent on the first layer and 1/3 on the second layer.
Higher oil consumption is due to one of several reasons:
- the oil is applied in a thicker layer (for example, due to a misunderstanding of painting technology or in order to create a more saturated color of the coating)
- the wood has not been sanded properly: not sanding or sanding with a coarser abrasive will significantly increase oil consumption
DECKEN oil flows freely through the spray gun nozzles.
However, application with a spray gun will definitely be associated with additional time and money costs:
- firstly, some of the oil will be lost at the time of application (a fine suspension of oil will be blown away)
- secondly, the oil will be applied in excess. Almost immediately, most of the oil will need to be removed from the surface with a rag, while simultaneously rubbing the coating into the wood. Thus, you will have to dispose of most of the oil with rags.
The oil is always applied in a very thin layer and rubbed into the wood. Increasing the layer of oil will not give the expected result: the oil will take a long time to dry, resulting in a fragile layer being formed on the surface of the wood, which takes a long time to get dirty and quickly loses its normal appearance. Thus, the most reasonable solution in order to make a more saturated color of the coating is either to choose an oil with a higher pigment content (for example, DECKEN ColorFasad Oil), or to mix an already purchased shade with a darker one, creating your own individual color.
In addition, you need to take into account that the oil will look different on different types of wood, on wood with different levels of humidity and different levels of preparation. It is important to do a test stain on exactly the sample of wood that you will be painting. This is why each type of oil has 0.125 liter test samples.
Yes. Identical oils of different colors can be mixed in any ratio to obtain an individual shade. When mixing, it is better to combine the entire volume of oil required to paint the surface in order to avoid possible discrepancies. It is important to mix thoroughly before mixing the oil. It should be remembered that DECKEN ColorFasad Oil can be painted upon request in any colors presented in the standard RAL and NCS shades.
Tinting oils with universal pigment pastes is unacceptable. Universal pigment pastes are made based on acrylic dispersion. This is a completely different environment that is poorly compatible with oil. In addition, the pigment particle size is too large for wooden substrates. Wood oil tinted with universal pastes will not create a long-lasting coating.
No is not. This product can be used as a temporary coating for up to 3 months. For example, if the log house has been delivered, but the color of the facade has not yet been selected or approved. Such temporary protection will allow the wood not to darken before treatment with basic tinting oils, which can provide long-term protection from UV rays, precipitation, etc.
Yes. DECKEN UVFasad Oil contains special colorless components that prevent UV rays from reaching the wood. Slows down the graying process and preserves the natural color of the wood.
The same oil can be used as a second (finishing) layer on top of other oils for exterior use to slow down pigment fading and increase the life of the coating.
The color of an oiled surface can vary significantly depending on the type of wood, the degree of preparation, and even the moisture content of the wood. That is why you should always do a test stain on a section of wood that will subsequently be hidden from view. This way you can estimate what color you will actually get.
Before starting work, the oil must be thoroughly mixed. Since the composition of the oil is quite complex and tinting compounds contain a fairly large amount of pigment, over time the heavy particles form a rather dense sediment. Simply shaking the jar will not lead to complete dissolution of this precipitate: when shaking, part of the pigment will rise, but full-quality coating in color will not be achieved; different colors may be noticeable on the surface being painted.
In this regard, the oil must be stirred for 2-3 minutes. In this case, the tool used for mixing must touch the bottom.
After mixing, the composition in the jar should become uniform in color and consistency. It is necessary to make sure that there is no sediment or clots on the bottom and walls of the jar. If necessary (if the work takes a long time), the oils must be stirred periodically to avoid the formation of sediment.
If you will paint large surfaces in one color, it is better to combine the entire required volume of oil in a large container, mix in a single container and return it back to the jars. This will also help avoid different colors.
It is also important to take into account that when mixing, you cannot add anything to the jars (including solvents, etc.)! The products are completely ready for use!
Applying oil in a thick layer goes against the very essence of the protective effect of oil. To create a protective layer, the oil must permeate the top layers of the wood, thus creating a protective layer. The tree can only absorb a certain amount of the composition. The excess that remains on the surface must be removed with a rag, otherwise it will create a fragile layer that will not allow achieving the intended decorative characteristics. In addition, the coating will take a very long time to dry.
Insufficient application of oil will lead to a loss of both the decorative qualities of the surface (the surface will look dull and pale), as well as to a deterioration in the protective characteristics of the oil and a reduction in the service life of the surface.
In this case, you need to apply another layer of colorless oil or oil of a similar color.
To restore a damaged area of the floor, you do not need to remove the old coating. The damaged area of the floor is sanded and covered with a new layer of DECKEN oil. If there is damage, it is enough to cover the floor only with colorless oil. If color abrasion is significant, oil of the same color as was originally used will be used. If there are torn scratches on the floor surface, the damaged area must be sanded, the scratch filled, and then covered successively with primer and oil of a similar color.
Yes, but when changing colors it is better to use more saturated or darker shades. Ideal for color changes are DECKEN ColorFasad Oil as the first layer and DECKEN Floor Oil as the second layer.
Sufficient air access to the painted surface is necessary for the oil to dry. Therefore, the room where the oil is applied must be well ventilated.
In addition, it is necessary to apply the oil in a thin layer and leave it for a sufficient time (6-12 hours) before applying the second layer.
No need to try to dry the coating with a hair dryer!
Source: decken-oil.ru
We make oil stain for tinting wood products
Now I will show you what kind of oil stain I make. I use different stains and paints for tinting: watercolor paint, construction water stain, alcohol stain, thinly diluted acrylic, tempera and artist's oil paint. And so I needed to tint the doors. They are not very new, they were painted with white paint. My task was to remove this layer of paint and make just tinted wood. I started thinking about tinting oils. I watched all the videos I found, read a bunch of forums. I found tinted oils in the store and read the ingredients. In general, creativity began. I realized that I could do something similar myself.
Small disclaimer. This master class is suitable for those who are not allergic to turpentine, white spirit, and who do not feel sick from the smell of linseed oil and alkyd-urethane varnish. Who does not have bronchial asthma. No, it's not ADHD, don't panic. Artists work with these substances all their lives. You just need to ventilate the room. With large volumes, do not get carried away for several hours in a row, but take breaks and go outside. You can also wear a gas mask in the form of a mask with boxes. Now there are modern ones, very comfortable. In addition, I have selected here the best materials that I found. There is no strong smell from them.
This is what I came up with in the finished products.
This is an old oak door from the 50s. It was painted over with white paint. I removed the paint. This is already my tint.
I'm tinting the other door. Either pine or Christmas tree.
This is also a homemade stain.
What I like about homemade stain is that you can adjust absolutely everything. We know the components, we know their behavior, and we can add them as we please.
So what we need:
1. Flaxseed oil (any kind: artistic is better, but you can also buy it from the supermarket). The oil is drying out.
2. Artistic oil paint Umber natural. I have Ladoga. (For 5 doors it took me one and a half large tubes)
3. Wooden blank. Let's tint it. Lightly sanded, on purpose.
4. Tikkurila white spirit. It smells like pine. No technical terrible smell. You can take Pinene, pharmaceutical turpentine, gasoline, or even essential oils. This is a thinner.
5. Yacht varnish “Unika super” semi-matte, “Tikkurila”. Because at the end I will cover it with this varnish. So that there is no conflict between varnishes. You can take any, even PF. But imported ones are better, they smell less, dry faster and are more transparent.
Questions
Weather-resistant, tintable oil for terraces and garden furniture
Reliable wood protection for up to 2 years
Protection from moisture and biological damage
40 tintable shades
Application method: Apply with a brush, sponge or a special applicator for applying oils and varnishes.
Number of layers: at least 2
Drying time between 2 coats: at (20±2)°C and relative humidity (65±5)%: 12 hours, the next coat can be applied after 24 hours. As the temperature drops, the drying time increases.
Complete drying time: at (20±2)°C and relative humidity (65±5)%: 12 hours, the next coat can be applied after 24 hours. As the temperature drops, the drying time increases.
Tinting base: EC
Types of work: for outdoor work
Application temperature: The surface to be painted must be dry and clean. During painting and drying, the air temperature should not be lower than +5 ° C, and the relative humidity should not be higher than 80%. Painting work is best done on a calm, cloudy day at a temperature of +10–+20 °C.
Source: moscow.petrovich.ru
Two recipes for homemade oil-wax for impregnating wood
Hello, dear readers and DIYers! Surely many of you make various products from natural wood, and you know very well that the key to their long service is not only competent pre-drying of the material, but also high-quality finishing of the surface with various oils, impregnations, or varnishes.
In this article, the author of the YouTube channel “Rag 'n' Bone Brown” will tell you about a fairly simple method of making oil wax at home for finishing impregnation of wood and products made from it.
The fact is that this is a truly wonderful finishing coating that not only protects the wood from moisture, but also smoothes out all the unevenness and roughness of the surface and gives the wood a unique, barely noticeable gloss.
Materials. - Natural beeswax - Linseed oil - Mineral oil - White spirit - Screw-top jars - Rags.
The author’s innovation lies in the fact that he decides to combine oil and wax and thereby speed up the process of finishing wood. In addition, the author intends to prepare a mixture of two types: one for cutting boards and wooden food utensils, and the other for other wooden products. The first mixture will be composed of safe components that, upon contact with food, will be harmless to humans. Whereas the requirements for the ingredients of the second type of mixture will not be as high.
So, the master will need the following ingredients: The first is beeswax. Its function is to thicken and harden the composition. When applied to a wooden surface, wax will give the latter durability, smoothness and a pleasant shine.
It is important to mix all the ingredients thoroughly and quickly, because as soon as the hot wax comes into contact with the cold ingredients and the walls of the jar, it will immediately begin to thicken.
To stir, you can use a wooden stick like this, long enough to reach the bottom. Now you can screw on the lids.
I thank the author for two simple wood impregnation recipes! Also, a similar recipe was proposed by Vladimir Natynchik in one of his articles. However, it has slight differences in composition and method of preparation. Instead of flaxseed oil, Vladimir used rosehip oil, since it has virtually no odor.
After applying thick oil-wax impregnations to the surface of the wood, it is recommended to warm it up with a regular household hairdryer. This will facilitate deeper penetration of the product into the thickness of the material.
Good mood, good luck, and interesting ideas to everyone!
The author's video can be found here.
Source: usamodelkina.ru
Where is the best place to apply this finish?
Impregnating wood with linseed oil does not provide a hard protective film that is resistant to scratches and abrasion. But this type of decorative finishing is valued for something else, first of all - environmental friendliness, antiseptic properties, the ability to emphasize the texture of wood and preserve it from cracking.
Flax drying oil is used for finishing products used indoors. It is optimal for covering furniture surfaces that are not subject to intense abrasion, wooden walls and ceilings. It is used to process wooden utensils, cutting boards, and children's toys. As a decorative and protective finish, linseed oil is appropriate to apply to the surface of valuable wood species to maximize the preservation of their natural qualities.
Methods for cleaning, bleaching and thickening oils
Prevention of peeling of the painting layer
The painting layer is strengthened with a 5-6 percent solution of fish glue, into which honey mixed with xylene or pinene is added as a plasticizer (one part of honey with pinene or xylene is taken for twenty parts of glue).
Drying oils
Light plays a very important role in the drying process of oils, and in the absence of light, drying almost stops. So, oil that dried in the light for 6 days dried in the dark in 66 days. In this case, direct sunlight acts especially energetically, since their warmth is of great importance here. Indeed, for oil paint to dry in sunlight, it takes from half to one third of the time that it takes to dry in the shade. The most active rays of the sun are ultraviolet rays, which have no less effect on accelerating the drying of oils than the effect of the so-called “sicatives”.
How high the air temperature is for drying oils can be judged from the following data. Flaxseed oil at 25-28 gr. C; It dries out sooner than at 15-18 degrees. C; With a significant increase in temperature, the drying process is especially accelerated. Thus, according to Weger, oil that dried at room temperature in winter in 5-7 days and in summer in 3-4 days dried at 50 degrees. C in a dark oven for 12 hours at a temperature of 95 degrees. C - for approximately 1 hour, and at 120 gr. C - in 30 minutes. Oil containing manganese sicatif and dried at room temperature for 14 hours, at 95 degrees. C dried in 30-40 minutes, and at 120 gr. C - in 15-20 minutes.
Cold delays the drying of oils, as does the high percentage of moisture contained in the air (in rainy times and in damp rooms); normal air humidity responds favorably to the process, since the oil, at the same time as oxygen, absorbs from the air a certain amount of water necessary for the normal course of drying, the action of which during the drying process goes hand in hand with the action of oxygen. From the above it follows that the drying of oil in too dry air, although it occurs quickly, is abnormal, since in this case there is a large loss in the oil substance due to the formation of a large number of gaseous products of oil breakdown. When the oil dries in air saturated with water vapor, a swollen film with a high water content is obtained, which, when completely dry, becomes covered with cracks.
Substances that accelerate the drying of oils include paints of a known composition, as well as special preparations called sicatives, which promote the absorption of oxygen by the oil.
The drying process is delayed and slowed down mainly by water and mucus contained in oils, and some essential oils added to fatty oils, since these latter themselves need oxygen for their drying and thus prevent it from being absorbed by the fatty oil.
In addition, certain paint compositions also tend to slow down the drying process.
The acceleration and deceleration of the drying process is also affected by the material that is coated with oil or oil paint. Thus, oil and oil paint dry faster on the surface of lead than on other metals; They dry more slowly on wood than on metals.
Later studies of vegetable fatty oils revealed that oils classified as non-drying oils also harden when placed in special conditions. Olive oil, for example, when applied to a lead plate, gains the ability to dry, which, however, requires several months.
The hardened oil, which is a flexible, elastic substance called linoxin, gradually (as it decreases in weight and volume) loses its elasticity, as a result of which old oil paintings become brittle and brittle.
Dried oil, when completely hardened, is insoluble in water and is only slightly soluble in ether, gasoline and other essential oils. Freshly dried oil is not a dry substance, but a liquid-solid one. Due to its composition and structure, it can be partially washed away by water if the paint from which the oil has been erased does not help fix it.
This is how oil paints get lost in the open air. This occurs not only due to the waste of volatile products from drying out the oil, but also due to the removal of soluble products by water. Hardened films of oil sometimes become soft again and become sticky. Such softening of the layer after the oil dries is observed mainly in poppy, nut, and sunflower oils and very rarely in linseed oil. In the light and in dry air, the films become hard again and lose their stickiness.
Preparing a mixture with wax
To increase the protective effect, you can make your own product with enhanced protective properties. Adding small amounts of wax will make the wood surface silky and even smoother. This composition can be used to treat light and dark products located in areas of high mechanical loads: on floors, stairs, armrests, doors.
The recipe is simple and easy to follow under normal conditions.
A portion of linseed oil should be slightly heated in a water bath, then gradually add pieces of beeswax to it. The ratio of components must be equal. If desired, you can increase the amount of wax and obtain a thick mass or, conversely, reduce the total mass of the pieces and make a viscous liquid.
When working, it is important to remember that all substances used are organic in nature and can easily ignite near fire. Therefore, after complete completion of work, the brush should be thoroughly washed with a solvent and completely dried in a safe place, away from sources of flame. Pieces of foam rubber and rags soaked in linseed oil should not be scattered, but collected carefully in one bag, the contents of which can then be burned.
When preparing the mixture yourself in a bathhouse, do not allow overheating or direct contact of linseed oil with fire.
Products purchased in stores or cleverly made with your own hands will help keep the tree unchanged for many years.
Application technology
Each manufacturer's use is indicated on the label. But there are standard methods:
- Immersion - when a wooden element is immersed in a hot composition and left to soak for several days. Then it is taken out and dried on a warm surface.
- Vacuum impregnation - the product is placed in a special device, where, under the influence of a vacuum, the oil penetrates deep into the wood.
- Two-layer application - performed using a brush or a piece of foam rubber when finishing the premises.
Let's take a closer look at two-layer application, which is suitable for treating wooden floors, stairs and walls.
Viscosity differences
In carpentry, there are about two dozen common types of wood, differing in density, porosity and vessel sizes. In each individual case, the oil must be selected individually, also taking into account the size, shape and specific features of the product being processed.
Please note that viscosity can only be adjusted with solvents when working with tung oil; other compositions absolutely do not tolerate this
The thicker and more viscous the oil used, the more difficult it is to apply an even layer before polymerization begins. Working with thick oils requires greater care; the resulting drips are subsequently very problematic to remove. The advantages of thick oils are their high drying speed, comparable to some types of varnishes. Also, due to the high content of solid particles, such oils form a more durable film, providing protection from both mechanical damage and contamination.
Thinner oils are used to process products that either have a significant surface area or are full of small parts with many hard-to-reach places. Low viscosity oils can be applied for quite a long time without worrying about uneven drying. However, to obtain high-quality protection, the product must dry for quite a long time; moreover, such oils are usually applied in 3 or more layers.