Understanding the terms
Tinting wood varnish (as well as stain, impregnation and other means) means gradually adding dye until it acquires the desired shade. That is, color is a dye that is gradually added to the solution.
Note! For each type of wood treatment product, you should use a different type of color. Otherwise, it may simply not dissolve when stirred, resulting in a suspension that cannot be used for processing.
As for which color to choose, it is recommended to adhere to the color chart when purchasing it. It is also useful to know that colors that use organic pigments are not particularly resistant to light. Therefore, for outdoor work it is better to use a color scheme that uses inorganic pigments.
In the photo - a color map for selecting the desired shade
There can be several hundred shades of color; the common types of tinting wooden stairs alone include about 50-100 shades. But if suddenly the color palette is not enough, then you can always mix 2 different colors and get your own shade.
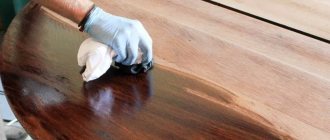
In this case, it is recommended to first experiment with a small amount of color and test the resulting tinted varnish or stain on an unnecessary piece of wood. A sign that everything went well can be considered a smooth surface after drying, the absence of drips and uniform coloring.
First you need to test the tinted varnish or stain on a piece of wood.
What options does the range of compatible paint materials offer?
Environmentally friendly water-dispersed silicone-based paints meet all the requirements for strength, resistance to external influences and durability that apply to high-quality protective and decorative coatings.- Environmentally friendly silicone materials are produced in a wide range of colors.
- Having good adhesion to any substrate and excellent light resistance, the silicone coating is applied without drips or streaks, dries quickly, and can be used outdoors without any problems.
- Very weather-resistant alkyd enamels are characterized by a bright, rich color, are easy to work with, and can be used for exterior and interior use.
- The cost of alkyd enamels is lower than silicone paint, but when applying it, it is recommended to install temporary exhaust ventilation and use protective masks or respirators.
- The characteristic odor of the solvent can be felt indoors for several days. And therefore, upon completion of work, it is advisable to ventilate the house more often. In the best case, it is better to postpone the decor update to the warm season.
How to tint correctly
In a nutshell, the instructions for tinting are that the dye is slowly added to the stain, paint, etc., after which it is simply mixed thoroughly. The dye is added gradually and when the liquid reaches the desired shade, you can proceed to processing the wood. However, there are a number of nuances, depending on what needs to be prepared - varnish, stain or wood paint.
Preparation of tinted varnish
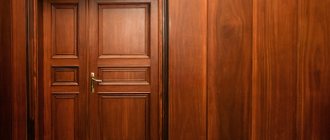
The main purpose of the treatment is to create a durable film on the surface of the wood; after the varnish has dried, it will protect the wood from moisture penetration into it, and the texture will also appear. Tinted wood varnish differs from regular varnish in that after processing the wood texture not only appears, but is also painted in the appropriate shade.
Sometimes even famous manufacturers can make mistakes in the color chart, so it makes sense to take care of preparing the varnish of the desired shade with your own hands. Dyes are usually sold in the same stores as the wood treatment products themselves. You can even try to negotiate with the operator of the coloring machine and the color can be cast into your container. This is just an ideal option, but it all depends on the mood of the employees.
The required color can be obtained from the tinting machine operator
You can try to do tinting using improvised means. For example, there are references to the successful experience of adding water stain to acrylic varnish (a kind of color for wood varnish). The resulting solution is quite pale (even with a high concentration of stain), so it is suitable in cases where strong darkening is not needed.
As for the process of processing a wooden product, it is recommended to adhere to the following sequence:
- the surface is carefully polished. immediately before applying a layer of varnish, you need to wipe the surface to remove dust;
The surface must be perfectly smooth
- then the first layer of tinted varnish is applied;
Note! The entire product is varnished at once; in no case is it recommended to break the surface into sections. If you prepare the next batch of varnish later, it is unlikely that you will be able to get the same shade, but the difference will be noticeable.
- Wood tinting is done in at least 2 layers. But if the surface is quite porous, and the varnish itself is not very saturated in color, then the number of layers can be increased to 3-4;
- It is recommended to make the last layer colorless.
Tinted oil and impregnations
- regular oil paints. They can be mixed at room temperature;
- You can also use gouache. but so that the water does not interfere with the process, the mixture will have to be heated, the water will evaporate;
You can use gouache to tint oil.
- in the past, people also used dyes such as ordinary ash. For example, tinting wood oil with ash will allow you to achieve a dark gray or even black color, it all depends on the concentration of the dye. Soot, colored clay and other natural materials can also be used;
A dark color can be obtained by mixing soot or ash with oil.
- If you buy a dry color and mix it with oil, you will get an analogue of purchased oil paint. Since their prices are comparable, there is no point in messing around with mixing oil and dye; it’s easier to just buy paint.
It should be remembered that when working with oil, too high a concentration of dye gives a more saturated color, but the properties of the oil are lost. That is, it no longer protects the wood from moisture so well and over time the coating will need to be renewed. So the color for wood oil should be added with an eye to the balance between the properties of the oil and the color saturation.
In the case of impregnations, the color after treatment is usually secondary, but even at this stage it is possible to ensure that the wood acquires a noble appearance. If a part of the structure is being processed that will not be visible, then iron oxide can be added to the solution, just so that it can be seen which part is processed and which is not.
Tinting parquet with tinted varnish
Tinting parquet flooring is not such a simple process as it may seem to many. Many nuances and pitfalls await an inexperienced person. How to tint, what technology and technique to use, what the output will be, and other answers, see the parquet tinting page.
In this article we will dwell in detail on the possibility of using tinted varnish, which is widely offered in all construction markets and other sites. Tinted varnish for parquet is sold everywhere, but those who offer it have hardly ever tried to use it themselves! Tinting varnish can hardly be called an excellent means for tinting parquet or floorboards.
Tinted varnish is not a professional tinting product!
Let's start with the fact that even on colorless varnish, sagging and overlaps are clearly visible after drying, although small differences in the thickness of the application are not noticeable. This is due to the fact that the eye only perceives changes in the degree of gloss, but the color scheme does not change when the thickness of the varnish film changes. When using tinted varnish, everything is different; the thicker the layer, the darker it is. Even small differences in thickness will clearly stand out. It is impossible to apply varnish over a large area perfectly evenly, without overlapping layers.
Let's explain it in our fingers. It’s easy to cover a small lamella with one stroke of the brush and place it on a sample, but it’s impossible to roll it out with a roller, much less apply it with a brush, without overlaying part of the varnish from one pass onto another. The tinted varnish will not spread, and the transitions and joints will be distinguished by dark spots and stains.
See an example of applying Tikkuril tinted varnish with a brush and the consequences of this on the parquet tinting error page.
Therefore, when asking the question: Why do stains remain on wood after white or colored varnish?, you are most likely confusing the stains with ordinary stains.
Tinted varnish is never used by real craftsmen!
But its use is still possible. Firstly, using tinted varnish significantly reduces the cost of the process. If you know how to do something, work without haste, and a few dark spots will not be a tragedy for you, then you can easily tint your dacha floor with this product. Let's give some advice. Use only a roller and a good quality one. Apply varnish only along the boards, exactly the width of the narrow section. Try to roll from wall to wall in one motion. Do not try to correct anything in the already varnished part. With the next pass, under no circumstances climb onto the already varnished part. Carefully consider the exit from the room so that by moving the roller along the finishing row, you can easily leave the room. Well, something like this.
Yes, still! If you are satisfied with the result of one of the layers, use the colorless version for the next coatings!
Tinted varnish is good for use on completely “killed” floors in apartments and industrial premises. It covers stains, rot and other damage well. True, in this case the structure is completely lost, and the floor takes on the appearance of being painted. The so-called “deaf” tinting of parquet. When applying several layers of tinted varnish, a completely uniform dark film is formed. At the same time, the reflective ability changes and the glass effect disappears when all layers are visible throughout the entire depth. In this case, color differences in thickness are leveled out, and the floor looks more or less uniform.
But such a coating is no longer tinting in its true sense, and is rather called painting.
After reading this article, you will be able to understand why it is not advisable to use tinted varnish to tint parquet or boards.
Source: parket-all.ru
Preparatory work
Once the choice of manufacturer and shade has been made, you can begin preparation. The final result will directly depend on its quality. The preparatory stage is divided into the following operations:
- Completely remove any remaining existing paintwork. For this you will need a scraping machine. This operation can be done manually only in the smallest areas.
- Carefully inspect the surface of the wood. All minor defects (depressions, burrs) must be cleaned with sandpaper, vacuumed, and puttied.
- Clean the putty areas and polish.
The preparatory work includes removing the remaining paintwork using a sanding machine.
Next, thoroughly vacuum the surface again. The dust left behind will form clumps and interfere with the quality of the tinting.
Varnishes for wood and more
Today we choose varnish for wood (fibreboard, chipboard, MDF, plywood) as well as for coating painted surfaces made of these materials.
Unlike wood glue, there are a huge variety of varnishes. Therefore, I will only talk about those that I have tried myself. These are one-component varnishes, most in demand by both professionals and home craftsmen. Let's go, as always, “bottom up.”
1. Nitrocellulose varnish (NC). Or just nitro varnish.
In principle, this is a normal varnish. Simple. I started covering my first creations with it. By default, this varnish is colorless, but stores sell several shades of it. I don’t know if it’s possible to tint it yourself; I haven’t tried it. Theoretically, it is possible, using a dye on an identical basis. Suitable for covering inexpensive items.
Pros: dries quickly, does not bubble when applied, cheap. Cons: The coating is rather weak, wears out and gets scratched quite quickly. Poor light fastness. Stinky! Therefore, you need to work in a well-ventilated area. However, after it dries quickly it stops smelling. Brushes can only be washed with solvent.
Consists of natural alkyd resins in an organic solvent. The varnish is not bad. I started using it after I became disillusioned with NC :)) The line of alkyd varnishes is divided by hardness and moisture resistance.
Pros: quite durable, looks good in terms of gloss (the markings don’t lie), good moisture resistance, light fastness. Reasonable price. Cons: Smelly! A little less than nitro, but long lasting. It takes a long time to dry, up to a day. And all this time it exudes a smell. Therefore, the use of this varnish in inhabited areas is almost impossible. Bubble when applied with a brush! Small air bubbles remain in the varnish layer and there is only one way to remove them from there - let the varnish dry and then remove the bubbles with sandpaper. And then cover it again with a new layer. Still the hemorrhoids! Why does it bubble? The jar needs to be shaken if the varnish contains matting additives (more details below). Stirring creates bubbles. Personally, I used yacht semi-matte and furniture semi-matte from Marshall. Until acrylic appeared.
Tinted wood varnish Cetol TSI
Seasonal PROMOTION for painting a wooden house at a competitive price
Attention!
The quantity of goods is limited, check availability with the manager.
Cetol TSI: Tinted semi-matt alkyd-based varnish on wood for interior use. Excellent tint for wood. Protective, wear-resistant, water- and dirt-repellent coating Cetol TSI is suitable for painting any indoor wood structure, such as doors, baseboards, suspended ceilings, furniture and shelving. The coating is also suitable for wet areas, such as bathrooms. Does not turn yellow.
We color Cetol TSI according to the fans of the Sikkens Natural Balance and Cetol Design Classic . To order flowers from these catalogs, follow the link Cetol TSI Satin plus.
Characteristics: Easy to apply. Resistant to impact and abrasion. Good resistance to water and non-aggressive detergents. Content of volatile organic compounds G. U. At 60 o (ASTM D 523).
Service life: Depends on the height and location of the painted object, as well as the quality of the wood, conditions and method of application, etc.
Packaging: 1 l,
Shelf life: at least 1 year in unopened original packaging. Store in a dry place at a temperature of 5-30o C.
Application system:
Important!
Wood moisture content should not exceed 14%.
| Old price | New price | |
| 1l. | RUB 1,399.92 | RUB 700.00 |
New unpainted wood: Apply to previously prepared wood (sanded and, if necessary, degreased with M600).
Some types of wood produce large amounts of extracts, and softwoods can be very resinous. In this case, the existing resin pockets should be removed, and the remaining resin should be washed with a cotton cloth moistened with M600 degreaser (it is recommended to change the cloths as often as possible). Allow the solvent to completely evaporate before painting. It is recommended to use special eye and hand protection.
Stir the varnish thoroughly before applying. For best results, it is recommended to use a good quality, soft, long-haired brush. Apply varnish in 3 layers (drying time between layers is 16 hours). To make the finish look beautiful, it is recommended to follow 3 rules: 1. Make as few strokes as possible; 2. Do not apply too thickly, as brush marks will remain; 3. Apply strokes along the wood grain.
Source: domkraski.ru
Announcements on NN.RU - Construction
Milan kitchen table new with free delivery to your doorstep in the city of Nizhny Novgorod Dzerzhinsk. Size: 1154*752*756 mm frame: legs. Price: 4,500 rub.
Dining group new collection free delivery within the city of Nizhny Novgorod Dzerzhinsk. Dzerzhinsk furniture factory Dastorg.
Carved entry posts for stairs made of oak, beech, ash, pine! From us you can buy carved pillars and balusters of various types and... Price: 7,000 rub.
Log house 6*9 five-walled, 2.8 m high, planed logs. Price: 360,000 rub.
«>
Decorative varnish - shine and protection for your plaster!
Decorative plaster does not require additional processing - it is classified as a finishing coating and forms a durable, aesthetic surface. However, if you want to emphasize the texture, add shine and add shades, special glazing compounds are used. In this article we will look at what finishing varnish is used to cover walls, how to prepare it yourself and what to apply it with.
Summarizing
Tinting varnishes, oils and wood impregnations is a creative process, and therefore very exciting. By adjusting the concentration of dye in the wood treatment liquid or oil, you can achieve almost any shade. As a result, even simple pine looks exquisite after processing.
The video in this article shows an example of using acrylic varnish tinted with a regular water-based stain.
Because You are not logged in. To come in.
Because The topic is archived.
Because The topic is closed.
What is a glaze composition
Glaze varnish is a coating designed to improve the decorative properties of a material. It is used on smooth and textured plasters, forms a durable transparent film, gives the desired shade and/or shine. It does not hide the color and texture of the plaster, but only emphasizes its relief.
Glazing varnish is used for:
- Improving the appearance of the coating. Different types of composition and application techniques give different effects: to emphasize the relief structure of the material, to give a pearlescent shine to the coating, to give the wrong color of plaster the desired shade.
- Protection. After drying, the composition forms a vapor-permeable film, which enhances the strength of the main decorative coating. Plaster treated with varnish is more resistant to mechanical stress, is not afraid of dampness, and does not fade under the influence of sunlight. Dust settles less on uneven surfaces, and if necessary, the wall can be washed. Finishing with plaster in wet rooms (bathrooms) must be completed with final varnishing.
The composition is environmentally friendly and can be used for finishing residential premises.
Below in the photo you can see how decorative plaster coated with varnish looks in different colors.
What varnish to cover the walls with?
Glazing varnish is a water-based acrylic solution + targeted additives. Available in 2 options:
- colorless - used unchanged or tinted independently;
- colored - completely ready for use; you cannot add paint or dye to it.
The composition may contain glitter, and the surface covered with it becomes pearlescent.
Glazing varnish, depending on the type, can be matte, semi-gloss or glossy.
Almost every manufacturer of decorative plaster also has a varnish for coating it. But it is not necessary to use materials of the same brand; you can choose any, for example, VGT, San Marco, Perlacheo, Tex, Poliver, Dali, Bayramix, etc.
How to tint varnish
If you can’t choose a color from ready-made compounds, you can purchase a colorless one and get the desired shade yourself. To give the desired color, special solutions are used - tints. Additionally, you will need scales, a mixing container and a drill with a mixer attachment.
- Pour the required amount of varnish into a container and weigh it.
- The maximum allowable amount of color is 10% of the base. It is advisable not to pour out all the paste at once, but add in small portions and then stir.
- Then apply the liquid to a sample of the coating and wait until it dries to evaluate the result.
It is important to remember that acrylic compositions may darken slightly after drying.
Features of tinting silicone paint
By thoroughly mixing, bring the paint into working condition. If a silicone dye is chosen as a consumable material, its composition can be tinted by adding colored pigments. To eliminate possible errors, select colors and dosage of dye in a small volume.
After receiving a positive result, tint the main volume in compliance with the proper proportions. Thin paint only with compatible thinner. The quality of the coating largely depends on the uniformity of the paint composition. You will save working time if you use a mixer or attachment on a household drill to mix the mixture.
How to make it yourself
Glazing compounds are produced by different manufacturers, but most of them are expensive. If you want to save money, you can prepare the solution yourself.
For this you will need:
- scales;
- wallpaper glue;
- acrylic panel varnish (matte or glossy, depending on what kind of coating is required);
- drill with mixer attachment;
- container for mixing the solution;
- color or water-based paint;
- additives (sparkles - glitter).
Recipe . The glaze solution (glaze) will consist of 2 parts glue, 1 part varnish and ½ part paint.
- First, prepare the glue by diluting the dry powder according to the instructions indicated on the package. Mix thoroughly and leave until the flakes are completely dissolved in the water. It is not advisable to store the prepared liquid for a long time, so you need to calculate the required volume and prepare as much as you need for work.
- Panel varnish is poured into a container with ready-made glue and mixed thoroughly.
- Then paint is added. If you use color, then pour in a smaller amount (not ½ part).
- At the same time, add glitter. Add very little additives - a few grams per 1 kg of solution is enough.
Materials required for painting lining
The following equipment is required for work:
- Roller;
- Drill operating at low speed;
- Construction mixer for paints;
- Plastic bucket with a volume of about 30 liters;
- Rags;
- Polyethylene for covering furniture.
First of all, we need to cover the floor and furniture with a protective material to avoid damage or damage. Next, we calculate the volume of color required for work. It's easy to do. We multiply the area of the required surface by the paint consumption per square meter (the manufacturer indicates this information on the can), and the finished figure is displayed. If all the required paint is not in one can, but in several, or even in dry form in bags, it is advisable to move everything into one container. This is done so that the color of the lining is uniform, without the slightest shades. The next stage is the preparation of the lining itself. It is very important to do the work carefully and efficiently so that the paint goes on evenly and the wood does not begin to rot in the future.
Application (glaze)
The glazing composition is applied to completely dry plaster. If there is dust on the surface (from grouting, for example) or dirt, remove it. Decorative finishes are varnished without preliminary priming; there is no need for it.
When carrying out work, the humidity in the room should not exceed 75%, and the temperature should be from +5 to +35 °C. When the primer layer has dried, begin application.
Application methods: sponge, roller, paint brush or spray gun.
Important! The solution containing glitter must be stirred constantly so that the additives do not settle to the bottom of the container.
- Work starts from the corner. The wall is mentally divided into squares with an area of 1 m². First, they process one, then immediately move on to the next, not allowing the first area to dry out. If you take breaks, the liquid will dry out and the transitions will be noticeable. There is no way to fix this.
- If the liquid has thickened, or you need to get a light, almost invisible coating, the liquid is diluted with water. The composition has virtually no odor during application and dries quickly.
- The composition is applied in separate strokes, without trying to completely paint the surface. Movements can be straight or circular, randomly directed. After treatment, even before the liquid dries, you need to shade the surface. Since the solution dries quickly, it is recommended to work together: one applies the composition, the other shades it.
Drying time depends on the specific composition, on average 1-2 hours.
Material consumption : about 100 g per 1 m². When using a spray gun, consumption is reduced.
If the goal is to create a light coating or additional protection for the plaster, then one layer is enough. The second is applied when it is necessary to give the surface greater color saturation. An additional layer can be made either with the same solution or with a different color. Between applications take a break of 1-2 hours.