Decorating is one of the many areas in which it is very necessary to apply the rule of the “golden ratio”. What is the "golden ratio"? This term is inherent in proportional division.
Interior decoration is the final stage of design. How well-chosen jewelry is appreciated. What visiting guests do is praise the tastefully designed space, and are motivated to create something similar.
The most important thing is to take into account the small details. It would seem that who cares about a flower on the windowsill or figurines with spices on an open shelf. It will be a hundred times better if the owner pays attention to the little things.
It is the consideration of small details that is the purpose of the article. Having looked through creative sites, I just want to talk about ways to decorate little things. Decoupage for your attention!
Previously, decoupage was used exclusively to add zest to furniture. In this way, an absolutely budget-friendly and spectacular interior was created. If earlier the tools were limited, then at the moment the situation is exactly different.
In the modern world, thanks to the latest materials, it is possible to decorate with absolutely any surface. The final product can become an original decoration in the apartment or an unusual gift for a loved one.
Varieties of decoupage
The decoupage technique involves cutting out decorative elements and then gluing them onto various surfaces.
In relation to bottles, several design methods can be distinguished.
- Classically decorate objects by gluing paper napkins, decoupage cards and rice paper onto them.
- The smoky method involves a combined design by painting the glued parts and creating smooth color transitions.
- The reverse gluing technique got its name from pasting decorative elements onto the inner surface of objects.
- The volumetric decoupage method involves the formation of a unique decor using putty, special plastic paste and other unusual elements.
- Decopatch gets its name from the special decorative paper that is used for it.
Operating rules
When decoupage, it is important to follow special rules that are developed specifically for this technique:
- The bottles from which you plan to make a craft must be smooth, without raised irregularities.
- To increase the accuracy and quality of cutting, it is better to work with nail scissors.
- If napkins are used, then only the top layer of paper is glued, which is removed from the desired picture.
- The glue that will be used throughout the entire work must be special, just for decoupage. If you don’t have one, and you can’t buy it, dilute regular PVA with water in a 1:1 ratio.
- The picture is glued like this: the surface is smeared with glue, and a picture is placed on top and leveled. The most important thing is that there is not a single fold or tear.
- If you use cards for decoupage, it is better to soak them in warm water for a while in advance, and then let them dry on a towel.
- The result of the work must be fixed with varnish to avoid accidental damage and deformation due to humidity.
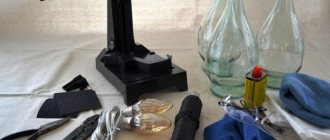
Tools and basic materials
Decoupage is first and foremost a fascinating creative process. In order not to be distracted from work, it is convenient to prepare consumables and necessary tools in advance.
- For decoration, you should choose smooth bottles without patterns or imprints.
- An important component of success in bottle design is the competent selection of decorative elements: decoupage cards, paper table napkins with an original pattern or drawings. Such products are easy to purchase in regular stores.
- To polish the treated surfaces you will need sandpaper. It is recommended to stock up on paper with different degrees of grain for step-by-step work.
- A solvent, regular nail polish remover or alcohol is needed to degrease the surface to be treated before decorating.
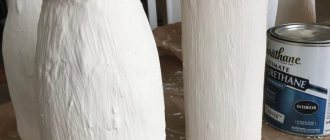
- Acrylic primer will serve as the basis for creativity.
- Special adhesives or regular PVA glue are recommended as adhesive mass.
- Acrylic paints will be needed to touch up some details of the image. After gluing all the parts, the product is coated with water-based varnish (or a special decoupage varnish) to create a reliable protective layer.
- Small, sharp scissors are essential for cutting out decorative elements.
- Brushes of various sizes made from artificial materials will be needed for applying adhesive coatings, paints and varnishes.
- A roller is convenient for smoothing decorative details.
- A sponge and soft cloths will be needed to remove excess glue or paint.
- Different containers for water, glue, paints, soaking paper parts.
Decoupage for beginners involves the simplest ways to decorate bottles using paper parts. Then you can move on to more complicated techniques.
What to make from
Very often, an empty bottle is used as a basis for decoupage, but this is not the only thing that can be decorated. Most often, people use glass objects, so it’s not difficult to decorate a vase, glass or something similar.
In addition, other dishes, pieces of furniture, flower pots, cutting boards, a bread box and the like are perfect.
To get a drawing, you take not only decoupage cards, rice paper or a napkin. You can use old magazines and cut up a bunch of images from them.
Such pictures need to be varnished a couple of times, allowed to dry, and then lowered into a container of water for twenty minutes. Next, you just need to tear off the transparent layer on top and stick on the design.
In the process you will only need glue, alcohol, varnish, acrylic, brushes, sandpaper, pieces of foam rubber and rags. Tinting is done using acrylic; when decorating, they use everything they can find in their home: from sparkles with beads to shells and bows.
The choice is great, it all depends on your imagination. You can come up with a bunch of ideas either on your own or inspired by photos on the Internet.
Stages of decoupage technique
The creative process of work can be divided into several technological stages, the sequence of which must be strictly followed:
- Bottle preparation includes washing, removing labels, and degreasing the surface.
- Surface primer.
- Gluing decorative elements.
- Application of varnish coating.
Regardless of the materials used and the complexity of the work, the design stages are unchanged. Decorations should be selected and cut out in advance.
Photo gallery
See our photo gallery for 27 more photos of interesting examples for inspiration.
Decoupage bottles with napkins
To become familiar with all the intricacies of the decoupage technique, beginners are recommended to start working by gluing bottles with ordinary napkins. This is a great way to do, for example, decoupage of New Year's bottles.
Operating procedure.
- Treat the bottle: remove labels, wash, degrease the glass.
- Paint the bottle with clear varnish as a primer.
- Paint the glass white or light color. It is convenient to apply paint in spray form.
- Carefully stick on the decorative elements. After drying, if necessary, level the surface by treating it with sandpaper.
- Coat the product with varnish.
Note!
- Master class on decoupage: step-by-step do-it-yourself decoupage schemes. Master classes on creating products for beginners (130 photos)
- Bouquet of candies: TOP-170 instructions for creating a bouquet of candies + DIY design ideas
- Bouquet of Raffaello: the best instructions for creating a bouquet of Raffaello with your own hands + simple diagrams with photo reviews
In a similar way, it’s easy to decorate a bottle as a gift or decorate a holiday table.
How to glue correctly without creases?
It is necessary to familiarize yourself with some rules before creating decoupage for beginners. Step by step, you can create unusual compositions with a photo of a bottle and napkins. Napkins provide a particular challenge. Some types of napkins cannot be applied wet, as they immediately begin to unravel. To glue smoothly and without wrinkles, you can use the hot method. PVA glue is applied to the surface. Then, after drying, the napkin is applied to this place and ironed with a hot iron through the paper. In this case, the napkin will stick without wrinkles. On a napkin glued in this way, you need to carefully apply varnish, especially the first layer.
Decoupage using toilet paper
For decoration, you can use paper towels or toilet paper. It is thin, textured and easy to work with.
Operating procedure.
- Store the bottle and degrease the outside.
- If necessary, apply the pattern with acrylic paint. Let dry.
- Tear the paper into pieces of the required size and thoroughly soak it with glue.
- Glue the paper parts onto the pattern elements, giving them volume.
- Dry the bottle.
- Carefully apply a thin layer of acrylic paint. If necessary, stick on rhinestones or beads.
- Coat the finished bottle with varnish in several stages.
In a similar way, it’s easy to do New Year’s decoupage using white paint and clear varnish.
Fixing the result with varnish
To protect the result of your painstaking work from external influences, for example from dust, water (this is very important for a bottle), scratches, air, you should cover the work with a varnish layer. Before doing this, thoroughly dry the product from glue and moisture.
To make your work look better, cover it with several layers of varnish.
Volumetric decoupage technique
For this type of decoration, you will need modeling paste and various three-dimensional elements: cereals, ears of corn, beads, dried flowers.
Operating procedure.
- Prepare the surface of the bottle and prime it with acrylic paint.
- The napkin prepared for decoration is covered with a film, on which a corresponding pattern of dried modeling paste is laid out.
- The film together with the paste is applied to the product, attached and the film is removed.
- A napkin is glued onto the resulting three-dimensional pattern.
- Fix decorations or paint them with paints.
- After drying, apply varnish in stages.
Volumetric decoupage will serve as one of the options for decorating a bottle of champagne for the New Year. A creative approach will result in a very original holiday decoration.
Note!
- Decoupage on wood: TOP-130 ideas for decoupage on wood. Instructions on how to work using the decoupage technique + simple photo diagrams
Drawing master class: step-by-step do-it-yourself drawing schemes. Master classes on creating drawings using different techniques (120 photos)
Master class on sculpting - TOP 150 photos with step-by-step instructions on sculpting products with your own hands. Master classes for beginners
Many more interesting ideas
For maximum inspiration, we bring to your attention more ideas for decoupaging bottles for the New Year.
Did you like the article? Tell your friends about it:
17 1 3
Decor of a plastic bottle
Not only glass, but also plastic is used as a base. Preference should be given to transparent, colorless bottles with a smooth surface.
Operating procedure.
- The bottle should be freed from stickers, washed, treated with solvent or alcohol.
- Clean the plastic a little with sandpaper and paint it. It is convenient to use a sponge for painting. Painting is done in stages, first the walls, then the bottom.
- After the paint has dried, you need to glue the paper parts.
- Additionally, you can stick on small fragments of eggshells, imitating a cracked surface, or give it a different shade with paint.
- The final stage is to apply the varnish coating.
By decorating a plastic bottle, you can bring to life a lot of creative ideas and decorate the bottle in any style and color.
Preparing the glass surface
Nowadays, each bottle from the store has various labels with information about the manufacturer, place of manufacture, composition and expiration date. But this will interfere with high-quality decoupage, so you need to get rid of the stickers. To do this you will have to put in a little effort, but the result is worth it. Leave the bottle in a solution of water and dishwashing detergent for several hours, then easily remove the paper. Use medium-grit sandpaper to remove any remaining glue and paper. Go over the entire surface of the glass with a degreaser and sand the glass again.
Vintage bottle
An unusual vintage vessel can be decorated using the craquelure method.
To obtain a spectacular antique bottle, a special craquelure varnish is applied to the surface covered with paint. When dry, it will crack, creating the appearance of a surface that has been fairly worn by time.
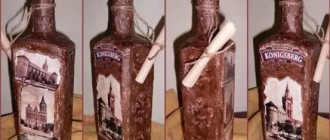
In addition, it is easy to paste the bottle with paper elements of the corresponding theme: ancient writings, geographical maps, floral motifs.
At the end of the work, the product must be varnished.
Story
Decoupage originated in France and is translated as “to cut out.” The work itself consists of cutting out various images from paper products and pasting them on glass products. To make it possible to beautifully decorate the interior, the design of the item is supplemented with elements from various materials, then covered with paints and varnishes.
Decoupage bottles with leather
It’s easy to use scraps of genuine leather to decorate the bottle.
The work is carried out using Moment glue. The advantage of leather is its relative elasticity. Therefore, by stretching and folding it, you can create an unusual relief surface.
The parts coated with glue are immediately glued onto the glass and pressed slightly.
You can complement the decor with other details, beads, metal or wooden elements.
The final touch will be a varnish coating, before applying which you can apply a few strokes of contrasting paint.
Decoupage of furniture in Provence style master class updating a chest of drawers
Having tried your hand at simple things, you can safely start decoupage with your own hands using napkins. In addition to the usual list of working materials, you will need wood putty. It is used to pre-level all the cracks, cracks and other irregularities on the surface of the chest of drawers, cleaned of old paint.
Sequence of decoupage of kitchen furniture with your own hands, photo and description:
Image
Operation description
Preparation The furniture must be thoroughly cleaned of all layers, and defects must be smoothed out with putty. After drying and sanding, all surfaces are coated with a primer and sanded with fine sandpaper.
Preparing pictures The drawing on the napkins is carefully cut out or torn off by hand, and the bottom layer is removed. The picture is coated with glue and applied to the furniture
The application is carefully straightened with a brush.
Finishing coating There is no need to rush. All drawings must dry
You need to varnish all the furniture, not just the place of decoration. For large areas it is convenient to do this with a spray bottle or spray can. This way the varnish will lay down in a thin layer. For the best effect, you need to apply 3-4 layers in succession, waiting for complete drying between treatments.
Result.
When decorating furniture with fabric, the process is practically no different from that described.
Ideas for decoupage bottles
Using the decoupage technique, it’s easy to please yourself or your loved ones with originally designed bottles of cognac, wine or champagne for any occasion. It is important to choose the right theme and decorative style.
Bottles of champagne in New Year's decor, with floral patterns or themed designs will look original. The occasion could be an anniversary, an important event or any other holiday.
You can decorate plastic bottles in a similar way, making beautiful liquid soap dispensers for the bathroom, original bottles, and even making flower vases from bottles.
By showing a creative approach, it is easy to make unique interior items or decorate gifts in a very original way.
Kitchen Design Ideas
There are a large number of ideas for decorating a kitchen using decoupage techniques. It is worth trying the following options:
- dishes, vases and cutting boards processed using decoupage technique;
- jars decorated with floral patterns;
- stools with patterns of small flowers and still lifes;
- kitchen cabinets with Provence style patterns;
- old chairs with scuffs.
Such cabinets will fit perfectly into the kitchen interior
Decoupage can be combined with gilding, tinting, the effect of artificial aging and the craquelure technique. To decorate the kitchen, styles such as ethnic, shabby chic and country are used. For decoration, you can use all kinds of gastronomic motifs: berries, cupcakes, cakes and fruits.
Kitchen decorating ideas:
To create a unique interior, you don’t have to spend a lot of money. From available materials you can create magnificent accessories and pieces of furniture for any design idea.
Related article:
Weaving from newspaper tubes: new ideas with photo instructions. Let's look at the features of making crafts and step-by-step instructions for several new products.
Photo of decoupage bottles
Decopatch
The technique is essentially similar to creating a patchwork quilt. The design consists of individual small elements that are united by a common theme or similar color scheme.
Selecting details for decoration requires a competent and thoughtful approach. To make the task easier, purchasing a ready-made kit designed to work specifically with this technique will help.
Gluing parts
The most exciting step in the creative process is gluing paper elements onto the glass surface.
The work will require accuracy, attention and concentration.
- The parts are carefully coated with an adhesive; in addition, it is easy to apply it to glass.
- The blanks are placed on the glass and their surface is very carefully smoothed, expelling air bubbles and excess glue.