Decoration materials and techniques
To create a beautiful vase yourself, you don’t need to purchase expensive materials. At home you can find quite a few things lying around that can breathe new life into a product.
The most unexpected objects are suitable for creativity:
- — natural materials (branches, wood, shells, stones, sand, fir cones);
- — food products (coffee beans, seeds, cereals, pasta, beans);
- — materials for clothing (string, artificial leather, beads, rhinestones, fabric, ribbons, buttons).
Decoration is appropriate in any technique: pique, stained glass, decoupage, ombre.
For inspiration, you can look at a photo of the vase decor in advance. It is not necessary to copy ideas completely. It is enough for the vase to have a harmonious and finished look.
Themed decorations
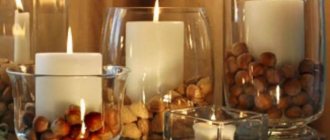
On the eve of the holiday, housewives decorate their rooms with balls, toys, beads and fir branches. An improvised night light made from a garland and a vase will help create a pleasant atmosphere.
Fairy lights
Make a “firefly” in a vase or glass:
Christmas decorations
Place Christmas tree decorations in a vase in colors that support the overall decor of the room:
When composing a composition of several vases, it is advisable to take those that have a similar silhouette, but different heights and widths. Each of them can be filled with different contents in a single color scheme and theme. This will complement the decor of the room and give it a finished appearance.
Did you like the article? Tell your friends about it:
1 1 1
Decorating with a pattern
The easiest way for those who are just taking their first steps in this matter.
The ornament can be geometric, floral, abstract.
Step-by-step instructions for decorating a vase with patterns.
- — The vase is washed thoroughly.
- — The product is treated with alcohol or acetone (to degrease the surface).
- — The main tone is applied. This is especially true for ceramic vessels. Glass products do not need to be tinted. It is convenient to use spray paint - it dries faster.
- - Patterns are drawn. You can decorate the entire vase, or you can decorate only the neck and bottom. There is an interesting and simple way for those who have not held brushes in their hands - creating patterns using tape. The vase is covered with pieces of tape in a chaotic manner, then the top is painted over with paint. It turns out an interesting texture.
- — Finally, you can add accents using sparkles (glitter).
Decorating a vase with pasta
Few people would think of such an idea, and not everyone would guess that the vase is “edible.”
What you will need:
- — figured pasta (shells, stars, bows, spirals, horns, feathers, scales);
- — a can of aerosol gold or bronze paint;
- - hot glue;
- - varnish.
First you need to come up with a general concept. It would be a good idea to make a sketch on paper. You can lay out the drawing in a pattern, or you can fill it with the entire surface of the vase.
Tip: using masking tape you can remove any remaining glue that will entangle the product like a cobweb in the process.
Incredibly, products decorated with pasta look luxurious.
Pique technique
Decorating glass vases using the piqué technique is painstaking work, but there are two points that will dispel doubts.
Firstly, you can first print out the picture you like and place it inside a vase to draw, like when you were a child, through glass. And, secondly, there is no risk of drawing a crooked or too thick line - the image can be easily erased with a cotton swab dipped in alcohol.
You will need different shades of paint for painting glass and ceramics.
Step-by-step instruction.
- — The product is degreased.
- — Light touches of the brush indicate the outline of the main element on the vase.
- — From the main element the gradual filling of the space with a pattern begins. For greater expressiveness, some points can be made larger and the intervals between them can be changed.
- — The drawing does not need to be done all the way to the neck. This will create an interesting effect: as if the vase is in a glass holder or an openwork cocoon.
The result is an incredible decor for a tall vase.
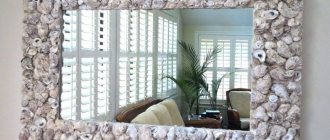
Marine theme
Souvenirs brought from vacation bring back pleasant memories. A composition of shells, pebbles and sand in a vase will please the eye until your next trip.
Sand
Sand from the beach can become part of a composition reminiscent of summer. It can be combined with shells in a transparent vase:
You will get a whole work of art if you paint the sand in several shades. Fill a clear vase, alternating layers of different colors.
Processing with food coloring is done as follows:
- Pour sand into the container in which the painting will be done. A container with a lid is best.
- Pour water into the container so that it covers the sand.
- Add a couple of drops of food coloring and mix thoroughly. If the color is too saturated, you can add water.
- Place the sand on cheesecloth, drain all the water and leave to dry. As a result, it should become completely dry.
In this way, each layer of sand is colored.
Shells and pebbles
Another pleasant reminder of your vacation are shells and pebbles from the beach. Sea elements in a glass vase will bring positive energy to the interior. Corals, shells, starfish - everything that you liked during your vacation will be a wonderful addition to the interior.
Decorating with burlap and jute twine
Burlap vases are popular because they create coziness. The texture and color of burlap harmonizes with wooden furniture and natural shades of the walls. Usually, decanters or flower pots of simple shape are chosen for covering with burlap.
Stages of creation.
- — The surface is degreased.
- — PVA glue is applied. Immediately wrap the twine at the top of the vase and at the bottom. The middle should remain clean.
- — A little glue is applied on top of the jute thread to strengthen it. The product must dry.
- — The part free from twine is covered with a piece of burlap.
- — A ribbon is glued on top of the burlap in a circle.
- — Take a piece of jute thread. Wooden beads are placed on both ends. The thread is tied in a bow and glued to the braid.
Tip: let the edges of the burlap overlap the twine a little. It will be more effective this way.
Such vases look good with dry twigs and reeds.
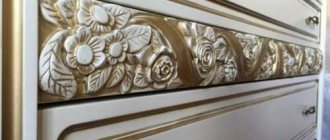
Vase using decoupage technique
One of the most difficult techniques. If you haven’t had to deal with it before, it’s better to practice on unnecessary things.
Decoupage is a decoration technique that involves attaching a design to an object and covering it with varnish (for better preservation).
With the help of appliqué with napkins and pictures, even the simplest jars become a work of art, not to mention vases. Almost any decoupage motif can be found on kitchen napkins.
Step by step instructions.
- — The white layer of the selected napkin is carefully separated from the colored one.
- — Using scissors, the required silhouette is cut out.
- — A thin layer of PVA glue is applied to the surface of the container.
- — The drawing with the pale side is placed on the file and moistened with water.
- — The cut out image in the water is carefully straightened out.
- — Excess liquid is drained. You need to make sure that the image is not deformed.
- — The application from the file is “sealed” to the vase.
- — The file is removed, the picture is coated with a brush dipped in PVA.
- — After drying, the vase is varnished.
Using the decoupage technique, you can make expensive decor for vases.
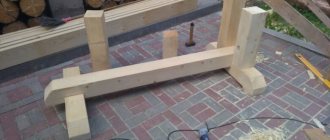
High vessels
An unusual option for making a floor structure consists of wooden blocks that are glued together. Although, this approach is more labor-intensive and there is no need to decorate it, since it initially turns out beautiful.
Note!
- How to make a flower stand with your own hands - the best options for stands for indoor and outdoor flowers
- Apartment decor - the best ideas for stylish and original apartment decoration with your own hands (100 photos)
- Living room decor - design ideas and video tips on how to decorate a stylish and modern living room (90 photos)
We are talking about inexpensive decor for vases, which is made practically from improvised materials. Never throw away an old vase that has lost its appearance. Give her a new life!
Before starting work, clean the surface of the product. You can decorate it with sealant and let it dry for a day.After complete drying, you can apply paint to the created pattern using brushes or an aerosol can.
The second method will allow you to get the effect of frozen glass. Once the first coat has dried, be sure to apply the second.
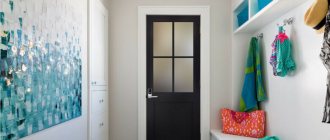
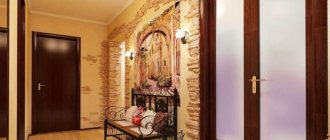
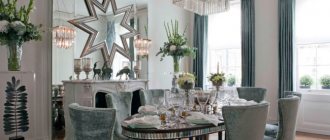
Vase for interior style
Conventional vases are not so in demand. If the decor of floor vases has an original stylistic design, it will become the highlight of the interior.
To successfully integrate handmade vases into the interior, craftswomen turn to motifs on curtains, pillows, and wallpaper.
Vases decorated with natural materials look good in an ecological interior. For example, dry branches.
In a classic living room, a simple vase is appropriate, without bright paintings or flowers.
For the little inhabitants of the room, vases decorated with decorative stones, ribbons, and flowers are suitable.
A vase that harmoniously fits into the decor will indicate that the owner has impeccable taste.
Dry plants
The active flowering season passes quickly in most regions, and you want to enjoy the beauty of plants at any time of the year.
Compositions made from dried flowers will help fill the room with warmth on a rainy autumn day.
Collecting and drying plants is not difficult, and you don’t have to grow them yourself. You can put together a composition from wild flowers and tree branches.
Branches
The branches are appropriate in a modern style interior. Compositions with natural wood will bring a feeling of comfort. Branches can be of different shapes, thicknesses and lengths.
All kinds of decor options give room for imagination: you can make compositions with feathers, pine cones, dried flowers. By the way, the decoration is easy to replace if the interior design has changed or you plan to make a thematic composition for the holiday.
Attach paper flowers to the branches:
To match the holiday theme, hang Easter eggs or Christmas balls:
How to process branches for decoration
After the branches are selected, cut down and brought into the house, they must be prepared for further manipulation.
- Dry - 2 weeks indoors, or 7 days on a radiator, or a couple of hours in the oven with the door open.
- Coat with wood preservative. This will extend the life of the branches and protect against the possible appearance of bugs.
Branches prepared in this way can be painted. To do this, select acrylic paint of any color. And don't forget to follow the basic rules:
- Branches should be painted in a well-ventilated area.
- You can adjust the desired color intensity by applying several layers of paint. The more there are, the richer the shade will be. But before applying the next layer, the previous one must dry thoroughly.
- You can add a vibrant shine to the composition and fix the paint with wood varnish.
Now the branches are ready for further decoration. Here are some options:
Leaves
Dry leaves can be part of the composition or the only element in the bouquet. Autumn ones, for example, delight the eye with warm shades.
You can add spikelets, cones, rowan berries and rose hips to the vase.
Tricks to help preserve foliage longer:
- Treatment with a cotton pad soaked in vegetable oil or glycerin.
- Spraying with hairspray.
- Dipping dried flowers into melted wax.
Dry autumn leaves are in perfect harmony with burlap, twine, lace and satin.
They are also great for composing a composition in a low vase.
Grass
Dried herbs add splendor to a bouquet of flowers. The cortaderia is popular. Fluffy pampas grass will fit into a minimalist interior and add sophistication to even a simple room.
Which vase is suitable:
- floor, about 40 cm high;
- elongated and narrow - for one dried flower, voluminous - for a bouquet;
- transparent, in which the grass stems will be visible.
Vintage herbal bouquet with cat's paw plant:
A few blades of grass in a transparent vase are an option for decorating the dining table.
Spikelets
The spikelets create a feeling of airiness and lushness of the composition. They should be collected before the grain falls off. The choice of cereals is varied: it can be rye, barley, oats, buckwheat.
Bread ears are considered a symbol of fertility and long life.
You can use not only natural, but also dyed materials.
Cotton
Cotton sprigs are sold in flower shops. They are used in making interior bouquets and wreaths. Cotton is self-sufficient on its own in a floor and tabletop vase.
And also in the company of other dried flowers and herbs.
Other dried flowers
In general, dried flowers are any dried plants. With their help, you can decorate a room, create a pleasant atmosphere and give the interior a touch of romanticism. Unlike fresh flowers and plants, dried flowers do not require sunlight or water.
Bamboo
Bamboo in the interior will bring a little tropical warmth to a city apartment. This decor makes the interior cozy and unique.
Of course, you can grow live bamboo, but a more practical and durable option is to have treated and varnished stems placed in a large floor vase:
Or shortened stems in a vase on a table or chest of drawers: