Plastic and glass surround us everywhere and very often bottles made from these materials accumulate in large quantities and litter balconies, garages, sheds and verandas. You can just throw everything into a landfill, but it’s better to try to use them as material for creative ideas.
Even inexperienced craftsmen can create an original lamp with their own hands from plastic or glass bottles. It is enough to be inspired by the ideas presented and arm yourself with our tips and recommendations.
Advantages and features of application
There are always many positive things about creating home decor items with your own hands. First of all, you can immortalize your favorite things, for example, by giving life to something that reminds you of a special event.
Another positive aspect is that by reusing old things, people help save nature from pollution from household waste.
Thanks to the variety of colors, the light from bottle lamps is very warm and creates a feeling of comfort in any space.
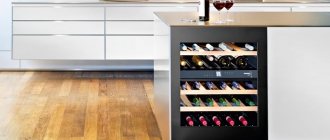
When creating lamps from glass bottles, you can implement different ideas and stylistic solutions. This could be a stylish bar accessory, a cozy table lamp, a vintage loft-style lamp, a romantic sconce, or a multi-colored gazebo lantern.
According to the method of power supply, the light bulbs can be battery-powered, run from a regular electrical network, batteries or solar panels.
To create a romantic mood, you need to take an empty container and place LED garlands inside it.
Where to use
The type of lamp in question is essentially a lighting device that is universal in design. Therefore, it can be used everywhere and in any combination with interior items where an artificial light source is required. For example, these are the following options:
- In the bathroom for placement on a shelf, cabinet, table. With proper design, the light bulb and contacts will be reliably protected from high atmospheric humidity.
- A pendant chandelier in the kitchen made from several glass bottles will look harmonious and complement any kitchen decor that is replete with glass objects.
- Lantern from a bottle on the street, veranda, gazebo. A lamp of this kind, if well sealed, does not require additional protection from rain, fog, wind and other weather conditions.
- Table lamp or floor lamp for living rooms, children's rooms, hallways.
- Night light for the bedroom and installation on a table or bedside table.
The optimal light source for a bottle lamp is LEDs. They are characterized by both low power consumption and high aperture ratio. With a reasonable selection of power, they practically do not overheat in a confined space. In addition, ice elements are manufactured with an initially high IP index, designed to work in wet environments and under water.
How to make a lamp from a bottle
Any glass or plastic containers are suitable for production. Bottles of champagne, wine, sparkling water and beer - there is an idea for every occasion.
Tools and materials
To create a lamp, there are several ways: put a battery-powered LED garland inside, or you can make a full-fledged lighting device powered by an electrical network. Based on this, the process will require a different set of tools and materials.
Basic set of materials and accessories:
- glass or plastic bottles;
- glass drill;
- electrical kit or garland;
- sandpaper (sanding paper);
- scissors;
- wire cutters
For decoration you may need:
- old base from a floor lamp;
- wooden base;
- metal structure for the lamp;
- glass matting paste or paint;
- decorative rhinestones, sparkles.
- accessories for decoupage (glue, plastic mass, jute cord, paints);
- decorative glass stickers.
If the glass specimen is valuable, you should handle it very carefully when working so as not to damage it. To do this, the surface is wrapped in paper and secured with tape. Simple bottles made of beautiful glass are usually washed and the paper stickers are removed from them. The same goes for plastic.
Particular attention should be paid to safety rules when working with glass and electricity. If you are not sure of safety, do not take risks.
When working with glass, you must protect your hands from cuts and your face from injury from splinters.
To work with glass you need to have:
- protective glasses;
- thick rubberized gloves.
Electrical installation work requires special tools and dielectric gloves.
Important! If you have no experience working with electricity, carry out actions strictly under the guidance of a knowledgeable specialist.
Papier-mâché mass
Now, I needed a mass in which I could sink the bottle and which I could cover with sand. After googling, I settled on papier-mâché, the recipe for which I liked most for its simplicity. I found it in the master class of Olga Egupets, a wonderful puppet maker. You can watch a video of this recipe on the Youtube channel, here is the link:
https://www.youtube.com/watch?v=Hoe1Dx3OrJk&list=PL7C00C05B3ED17917&index=11
- ripped up toilet paper;
- poured water (just to wet the paper);
- squeezed out excess water;
- Add PVA glue to the resulting, soaked and wrung out mass of paper and mix well.
I make papier-mâché
In the end, it turned out to be such a mass.
Papier-mâché paste
Before applying the mixture, I generously coated the chipboard with PVA glue so that the papier-mâché would stick well to the chipboard. I let a little glue stick to the chipboard and began laying out papier-mâché, imitating a small mound. I pressed the bottle into the middle. But, in order not to stain the bottle, I thoroughly wrapped it in cling film.
Lay out papier-mâché
And now all we have to do is wait for the papier-mâché to dry. It takes a long time to dry, a week for sure.
When the mixture had dried a little (after about a day), I pulled out the bottle so that the place where the bottle lay would dry faster. But this, again, was my mistake(((. I didn’t take into account that the papier-mâché mass would dry out. The bottle no longer fit in length. This can be seen in the photo below.
The mass, when dried, shrunk
I had to correct the defect, and at the same time enlarged the mound.
First, I used a knife to cut off the excess near the neck of the bottle. Then, she again kneaded the papier-mâché mass and laid it out along the bottle, raising the sides around the bottle. And in the area of the neck, I made a groove in which the cord will later lie.
Again I laid out a mass of papier-mâché
And again, I began to wait for the mass to dry. True, I waited a little less; it took 5 days to dry. But, having learned from bitter experience, I left the bottle in the mass. Only, periodically, she moved her, lifted her.
DIY table lamp made from glass bottles
The lamp, which can be made in 10 minutes, consists of a glass bottle and an LED garland, with batteries hidden in the cork.
A banal glass container can be turned into a stylish design object
For production you will need:
- Prepare the source material, clean the label from the surface or leave it unchanged.
- Insert an LED filament with bulbs through the neck and close the bottle with a cork.
Another option for a beautiful night light is a floor lamp. A stylish bottle of expensive alcohol is very suitable for this occasion. At the same time, you can take any container made of beautiful glass or unusual shape. Even a lamp made from a beer bottle will look very original.
Lovers of designer items will never throw an empty glass bottle into the trash, but in a few hours will turn it into a fashionable lamp
Before production you need to buy:
- lampshade for a floor lamp (you can make it yourself);
- a set of electrical elements for fastening in the neck; before purchasing an adapter, you should measure the internal diameter and purchase an element of the required size;
- garland (optional).
In this manufacturing method there is no need to drill the glass, since the wire runs from the outside, from the light bulb socket.
Procedure:
- Wash and dry the bottle base.
- Insert the electrical adapter into the neck and secure it. If its size is smaller, you need to supplement the missing volume by wrapping it with electrical tape.
- Screw the light bulb socket to the adapter.
- Connect the electrical cord and plug. In this case, it is necessary to strictly follow the instructions for assembling the electrical element.
- Install the lampshade and screw in the light bulb.
Design ideas for beaded lampshades
Any skillfully made bead product looks wonderful. A beaded lampshade will look no less beautiful; when the light is on, it will shine and sparkle, filling the room with colorful highlights. There are quite a lot of options for making it. For example, a similar lampshade can be created based on any cross stitch pattern:
A little imagination and a handful of multi-colored beads - and the interior of the room will be decorated with such an original lamp:
How to make a table lamp from a bottle?
In order to make a table lamp from a bottle, you need to select a container of an original shape, preferably from a fairly expensive drink with high-quality glass.
First you need to drill a hole for the wires in the bottom of the bottle:
- To do this, make a mark with a marker in the center of the bottom (use a ruler).
- Next you will need a deep bucket of sand.
- Fill the bottle with sand, turn it upside down, sticking the neck into the sand. This will balance the pressure on the glass during the drilling process and reduce the likelihood of it cracking.
- The bottle must be drowned in the sand with rotating movements so that approximately 5 cm of the bottom remains on the surface.
- Pour a little water on top of the bottom of the bottle and use a glass drill (0.95 cm) to drill a hole in the center of the mark at minimum speed. During the drilling process, it is necessary to hold the drill vertically very level, with virtually no downward pressure. Although water will theoretically prevent glass dust from flying away, it is important to prevent it from getting into your eyes or respiratory tract. Therefore, you must wear a mask over your face and eyes.
- It is very good if someone helps you by continuously pouring a thin stream of water onto the bottle.
- After the hole is ready, its edges must be sanded - this will prevent the wire from being cut during operation of the lamp.
- The same hole should be made in the bottle cap, after holding it in a vice.
If the selected bottle is not beautiful enough, you can decorate it with nail polish.
- Now you need to take a strong lid from a spice jar and drill a hole in its center. The edges of the hole should also be sanded.
- Then you need to put the cover on the rod, and add a washer and nut on top to secure the support cover. Place the bottle on top, base to cap, neck up. The nut is carefully tightened, securely fixing the structure.
- Next, a hole is drilled on the spice jar and the power cord is passed through it, which is then threaded through the rod and brought to the top. Care must be taken to ensure that the cord in the rod does not twist.
- Now the base cup is threaded onto the cord and rod on top, the set screw is tightened tightly and the wire is tied into a knot.
- The ends of the wire are stripped and the contacts on the cartridge are released (it is recommended to buy it with a switch). Then you should bend the ends of the wires, pass them through the clamp and tighten the screws on the base.
- The socket is inserted into the cup on the bottle so that the wires go into the cup, and the light bulb is screwed in.
- You can choose a shade for the finished lamp to suit your taste. You can plant it on a wire base.
Lamp made from a bottle using the jute filigree technique
How to make such a table lamp from a bottle? Its lampshade is assembled on a form for which a flower pot was used, from individual fragments of branches. To eliminate the gaps between them, during the work process they should be connected with various curls and leaves. The base-bottle made of blue glass is also decorated with the same elements. In addition, for its decoration you can use simple bleached jute, marbles and a glass outline. An LED strip is ideal as a backlight, since this option will add brightness to the product and, in addition, the LED strip is practically safe.
- Jute and marbles can be purchased in specialized stores or ordered online.
- It is necessary to prepare twigs from which the lampshade will subsequently be assembled.
- Form a lampshade. The finished hat looks like this:
- Decorate the bottle base.
- The lower and upper parts of the lampshade look like this:
What materials would you use to decorate the lamp? Write your answer to
To create an original table lamp with your own hands, use a variety of glass bottles, both for alcohol and other products. The most important thing is that the shape of the bottle is unusual.
Not only do table lamps look beautiful, but they are also an eco-friendly way to reuse your “household waste.” This lighting device is very reminiscent.
This DIY table lamp will be a unique gift for a wine collector or brandy connoisseur. In this case, it is recommended to keep the labels on the bottles. And if you use bottles of oil or other “non-alcoholic” product for the lamp, it will become a real gift for parents (mothers and grandmothers). In general, it is suitable for any connoisseur of handmade items.
As mentioned above, you can leave a branded sticker as a decoration, and also fill the inside of the bottle with multi-colored glass balls in accordance with the color scheme of your interior.
To create a table lamp with your own hands you will need: 1. A beautiful bottle. 2. A set consisting of a socket, a switch, a cord and a plug. You can use a ready-made set, or you can purchase everything separately. 3. Diamond crown. 4. A small lampshade, which can also be purchased ready-made or made yourself.
As you can see from the kit, the costs are minimal.
Step 1
The first step is to drill a hole in the bottle through which the power cord will then be passed. This is perhaps the most responsible and difficult part of the job.
The drilling location is selected on the side that will be located behind the lamp during operation. Also, the hole for the power cord should be located as close as possible to the base of the lamp.
Before starting work, it is necessary to tilt the drill to the side and use the edge of the drill to mark the drilling location. This is to prevent the drill bit from sliding around the bottle and ultimately causing damage. After this, you can proceed directly to the drilling process. It is worth noting that the drilling site must be constantly watered. This will protect you from glass dust, which can negatively affect your health if it gets into your lungs. In addition, water will prevent the glass from overheating and allow you to complete difficult work to the end without damaging the glass bottle.
Don't forget about protective equipment such as gloves and safety glasses. Keep in mind that you perform all drilling work at your own peril and risk. The site is not responsible for damage caused to your health during the manufacturing process of the table lamp.
The drilling process may take several minutes, it all depends on the quality and thickness of the glass. Be careful and patient and you will get a clean, even cut.
If you still do not dare to do this work yourself, we recommend contacting a glass cutting workshop. There, a master of his craft can handle this task.
Step 2
Pass the power cord through the hole in the bottle. In this case, it is necessary to install a special rubber ring that will protect the power cord from rubbing against the edges of the bottle.
If you use a separately purchased cord, switch, socket and socket, then after passing the power cord through, mount all the elements together.
If you purchased a ready-made set, you will have to cut the wire running inside the switch in order to be able to pass the cord through the hole in the bottle. After you have passed the cord, solder the wire at the cut site and assemble the switch.
Secure the cartridge in the neck of the bottle and do not connect the plug to the outlet
until you finish creating the lamp.
Step 3
The next step is to decorate the inside of the bottle (see description at the beginning of the article), if there is such a desire. Paint the lampshade a color that matches the color of the bottle or the color of your room. Attach the lampshade to the socket.
Step 4
Install the light bulb in the socket. A few words about choosing a light bulb. It is best to use low power or use LED. This requirement is based on obtaining the least possible heating of the lampshade.
Without special expenses, you can add a twist to your usual room interior and make the design unique. Not everyone has the money to throw away good, but boring things and buy new ones for the house, but you can make changes to the interior of your room if you make a chandelier from plastic bottles with your own hands.
There are quite a lot of options with which you can implement such an idea and create a unique interior element. In addition, if you especially like this activity, you can turn your hobby into your own job, thanks to which you will earn money while doing what you like.
It’s not that difficult to create a chandelier from plastic bottles - the main thing is that it won’t take much of your time, and the results will definitely please you. To do this, you will need some blanks that you will use to create a unique item for your home.
In addition, this option is a win-win if you make a chandelier from plastic bottles with your own hands.
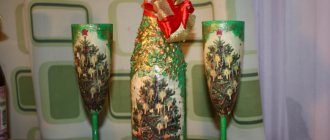
Beautiful lamp made from wine bottles
A lamp made from wine or champagne bottles can be made in the form of original candlesticks.
Having learned a simple way to cut bottle glass, you can make many useful things - candlesticks, glasses, vases
For work, you can use glass of any color, select identical bottles of the same volume, or find containers of different shapes and colors. The play of light and the tone of the interior lighting will depend on this.
For production you will need:
- bottles;
- cotton (natural) thread.
- alcohol or acetone;
- lighter;
- sandpaper;
- container (bucket) with cold water.
Progress:
- In the place of the intended cut, wind a thick natural thread well moistened in acetone or alcohol liquid. Do not use synthetics as they will melt.
- Light the thread and begin to rotate so that the flame evenly heats the entire circumference.
- Place the container in ice water. The crack should run exactly along the circle where the thread is stretched.
- Sand the cut with sandpaper. To do this, place a sheet of sanding material on a flat surface and make circular movements with the cut.
- Place candles of suitable diameter on wooden or ceramic stands. Place ready-made candlesticks on top.
Attributes for needlework
A table lamp with your own hands can be created from absolutely any necessary and unnecessary things. Everyone in their house has old items that they couldn’t throw away, but there was also nowhere to use them. It's time to give them a second life.
To decorate a lampshade or lampshade, you can use the following details:
- beads, seed beads, glass beads, sequins, stones, shells, buttons;
- cocktail umbrellas revealing tin can details;
- plastic bottles, spoons, forks, lids, yogurt, tin and other jars;
- fabrics and textiles, braid, ribbons, threads, bows;
- newspapers and paper clippings, drawings for decoupage techniques;
- toys, both soft and hard, right down to the smallest kinder surprises.
As a base for a table lamp, you can cut wooden stands with your own hands or use ready-made ones from under something. You can also use flower pots, plates, an updated base from an old lamp and many other items, or do without a base at all.
The frame for creating a lampshade can be a sphere or a ball, which can be easily removed at the end of the work.
The easiest way to liven up your interior with a new lamp is to repair the old one.
Loft lamp made from bottles
In modern apartment design, the loft style has become very popular. The bottle lamp is ideal for such an interior.
Sometimes accessories for creating an unusual sconce can be found in the most unpredictable places, for example in a plumbing store
To make it you will need a beer bottle, several brass parts for plumbing and adapters for attaching wiring and light bulbs.
This model uses a narrow LED lamp, so there is no need to drill or cut glass. The function of the switch is performed by the water valve. To simplify the design, it can be placed on a wire.
DIY New Year's lamp from a bottle
Colored lights sparkling in the glass create a fabulous New Year's atmosphere. Lamps filled with colored garlands are very easy to make. To do this, it is enough to have some electrical installation skills to partially disassemble the garland and thread the wire into the hole drilled in the bottle.
New Year's design can be created by decorating glass containers with symbols of winter
The lamps can be decorated with sparkles, snowflakes can be glued on, covered with matte paint, and other New Year’s accessories can be placed inside in addition to the garland.
Without extra costs, you can make New Year's decorations for your home by taking a wine bottle and holiday decorations
Pendant lights made from wine bottles
You can make a pendant lamp from a bottle, decorated with wire, using a minimal set of materials.
Pendant lamps can be mounted on a common wooden base - such a chandelier can be hung above the bar counter
To work you need to prepare:
- 3 bottles;
- glass cutting machine;
- sanding paper;
- light bulbs with wires;
- glasses and gloves for protection;
- wire black or other dark color.
- screwdriver.
Progress:
- Prepare the material.
- Cut the containers along the marked lines. The size of the lamp depends on individual preferences. Don't forget to protect your hands and face with protective equipment.
- Sand the cut with sandpaper.
- Using a screwdriver, disconnect the wire from the socket and thread it into the neck. Reassemble the structure, attaching it to the base.
- Decorate the lamp by winding the wire around the circumference in any order.
How to make a chandelier (master class!)
The main lighting fixture of the house is the chandelier. You can make it from an ordinary glass bottle. The main thing is that it will be exclusive.
To create such beauty you will need:
- bottles (size and quantity depends on the preferences of the owners);
- protective equipment (goggles, mask and gloves);
- glass cutter and sandpaper;
- screwdriver and wire.
Necessary materials Having the necessary tools and materials at hand, you can begin making the chandelier:
1. Soak the bottle in water. This will make it easy to remove labels and debris. After cleaning, the container must be thoroughly dried.
We wash bottles and remove labels
2. Make a cut of the bottle. The glass cutter is installed at the required level. Cutting is carried out slowly, which will allow you to get an even cut line. When working with a cutter, you must wear protective clothing only. If you don’t have the necessary tool at hand, cutting a glass bottle can easily be done with thread. The video below clearly demonstrates this.
We cut the bottle
3. Now the bottle is placed under the tap. Turn on the hot water and keep the workpiece under it. Hot water is alternated with cold. As a result of sudden temperature changes, the unnecessary piece will fall off exactly along the cut line.
Processing glass under water
4. The cut area is treated with sandpaper. The cut should be even and smooth.
Related article: New Year's gift: 8 ideas for DIY New Year's gifts
Sand the edges with sandpaper
5. Use a screwdriver to disassemble the lamp. The wire must be carefully pulled out and passed through the neck, put the lamp back together and check its operation.
We stretch the wire through the bottle
6. All that remains is to decorate the lighting fixture. For this, ordinary wire is used. Starting from the neck, we wrap it around the bottle. Any material is used for this. This can be regular black or colored wire.
Decorating the bottle
The chandelier pendant is ready. All that remains is to install it. If desired, the product can be painted and given any design. The main thing is that it blends organically with the interior of the room.
Chandelier made from glass bottles is ready
A good solution would be to use glass stone. It should be taken into account that the light transmittance of the product will decrease slightly. Stones of various shades are used for decoration. You can combine several shades. The main thing is that the lamp looks organic.
Bottle decor with glass stones
The stones are attached to the glass using glue. The lamp can only be used after it has completely dried. This will take no more than a day. Complete drying of the glue will ensure reliable adhesion of the stone to the surface. It is better to use an adhesive composition that can withstand temperature changes.
Video: how to cut a glass bottle with thread
Floor lamps made from plastic bottles
You can make an original floor lamp with your own hands from ordinary plastic bottles and disposable spoons.
A cheerful floor lamp in the shape of a pineapple will decorate a child's room - to create it you will need a plastic bottle and disposable spoons
To make a bright floor lamp you will need the following materials:
- five-liter plastic bottle;
- knife;
- gun with silicone glue;
- disposable large spoons (for the “Pineapple” model, use yellow material);
- base for a floor lamp.
Sequence of work:
- Cut off the bottom of a large container.
- Cut off the handles from plastic spoons. The parts can be painted or you can immediately purchase colored cutlery.
- Start gluing from the bottom edge. Attach each next row, slightly extending onto the previous one.
- Make pineapple sepals and leaves from thin green plastic.
- Attach the lampshade to the base of the floor lamp.
Blanks for crafts
If you decide to make chandeliers from plastic bottles, first you need to purchase blanks, as well as buy those elements with which you plan to decorate it. Details that can be useful when creating a chandelier from plastic bottles are wire, satin, plastic, toys, artificial butterflies
etc. You will also need
wooden slats and wire as fastening
: this frame will hold the entire chandelier.
Important!
Think through every little detail. You can even draw a sketch and several chandelier design options in order to choose the best one. This will save you time and effort, besides, it will be possible to better understand what exactly you want to see in your room and what will look better in the overall interior.
Chandelier in the form of petals
Materials needed to create a chandelier from plastic bottles In order to create a chandelier from plastic bottles with your own hands, you will need to prepare:
- clean plastic bottles (cleaned of stickers);
- nail scissors;
- a new light bulb and possibly a socket;
- blowtorch;
- wire (you need thin and thick);
- soldering iron;
- regular scissors;
- gloves to protect hands;
- chandelier frame.
First, you will need to trim the top of the bottles, and then cut the resulting ring. This will make it easier to cut out leaves from them. To make the edges more beautiful and neat, use manicure scissors rather than ordinary scissors.
: The work ahead is quite painstaking. After this, you need to treat the ends of the resulting leaves with a blowtorch.
Remember!
It is very important to use protective gloves to avoid getting burned or injured when preparing sheets for the plastic bottle chandelier.
To create a visual effect of naturalness, it is worth heating the front side with a blowtorch, and at the moment when the leaf is well heated, you can make veins on it using a knife.
You can choose the shape of the sheets yourself. The leaves that look the most beautiful are those that are similar in shape to maple.
.
After all the leaves have been prepared, you can proceed to the stage of attaching them to the frame. Thin wire needs to be cut into small pieces. After this, take a leaf and melt its back side. While it's warm, glue the wire to it. After such work done, you should have full-fledged leaves with sticks.
At the next stage, you will need a large and long wire so that the leaves can be collected into one branch. All branches can be carefully screwed to a long wire. The resulting chandelier can now be mounted on the ceiling.
Insert the socket and screw in the light bulb. Your chandelier is ready!
Appreciate: even in such a small area it is possible to create full-fledged comfortable housing with maximum functionality.
How to make a ceiling light from plastic bottles
Scrap material, such as plastic bottles, can take its rightful place in the house or country house in the form of original lamps.
Lampshades made from transparent plastic bottles will add an unusual style to the interior of a country house or gazebo.
Plastic is a very malleable material. It can be cut, heated, bent, melted - this is how various decorative parts can be made.
This master class describes the process of assembling a lamp from transparent plastic bottles with a volume of 0.5 liters.
For work you will need to prepare materials and tools:
- bottles 50-60 pcs.;
- stationery erasers;
- sharp knife;
- set for a light bulb with socket and wire and switch;
Lamp assembly:
- Clean and dry the collected material well.
- Cut off the plastic rings.
- Tighten the bottles together with rubber bands, securing each row sequentially.
- When a sphere is formed, insert a cable with a light bulb into it.
Advice! Tighten the structure with rubber bands as tightly as possible so that the lampshade does not sag or become deformed during use.
Wall sconce
Another popular type of lamps that you can make with your own hands from bottles is a wall sconce. Let's look at an example of a master class on how to assemble it, as well as what materials and tools will be required for this.
Materials and tools
To create a wall sconce you will need:
- A plastic bottle of suitable size.
- Light bulb with socket, conductors.
- A knife with a narrow sharp blade.
The process of assembling a lamp from a bottle
To assemble a basic sconce lamp, you need:
- Wash and dry the plastic bottle.
- Cut its side surfaces from the neck to the bottom into even thin pieces.
- Mount a wire frame on plastic strips so that the shape of the lamp becomes spherical and stable.
- Install the socket with the light bulb inside and remove the wiring.
- A bottle cap can be used to better secure electrically conductive wires, and also as an element of a bracket attaching a lamp to a wall.
It is easiest to make a wall sconce when you already have a ready-made lamp frame and when, instead of a lampshade, you can attach a decorated bottle to it.
DIY sconce lamp made from a plastic bottle
Sometimes at home you can find a base from an old wall sconce that you would hate to throw away. To prevent it from going to waste, you can make a new lampshade from plastic bottles.
For an air lampshade you will need about 10 plastic containers and a gun with silicone glue
Completing of the work:
- Cut off the bottom. Cut the plastic lengthwise into strips. To determine the length of the petals, you need to bend the strip in half and attach it to the base. Cut the remaining bottles in the same way as the first, observing the dimensions.
- On all blanks, bend the strips outward and secure them to the neck using glue or rubber bands.
- Glue the resulting decorative elements onto the base of the lamp. Only an LED lamp can be used in sconces.
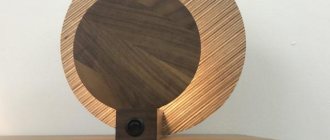
Options for creating wooden table lamps
Increasingly, in the design of modern interiors preference is given to natural materials and eco-style. The lamps are not far behind. There are a huge number of wooden table lamps, but it is much more pleasant to create decor for your interior yourself, especially if you have interesting ideas and skills in working with wood.
A very simple and original way to create a lamp is to use a log and LED light bulbs in a strip. A small log needs to be sawn into round, uniform layers and a small hole for the base must be made in the center of each. A tube with an LED strip is inserted into the center, and the layers of the log themselves are located one above the other at a distance through which the light will penetrate.
If you know how to use a jigsaw or electric saw well, you can create any figure, object or character outline from a decent part of a log. All that remains is to sand the base, run the cord, insert the light bulb into the socket and, if desired, make a lampshade.
An even simpler way to create an elegant eco-lamp is to collect sticks of the same size and attach them straight or diagonally to the old lamp frame. The lampshade can also be updated if desired.
The question of how to decorate wooden lamps will not even arise. After all, such products themselves will decorate the interior.
Street lamps from a bottle
You can make a cute, weather-resistant lamp from a plastic bottle.
An original and affordable lampshade, made from one plastic bottle
For the lampshade you need to take 3 plastic containers - 1 for the base and 2 colored ones for decoration. Sharp scissors, a utility knife and tape will come in handy.
Sequence of manufacturing the lampshade:
- Cut off the bottom and threaded neck from the main bottle.
- Cut the colored containers in a spiral into strips 0.5 cm wide and paste them over the base for the lampshade in any order and secure with tape.
- Place the lampshade on the lamp.
Important! Only LED lamps can be used in a plastic lamp.
Decorating ideas
The glass bottles in the form of lamps themselves look original. Especially collectible or expensive items. Excessive decor will only spoil the effect of the expensive design of bottles of elite alcohol.
To decorate lamps you can use various techniques and materials:
- Paint with stained glass paints or simply paint the inside of transparent glass.
- Decorate with decoupage elements.
- Cover the surface with rhinestones, marbles, decorative ribbons and figures, stickers, twine.
- Decorate with macrame elements.
- Place sea pebbles, colored sand, glass balls, decorative soil, and dried flowers inside the bottle.
- Make the surface of the glass matte using paint or a special paste.
- Create lamps and candlesticks of different shapes by cutting bottles.
Decorative elements need to be selected so that they harmoniously combine with the interior and the lamp itself.
Bottle chandelier.
Particularly popular are ceiling lamps, the shape of which is sometimes striking in its unusualness. But it is precisely such exhibits that fit perfectly into many modern styles. Therefore, a frame can be invented by combining several options from the same designers.
We use any material - wood, metal, plastic, which is more suitable for the interior of each individual space. We choose the shape according to taste, and there are simply countless options. Someone is a fan of minimalism, and strict lines are suitable here, perhaps just one wooden board on which transparent square bottles are hung in a row.
Some people like chic and pretentiousness. Metal rods, bent in the shape of a vine or a thorn bush and wrapping around many colored or even gilded glass shades, will help here.
This idea will delight all guests who visit the room. Low-hanging bottle lamps of different colors and shapes will look organic above the kitchen table; by the way, this format will also fit into the design of the bar counter.
Original ideas for lamps made from bottles with photos
Bottles from famous brands can become a design detail in an ordinary tabletop floor lamp The combination of a glass bottle and wood looks presentable and can become an original gift Volumetric decoupage allows you to create sculptural masterpieces even on the surface of a glass container, turning the lamp into a work of art Original candlesticks can be made from ordinary wine bottles by cutting cut them in half and decorate them with decor from wire and letters. To make bottle lamps, you don’t need to know how to handle electricity; just insert a special luminous cap into the neck of the bottle. Urban style and loft carry the idea of using old things in an unexpected embodiment. If you have a glass collection in your closet, you can make it from her enviable lamp or even a chandelier