Even 10-15 years ago, the lack of a large selection of flower vases pushed our mothers to create this piece of furniture on their own. They used improvised materials that were available in those days - glass and plastic bottles, watercolor paint, colorful and unusual paper.
Master class: vase made of glass bottles
You won’t find any shapes and sizes of glass containers on store shelves. To create a vase, you can choose a jar you like or use ready-made containers from baby purees, store-bought jam, etc. The main thing is that it has an interesting look and is suitable for decoration.
Glass is most often used as a basis for creating flower vases. It holds liquid perfectly and is easy to clean and decorate. Plastic containers are considered safer and more economical. Along with glass, it serves as an excellent basis for the embodiment of the most daring creative ideas.
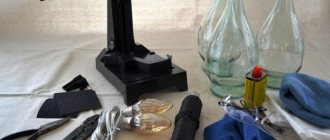
To create a vase we will need:
- small glass containers
- plain or corrugated paper in different colors
- PVA glue
- scissors
Corrugated paper will be the main decorative element of the future vase. Cut it into strips 3-5 cm wide and form flowers from them. Cut out leaves and stems from green paper.
To drape a glass surface, decorate it with strips of fringed paper. You can use several similar shades or, conversely, create a multi-colored mix of several opposing colors. Glue the prepared flowers and leaves on top of the base.
There may also be several options:
- create a composition of flowers on the front side of the vase
- distribute flowers over all surfaces to be decorated
The choice depends solely on your preferences and the amount of material.
Tips for extending the life of cut flowers
Agree that cut flowers do not stay fresh as long as we would like. How to slow down the withering of flowers? To do this, it is important to minimize the growth of bacteria in the water, as well as to give the flowers the missing nutrition, replacing what they would have received if they had not been cut.
Learn how to extend the shelf life of cut flowers with these simple tips.
Trimming
Trim the ends of the stems at a 45-degree angle, at least 1.5 cm, to ensure better water absorption. It is best to trim them with sharp scissors, a serrated knife or pruning shears so as not to flatten the stem. It is best to trim the stems under cold running water. Thanks to this method, air will not be able to get into the veins and clog the “vessels” of the plant.
If you find that the flowers are starting to wilt, quickly prune them again.
Trim off any leaves or flower parts that fall below the rim of the vase. The only things that should be inside the vase are the stems and water.
Thanks to these actions, you can prevent the appearance of cloudy water and slimy stems, which cause flowers to spoil.
Preparing the vase
Bacteria and other microorganisms that may be on the surface of your vase can quickly cause your flowers to wilt. Be sure to thoroughly clean the vase beforehand with hot water, a little dish soap, and a little vinegar to kill any bacteria—even if it looks clean! Change the water frequently and re-wash the vase if the water becomes dark or has an unpleasant odor.
Location
When displaying flowers, look for a cool place, away from direct sunlight, to preserve the bouquets as long as possible. Beware of other heat sources, such as appliances or radiators, which can quickly cause flowers to wilt. For the most part, fruits and flowers don't go well together either. Many fruits, including bananas, avocados, apples and kiwis, produce a gas called ethylene. This gas can shorten the lifespan of any flowers stored nearby (as well as increase the rotting of any other fruits that do not contain ethylene), so try to keep these fruits and flowers separate from each other!
Adding a special solution for feeding
To extend the life of flowers, you can prepare a simple solution. It consists of just three main ingredients: citric acid, sugar and bleach. The solution is formulated to help flowers stay fresh longer, and each element has properties that are said to keep flowers longer than their normal lifespan with plain water.
Citric acid lowers the pH of the water, making it more suitable for freshly cut flowers.
Sugar acts as an actual "food" because flowers produce and consume sugar through the process of photosynthesis, and when they are cut they can no longer produce sugar. By adding sugar to the water, the flowers think they are still eating, which makes them perky.
Bleach acts as a water disinfectant and helps get rid of potentially harmful bacteria that may interfere with long-lasting blooms.
You can make your own flower food by following a few simple steps. It is made from ingredients that you most likely have in your home.
Decorating a vase with acrylic paint
The use of paints can radically transform glass jars that are simple at first glance and turn them into an elegant and beautiful flower vase.
Watercolor paints and gouache adhere weakly to the glass surface, leaving streaks and transparent gaps. Therefore, use thick acrylic paints that apply easily and dry quickly, and aerosol paints in cans that ensure even application.
First, coat the glass jar with the base color, completely covering the transparent surface. Next, you can begin the creative process itself - painting the vase. You can use abstract patterns, hearts and even inscriptions as decorations.
If you do not have artistic abilities, then use stencils. Apply them to the surface of the jar and spray with spray paint. Try not to spray too much liquid, otherwise the design will spread and ruin the entire design.
Original craft
Try creating a vase from a material such as cardboard, which will become a wonderful stylish item in the interior.
Gather the components needed for work:
- a cardboard pipe of certain parameters can be purchased at a hardware store;
- stationery knife, glue, newsprint;
- paint and varnish used as a fixative.
Make a bottom for the prepared pipe - cut out a circle with a diameter that matches the diameter of the pipe and glue it to it. The vase frame is ready. Making paper decorations is a rather labor-intensive process. Fold the cut newspaper strips in half and then roll them into small rolls, gluing the ends together.
Prepare a sufficient number of such parts. Cover the surface of the cardboard tube-vase with them. Please note that they need to be placed very close to each other. However, there will still be gaps that can be filled with any available material - small buttons, beads, types of pasta, beans (white or red).
It is advisable to paint the product with gouache, not very diluted with water, or with aerosol paint, carefully painting the paper flower rolls. Leave the product for a while to dry. Decorate according to your taste.
The simplest items can become the highlight of your home's interior. When thinking about creating a vase with your own hands, you need to carefully analyze the style of the interior so that your work emphasizes its originality. Let's look at some of them and listen to the advice of designers.
The laconic, discreet shape of the vase, its discreet colors and neat finish are perfect for the minimalist style. Classicism presupposes symmetry in ornaments of light colors. A variety of materials are used to create a vase with your own hands, suitable for the high-tech style. Metal, plastic, glass or wood are used. Vases, the design of which combines literally everything (even the seemingly incompatible) look interesting in the extravagant kitsch style.
Preference in decoration is given to spectacular rich colors and original decor. Art Nouveau is characterized by abstraction, smooth lines and decoration using decoupage. To create a vase that suits the avant-garde style, you need a rich imagination, as well as extremely rich colors and elegant patterns.
An individual vase in your own design will become a unique addition to the design, tell about the taste of the owners, and delight the guests. This item will be a great gift for birthdays, New Years and other holidays. Make crafts - vases, give yourself and those around you beauty and a good mood.
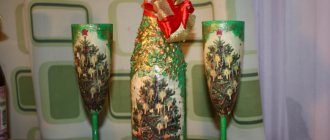
Glass vase with linen decor
Every needlewoman has a bag with leftover fabric that is a pity to throw away. “Perhaps they will come in handy,” we say; our master class is just such a case. To create a vase, we will need pieces of fabric that will be used to decorate glass or plastic bottles.
To secure the material, use assembly adhesive or a glue gun. This fixative will not be washed off with water and will reliably glue the fabric to the surface of the jar. As you work, press the fabric tightly against the glass or plastic container, otherwise it will slip off after drying.
Vases decorated with lace look very delicate; in addition to it, use pieces of twine, making knots or bows out of them.
A vase made with your own hands cannot be compared with a purchased version. It will have special value and will become an important attribute of special events. If you want your loved one to please you with magnificent bouquets as often as possible, then prepare a beautiful vase for such events.
Small and large decorative details
Almost any container can be decorated with beads, buttons, sparkles and other small details.
Glass goes well with these materials. This is important for those people who are trying to figure out how to make a beautiful glass vase with their own hands. Decoration can be either chaotic or orderly.
In the first case, you can spread glue on the surface of the vase and simply start dipping it into a container with beads, rhinestones, or whatever you like. Such compositions are fresh and modern, which is good for many designs.
The second method is more organized, but requires more imagination and creativity. In this case, you are not just making a decoration, but creating an entire design.
Depending on your skills, you may end up with something simple like an ornament, or a full-fledged painting.
At the same time, to decorate the vase, you can use natural materials - beans, berries, pebbles, shells, leaves and the like.
To fix it, you can use either regular glue or cover the entire vase with plasticine, and then apply decorative elements.
Space for imagination
Decorating glass vases is a varied and very creative process. They can be decorated with twine and ropes, gluing row by row with PVA glue.
Bottles and jars made using Decoupage and mosaic techniques look beautiful. You can create a real masterpiece using lace or imitate cutwork embroidery on a transparent surface.
To do this, you need to apply a design to a vase made of fragile material using a thin brush. White acrylic paint should not be thinned; it may bleed.
After drying, using the dot method along the contour, add relief and volume to the design. Connect all fragments of the drawing with lines resembling a mesh. It's easy to make and looks luxurious.
Using colored acrylic paints on glass you can create a picturesque picture, imitating Zhostovo painting. Vintage painting looks unusual and stylish.
- All about bouquets of roses: how to choose and store?
- High quality kitchen furniture
- Apartment decor - rules, fashion trends and modern apartment design ideas (145 photo ideas)
One of the ways to decorate is to decorate the vase using glue with different grains. Millet, buckwheat, rice and even semolina will be used. After drying and painting, an object decorated with improvised materials will look embossed.
Unified interior style
Along with furniture and other interior items, decorated vases should not differ sharply from the general style of the apartment or house.
They must fit into the overall decoration of the home in color and design. Read: Stretch ceilings with photo printing
Nowadays, housewives are increasingly using floor vases to decorate their homes. Large plants are planted in them, which provide the room with the spirit of nature.
The decor for floor vases should be special. Items for decorating large-sized items should also be voluminous.
If several such objects find their place in the room, then they should be decorated in the same style. They can be decorated with shells, shiny aquarium stones or brocade.
A large vase can also be decorated using the Paper Art technique. First, you should make flagella from single-layer napkins using glue. On the surface of the vase, draw a beautiful picture or transfer a floral ornament or pattern.
By squeezing glue onto the outlined lines, attach the flagella, thereby creating a relief pattern. The richer the pattern, the more prominent and impressive the product will be.
When the glue dries, you need to spray paint the entire surface, and after some time, go over the convex pattern with a brush or sponge with contrasting paint.
To give the effect of aging, you need to rub the surface with sandpaper.
Choosing a form
Once you have decided on the material you will use, consider the shape of the product. The shape is chosen at your discretion, imagination and combination with the chosen interior style.
Related article: Steampunk in the interior
Designers consider the following to be the most popular forms:
• round, such a vase will succinctly fit into any interior; the easiest way to make it is using the papier-mâché technique, using an ordinary bottle as a basis; • square, it will suit a modern interior; the base will be a cardboard box; • triangular, the method using newspaper tubes is suitable here, this shape looks very original.
The vase can be elongated, convex, oval. Its form is the most bizarre and original. Finding a suitable base for a large floor product is not so easy. Don’t give up, you can make a temporary structure, for example, from cardboard, plasticine, plastic. And create a decoration for your interior from it, applying a lot of papier-mâché to the base. Subsequently, the dried workpiece is cut, the base is pulled out, and the halves of the workpiece are glued together, sanded and decorated.
Lesson #4
You will need:
- cylinders made of birch bark (their diameter should be slightly larger than the diameter of the vase that you will insert inside the flowerpot);
- yarn;
- container with warm water;
- scissors, hot glue gun.
If the cylinders are too wide or tall, we recommend that you unfold them and, after marking them with a pencil, cut them to the desired size using scissors.
Now you can roll the birch bark into a cylinder. We recommend that you first soak the birch bark in warm water to soften it. Fold the bark overlapping, overlapping one edge over the other. Apply hot glue, glue the cylinder together and tie it with thread or decorative tape. You can also glue a cardboard cylinder, wrap it in birch bark and glue it.