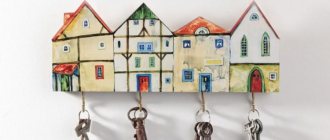
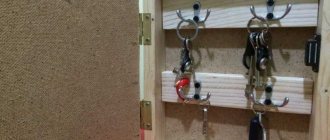
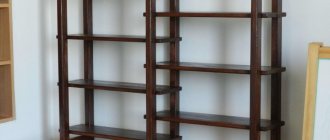
Assembling a wooden structure
Even a novice craftsman with minimal carpentry skills can make a wooden wall shelf from boards with his own hands. To assemble a simple model, you don't need complex woodworking tools. To complete the work quickly, prepare the necessary equipment in advance and draw up a sketch of the future design.
The shelf is part of the interior and can be decorated in any style. In order for it to complement the design of the room, you need to think about the shape and material from which it will be made.
Required tools and materials
Wood is a universal structural material that does not require professional carpentry equipment to process. All parts are cut from a solid board or sheet lumber (plywood, chipboard, MDF).
For assembly you will need:
- Wooden planks. Their number and dimensions depend on the chosen design, method of fastening, and the expected weight that the shelf must withstand.
- Fasteners Self-tapping screws, screws, and embedded elements are needed to connect the parts together and secure the frame.
- Decoration materials. The finished shelf is painted, varnished or a textured film is glued to the front surfaces.
- Glue. To increase the strength of the joints of the parts, they are coated with an adhesive compound (PVA or carpentry).
To get the job done quickly, you should use carpentry hand and power tools. If the necessary equipment is not at hand, you can ask friends or rent it. To assemble the shelf you will need:
- Jigsaw or circular saw. The latter is more preferable - when cutting, the cut will be smooth, without bends.
- A screwdriver with a set of drills and bits for screwing fasteners.
- Grinding machine with replaceable sanding cloths of 60, 120, 240 grains per square centimeter.
- Grinder with sharpening wheel and metal brush.
- Electric planer.
Drawing up a diagram, marking
The manufacture of a shelf begins with drawing up a sketch of the future design. A simple diagram, made on an approximate scale, will allow you to calculate the area of the workpieces, their number, and attachment points. The resulting dimensions are transferred to boards or sheets of lumber. Marking is done using metal meter rulers or tape measures and even wooden blocks.
When transferring dimensions, allowances are left for processing the ends if the edges of the workpieces crumble during cutting. This happens especially often when cutting plywood or chipboard. Before assembly, the allowances are cut off with a plane with a sharp blade or cleaned off with a grinding machine. When forming the final dimensions, check the perpendicularity of the ends to the base surfaces using a mechanic's or carpenter's square.
The correct shape of the workpieces can be controlled by measuring the diagonals. For a rectangle they should be equal.
Material cutting
After applying the markings, they begin cutting the lumber into blanks. To do this, use a circular hand saw or jigsaw. If they are not available, you can use a regular hacksaw with fine teeth. In addition, it is possible to cut and glue the edges of laminated chipboard at the point of purchase using professional equipment. The blanks obtained in this way will be of the correct shape with the required parameters. Then all that remains is to assemble the piece of furniture on site.
Assembly
When the craftsman has everything he needs, he can proceed directly to assembling the frame. Progress:
- The cut workpieces are cleaned and burrs are removed.
- At the locations of the fasteners, holes are drilled with a diameter slightly larger than the size of the hardware.
- The parts are laid out on the floor or other flat surface, forming the outline of the future shelf. The joints are lubricated with glue and the components are tightened with self-tapping screws.
- Weak spots are reinforced with metal staples.
- Brackets for hidden wall mounting are screwed onto the back side.
- The finished structure is opened with decorative coatings. If the shelf is made of laminated chipboard with glued edges, it does not need additional processing.
What you will need
To make hanging shelves with your own hands you will need:
- wooden boards - 3 pcs.;
- strong twisted rope - a large skein;
- flanges - 2 pcs.;
- galvanized pipes with threads on both sides - 3 pcs. (one long, 2 short);
- galvanized elbows;
- tape measure, level, wood clamps;
- drill;
- sandpaper and grinder;
- stain and brush;
- screws or wall anchors;
- universal glue and glue gun.
How to make a hanging shelf
Purchase three pieces of wood from a home improvement store, or measure and mark three pieces of 1" x 8" pine by 18" long (Image 1). Cut them at home using a circular saw (Image 2). If necessary, sand any rough edges.
Turn all the boards upside down. Using a tape measure, mark 1" horizontally and vertically from each corner on all three boards (Image 1, 2). This is where the holes for the rope and grommets (also called nylon spacers) will go. These grommets will be hidden from view but will help hold the shelves in place so you don't have to deal with a lot of knots.
Next, have a 1-inch shovel ready with masking tape to act as a depth adjuster to ensure you don't drill too deep into the bottom of each shelf (Image 1). You need to drill deep enough so that each plastic sleeve fits flush and is hidden from view. Tape the drill so that only 3/8" of the tip is exposed (Image 2). Align the point of the spade with the pencil mark and drill down slowly to avoid going too deep (Image 3). (The sharp tip of the bit will go through the other side a little, but that's okay.) Repeat until all 12 holes are completed. Note:
Once you're done, resist the urge to stick the grommet in there. how can it get stuck?
Then flip the three boards right side up and, using the small hole as a guide (Image 1), replace the spade bit with a regular 3/8" drill bit and drill through (Image 2). Repeat until all 12 holes are completed (Image 3) .
After preparing all the holes, paint the primed boards. While they are drying, move on to the next step.
Using a 1/16" drill bit, drill through each of the 12 plastic bushings (Image 1). Then drill the same hole using a countersink drill bit so that when you add the screws later, the screws will fit. flush with the side of the bushing (Image 2).
Our shelf was about 34 inches tall, so we used two 7-foot pieces of rope—one for the front and one for the back. You can customize it according to your sizes. Note:
Threading the rope through the holes will be much easier if you wrap the ends with masking tape.
Then assemble the shelf by passing the rear cable
first through the top shelf and then through the grommets so that the rope and shelf are centered and hanging securely from something. You can go ahead and hang it in place or temporarily on something so you can easily make changes. (We used a scrap piece of cardboard with a screw.) Then pass the front rope through each side of the top shelf (Image 1), then its grommets (Image 2, 3) and let the front piece go through each side of the top shelf (Image 1), then through it bushings (Image 2, 3). The rope is still hanging freely.
It is important to take the time to adjust the top shelf so that it reaches the desired height using the back rope. Once you have determined the correct height of the top shelf on the rope, slowly drive small #4 3/4" screws into each grommet using drill, pushing the screw through the back cable and into the other side of the bushing (Image 1). Since you used a countersink bit, the screw should lie flat and the bushing should slide up easily into the hole you drilled in the bottom of the board. Repeat this step on the other side of the shelf/back rope. Then focus on the front cables and get the top shelf fully level before moving on (Image 2), screw the screws into the grommet/rope, then slide the shelf down onto the grommet so the shelf is at the desired height and level. Once you have that " just like that”, you can measure the distance from this top shelf so that the bottom shelves are positioned correctly and level (Image 3).
Once the bottom shelf is hung, tie the ropes into a knot on both sides (Image 1), then cut them with a utility knife (Image 2). For an interesting texture, you can part the ends of the ropes to create a fringe (Image 3). Now you are ready to hang the shelf; just make sure you use the right hardware and anchors. Note:
If you hang a shelf in the bathroom, the steam will help the rope straighten a little over time.
Master class No. 1: hanging shelf
If you have a lot of souvenirs, figurines and other decorative elements stored in your room, make an original and convenient hanging shelf on ropes to display them. The big advantage of this design is that you don’t have to drill many holes in the wall to attach it - just one nail in the ceiling is enough.
To work you will need:
- 2 rectangular wooden blanks;
- skin (coarse and fine);
- drill;
- drill;
- rope;
- scissors;
- construction clamps;
- materials for decorating the product - brushes, paints, leftover wallpaper (to the taste of the master).
Having prepared the necessary tools, you can get to work.
- We make preparations. Wood is a material that is very easy to work with. The main thing is to choose boards that are perfectly smooth, dry, without mold, voids or cracks. Then there will be no problems processing them. Go over the prepared boards with sandpaper, first coarse, then fine. File the edges with a hacksaw.
At your discretion, the shelves can be painted or covered with stain and varnish, and covered with remnants of old wallpaper. Having chosen to paint, treat the wood with an antiseptic primer in advance. The paint adheres to it better, and the service life of the product increases.
- We make holes. Place both shelves together and secure with construction clamps. If there are no clamps, make holes on each shelf separately. The main thing is that they are located strictly under each other in the same places. The size of the drill should be selected based on the diameter of the rope - it should fit freely into the holes.
- We measure the rope. You will need four ropes of the same size. Determine their length yourself, depending on how far from the ceiling you plan to hang the shelf. Don't forget to add a few centimeters for tying knots.
- Assembling the shelf. Tie a knot on each rope (the bottom shelf will rest on them). Pass the free ends through the holes and tie them in a knot again - the crossbar will be fixed. Measure the distance to the second shelf and secure it in the same way as the first. Check that the distance from knot to knot is the same on all ropes.
- Securing the shelf. The last step is to tie all the ropes at the end with a secure knot and secure it to the ceiling. If the length is not enough, tie additional rope to the knot.
Your wall shelf is ready. All that remains is to place your favorite things on it.
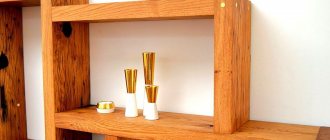
Types of shelves
Shelves perform many functions and are used for different purposes. In this regard, shelves can be presented in the form of hanging structures or niches, attached in several ways, and made of different materials.
Kinds
| Variety | Description |
| Wall mounted | As the name suggests, they are attached to the walls. Place it above the sofa, bed or next to the table. |
| Hanging | Attached to the ceiling using chains, cables or belts. Often used in the living room, bedroom, kitchen. |
| Corner | Hang at the junction of two walls and attach to the walls or ceiling. A universal option for any room. |
Shelves are completely different both in appearance and functionality.
You can store things, books or place decorative elements on the shelves
Form
Shelves are available in a wide range, differing in:
- shape, size, color;
- surfaces (smooth, glossy, matte or textured);
- style orientation;
- functionality (stands, lighting).
Design
The variety of existing shelf designs will delight everyone who decides to add new elements to their home. After all, this will help create a unique interior design and surprise everyone with unusual shelves that can:
- be with side walls or without them at all;
- be located horizontally or vertically relative to the wall;
- have several tiers or move to the sides;
- have right angles or have a rounded shape.
Shelves can be of completely different shapes and designs
Using shelves you can significantly update the interior of a room.
Shelves in the kitchen are designed for storing kitchen utensils or decorative items.
Material
The advantage of this product is that it is made from various materials:
- metal;
- tree;
- glass (transparent, frosted or colored);
- MDF;
- chipboard;
- plastic;
- a combination of two or more materials at once.
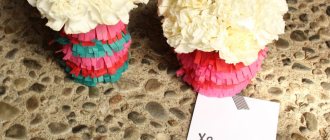
Decorative elements at the top
At the final stage, decorate the finished structure. Take the cut ends of the rope. Wrap them tightly in a spiral at the top of the structure.
Apply a few drops of all-purpose glue along the entire length of a piece of rope. Be sure to put two drops at the ends. Secure one of the ends of the segment to the shelf rope under the bar itself, under the knot. Make several tight turns. Secure the opposite end of the piece. Decorate the remaining 3 upper corners of the structure in exactly the same way.
After winding the ropes, the process of making the shelf can be considered complete. All you need to do next is place the items on the shelves that you planned to put on them. These can be books, decorative elements, lamps, candles and, of course, indoor flowers.
Found a violation? Report content
Laying the frame with slats
We cover the racks with boards. All tiers are made according to this principle. For flooring, craftsmen recommend using narrow joists. Such a device will be well ventilated.
For the stability of the structure, rubber pads should be used, which are placed under the bars. Let's see how to make shelves for a bathhouse.
For the flooring you will need boards that do not rot. The lags are secured first on the lower horizon, and then on the other.
For a one-story structure, there is less installation. The gap between 2 boards is 1 cm.
The largest gap between two joists is 2 cm.
It is better to secure the boardwalk with wooden elements, but this is not always possible, so often the logs are secured with self-tapping screws. The self-tapping screw is screwed deeper into the board.
Folding flower stand
A simple and functional device will help you stylishly arrange flower pots with indoor plants - a DIY bookcase with a folding mechanism.
Note!
- Do-it-yourself screen: a step-by-step master class for creating it yourself. Types of screens, manufacturing materials + design ideas
- Do-it-yourself installation of interior doors - preparation of the structure, selection of doors, installation step by step + instructions from professionals
- DIY shoe rack - types of designs, manufacturing materials, step-by-step master class with simple diagrams and drawings
Drawings of the rack are freely available on the Internet. Dimensions can be adjusted to fit space parameters.
Assembly sequence:
From a 2.5x3.5 rail we cut out the rear support posts and the front folding ones. In this case, the front pillars are approximately longer than the supporting pillars. The difference in length affects the folding level of the structure and the size of the bottom shelf.
We lay out the racks on a horizontal surface and mark, drill and install the cross bars at the same level.
Stacked shelves are assembled from slats onto two transverse beams of the required width. The lowest shelf has the maximum depth, and the highest one has the minimum depth.
Note!
- Do-it-yourself sliding wardrobe - manufacturing manual with a full description of the stages, types of structures, choice of manufacturing materials (photo + video)
- Do-it-yourself carriage screed: step-by-step instructions for creating it yourself, diagrams and drawings for beginners, selection of materials and tools (photo + video)
- DIY stool - types of stools, manufacturing materials, step-by-step master class with simple diagrams and drawings for beginners
The racks are connected to each other with furniture ties, allowing the structure to unfold.
The shelves are attached to the rear shelf using furniture ties to make them easy to stack. When disassembled, the opposite edge of the shelf is fixed on the transverse strip of the front pillar.
The finished product can be painted to your liking.
Preparatory stage of work
The best time to install this air shelving would be during a home renovation, as the installation will affect the floor and ceiling of the room. So, what materials do we need for work:
- Shelves made of MDF or plywood. You can use reinforced glass, but for a small room this is not the best option. Still, such a fragile material requires more voluminous areas.
- Cables. The number of halyards depends on the expected weight of the structure. If the DIY hanging shelf is intended for souvenirs and photographs, two cords will be enough. For more massive objects, the number of strands increases to four.
- Turnbuckles are devices for adjusting the tension of ropes. They are two screws with multi-directional threads screwed into a ring. Tightening or loosening the cable is achieved by rotating the ring.
- Installation rings for fastening shelves on a cable.
- Universal plastic dowels ∅ 10 mm.
- Rope clamps.
- Screws with hook or loop heads.
List of required tools:
- Drill, drill bits for wood and concrete.
- Ruler, tape measure, pencil.
- Hammer.