Houseplant lovers know how difficult it can be to place all the flowers because window sills and tables are not enough to create a beautiful home greenhouse.
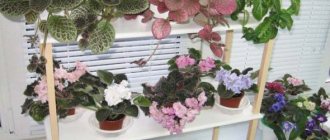
Those for whom growing indoor flowers becomes a real hobby always have a rich collection of various plants that require a lot of space. Each of them must be provided with enough well-lit space to ensure comfortable conditions.
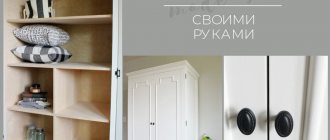
To make them look impressive, it is important to place them well in the interior of the room. Floor, wall, and hanging flower shelves, which are made in any, even the most unusual design, are ideal for this.
Advantages of self-made shelves
There are products on sale that can be used to quickly solve the problem of placing a home flower garden. But they are not very diverse; they are the same type of standard designs.
When you make flower shelves yourself, you can create your own unique room design, choose the best option for each plant, and how to present it more effectively.
When you make shelves yourself, you can choose the materials for them yourself, calculate their dimensions, the required number of stands, and develop your own original design.
The cost of a shelf or several shelves will be much cheaper than store-bought products. And if you make such structures from waste materials, unnecessary old furniture or other suitable items stored in the house, then the only costs will be time and labor.
Options and drawings of shelves for pantry
Before choosing any shelving option, it is important to know the dimensions of your pantry. Armed with a tape measure, you can easily measure all the necessary data and build on them in the further selection of the scheme.
Dimensions for each structure must be calculated individually, depending on the available space
Based on the individual dimensions of the pantry, it is important to understand the height and permissible width of the shelves, the distance between them, and the most comfortable depth of the entire product. Thus, making a rack will not be very difficult. Furniture manufacturing, like nothing else, is subject to the principle “Measure twice, cut once.”
The design can be either simple or intricate - it all depends on the imagination of the manufacturer
Leaving aside the classic shelving, you can allow yourself to go a little wild in the design of your storage space. By putting more effort into the drawing and measurements, you can make with your own hands not empty shelves in the pantry, but a work of carpentry art.
Types of shelves for flowers
According to their designs and placement methods, flower shelves are divided into several types:
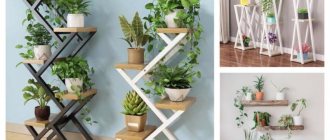
- Floor-standing. The most durable, reliable products that are especially suitable for large plants in large, heavy pots. They come in various designs - in the form of racks, whatnots, single stands, spacers, pyramids, A-shapes, ladders, etc. They require a lot of free space to accommodate them.
- Wall-mounted. Can be hung on walls using various fasteners. They allow you to save more space, especially corner ones. The most common types are shelves, racks, compositions of several separately placed single shelves or various original configurations (triangles, squares, honeycombs, etc.).
- Hanging. An excellent solution for saving space. Such structures are attached to ceilings, window openings, and are designed for light, small flower pots. For reliability, strong anchor hooks are used as fastenings to ceiling surfaces, onto which hanging shelves are then attached. Rope, leather belts, chains, cables and other suitable materials are used as hangers to which the shelves are attached.
- For window sills. Shelves for flowers on the windowsill are made in the form of small figured stands or in the form of multi-level racks that are attached to window openings.
All these structures can be installed not only indoors, but also used to decorate balconies, loggias, verandas, and some even open areas in summer cottages.
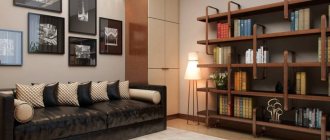
Compositions of several, made in the same style, different types of shelves - floor, wall, hanging - look beautiful. You can choose homogeneous materials for them (wood, plastic, metal) or combine different ones.
The following materials are used to make shelves:
- Wood. Shelves made of this durable, eco-friendly material, when assembled correctly, can withstand heavy loads. Wood is easy to process; even beginners can handle making shelves of simple designs. Experienced craftsmen make wooden shelves decorated with carvings, inlays, and paintings. Without professional training, you can beautifully decorate a shelf using the decoupage technique.
- Plywood. This material is even easier to work with, but it is no longer as durable as wood. Various shaped products can be easily cut from plywood. The original design can be made using the technique of painting with paints, decoupage, decorated with rhinestones, beads, other decor, and also covered with self-adhesive film with an imitation of any texture. Plywood shelves can be combined with other materials.
- MDF boards, chipboards. From the waste of these cheap, but durable and neat materials, with the help of a set of simple tools you can make cute original shelves. Cuts of all parts must be treated with a special adhesive tape, selected by color.
- Metal. This material is used in the form of profiles or chrome tubes for the frame, as well as metal grids or solid sheets for shelves. Beautiful exclusive products are made from forged metal.
- Plastic. To make shelves, plastic pipes, sheet plastic (transparent, colored, smooth, textured) and even PVC window sills are used.
- Strained glass. Transparent shelves visually save space. But they are only suitable for light, small flower pots. The glass should be no thinner than 0.5 cm. They are attached to metal frames with special clamps. Slots are made for them in the wooden frames, into which the glass is then inserted.
Plywood wall shelf
To manufacture such a product with a structure assembled only from sheets, you will need plywood and veneer for processing cuts. If the plywood shelves will be attached to a wooden frame, then another beam is prepared.
Tools and additional materials you will need:
- a manual (or electric) jigsaw for cutting plywood along curly lines;
- circular saw - to obtain more even straight cuts;
- a set of figured files for processing edges;
- sandpaper for sanding surfaces;
- screwdriver;
- self-tapping screws;
- fastening elements, awnings;
- scissors, pencil, paper;
- PVA glue (or carpentry glue);
- stain, paints and varnishes for surface finishing.
How to make a shelf for flowers from plywood, sequence of work:
- draw a sketch and make patterns from paper;
- according to the patterns and calculations made, cut parts from plywood (timber);
- align the edges using needle files;
- sand the surfaces with sandpaper;
- assemble the entire structure using glue and screws,
- treat with stain;
- stick edge veneer tape onto the open sections of the parts;
- varnish;
- After the varnish has dried, secure the canopies.
Required Tools
To collect the configuration you will need the following tools:
- screwdriver;
- building level;
- electric drill;
- saw;
- pencil for marking;
- hammer;
- screwdriver;
- roulette;
- manage.
The choice of fasteners will depend on the raw materials of the future configuration. The heavier the raw material, the stronger the fastener. If you are planning to install a metal wall flower shelf, you will need to use a welding machine to attach it.
Otherwise, there is a chance that the stand will fall down soon.
Master class: plywood shelf
Making a shelf out of plywood is not difficult; first you need to prepare a suitable sketch.
- Plywood is easy to work with, you can cut out many interesting shapes, so the shelf will turn out unique and original.
- The sketch must be transferred to a sheet of plywood. It should be remembered that such a shelf will not withstand heavy loads, so you should not load it with flowers and overload it.
- To cut out figures, it is better to take a regular or electric jigsaw, after which you need to sand the cut edges of the saw with sandpaper and apply a special impregnation.
- The last stage is applying paint, which will allow the plywood shelf to become more resistant to damage and moisture.
The finished shelf can be decorated however you like, just use your imagination and prepare the necessary furniture.
Master class: shelf made of furniture panels and bars
Cutouts from glued furniture panels can be found in furniture workshops and bought for pennies. After all, shelves require very small parts that are difficult to find for other purposes. But you can also buy a sheet of the appropriate size.
This material is practically no different in appearance and characteristics from solid wood, it is just as easy to work with, and also requires a protective finish to increase moisture resistance. A neighborhood with which it is inevitable to put living plants on shelves.
Step 1. Decide on the number and shape of shelves, draw their outlines with a pencil on the cabinet panel.
Step 2: On the bad side, cover the outline with masking tape or masking tape to prevent chipping when cutting.
Step 3. Cut out the pieces with a puzzle.
Step 4. We fix the parts on the table with clamps and process their edges with a milling machine, rounding them or giving them a shaped shape.
Step 5. Remove all small irregularities and defects by sanding. To avoid the formation of abrasive scratches on the surface, sanding should be carried out along the grain of the wood.
Step 6. We also process the rods for the legs with a router, round the corners and smooth them until a smooth surface is obtained without scratches or burrs. If there is a desire and opportunity, they can get a curly shape. Otherwise, normal processing is sufficient. Also, instead of beams, you can use ready-made balustrades for stairs and railings.
Step 7: Flip the bottom shelf over, place the legs evenly on it, and trace each one at the base with a pencil. Then, in the center of the drawn square, we make a hole with a thin drill so that you can see where to screw in the self-tapping screw from the front side.
Step 8. Coat the ends of the legs with glue, put them in place according to the marks and fasten them with self-tapping screws using a screwdriver or screwdriver.
Step 9. Determine the position and height of the second shelf. It slides to the side relative to the bottom, so two legs of different lengths are needed: one on the floor and the other on the top of the bottom shelf. We calculate these dimensions, cut out the bars of the required length and fix them according to the already known pattern.
Step 10. Attach the third tier, one of the legs of which rests on the bottom shelf, and the other on the second.
Step 11. We coat the finished structure with varnish or varnish or impregnate it with a protective impregnation in two or three layers.
Master class: plastic shelf
Answering the question of how to make shelves for flowers with your own hands, you can try to make a plastic shelf, which is very convenient to use. The material used is a plastic window sill, which can be ordered separately.
Before this, you need to decide what the size of the shelf will be.
- You need to drill holes in the window sill for the legs, two on the sides and one in the center.
- A shelf is placed on the legs and all additional elements are attached.
- The most ideal place for such a shelf is a window, where it will look most appropriate.
- If you wish, you can use any plastic, you can even take an old plastic basin and cut out a shelf.
It can be mounted on the wall or hung, plastic shelves can be freely installed outside, they are not afraid of sudden temperature changes and precipitation.
Corner flower shelves
You can save space using a corner shelf. These products are floor-mounted and wall-mounted, placed on internal or external corners. They are made from any materials.
They can be compositions of several single shelves or full-fledged spacious racks. The assembly and fixation of such structures depends on their types and materials.
Hanging shelves in the pantry
Wall shelves always look light and laconic. This option is perfect for lovers of high-tech style and minimalism. The whole secret of such products lies only in installing them on the wall. Read more about how to create this piece of furniture and install it correctly in step-by-step instructions:
- The first stage is making the shelves. In this design, they must be wide enough so that the mount fits securely to the product. Plywood must be cut into equal pieces - the dimensions in this case depend entirely on individual preferences.
- You should get one long and narrow blank - the front side of the shelf, two wide boards for the base itself, two small side ribs where objects will be located, as well as three bars - they will become jumpers.
- You should get one long and narrow blank - the front side of the shelf, two wide boards for the base itself, two small side ribs where objects will be located, as well as three bars - they will become jumpers. Important! The side edges of each workpiece are sharpened at 45 degrees for easy assembly of the parallelepiped shelf.
- Having provided additional convenience with masking tape, you need to fold the shelf around three bars already attached to the base. In this position, they must be glued and secured with weighty objects until they dry.
- The next step is to secure the side panels in place of the shelf ribs. This can also be done using glue. The blanks are cut from the same plywood with a 45-degree edge.
- The next step is to secure the side panels in place of the shelf ribs. This can also be done using glue. The blanks are cut from the same plywood with a 45-degree edge.
- For aesthetics, treat the joints with wood putty - they should become invisible. Sand the shelf. If desired, you can prime, paint and varnish.
- For fastening, you need to take metal bars or profiles. They must go inside the shelf cavity. Weld or fasten the workpieces as shown in the photo. Paint as desired. Place them on the wall.
- For fastening, you need to take metal bars or profiles. They must go inside the shelf cavity. Weld or fasten the workpieces as shown in the photo. Paint as desired. Place them on the wall.
- Place the shelf on the metal fastener.
This design of a wall rack will not take up much space and will be an excellent design solution. Moreover, the load capacity of the structure is several tens of kilograms.
Wooden shelves
The preparation of wood parts and the assembly of shelves from them is done using almost the same technology as from plywood. The resulting wooden flower shelves are stronger and have a greater variety of designs. They use timber and boards.
Even from the remaining scraps you can make beautiful original products. Interesting designs of flower shelves are made from ordinary containers - boxes, pallets.
Flower shelf made of wood and metal
Combined products with metal frames made of profiles or pipes and wooden shelves are assembled in the form of volumetric racks, small shelves, or hanging shelves.
Holders for pots are made from metal, which are then attached to wooden planks.
Forged metal shelf
Products made by artistic forging create a classic, luxurious environment. Such shelves can be made only of metal or combined with wood or glass. The results are very impressive interior details.
Most of these shelves are made to be floor-mounted due to their heavy weight. Forged shelves for flowers on the wall are made in small and medium sizes, and special fasteners with increased strength are installed for them. The walls must also be strong enough to support this weight.
How to care for shelves
Despite the fact that making shelves does not require serious financial investments and labor costs, any bathhouse owner does not want to redo them every few years due to loss of appearance, mold or other problems. Simple rules for caring for bath furniture will help you avoid them:
- Each time after completing the bath procedures, the steam room must be ventilated by opening the door and window, if any.
- To speed up the drying of the shelves, wipe them with a dry cloth that absorbs water well.
- During drying, all water from containers must be poured out or closed with lids.
- Things remaining on the surface should be removed, and traces of dirt and soapy compounds should be washed off. You cannot use abrasive or chemically aggressive products for this.
Regular cleaning and ventilation are required to extend the life of bath furniture Source scontent-cdg2-1.cdninstagram.com
In general, the interior of the bathhouse should be kept clean and dry, periodically carrying out general cleaning. It is better to make the beds of the shelves in the steam room removable, and in hot weather take them out to dry in the sun.
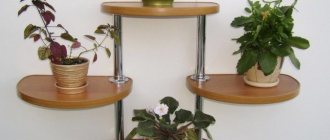
Shelf made of laminated chipboard and chrome tubes
To make such structures, you can use scraps from new laminated chipboards or parts of disassembled used furniture. To process cuts, you will need an adhesive edge or T-shaped (U-shaped) edges.
For chrome-plated tubes, you need to select flanges corresponding to their sizes, which are needed as supports for fastening the shelves. If the structure is floor-mounted, then you can install wheels to conveniently move the shelf with plants to another place, if necessary.
Work order:
- cut the required number of shelves;
- process the edges with an adhesive edge or edging (the U-shaped one is filled with a rubber mallet, for the T-shaped one you need to make grooves in the edges on a milling machine);
- Using a Forstner drill or a milling cutter, make holes in the prepared slabs that correspond to the size of the tubes; in the upper shelf they should not be through;
- insert the tubes into the holes and secure them with flanges on both sides of the plates (the top one with the bottom one);
- attach furniture wheels or legs to the bottom of the tubes.
Photo gallery of ideas
If none of the methods we suggested for making a shelf appeal to you, we suggest looking for ideas in our photo gallery. Here we have collected other examples of wall shelves that you can make with your own hands from wooden boards, the same pallets, boxes and other readily available “lumber”.
Corner shelves
Making your own corner shelf couldn't be easier. To make one shelf as in the photo below, cut out a triangular blank of the desired size and with the required angle (rarely the internal corners of the walls are exactly 90 degrees) from plywood or wood 1.5-2.5 cm thick, as well as two small support strips (length one strip should correspond to the leg of the triangular workpiece, and the length of the second strip should be calculated according to the formula: length of the leg minus the width of the first strip).
DIY corner shelf
All parts need to be thoroughly sanded and then painted or simply treated with wax/varnish. Next, make markings using a building level both on the walls and on the planks (note that the holes will be through!). Drill holes in the walls, insert dowels into them, and then hang the supports using screws using the through-hole method. It is important to choose the correct screw length - it should be calculated using the formula: dowel length + thickness of the support bar + screw diameter. Finally, all you have to do is install the shelves and secure them either with wood glue or wood nails/screws. If you want to hide the heads of the screws, use wood putty, and then paint over the “patches” with paint to match the shelf.
You can screw hooks for mugs into the bottom of the kitchen corner shelf
DIY Corner Bathroom Shelf
Homemade corner shelves of different sizes
Skateboard shoe racks
To make a shelf out of a skateboard, you need to remove the wheels from it and then hang it on the wall using brackets.
Shelf in a baguette
A shelf framed by a frame is easy to make: first you need to put together a frame of boards according to the size of the frame, then you need to install several divider strips inside the box.
Shelf with flywheel hooks
If you have a simple wooden bathroom shelf, decorate it with cross ceramic faucet handles. It’s hard to imagine a more stylish thing!
Wall storage system
Boxes are almost ready-made shelves that you just need to hang on the wall.
From several single type drawers you can make a full-fledged modular storage system.
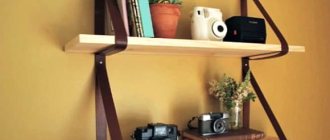
Hanging shelves made of wooden boards and leather straps
From a wooden board and a couple of leather straps, you can make just such a stylish hanging shelf with your own hands.
Shelf for storing fruits and vegetables
As you know, some fruits and vegetables need to be stored at room temperature. But where can we find a place for this? Our answer is on the wall using a shelf like this made of wooden boards and metal baskets.
Glass shelf on the window
Glass shelves look light and airy and transmit light well, which is beneficial for plants. They choose strong tempered glass with an optimal thickness of 0.5 cm. They are made in the form of racks with wooden or metal frames that are attached to window openings.
The structures can be solid with vertical and horizontal supports, as well as without vertical supports, when only horizontal supports are attached to the window frame, on which glass shelves are then laid.
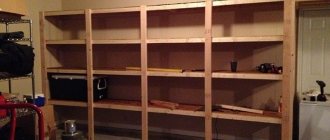
Profile shelves in the pantry
Making a rack using metal profiles is suitable for storage rooms, where the walls are easily subject to self-tapping screws.
Simple shelf design using metal profiles
There are several nuances in the execution of this version of the product. For ease of installation, it is fixed under the ceiling and near the floor; it requires fastening to the walls. If this can be done in a pantry room, then the rack will make the owner happy with its simplicity and conciseness. Step-by-step manufacturing instructions are below:
- Metal profiles three meters long will be placed on the wall as follows. A total of 8 supports for the shelves are required. If necessary, the dimensions of the diagram must be adjusted to the dimensions of the storage room.
- The dimensions shown in the diagram below can also be adjusted. At this stage, it is necessary to attach metal profiles to the wall, floor and ceiling of the storage room. The framework of the structure begins to emerge.
- The dimensions shown in the diagram below can also be adjusted. At this stage, it is necessary to attach metal profiles to the wall, floor and ceiling of the storage room. The framework of the structure begins to emerge.
- Install additional perpendicular profiles on vertically fixed workpieces. They must be parallel to the wall ones. Thus, at this stage of work, the home craftsman needs to have three supports on the wall, two vertical ones from floor to ceiling, one from the beginning of the shelves to the ceiling, as well as three horizontal supports. The 8 profiles stated at the beginning of the instructions are used up - the shelving frame is ready.
- The next stage is creating shelves from plywood. Three blanks with a width of 500 mm are cut from a piece of 3000 mm. The quantity and sizes are selected individually.
- The next stage is creating shelves from plywood. Three blanks with a width of 500 mm are cut from a piece of 3000 mm. The quantity and sizes are selected individually.
- The final stage is the installation of plywood shelves on a structure made of metal profiles. Here you need to secure the bases with self-tapping screws and the rack is completely ready.
Quick and easy production will not ruin the home craftsman, but will provide additional storage space for tools, cans and other household items.
Ideas for making unusual shelves with your own hands
To make original designs for flower shelves, you can use the following ideas:
- the shelf is made in the form of a tree trunk; liana plants, reminiscent of tree branches with leaves, are placed on the stands;
- an arch in the shape of a heart is made, on the stands of which flowering plants are placed;
- The floor structure can be made in the form of a pyramid, house, bicycle, and the wall structure can be made in the form of a honeycomb, stairs, waves.
Simple rules for arranging shelves
When placing flower shelves, take into account the illumination that is necessary for plants. Shelves are installed further from the window for shade-tolerant plants, and those that love bright light are placed in well-lit places, but not in direct sunlight.
Some plants cannot tolerate drafts, especially when ventilated during the cold season. When arranging shelves, it is important to create a healthy environment for all plants.
All designs in color and shape must fit harmoniously into the interior of the room.
Conclusion
You can make beautiful flower shelves yourself without any special preparation. First you need to come up with your own original design or find a ready-made one suitable for the interior of the room where the plants will be placed.
Available materials make excellent products that create an unusual atmosphere in the room and become bright decorative elements.