It would seem, how can an ordinary small rug change the interior? But it turns out that it can become not only useful, but also a bright, interesting detail in interior design. Of course, you can buy it in a store, fortunately, now there are rugs for every taste and color. But think how nice it will be when you make it yourself, especially since such a rug can be easily made from old things, for example: threads, fabrics, wine corks, belts, and much more. All you need is to know the step-by-step instructions, stock up on the necessary materials and patience.
Rug made from old leather belts
Making a mat from belts is very simple.
For this you will need:
- 10-12 natural or faux leather belts
- awl or leather punch
- twine or string.
First make the belts the same length by cutting off the buckle. Make holes along the edges of the straps at a distance of approximately 2-3 cm from each other and 0.5 cm from the edge. Sew them together using thin hemp rope. The order of pulling the rope is arbitrary; you can sew along the belts, across, crosswise between the holes. Metal staples instead of rope will also look very stylish.
Fabric-based products
You can use fabric as a backing: burlap. Prepare 2 by 10 scraps and get to work. Thread each piece into the cell evenly across the entire width of the base, the tighter the better. This way the rug will be fluffy and soft.
Before creating a rug from old T-shirts turned into yarn, trim the ends of the fabric and select the shape.
This rug is perfect for both the hallway and the bathroom.
Soft rug made from old fabrics
Required material:
- scissors
- pieces of old (unnecessary) fabrics, maybe old clothes
- bath mat (with holes)
1. Cut the fabric into small strips
2. Using tweezers or a hook, begin pushing the strips through the holes.
3. Tie all fabric strips with a simple knot.
Tools for work
First, you need to prepare all the necessary equipment.
Be sure to wash old T-shirts and dry them thoroughly. It is advisable to choose shades that are not the brightest; they should be more or less combined with each other. A plain rug will also be boring; it is better to alternate the colors of the “yarn”.
To get started, stock up on the necessary materials and equipment:
- Old T-shirts.
- Very sharp and comfortable scissors.
- Large crochet hook.
- With a ruler.
- Chalk or soap.
Making a rug from old towels
Required material:
- old towels
- scissors
- sewing machine (needle and thread)
1. Cut your towels into several strips. In this example, each strip is about 3 - 4 cm wide.
For convenience, you can fold each towel in half and cut it into 2 halves. Fold each half in half again and cut along the fold line, etc. It is advisable that all towels are approximately the same size.
2. Place 3 strips of different colors together and secure them with thread (stitch the ends). Start braiding these strips. After finishing the weaving, stitch the ends again.
3. Make several of these “braids” and then connect them into one long strip using a needle and thread (or a sewing machine).
4. Start rolling your long strip into a spiral, securing it with a thick thread.
5. Secure the entire structure and turn it over so that the seams are on the bottom.
Your rug is ready!
Wine cork rug
Wine bottle corks are an excellent material for a variety of crafts for the home and garden. One useful option is to make your own cork mat. Cork bark practically does not absorb moisture and bacteria do not multiply in it, which is why cork is excellent for rooms with high humidity, that is, for the bathroom. And walking on a mat of traffic jams is not only very pleasant, but also useful!
To make a small rug, you will need:
- 150-180 wine corks;
- glue;
- a piece of water-repellent material for the base (rubber shower or yoga mat, rubberized fabric, soft thin plastic);
- sharp knife;
- coarse sandpaper;
- cutting board.
1. Assemble and prepare the plugs. If you do not have the required quantity, you can buy plugs in online stores. Wash them thoroughly in warm soapy water. To remove red wine stains, soak the corks in a bleach solution and leave them overnight. Then rinse well and leave to dry.
2. Cut each cork lengthwise into two pieces. Use a cutting board and a sharp knife. If the cuts are very uneven, smooth the edges with sandpaper. For convenience and safety, it is better to cut the cork not on its side, but by placing it in a vertical position.
3. Place the corks with the cuts down on the table as they will be located on the rug, decide on the size of the future rug. Then cut the base of the rubber material to the desired size. You can come up with a pattern yourself, it can be a checkerboard pattern, even rows, zigzags.
4. Start gluing the corks to the base with an adhesive suitable for gluing such surfaces. Glue the corks around the perimeter first, then moving towards the center. Remove excess glue immediately with a cloth.
The cork mat must dry completely. To make it completely waterproof, you can treat the surface with a sealant. If you use a cork mat in the bathroom, it is advisable to dry it in the sun at least once a month for prevention.
Rug woven from shreds
Materials needed for making it yourself:
- thick fabric (carpet base)
- pieces of fabric
- black thread
- needle
- scissors
- fabric glue
- adhesive tape
- spray for protective coating (if desired)
1. Select the size of the carpet and prepare a cloth of the appropriate size.
2. Prepare long strips of fabric. Each strip should be approximately 6-7 cm longer than the main part of the carpet.
3. Prepare several bundles of 3 strips and start braiding. You need several blanks so that you can combine them into one carpet. For convenience, secure the ends of each piece with adhesive tape. Don't weave all the way through - leave some of the fabric unwoven.
4. Apply glue to a thick canvas. No need to skimp on glue.
5. Carefully place the blanks on the canvas so that they stick.
6. Connect all the pieces together using a needle and thread.
7. Remove the duct tape from the ends. Trim the ends so they are even.
The rug is ready!
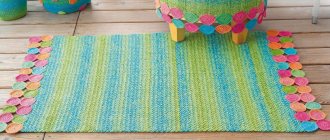
DIY pompom rug: Option No. 1
Required material:
- wool thread
- scissors
- bath mat (with holes)
1. Wrap the wool thread around your fingers (the more you wrap, the fluffier the pompom will be).
2. Carefully remove the wound thread from your fingers. Prepare another short thread - about 20 cm long - and tie it around the wound thread (in the middle).
3. Cut off the ends with sharp scissors. Also cut off the excess parts with scissors to get a neat round pompom. But don't cut the thread you used to tie the pompom, you'll need it later.
4. Make enough pom poms to cover the bath mat. After this, begin to thread the thread through the holes and tie it to the rug, thereby attaching the pom poms to the rug. The pompoms should be close to each other.
5. When you have tied all the pompoms to the carpet, you can cut off the ends of the threads.
Your DIY pompom rug is ready!
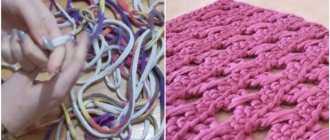
Preparing the “yarn” for work
Before work, we must cut each T-shirt into strips, the width of which is approximately three centimeters. This process is long and tedious, and for this you need the most convenient scissors possible. They should cut, not chew, matter.
The stripes should be even and the same width - if you are not confident in your eye, then first draw out the fabric. Of course, it will take time, but the result is worth it!
It is best to draw with chalk or soap, since pencils do not write on knitwear.
Sew them together into one “thread” and wind them into a ball.
In the photo you can sometimes see wicker rugs consisting not just of straight ribbons, but also of ones rolled into tubes. To get this effect, you need to wash and dry the already cut “yarn”.
Simple pompom rug: Option No. 2
To make this blue and white pompom rug, you will need:
- thick woolen threads for knitting;
- mesh base for the rug;
- scissors.
1. Make pom-poms in different colors to create a smooth gradient color transition. You can make a plain rug or lay out a specific pattern. You can also play with the size of the pompoms, using large, smaller and very small ones. To do this, look here for the best way to make pompoms of different sizes.
2. Now tie each pompom to the net, following the color scheme. Try not to see the outline between the pom-poms.
If desired, the back side of the rug with knots can be covered with fabric or knitting so that the pompom rug is beautiful from all sides, even from the inside out. If you couldn’t find a suitable base - a mesh - it doesn’t matter, pompoms can simply be sewn to any fabric.
Crochet
For those who know how to crochet, this method will seem the easiest to perform. In addition to T-shirts and scissors, you also need a hook.
How to make a long thread from T-shirts was described in the previous method of creating a rug. Only for this option, the strips need to be cut thinner, about 3 centimeters.
Next you can start knitting. To start working, we crochet six air loops and connect them into a circle. In the next row we add loops, one through each column, to get twelve loops.
We conditionally divide them into twelve parts and, when performing the next row in each part, add one loop. Thus, we continue to knit in circles until we obtain the desired size of the rug.
If the carpet is not completely flat, it can be straightened with an iron during the ironing process. And then leave to dry on a flat surface. Using this principle, you can make a carpet of any shape, the main thing is not to forget about the smooth transitions of colors in the product.
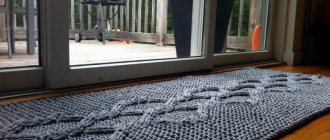
Round foot mat made with a hoop
Old knitted T-shirts are actively used by craftswomen for a variety of crafts; in particular, the idea of making rugs out of them is very popular.
Necessary materials:
- 3-4 T-shirts (other things, ribbons or ropes)
- children's gymnastic hoop or hula hoop for adults scissors
It is recommended to take items made of fabric with a minimal admixture of elastane, tape or just rope.
The size of the mat depends on the size of the chosen hoop; you can take either your daughter’s gymnastics hoop or a large weight loss hoop. The weaving technology is very simple; even a child can do it by making a round rug on a hoop for their room.
Cut T-shirts or other old outerwear into strips of equal width, from one side seam to the other, to form rings. Place each strip on the hoop: first a vertical line, then a horizontal one, and then divide each sector into equal parts with a strip of a T-shirt.
Important! The strips of fabric should not be very stretched, otherwise the finished rug will wrinkle and will not hold its shape. Ideally, the T-shirt strip should fit almost loosely over the hoop, with minimal stretching of the fabric.
It's likely that if the diameter of your hoop is larger than the t-shirt strip, it's too tight or you're using ropes at all. In this case, simply wrap the hoop in fabric or rope and tie a knot.
Try to have all the base lines intersect at the center point. We start weaving the rug from the center. Take a strip of T-shirt, fasten it with a loop to one of the warp lines and pass it under and over the longitudinal lines.
When the strip ends, tie another T-shirt ring to it, hiding the knot under the previous row. Continue weaving in the same way, alternating between pulling the strip under and over the longitudinal lines. Try to keep each circle pressed tightly against the previous one, avoiding large spaces or holes between them. Once you have finished weaving, cut off the ends of the loops with scissors and tie them with a knot.
Patchwork
DIY Christmas tree toys made of fabric
Making a fabric rug using the patchwork technique is very easy. As a result, you can get an original and beautiful product. To do this, you should follow these instructions:
- Preparatory work. To create, you will need scraps or scraps of fabric, which you can buy in a store or online. The material needs to be washed and steamed. If old pieces are used, they should be starched and ironed. For this, experts recommend using scraps of drape, gabardine or tweed.
- Fitting the patches. Give all pieces the same shape and size. It's best to use a template here. There is no need to leave seam allowance.
- To ensure a long service life of the rug, it is recommended to use a lining made of foam rubber or padding polyester as a base. Prepared pieces of fabric are attached to it in a chaotic manner or according to a pattern that can be found on the Internet.
It is recommended to start with simple sewing. Only after this can you try complex designs and curved lines. An original solution would be the knitting technique, in which the fabric is not sewn, but tied. To create a three-dimensional product, quilting is used. In this case, two canvases are sewn together, and padding polyester is placed between them.
Illuminated rug
Sometimes at night you want to go to the toilet, go to the kitchen to eat, drink a glass of water or prepare a bottle of formula for the baby, so you have to get up and leave the bedroom. In the dark, and even in a half-asleep state, there is a risk of bumping into something, and turning on the overhead light is not always possible so as not to wake up other family members. For such cases, LED floor lighting in a rug will be an interesting and useful solution.
Craftswoman Johanna Hyrkas came up with the great idea of using an LED strip as a lighting sign for the way out of the bedroom. The ribbon is twisted in a spiral, located inside a round rug woven from ordinary rope, and a long tail leads further from the room. Soft, cozy light spreads across the floor without disturbing sleep.
Such a rug with LED lighting can serve as a night light in a child’s room. In addition, a strip of rug can be laid along the walls and lead to the toilet or kitchen. For such purposes, it is better to use a sealed closed LED strip. You can make a rug with your own hands, using a large crochet hook or using your fingers to braid a ribbon with thick yarn or rope. Of course, there are expensive models of LED floor lighting with a light power control. But often the homemade option is an excellent budget solution, as in this case.
Rug made from jeans labels
The concept of using clothing items for other purposes after they have been worn out is not new. For decades, women have been making patchwork rugs and quilts from old items. In the same way, you can make a carpet with your own hands from labels from jeans. The only problem is finding enough labels, because even for a small rug you will need at least 50 pieces.
To make such carpets with your own hands, it is better to sew labels onto some kind of fabric, maybe even thin. Labels sewn on each other will give the carpet the necessary density. For work, use a sewing machine, since manually sewing each label is a very labor-intensive task. Make stitches around the perimeter of the label, where it was sewn to the jeans. You can choose the pattern yourself - the correct even mesh, herringbone, spiral for a round carpet, but labels in a slightly irregular order, sewn on top of each other, look most impressive.
Video for beginners
A detailed description of working with old T-shirts using different techniques can be found in the video selection below. Enjoy watching.
A small rug that can find a place in any room of the house can become a bright, interesting and useful interior detail. A soft knitted or wicker rug is a nice place to put your bare feet in the morning; in the bathroom, a rug will absorb excess water and prevent you from slipping on a wet floor; on a doormat you can wipe off dirty shoes and leave them to dry. Of course, you can buy any rug in the store, but we suggest looking at 10 simple ideas on how to make an original rug with your own hands from different materials!
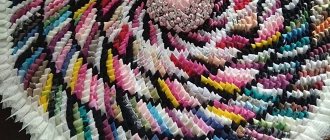
How to make a rug "French bracelet"
Required material:
- old fabric of 2 colors (you can use old T-shirts). The width of each piece of fabric is 20-25 cm and the length is 3 meters. If you are using old T-shirts, you can join several pieces together with a thread and a needle.
- scissors
- needle and thread
- adhesive tape
1. Arrange 5 strips of different colors in the order in which you want them to look on the future carpet.
2. Next to the 5 laid out strips, place another 5 strips in a mirror image.
3. Take the first strip, in this case the pink one, and tie it as shown in the image. First, fold the fabric to form a number 4.
4. Continue tying the pink strip around the remaining strips until you reach the middle.
5. Start doing the same on the opposite side, tying another pink stripe around the other 4 stripes. Start also with the number 4, but in a mirror image.
6. When the two pink stripes meet in the middle, tie them together.
7. Repeat the same with the subsequent remaining strips. Choose the length of the rug yourself.
8. Start another rug, choosing the same colors. After this, connect both rugs with thread and needle.
Tip: If you wish, you can make one or more similar rugs, which can then be sewn into one large rug.
9. Excess parts can be cut off and the ends secured with thread to prevent them from unraveling.
What do you need
- Scissors
- About a dozen T-shirts
- 33" hula hoop
- Before you start, some terms you need to know: warp - stripes for a hoop, weft - stripes for a weave.
For the base, cut 1-inch strips of T-shirt loops without cutting the edges, one or two, three colors and a 33-inch hoop. Ideally the loops should be the same color, we used two colors for clarity in our photos. You will need only 11 loops. For the wefts, cut at least 50 stitches from the remaining shirt. Save unused sleeves to your project basket.
Pull one loop through the hoop as shown in the picture
Add and fasten a second loop, perpendicular to the first.
Repeat, filling gaps, pull all 11 loops, preferably at the same distance
Connect the two loops at the top of the hula hoop together as shown in the picture. This creates an odd number of warp threads in the spokes of the wheel, allowing the overunder weft pattern to alternate with each new row.
Pull the first weft of the loop to the center through one needle (we chose two times in increments of 5), wrapping it around the warp and then passing it back through itself.
We begin weaving the weft above and below the deformation of the knitting needle, forming a tight spiral. Weave both parts of each warp as one, weaving over or under the two together. As you work, press the weft material towards the center of the hoop and keep it just loose. If you pull the weft tightly, the blanket will form lumps or kinks. When you reach the end of the weft piece, add a new loop, insert it at the end of the first and back through itself.
When your rug is about 8 inches in diameter, begin to pull to warp as two separate strips instead of one unit, weaving over or under each strand instead of going over or under a double. This increases the number of warp threads on the knitting needles, improving the structure of the project. When you reach the two deformed spokes that you have shifted to the top of the loom, separate them. Treat one of the spokes as two separate stripes, but continue to treat the other as one. This supports an odd number of warp threads on the knitting needles.
When the carpet is the right size, but no closer than 8 cm from the edge of the hula hoop, open your weft loop.
Tie the ends around the mat, and tuck the ends into the mat.
Tie the ends in pairs and then trim them to make a fringe or tuck them back into the rug.
HERE IS ANOTHER EXPLANATION OF HOW TO WEAVE A RUG
we will start weaving a decorative rug
, which will subsequently become a wonderful decoration for the interior of your home or cottage!
For work we will need:
- hula hoop,
- old, unwanted oversized T-shirt
- a ball of multi-colored knitted fabric (it should be loose so that it can be compressed during work)
- scissors