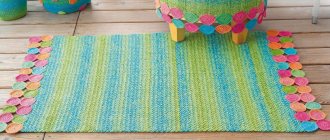
A knitted rug can perfectly complement your interior
Disused knitwear can still serve its owners, receiving a second life in the form of an unusual household item. Unnecessary T-shirts, T-shirts and knitted jumpers accumulated in closets and on mezzanines encourage people to create all sorts of ways to use old things to decorate the interior.
It’s not at all difficult to make a rug from old T-shirts with your own hands. The time spent will be repaid with pleasant emotions from the creative process.
Manufacturing methods
There are different techniques for creating rugs from old T-shirts. More complicated ones for experienced craftswomen and simpler ones for those new to design.
Types of woven rugs
[Show slideshow]
All the variety of methods can be divided into several main types:
- knitting;
- weaving;
- from braids;
- grid-based;
- on a fabric basis.
Crochet
Knitting without a hook
Let's try to weave...
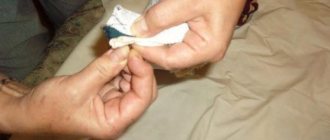
To make a small, approx. up to 40 cm long, a woven rug made of threads, yarn or fabric ribbons/bundles is not needed at first. A rectangular piece of cardboard and a dinner fork will be enough. Using a fork, immediately poke holes for the base: lines are drawn along the short edges of the cardboard “machine”, at a distance of 3-5 cm from it. The first 4 holes are pierced along the line with a fork, then the fork is shifted by 3 tines so that the outer one falls into the last hole that has already been pierced, 3 more holes are pierced, etc. The cardboard is cut to the holes; The warp thread is carried out in one piece, placed in a loop under the edge petals - “pegs”. Leave the ends of the base free for approx. 10 cm each.
Then we weave, as usual, pos. 1-2 Fig., but instead of a shuttle you will have to use a gypsy needle; the shuttle will not fit between the cardboard and the fabric. Having carried out 4-10 threads of weft, depending on its smoothness, we tamp the fabric with the same fork, pos. 3. We obviously unwind the wefts in excess, because the missing thread is tied from the inside out, which is not possible in this case.
How to weave a rug without a loom
Next, the ends of the worked weft threads are left at approx. 10 cm and glued to the “camp” with tape, pos. 4. When the entire warp is woven, they are carried out with a needle under at least 8-10 weft transitions from the wrong side to the face, pos. 5, and trimmed.
The next stage is to remove 3-4 loops from the petals at one end of the base and insert the free end into them, pos. 6. We tighten it a little, but don’t cut off the “tail” yet! We do the same with the other end of the warp thread.
Now the base can be completely removed from the pegs. Place the rug approx. for a day on a flat, smooth surface for self-tightening of the fabric under the influence of residual stresses in the threads. If the loops of the base have not yet tightened completely after this, smooth the rug, tighten it, and shake it until they tighten. Now you can cut off the “tails” of the base - the product is ready for use!
In a similar way, you can weave rugs from leftover yarn or patchwork rugs from ribbons/strands (remember - jeans, tights, rags?) Both materials can be used together, but the warp and weft must be uniform. They are assembled from separate threads/ribbons, secured with knots, on the left in Fig. It remains to decide how to connect threads/ribbons that are not long enough, or to bring out the pattern. As for the threads, there is no way on a cardboard “loom”, you need to take whole ones. And 2 ways of connecting tapes are shown there in the center and on the right. You can connect very short ribbons first, but the joint will be visible. The second joint is invisible, but the overlap of the ends is needed from 4-5 cm.
Weaving a patchwork rug on a piece of cardboard and methods for joining the patches
Materials and tools
To make a rug from old T-shirts, you will need simple tools:
- scissors;
- knitting needles or crochet hook;
- thread and needle;
- cardboard for weaving;
- fabric glue or glue gun if using a fabric base.
Crocheted rug
“Yarn” for knitting and weaving rugs is prepared by cutting ribbons 1.5-2.5 cm wide from old T-shirts, T-shirts, tights, sweatshirts. Knitwear is cut in a circle and in a spiral. The strips are sewn together and twisted into balls to make it easier to work. The strips can be connected in another way. Each strip is cut at a distance of 1.5 cm from the edge. Place on top of each other, aligning the slots. The opposite end of the top strip is passed through the holes from below. To make rugs from T-shirts based on a mesh, rectangles measuring 2 * 12 cm are cut, this is not at all difficult to do with your own hands using a cardboard template.
Preparing threads for weaving
What you can make from old T-shirts with your own hands
From old T-shirts, like from other clothes, you can create many new products.
For many centuries, people have made rag rugs from scraps of fabric and old clothes. In modern times, of course, everything is available and can be bought. But handicraft and creativity are more in fashion than ever, and you can be proud of things you have made with your own hands, in which your soul has been invested and your creativity has been revealed.
In addition, this is also budget saving, and rich is not the one who has a lot of money, but the one who knows how to save and manage it correctly.
Here is just a small list and photos of what can be made from old T-shirts:
- sofa and decorative pillows
- bags, wallets, cosmetic bags
- potholders
- vases and baskets
By the way, I knitted a similar basket as in the photo on the left from jute twine. - beautiful and unusual necklaces
- pompoms and flowers for decoration
- rugs and chair seats
Pompoms are made from knitted yarn in the same way as from wool, by winding the yarn on a cardboard circle.
How to make pompoms from yarn. Pom Pom Crafts
Ideas for decorating pillows with knitted flowers can be found here>>.
You can try to make a pillowcase from a whole T-shirt, and craftsmen make bags.
But even more interesting, in my opinion, are crafts made from yarn cut from an old T-shirt.
Such things can be knitted very quickly, literally in a day.
Moreover, the manufacturing methods can be different, not only crocheting, but also methods without a hook. Let's look at them in detail below using the example of making rugs, bags and baskets.
In the meantime, I’ll tell you about the kind of pillow I sewed.
Pillow
I had a favorite knitted T-shirt, but I had completely outgrown it, so I decided to use it for a pillowcase on a sofa cushion. The idea was sitting around and waiting for inspiration until I saw a photo of an interesting pillow made of fabric combined with a knitted insert.
Thus my new pillow was born. I’ll tell you now how to make a pillow from an old T-shirt.
In principle, nothing difficult.
- We try the T-shirt on the pillow so that its bottom edge coincides with the bottom edge of the pillow. After all, it has already been filed and this will make our further work easier.
- Cut off the excess top of the T-shirt.
- Cut along the side seams. We get two identical pieces of fabric.
- Then I first crocheted a strip like this.
How to knit these voluminous flowers can be seen in the publication on knitting pillows and blankets with voluminous flowers. - We try on the knitted part on the future pillowcase and cut a strip along its width on one of the pieces of fabric from the T-shirt.
- Sew the knitted strip onto the knitted part from the front side so that the toes hang down onto the fabric.
- We sew two parts of the pillowcase on three sides (from the inside, of course).
- You can make a button closure or sew a zipper along the bottom of the pillow. I simply sewed this edge together with blind stitches using a needle and thread.
Now I have this bright pillow made from an old T-shirt.
Bags
Beautiful bags can be crocheted from yarn cut from old T-shirts of different colors.
And there is another interesting way to create a creative summer beach or shopping bag.
For this we need a ready-made basket, the kind we use for household needs.
We cut the yarn from T-shirts into small strips of equal size and tie each one, inserting it into the holes of the basket, simply wrap the handle with ribbons.
Makes an adorable shaggy bag from an old T-shirt!
Basket
A basket made of knitted yarn can also be crocheted in the usual way, like an Easter basket, for example. By the way, a great idea for a holiday! Take a thinner hook so that the knitting is tight and the basket holds its shape.
There is another option, also crocheted, but using knitting yarn - acrylic or cotton, you can just use the leftover yarn.
In this case, the T-shirt ribbons will remain inside the yarn loops. I think that the principle of such knitting will be clear from the photo.
Knitted products
The “knitting” technique is suitable for craftswomen who work with crochet or knitting needles. The rug is knitted in circles to the desired size according to ordinary circular patterns. For knitting, they do not use any complex patterns; they knit the fabric with knit stitches. Even a rug from braids can be made novice master.
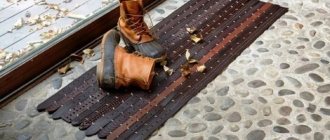
Braid rugs
[Show slideshow]
The work is performed in the following order.
- Place 3 ribbons of contrasting colors together and braid them.
- The ends of the blanks are stitched.
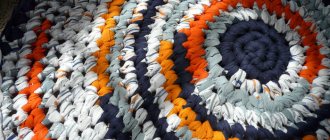
- The braids are connected to each other manually or using a sewing machine.
- Twist the braid into a spiral, securing it with threads. The seams should be on one side, this will be the bottom of the product.
Rug with a braid secured with threads
Another way to use braids is this.
- Prepare the base for the carpet from thick fabric.
- Take strips of fabric slightly larger than the width of the base and braid them without braiding them to the end.
- Apply fabric glue to the base and glue the pigtails. All blanks are fastened together with a needle and thread.
Braid rug with glue base
Preliminary stage
For the remodel to be successful, you need to take care of everything necessary in advance and choose the appropriate method of work.
Preparation of tools and materials
During the activity you will need the following tools and materials:
- old T-shirts;
- sharp scissors;
- a needle and threads of suitable density and color;
- Hook No. 15 - 20 (if you decide to knit a rug).
The specific list of basic materials depends on the chosen method of work.
Reference! When making a mat on a base or on a frame, in addition to the basic materials, you will need cardboard, glue, a frame and small nails or a gymnastic hoop.
Selecting T-shirts and preparing them for alteration
From the (clean!) T-shirts accumulated in the closet, those suitable for alteration are selected.
Item selection parameters
Fabric density. It is best to use products of the same density: thin T-shirts or sweatshirts made of thicker knitwear.
Color. You need to imagine in advance how the colors of different T-shirts will be combined in a new product.
When selecting things, you can use clothes that have different shades of the same color, for example, dark blue - blue - light blue - pale blue.
Rugs made from contrasting colored items, as well as variegated, multi-colored items, look good. In this case, you can choose several (no more than 3) primary colors and complement them with color shades.
Important! T-shirts that have lost their color (faded from the sun or faded from repeated washing) can be pre-dyed by choosing paints in the desired colors.
Basketry
Work algorithm:
- For the “weaving” technique, take a round base or a rectangle.
- To weave a round rug, draw a circle of the desired diameter on cardboard. Divide the circle into 36 equal segments. Cut with an allowance of 3 cm from the edge.
- Slots are made along each ray from the edge to the border of the circle to fix the threads. They begin to braid the base clockwise or counterclockwise, passing the knitted strip alternately first above the thread, then under the thread. When the weaving is finished, the tip of the ribbon is secured with a needle and thread.
- The rug can be decorated with pompoms or tassels made from knitwear cut into strips.
Advice! If the rectangular shape of the future product is chosen, prepare a frame of the required size.
Weaving a rug on a frame bar
- On the top and bottom slats of the frame, nails are placed at a distance of 2.5-3 cm from each other. Stretch the base using threads of a neutral color.
- The fabric ribbons are passed first over the warp thread, then under it. After weaving is completed, the knots are hidden on the underside and the rug is removed from the frame.
Rug on a hoop
A self-explanatory photo tutorial from Fab art DIY. To weave a round rug, use an ordinary hoop instead of a loom. The best project to do with your kids.
Materials and tools: old clothes, scissors, yarn or rope for the base, hoop.
Complexity: 2
Mesh based products
Work algorithm:
- The base of the mat is a painting or plaster mesh. Cut a piece of mesh to the size of the future carpet.
- They step back 1 cm from the edge and begin to fasten shreds of fabric measuring 2*12 cm into the cells. The shreds are brought in from the bottom of the mesh, pulling them up using a hook. Tie a knot and proceed to the next piece. Work begins from the center of the carpet.
The reverse side of the rug on which the mesh base is visible
Tip! If there is no construction mesh, you can knit the base for the carpet yourself.
The rug is made by hand on a mesh basis
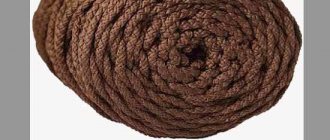
- The fillet mesh is crocheted from polypropylene twine of appropriate thickness. First, knit a chain of chain stitches, then alternate double crochets and chain stitches.
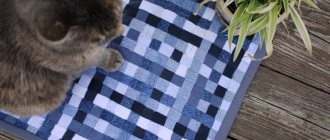
- Based on the mesh, you can make a bargello style rug. The pattern turns out to be unusual and very beautiful. A characteristic feature of the embroidery is a vertical stitch that captures four vertical warp threads. The next stitch is offset by one base thread.
Mat on loin mesh
Techniques and features of making pompoms
The step-by-step process of making a carpet from pompoms with your own hands should begin with the creation of these very pompoms.
- The simplest method, known from school labor lessons, is making pom-poms using cardboard blanks. Two circles of the same diameter are cut out of thick cardboard. It is worth considering that the larger the diameter, the larger the pompom will be. A smaller circle is cut in the center of each workpiece. Cardboard circles are aligned and thread is wound around them. The more often it is laid, the denser the pompom will be. The threads are cut on the sides with nail scissors and neatly pulled together in the middle. Afterwards, the product should be fluffed and the unsightly protruding ends should be trimmed.
- You can make pompoms more productively using a regular chair. The threads are wound between the legs. Then, the resulting “tape” is pulled together in several places and cut between the dressings. To obtain identical pom-poms, the workpiece should be separated using a measuring tape before re-upholstering.
- For small pom-poms, a similar procedure can be performed on a regular table fork by winding the threads around the tines.
- Less convenient and less productive, but still valid, is the method of making pompoms using your fingers. From two to four fingers can be involved. The thread is wound around the fingers, removed, pulled together in the center, and the loops are cut with scissors.
- For another way to make fluffy blanks for a rug, cardboard toilet paper rolls will come in handy. Before use, they should be compressed, giving the cardboard a triangular shape. Here the thread is also wound and, after cutting, pulled together in the middle. The pompom is ready!
Additional Information. The number of dressings is inversely proportional to the diameter of the finished pom-poms. If large ones are needed, dressings should be done less frequently.
Preparing the base and mesh of the carpet
- The most convenient base for a pompom mat is a construction mesh. Firstly, it can be bought at almost any construction store. Secondly, it is durable and has clearly demarcated cells, so the pompoms will be distributed evenly. And thirdly, no other base can boast such ease of attaching pompoms. There is no need for any additional equipment except the hands of a master. But to increase the speed of the process, you can use a crochet hook.
- If you don’t have time to go to the store, but have a soft cord at hand, then you can weave a mesh base from it on a homemade frame made of boards and nails. The main thing is that the size of the pompom is larger than the cell size of such a grid.
- Some people prefer a fabric backing. But not all fabric will work. For example, denim, tapestry or corduroy will hold the shape of the rug perfectly.
- An interesting option for the base is a ready-made rubberized mat from the store. The process looks like this step by step. We buy a ready-made rug of the required size with a rubber base and cover its front part with pom-poms.
DIY pompom rug - selection of materials
To make a rug you need the following materials:
- Threads for knitting, leftover yarn will do. The thicker and fluffier the threads, the more magnificent the balls for the rug will be.
- Thick cardboard/paper roll - for forming pompoms.
- Scissors.
- Base mat with wicker frame. You can buy it at a handmade goods and crafts store.
Having prepared everything you need, you can begin to manufacture the components.
Fabric-based products
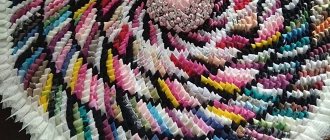
To make a rug, circles with a diameter of 12 cm are cut from old knitted items. A seam is laid along the edges of the workpiece “forward with a needle”, filled with padding polyester and the thread is pulled together.
You can make such a wonderful rug for a baby
For filling you can use old blankets made of padding polyester, holofiber from matted pillows, and foam rubber scraps.
The balls are manually sewn to the base. You can use a glue gun to attach the balls.
Volume mat
Fluffy grass
Real patterned fleecy carpets are an immense topic, like the entire history of carpet weaving. But making a small, simple grass mat at home won’t be too difficult. The first method is tying with knots to a construction mesh. Propylene (this plastic is practically not electrified) or nylon fluffy cord allows you to get a pile up to 5 and even 10 cm high, pos. 1 on next rice.
If you don’t want grass, but something like a densely planted lettuce, you can knit a fluffy rug from scraps. In this case, so that the pile does not fall off, the scraps are taken wider so that the knots slightly expand the mesh cells, and knit in a checkerboard pattern, pos. 2.
Two easy ways to make fluffy rugs
In both cases, if there is a pattern, it is drawn in advance along the base grid, pos. 3. Knit a simple bayonet in knots. This knot is very reliable, cannot be felt with bare feet and is easy to knit either by hand or by crochet, pos. 4 and 5.
The second method, firstly, gives a soft mat that can be rolled up and washed in a machine. Secondly, ordinary knitting yarn produces a dense, non-falling pile up to 7 cm high. How such a rug is made is clear from the poses. 6-9. The width of the cardboard mandrel for winding pile strips is according to its desired height. The finished strips are attached to a coarse woven base.
Some explanations, however, will be needed regarding pos. 6 and 9. If sewing is not intended to be done immediately after winding the strips, then you need to baste the uncut edge of the layer using a basting of 1 full and 3/4 of a half eight, this is the so-called. eight 7/4. How it is done is shown in pos. 10. The number of turns in one tack is not necessarily 4, it can be 10 or more, depending on the smoothness of the yarn. The hairier it is, the more turns you can grab with one figure eight loop. A strip swept in this way can lie in the chest of drawers as long as you like without spreading.
During final sewing, the first strip of pile is attached, straightened. Then its threads are bent to the non-working side and the next one is attached as close as possible, etc. The edge of the base in the finished rug will show through a little, so it is trimmed with braid.
Caring for rugs
A rug made from T-shirts will serve you for a long time and will be pleasing to the eye. For care, choose hand wash or delicate machine wash. Dry flat in a ventilated area.
This rug is easy to wash both by hand and by machine.
Making rugs from T-shirts with your own hands solves two problems at once. Clearing closets of junk and getting things that will be useful around the house. Transforming old unnecessary things into a useful and beautiful piece of furniture is a real miracle. Rugs made from old T-shirts are akin to painting masterpieces. Even when using the same techniques, the craftswoman ends up with her own version of the rug.
How to make a rug from wine corks
An unusual rug made of wine corks will be a real decoration for a bathhouse or bathroom. The technology for making such a useful decoration is quite simple. All you need to do is find the raw materials, i.e. corks in the required quantity, rinse them and dry them.
Cork material is not subject to rotting processes, bacteria do not multiply on it, which is why a cork mat must be present in those places where you perform barefoot.
For work we will need:
- wine corks in quantities from 150 pieces;
- rubber mat;
- cutting board;
- sandpaper;
- glue.
Stages of work:
- We cut the clean and dried cork lengthwise into two parts;
- We lay the blanks on the base, pre-distributing them according to color if necessary, into a mosaic.
- Before gluing, each half is treated with sandpaper for better adhesion.
Many housewives love to decorate their home with various products. Made with your own hands, they create an atmosphere of warmth, coziness and comfort on winter evenings. A good option to diversify the interior of an apartment and introduce elements of antiquity into it is to make a crocheted rug from old things, the execution of which is simple and accessible.
You will need to prepare source materials. Go through old things. T-shirts, dresses, tights, skirts and others made from knitted and synthetic materials will be useful. Cut them into strips in a spiral and wind them into balls.
Prepare a hook size 8.5-10. It will be great if the balls turn out to be multi-colored.
Making yarn - how to cut old things
When making your own rugs, you will need various pieces of old clothing. Knits are best suited because the fabric has the right level of softness and pliability. It is very easy to work with; knitting does not cause any difficulties. Try to select multi-colored items so that the finished rug turns out bright, colorful and rich.
You should try to cut strips of fabric for tape to the same width
First, we’ll tell you how to properly prepare yarn from old things:
- Find unnecessary T-shirts, sweaters or T-shirts made from natural materials, iron them;
- Use scissors to carefully cut off all finishing seams;
- We cut the fabric into strips up to 3 cm wide from one seam to another, without allowing the seams to intersect. The stripes must be straight, otherwise the rug will not be so beautiful;
- The strips be cut right up to the neck;
- The last step is to create one long ribbon from strips of fabric. The T-shirt should be placed on your hand and cut diagonally in those places that remained uncut after previous manipulations. The result should be a long narrow ribbon, which we will later use to create rugs.
The process of creating yarn is relatively simple, although there are a few things to consider. For example, the density of the fabric affects the thickness of the stripes. So, the thicker the knitwear, the narrower the strips need to be cut . If clothes with sleeves were used for yarn, then you should not throw them in the trash, because we will also need them. By cutting small pieces of fabric in a spiral pattern, we obtain strips of reasonable length, which can then be sewn or knitted together.
The end result should be a lot of stripes and ribbons made from old items. They need to be wound into balls and sorted by color to make it easier to find the fabric of the desired shade when knitting. If you want a cheerful and bright rug , then you need to prepare as many colored balls as possible.
Preparation
Of course, first of all you will need to prepare the material for weaving the rug. To do this, collect the T-shirts and cut them into even strips approximately 3 cm wide.
This task is tedious and long, so you need to choose scissors with comfortable handles and long, well-sharpened blades that will cut and not “chew” the fabric.
If you don’t really rely on your own eye, then it’s better to first draw even stripes on the T-shirts. It won’t take much time, and the final result will be much better and more accurate.
An ordinary, simple pencil draws very poorly on knitwear; it is better to use a sharpened chalk or soap.
Look carefully at the photographs; they clearly show that some rugs consist of flat ribbons, while others consist of peculiar twisted “pasta.”
If the second option suits you better, you will need to wash the prepared strips. After washing, they will roll into tubes themselves, all that remains is to dry them.
How to choose “raw materials”?
How to cut old T-shirts into yarn?
- First of all, it is important to choose the appropriate raw material option. You will need a solid color, fairly soft in texture, but not too washed out and “flimsy” (which happens with knitted items that are stored in closets and closets for too long). In fact, the material must correspond to its original characteristics - stretch normally and not disintegrate into fibers at the first touch.
- For cutting, it is better to take that part of the product where there are no seams or unnecessary seals. Of course, T-shirts with voluminous embroidery and other embossed inserts are completely unsuitable in this case. Prints applied with paint will not interfere with your needlework, so you can safely take such things for a future creation.
- Before cutting, it is best to wash and iron the knitted product, but the latter is not necessary.
Crochet rug: diagram and description
Before crocheting a rug, you need to decide on its shape and choose the desired pattern. The thicker the material from which you will knit, the thicker the hook you will have to stock up on. Sometimes a tool with number 10 is used. Our grandmothers often asked their husbands to make such a hook from wood or cast it from metal at a factory (turned on a machine from a thin cylindrical blank), since it was impossible to get industrial samples of the indicated sizes. After all, it was not a thread that had to be hooked, but a ribbon made of fabric.