Then you will need:
- rubber hammer,
- metal carpenter's ruler 1 meter long.
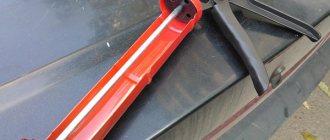
Any adhesive connection, and especially adhesive tape, has its own thickness, that is, there will always be a couple of millimeters between the mirror and the chipboard. This means we place the edge of the ruler there. In order not to scratch the mirror amalgam during work, the narrow edge of the ruler should be lightly sanded with fine sandpaper. This is necessary in order to remove burrs from the metal and sharpen it slightly.
Action 1 . With light blows of a rubber hammer on the other end of the ruler, we move it under the mirror, 10-15 centimeters. (If the edge is successfully separated, we deepen the ruler further at intervals of 10 cm).
Action 2 . Without lifting the ruler from the plane, holding the free edge, we make horizontal movements (as shown by arrow No. 2 in the photo), cutting off the silicone or tape. By the way, tape is much easier to cut than silicone, which once again confirms that tape is not reliable for attaching heavy mirrors.
Under no circumstances try to lift the free edge of the ruler high above the plane, this is tantamount to moving to a bend. The mirror may burst.
If it is not convenient for you to “twist” the ruler along the plane and you just want to lift the free edge and grab it more comfortably, then be sure to hold the ruler on the plane at the base of the mirror with your other hand.
So, gradually moving the ruler deeper, we cut off all the glue. There is no need to cut off only one side at once; it would be much more correct to cut off gradually, alternately from all sides.
Before applying the new mirror, do not forget to clean off the old silicone.
There is another way to remove a mirror without breaking it, this is the cutting method using nichrome wire, which is very often used by furniture makers. But it has several significant disadvantages:
- this process is much more labor-intensive, requiring the work of at least two people,
- it is very difficult to remove a mirror of a large area,
- In 100% of cases, nichrome thread leaves marks on the amalgam, hopelessly damaging the mirror.
And the best thing is to always think in advance, and not correct your mistakes later.
How to Remove a Mirror Glued to Liquid Nails
How to fix a mirror on the wall
Pull the cutting wire around the corner of the mirror. The fragments are used as a mirror. take off with this homemade saw
agglutinate
the mirror
from the wall without resorting to a hammer and chisel.
I remove mirrors from all surfaces taped with Y/G or Double Sided Tape . The method is quite simple, but labor-intensive. Carefully run the line for the mirror , we heat the glass with a hairdryer (evenly) and see how the strings are attached (w/h or adhesive tape). How to remove the steering column from a UAZ loaf
. Keep the line down. After a quarter of the volume, we attach the suction cup to the top (passed) part of the mirror. Many bathrooms have large mirrors that are simply attached directly to the wall without any frames.
how to fix a mirror on the wall
There are two main ways to remove a mirror, after which the mirror will remain intact for further use. You will be using wire between the mirror and the drywall, so you will need a longer length of wire than the diagonal size of the mirror.
This will minimize the number of fragments that will occur in the event of a mirror crack. Even if you want to use a mirror
this step is a necessary precaution. Begin by carefully running the wire between the mirror and the drywall at any corner, pressing it firmly against the wall. Slide the wire back and forth to compress it behind the mirror. How to remove the headlight unit on a Tuareg: how to remove the headlight unit on Tuareg.md. Once the wire is behind the mirror, pull it to the opposite corner. Using a back and forth sawing motion will prevent the wire from getting stuck behind the mirror.
Choosing a way to attach a mirror to the wall
This mirror removal method involves removing the entire piece of drywall that is glued to the mirror. Any adhesive seam, and even more adhesive tape, has its own thickness, that is, there is always a couple of millimeters between the mirror and the chipboard. To avoid scratching the mirror amalgam during operation, the narrow edge of the line should not be sanded with fine sandpaper.
In any case, do not try to lift the free edge of the ruler high above the plane, this is tantamount to turning. Mirror
may burst.
Be sure to clean off the old silicone before marking the new mirror. There is another way to remove a mirror
without disturbing it, this is the cutting method using nichrome wire, which is often used by furniture makers.
In 100% of cases, traces remain on the amalgam, hopelessly wandering around the mirror .
Glue and liquid nails
According to archaeologists, people have been using mirrors since the Stone Age, rubbing pieces of tin, gold or platinum to create a shine. But the prototype of a modern glass mirror appeared only in 1240, when people learned to blow glass bottles.
Disassembling the mirror
The science.
Disassembling a large mirror
flat mirrors only at the beginning of the sixteenth century in France. Removing the rear bumper on a Ford Focus 2. How to remove the trim. Modern glass mirror This is well known to everyone and is a sheet of polished glass, one side of which is coated with a thin layer of metal called amalgam.
Installation of mirrors
After all, everyone knows that it is forbidden to store gas in plastic containers, because after a few hours the container turns into a liquid mass. We take a thread (corrugated), a hair dryer and a suction cup. Make sure that the glass is not overheated and that the temperature is evenly distributed over the entire surface of the hob. The advantage of these mirrors is that they are cheap and easy to install, but there is a small risk of falling and breaking during use or cleaning.
Cover the front of the mirror with clear tape. This is the fastest and safest method if you are still planning to renovate the space and replace the drywall. Make sure you wear pants and long sleeves while working with fragile glass. as a take off mirror
, glued to silicone or
double-sided tape
.
Well, you never know for what reason or form it doesn't suit the client or whatever, it doesn't matter, but it's to take off
.
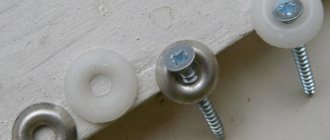
This is necessary to remove burrs from the metal and sharpen it a little. We recommend keeping old studs in the wall as they often become larger when removed.
Method 1 of 2: Remove the wall mirror with cutting wire
8. Laying cables in the wall. Laying cables under plaster. one of the most labor-intensive and dirty jobs. Often home craftsmen do this with a hammer and chisel. Insert small nails in a crisscross pattern into the wall near the cable, then cover the channel with plaster. After the plaster has dried, remove the nails and cover the holes with plaster. 15. Good knot. Even if this advice seems ridiculous, it will go well.
16. How to remove and clean the scooter carburetor; on my quadrangle as you cf 500 started digging. Choosing a Paint Roller Long-nap rollers are especially good for liquid paints. 18. Checking the Basics If the old paint on the wall stains your hand as shown in the photo, one thing is clear: there is no wallpaper or new paint. Such coated old paint should be washed thoroughly with water. After drying, the wall is covered with a layer of primer and only then paint.
20. Ease of operation. For easy painting of high walls and ceilings, use the telescopic rod up to 3 m long. The paint roller is simply attached to the telescopic rod. How to disassemble the side mirror for octave excursion? How to disassemble GTZ Skoda Felicia? Then apply the next strip of paint (until the paint is dry) and spread again. Paint the walls completely without making any breaks.
26. Battery Protection Although special paint rollers are ideal for the distance between the wall and the battery, they can significantly contaminate the battery with paint. 35. Room temperature. When painting, as well as when gluing wallpaper, the room should be at normal temperature. 37. Bonding in the direction of light. Ceilings are always wallpapered in the direction of the light. Thus, the joints of the wallpaper become invisible and do not create a partial shadow.
43. Trimming wallpaper Often the wallpaper extends several centimeters longer than the wall, and therefore a projection is formed. 45. With a battery To glue the wall behind the battery, cut the wallpaper in the form of a comb: leave the top part intact and divide the bottom into strips. 46. Accurate calculation. The distance between the battery holders is measured, the roll is cut according to the measurements and cuts are made. In this case, the wallpaper for this case will be glued to the battery mounts.
However, removing a glued mirror can be challenging. Remove the entire drywall panel from the wall. Once you have trimmed the entire perimeter around the mirror, take that piece of drywall with the mirror attached to the wall and set it aside. Therefore, when attaching a mirror to the wall, you must act very carefully so as not to accidentally damage the thin mirror coating and the glass itself.
Methods for attaching mirrors to the wall
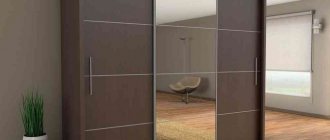
So, you bought a mirror, but don’t know how to hang it on the wall? Follow our recommendations carefully and you can hang a mirror yourself without breaking the bank. Frameless mirrors are very popular now, and we will deal with this case first.
For all types of installation, prepare the following tools:
First of all, it is important for us that the mirror hangs evenly. To do this we will use a level. The level may be large, or it may be small. By the way, modern technologies make it possible to use even a virtual building level for leveling. To do this, download the appropriate application from PlayMarket or AppStore.
Also, it will be more convenient to install with a suction cup handle for glass. With its help, you can carry the mirror without fear of breaking the canvas. In addition, in all methods except gluing, you will need a screwdriver with a drill of the required thickness for your base.
Mirror glue
The advantage of the gluing method is that you do not need to drill holes in the wall. The adhesive composition will perfectly hold the mirror even on surfaces such as tiles and laminated MDF. At the same time, keep in mind that the wall on which the product will be located must be level. In addition, ordinary superglue or sealant will not be suitable for these purposes, since it contains substances that corrode the reflective layer of the mirror.
If you are gluing a mirror to a wooden surface, it is better to use a combination of glue and several strips of double-sided tape.
Step-by-step algorithm of actions:
- From the section of the wall on which the mirror will hang, it is necessary to remove decorative finishing - wallpaper, paint or plaster. Cover the wall with primer, dry and degrease.
- Also degrease the back surface of the mirror. Apply glue according to the diagram in the illustration above. For stronger adhesion, apply glue to the placement site as well.
- Together with an assistant, quickly and carefully lift the mirror and install it in its place.
- Secure it from the outside with masking tape. After 3 days, the mirror will be completely dry and the insurance can be removed.
Mirror holders
Installation on holders is good because the mirror can be removed and moved to another place at any time. In addition, the holders are best suited for mounting on uneven walls.
In this method, holders are first mounted into the wall, and then the canvas itself is inserted into them. It is more convenient to start installation from the lower holders, because they are the very base that will hold the mirror.
Step-by-step algorithm of actions:
- Place the mirror against the wall. Level it using a level and use a pencil to mark 4 points into which the fasteners will be screwed. Typically, two holders are used at the bottom and two on the sides of the mirror.
- Using a drill, drill the required holes in the wall.
- Insert the screws into the special holes on the fasteners. Attach the holders to the wall using a screwdriver.
- Together with an assistant, carefully lift the mirror and install it in its place. Cover the fastening area with decorative covers. Ready!
Dowel mounting
This method is intended for mirrors on which 4 holes have already been made by a master glazier, and is considered the most reliable of all. If there are small children in the house, it is better to choose this one.
I would like to point out right away that it is absolutely forbidden to drill holes on the mirror surface yourself! Your mirror will simply crack, so it's best to take it to a glass shop to create the holes.
Step-by-step algorithm of actions:
- Place the mirror against the wall. Level it using a level and mark 4 points on the wall with a marker into which the screws will be screwed.
- Leave the mirror, drill the necessary holes in the wall with the depth of the dowel. If the wall is made of brick, plasterboard or wood, a regular drill can handle this, but if it is made of reinforced concrete, you will need a hammer drill.
- Insert plastic bushings into the holes so that they do not protrude beyond the plane of the wall.
- Together with an assistant, carefully lift the mirror and screw the screws into the created base. The important role of the assistant is to hold the mirror while you screw in the screws. Put on the decorative caps and you're done!
Plates for mirrors
One of the reliable methods for concealed mounting of mirrors is metal plates. They are made of galvanized metal, so they are not subject to corrosion and are suitable for use in the bathroom. But one plate can only support a weight of up to 6 kg, so this installation method is not suitable for large, heavy products.
Anchor hooks are screwed onto the wall, and plate holders are glued to the back of the mirror. Attention! For this purpose, special glue for mirrors is used so as not to damage the amalgam. To prevent the mirror from breaking into small pieces in case of injury, it is recommended to stick a protective film on the back side of the amalgam.
Step-by-step algorithm of actions:
- Degrease the back surface of the mirror and the glued side of the plate. Connect them with glue and leave for a day.
- Place the mirror against the wall. Level it using a level and make pencil marks in accordance with the location of the glued plates.
- Screw the anchor bolts into the wall with a drill and hang the prepared structure on them. Ready!
Mirror fittings
Clamps, strips, staples, brackets, profiles - there are a lot of types of accessories for fastening mirrors, you can choose the one that suits you best in design and style. It is advisable that the staples are 5-7 cm from the edges of the mirror.
The profile method involves attaching a metal strip to the wall into which a mirror is inserted. So it is fixed at the bottom, and at the top there is usually a hook or the canvas is glued to liquid nails.
The hardware method involves creating four holes in the wall. First, self-tapping screws are screwed into the holes created in the wall, and then the mirror sheet is carefully inserted into the grooves of the fasteners.
Mirror in frame
Hanging a framed mirror on the wall is an easier task than the previous ones. Most often, these mirrors already have D-rings or hooks. You will only need to provide a mate - two or more hooks. The number and power of fastenings are selected according to the weight of the product, as well as the supporting wall. For example, for plasterboard walls it is better to use so-called “butterfly dowels”.
Rope suspension
In some interior designs, such as loft, Provence or country, this installation method would be appropriate for round mirrors. A cord or rope brings a special zest to the interior of a room, and it’s not difficult to create this original frame yourself.
Features of cleaning marks depending on the type of surface
Before you begin to deal with tape residues, you should consider which method will be not only more effective, but also the safest and most gentle. It can be different for each type of surface.
Glass, mirror
Any removal method will do, except using abrasives or metal brushes , since it is not difficult to scratch the glass surface:
The heating is allowed to be low, so a hair dryer will not work here. Otherwise, the glass product will simply crack.- You can use oil, alcohol, solvents or glass cleaners.
- Baking soda, which is a weak abrasive, and a school eraser will not leave visible marks on the glass or mirror.
- Paper tape can be soaked in hot water in advance to remove the top paper layer.
You can learn more about ways to remove tape residue from glass here.
Plastic
It is even easier to damage than glass, so no brushes or scrapers . Products made from polymers should also not be heated - some types of plastic may lose their shape and warp at elevated temperatures.
Find out more about removing tape marks from plastic surfaces here.
Tree
When transporting furniture, adhesive tape is used quite often. After all, it is so convenient to fix doors that are trying to open. But then the torment comes. It seems that the tape is firmly stuck to the smooth surface.
How to remove from a wooden surface:
Both polished and unvarnished wood is quite capricious. The heating method will not work here.
The varnish will crack when exposed to high temperatures. In this case, there is no need to use active chemical reagents and solvents.
Read more about how to clean tape and its residues from furniture in this article.
Laminate
Even a coating with a high wear resistance class can be damaged by an overly sharp blade. Scratching a regular laminated panel with a knife is even easier. Therefore, no knives .
Treating the surface with a solvent to avoid removing the polymer coating is also prohibited.
Since laminate does not tolerate large amounts of water, this is done with a slightly damp cloth,
Painted or wallpapered walls
Removing tape from such a surface is most problematic. It will be removed along with paper, acrylic or water-based emulsion. It is especially difficult to remove it from non-uniform, uneven surfaces.
First, the glue is softened with an iron: it should be warm, but not hot . Iron the problem area through gauze or a thin napkin. The softened tape will come off easily.
How to peel off a mirror - step by step instructions
First of all, it is necessary to dismantle the supporting structure. The door must be in a horizontal plane to prevent deformation as a result of mechanical stress. Don’t forget that you also need to completely remove the mirror fixing elements. These can be decorative inserts that are fixed on the inside of the door.
The mirror can be attached to the main surface using “liquid nails” or glue, double-sided tape or suction cups, staples and screws.
The next step is to glue the tape along the entire plane of the element to be separated with a slight overlap on the previous strips. This is necessary to ensure that the damaged areas do not harm others.
Before removing the mirror, you need to remove the element on which it is located (cabinet door or frame).
It is important to know! It is necessary to paste over the mirror after heating the element with a hairdryer. Otherwise, the tape or film will lose its size, as well as the quality of its fixation. Moreover, the adhesive base of the tape releases caustic substances when heated.
Mirror separation by points
Attaching an element is much easier than removing it. After heating and pasting, the glue applied on the back surface of the product retains its plasticity for at least 10 minutes. During this time, you will need to separate its layer by using a metal ruler.
It is easier and more convenient to carry out the dismantling procedure in a horizontal plane.
First of all, work is carried out in the corners, but to a depth of no more than 15 cm from each point. Uniform destruction of the adhesive layer guarantees the release of the stress acquired by the mirror as the glue hardens.
Worth knowing! It is not recommended to use a “nail” for such purposes. Its thickness significantly reduces the chances of safe dismantling and the product maintaining its appearance. The same applies to kitchen knives.
Warm-up duplication
After completing the work with the corners, you can proceed to the central part. Heating with a hairdryer is carried out in the same way for several minutes. There is no need to wait for the smell of glue to form. This is a consequence of overheating, which will also inevitably damage the monochrome coating of the mirror and increase its haze.
If the mirror you are removing is already damaged, then it is better to avoid dismantling it yourself and entrust it to professionals.
It is important to know! The optimal distance for working with a hairdryer is at least 12-14 cm when working with doors made of pressed wood materials, with external PVC film covering. 7-10 cm for cabinets made of solid wood. An additional recommendation is to isolate previous sections where work has already been completed.
Once heating is complete, the central part is further protected with tape. Double-sided tape will do the best job for this purpose. Its use allows you to additionally attach a lifting plane that provides uniform tearing force without mechanical damage. Such remembering elements can be wooden trowels for plaster or suction cups for glass from any accessories.
If brute physical force is used, the mirror is unlikely to be suitable for further use, so you must act extremely carefully during dismantling.
The average mechanical force that household glue can withstand does not exceed 20 J. Therefore, for the last stage of work you will not need to use any tools.
In this simple way, you can figure out how to peel off a mirror from a cabinet without damaging it, while maintaining the possibility of subsequent use.
What is the best way to disconnect?
- The first method is suitable for cabinets from which the door can be removed. Do not remove the mirror when it is in a vertical position, as you may break it and injure yourself.
- For the second method, you will need wire, and it works like this: with movements to the left and right, you need to cut off both the layer of liquid nails and other adhesive mass that attaches your mirror to the cabinet. This option is very convenient and the safest: nothing will burst or crack if you do not overdo it with sharp movements.
- The third method is intended for a wardrobe, when working with which it is especially recommended to be more careful and adjust the level of brute force if the mirror is not to be damaged.
Is it possible to peel off an extra decorative element yourself?
The answer is clear: yes.
But for beginners, the process is quite labor-intensive and requires high concentration and careful attention, so it is better to arrange for yourself an environment in which nothing can distract you. If you follow all the rules, follow safety precautions and follow the recommendations, you can remove the mirror at home in half an hour or less , but in cases of difficulties or complex fasteners, it is better to contact specialists with experience in such work with this issue.
How to remove?
Before you begin removing double-sided tape, you must carefully read the instructions and removal tips, because any careless movement can ruin the surface on which traces of the tape are located.
There are dozens, maybe hundreds of methods for removing adhesive marks, but the most effective ones are revealed below. Let's look at each of them in more detail.
Stationery knife
The method is simple, but it is permissible to use it if the likelihood of scratching the surface is minimal .
Proceed with caution. The paper or film base is pryed off with a blade. The loose edge of the tape can be easily torn off by hand.
If it was not possible to remove all the adhesive tape at once, and pieces remain, you need to lift the edge of the adhesive tape again with the tip of a knife, and so on until it is completely removed.
Rubber (caoutchouc) disc
A soft attachment for a drill or screwdriver will help you cut off adhesive tape from a large area . The rubber disc will remove the top sticky layer without leaving scratches on the surface.
The tool must be set to minimum speed. Plastic rubber will not harm even the paintwork.
Glue heated to 80-100°C is removed faster. You can use either a hair dryer or a hair dryer to dry your hair. They can be replaced with an iron set to the minimum temperature.
The advantage of this method is the absence of scratches even on paper . The most tightly attached tape can be removed without difficulty.
But there is no need to heat non-heat-resistant objects to high temperatures, especially with a powerful hair dryer - they will immediately deform. It is better to expose them to the sun for a short time or keep them under steam - the glue will noticeably soften.
Oil
The glue will easily slide off if you lubricate the area of contamination with vegetable or essential (for example, eucalyptus) oil . They contain organic unsaturated acids that can dilute polymers:
Wipe the sticky surface with a sponge and leave for several hours.- You can lay a rag soaked in oil on a horizontal tabletop or bedside table for about 20 minutes.
- If the stain is stubborn, it is best to leave the greased stain on overnight. In the morning the stain will come off without effort.
- All that remains is to wash off the oil. Easy to clean surfaces (glass, polished furniture, plastic) do not absorb grease, so there will be no problems.
This method is not acceptable for paper wallpaper.
Eraser
If you rub the remaining glue with a regular eraser, it will form pellets and come off easily . Just rub it with a cloth.
Gasoline, acetone, white spirit
The main advantage of the method is the ease and speed of removal:
Special cases
Sometimes a glue blot appears on the ceiling, for example, when gluing PVC panels. In this situation, it is worth spending money on a special remover, because you need to work on the ceiling carefully and for sure, otherwise the trace of the stain will immediately catch your eye. Moisten a piece of fabric with a solvent, glue it to the site of contamination, leave it for an hour, then clean it and wipe off any remaining glue.
When cleaning silicate or organic glass from liquid nails, they work extremely carefully: the slightest scratch will ruin the appearance of the product. Do not use abrasive products or too aggressive removers: it is better to try rubbing with acetone using a soft sponge. After removing the stain, the surface is washed with mild SMS, non-abrasive detergents and wiped dry so that it looks like new.
Expert advice on choosing a replacement method
The method of attaching the mirror sheet to the cabinet depends on the following conditions:
- The size of the mirror itself: if it is large and heavy, it is better to choose mechanical fasteners for mounting. They are able to withstand a lot of weight. For small mirrors, glue, tape or liquid nails are suitable.
- The room where the cabinet is located: if the room is constantly humid or hot, for example, in the bathroom or kitchen, it is better to take a moisture-resistant or heat-resistant adhesive composition.
- Availability of tools: it is hardly worth buying a screwdriver just to attach the mirror to the fasteners. You can choose a simpler option - glue the element with glue or liquid nails.
- The skill of a person planning to work independently: if you have experience working with glue, it is better to use a proven product than to try to twist screws without the skills to work with a screwdriver.
The procedure for gluing a mirror to a cabinet door is quite simple. It is easy to handle even for a person without experience. This requires a minimum of tools and materials, which can be purchased at any hardware store.
Safety rules at work
- The first and most important rule is to cover your body with clothing so that if something happens, the fragments do not cut your skin.
- The second rule is to work in an open place, preferably on the street. If this is not possible, it is necessary to thoroughly clean the room in which all work will be carried out, and to prevent any residue in the form of small fragments on the floor.
- The third rule is not to allow children to approach the tools or touch the door with the mirror, as the child may accidentally push it off or cut himself.
- The fourth rule is to regularly check your hands for small fragments and stop working if you notice that fragments have gotten into them.
- The fifth rule is that it is advisable to work in protective glasses so as not to injure yourself.
Removing mirrors at home is an activity that requires patience and the ability to take your time, as well as increased safety in working conditions. If you are not sure that you have sufficient skills for dismantling, and you do not know whether you can do it yourself, it is better not to tempt fate and call a specialist, paying, but saving your nerves and health.
Features of dismantling. Mirror replacement
Depending on the type of surface, these decorative elements are fastened using “liquid nails”, suction cups, glue, double-sided tape, staples and screws. Some of these fasteners do not cause problems during dismantling, since the screws can be unscrewed, the suction cups can be peeled off, and the brackets can be bent.
It is much more difficult when it is “tightly” fixed to the surface using special glue or “liquid nails”. Therefore, in order to safely remove and replace a glued mirror from a cabinet door, you should adhere to the following rules:
Important! Due to the use of brute force, the mirror, unfortunately, after dismantling most often becomes unsuitable for further use.
- To prevent fragments from scattering around the area during impacts, you should use tape.
- Another option is to use solvents such as acetone, gasoline or white spirit.
Important! If you still have packaging from glue or “liquid nails,” you can, with the help of a composition specialist, select a solvent that will be most effective.
- If the mirror is damaged, you should not dismantle it yourself, as it is unsafe. In this case, it is better to entrust the matter to specialists.
Where should I start?
In order to carefully remove material glued using the “liquid nails” composition, it is important to take care of safety in advance. If it is glass or mirror it is recommended:
Ethyl or ammonia
It is recommended to apply ethyl alcohol to a cotton-gauze swab or cotton pad. Then you need to scrub the area until all the dirt is gone. An important condition in this case is the timely replacement of dirty swabs with clean ones, since the speed of the cleaning process depends on this. Ethyl alcohol affects the adhesive tape base at the molecular level, destroying its structure.
In addition to ethyl alcohol, you can also use ammonia. It acts similarly to ethyl alcohol. The difference is a sharp, unique smell that dissipates fairly quickly.
According to experts, fresh marks left after removing double-sided tape are easier to remove than old stains. The older the stain, the more it is absorbed into the underlying material, and accordingly, the more difficult it will be to remove it without leaving a residue. In addition, adhering dust and other small particles significantly complicate the cleaning process and restoring the original condition of the affected area.
For old marks, heating procedures are well suited if the characteristics of the material on which the tape was fixed allow this.
How to remove a mirror glued with silicone or double-sided tape. Well, you never know, for whatever reasons, whether the form didn’t suit the client, or something else, it doesn’t matter, but it needs to be removed...
Then you will need:
- rubber hammer,
- metal carpenter's ruler 1 meter long.
Any adhesive connection, and especially adhesive tape, has its own thickness, that is, there will always be a couple of millimeters between the mirror and the chipboard.
Tips on how to easily and safely remove a mirror from a cabinet door
Of course, if you adhere to the rules and instructions described above, then the whole process will go through without any difficulties. However, you should also consider tips that will certainly make this work easier.
- When cutting drywall, it is advisable to make the edges even. This will make your future work much easier when you restore the surface or make repairs.
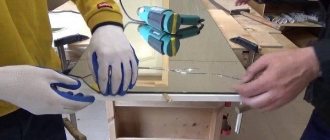
- When you cut through the glue, you should hold the mirror. You can even call another person to help you perform this function.
- To eliminate residues that are located at the site of the removed product, it is recommended to use a solvent. He will do an excellent job with this task. It is better to use this method in cases where further interaction with the element is planned.
- Remember that during the dismantling process all actions must be smooth and proceed carefully. Sudden movement is prohibited.
- When using the ruler, it is not recommended to raise it high, otherwise the mirror may break.
Now removing the mirror from the cabinet door will not be difficult for you.
Removing traces of mechanical damage
If the question of how to remove a mirror from a cabinet door does not cause any difficulties, and you already have a finished result with some visual defects, it is worth reading the following information.
If the procedure is carried out independently, then you need to act taking into account some safety rules.
Scratches, chips and other acquired defects on cabinet doors can be disguised by tinting them. This option is the simplest and does not have any particular aesthetic impact. Suitable for cabinets used in non-traffic rooms or pantries.
The optimal solution is to re-decorate using PVC adhesive sheets.
They are also heated with a hairdryer, followed by smoothing them flat.