Today, liquid nails are used in many areas of everyday life - from minor repairs to construction. Learning to use a liquid nail gun is not difficult, but the variety of designs of such mechanisms can be confusing for a beginner. At the same time, the algorithm for use is the same for all models: insert the cylinder, ensure the supply of glue, press the trigger. Let's look at the principle of operation of the gun, and also get acquainted with the advice of professional installers on the correct use of liquid nails.
Description of the device operation process
First you need to figure out how to properly place the container with “liquid nails”.
It is unacceptable that the seal of the package is broken if installed incorrectly, otherwise the glue will dry out and it will hardly be possible to use it. Before using the gun, you need to prepare the following things:
- a bottle of “liquid nails”;
- sharpened knife;
- glasses and gloves for protection;
- a breathing mask if you plan to use an adhesive mixture prepared yourself;
- a dry rag to remove excess adhesive;
- a solvent, due to the fact that the glue may accidentally get on the skin or some surface.
The principle of operation of the tool is quite simple - after pressure is applied to the cylinder mechanically, the adhesive substance “comes out” of the cylinder. The pressure is provided by a rod, which is activated by acting on the trigger lever. In pneumatic mounting units, pressure is supplied by air. Difficulties arise when you need to choose the appropriate glue. As a rule, manufacturers use the same standards, that is, glue can be selected for any gun.
If you use a skeleton or semi-open pistol, removing blockages occurs quite quickly. First, check to see if the container with “liquid nails” has a special restrictive bottom. If it is there, delete it.
Next, pull the rod out of the device; to do this, mechanically act on the lever and remove the rod. Instead, install the tube and press the release lever 2-3 times with little force to strengthen the balloon.
Poke a hole in the container, glue will flow through it to the tip.
If you decide to use a tubular tool, it is charged differently. First you need to make a hole in a container with “liquid nails”. The container with the adhesive must be fixed so that the cut end of the container is directed towards the tip from where the glue will “come out”. Before installing the cartridge into the tool, you must remove the rod.
As a rule, the kit comes with several nozzles with tips; use one of them to tighten the cylinder. If there is no hole on the tip, then you need to cut off a very small part with a knife at an angle of 45 degrees. Then gently press the trigger lever and move the glue along the pre-applied markings. If you use a skeletal or semi-open instrument, then in order to fill the void in the cap, you must first press the trigger lever several times, and then perform the actions smoothly.
In electric and battery-powered mechanisms, pressing the release lever controls the rate of release of the adhesive substance, so if you have never used such a complex unit before, it is better to start with inconspicuous places.
Before the gluing procedure, the surfaces must be cleaned and degreased. Then apply “liquid nails” in a thin layer or in dots. If the surfaces to be glued have a large area, for example, ceramic tiles, then it is necessary to apply the adhesive on them in the form of a snake or mesh. Afterwards, the surfaces to be glued need to be pressed against each other; if necessary, they should be fixed with special structures. Flat parts can be placed under the press. Some types of glue set within 1-2 minutes.
As a rule, complete gluing of surfaces occurs after 12 hours, sometimes after a day.
Applying glue with a gun: tips and tricks
Before squeezing the substance onto the materials to be glued, it is recommended to understand how to do this correctly. If you plan to glue large and heavy parts, such as ceramic tiles or gypsum structures, then it is better to apply the glue continuously in the form of a snake or mesh. This will increase the gluing area and also ensure the reliability of the connection.
The setting speed of liquid nails is from 1 to 2 minutes, which depends on the materials being glued. After applying the substance, you need to press them tightly together and hold for at least 1 minute, and preferably 2 minutes, which will be more reliable. If possible, a press can be used, especially when joining wooden structures.
This is interesting!
The more substance is applied to the connecting materials, the longer it takes for them to harden.
Sequence of gluing parts
To release the glue from the tube, you need to press the gun handle with frequent hand movements.
The threaded head of the tube is cut off with a sharp knife or the membrane is pierced with a sharp object. A conical tip is screwed onto the head and the cap is removed from it. The edge of the tip is cut at an angle of 45°, and the cap is put on again. The glue cartridge is ready for use.
Before inserting the cartridge into the gun, the operating rod must be relaxed. The tube is inserted into the device; by pressing the trigger, the rod is clamped until it stops. The cap is removed. By frequently pressing the handle, the glue is applied to the surface in an even strip or dotted fragments. To glue large surfaces, a mesh or snake is applied.
The surfaces to be glued are pressed and, if necessary, fixed with additional devices. Individual flat parts can be pressed down with a press. Some types of glue set within 1-2 minutes.
The total bonding time of the parts is usually 12-24 hours.
The area of surfaces prepared for gluing should be taken into account. Do not completely cover large surfaces to be glued with glue and do not apply excess glue. This will increase the setting time of the composition. To glue decorative parts, the cut is made with the smallest distance from the end of the cone.
Excess glue that appears is wiped off with a rag soaked in solvent. Glue stains remaining on wood parts can be washed off with a special cleaner. The glued structure can be used no earlier than after 24 hours.
Gluing process with and without a gun
The material can be applied in two ways: dotted, solid line. If the structure is massive or the area will be subject to increased loads, as well as if the bonded surfaces are used in conditions of high humidity, it is recommended to choose the second fastening method. In other situations, you can get by with spot application. This method involves reducing the consumption of adhesive material.
Half body liquid nail gun
Tip: After applying liquid nails, wait 5-7 minutes. and only after that forcefully press the surfaces to be glued together. More detailed information can be found in the instructions for the adhesive composition.
There are several ways to attach surfaces. Each of them uses a different gun for applying liquid nails:
- Mechanical - involves the need to squeeze out the adhesive by pressing the release lever on your own.
- Pneumatic. In this case, the rod moves under the influence of an air flow created manually (by releasing the handle).
- Rechargeable. In this case, the process is fully automated, since a battery/rechargeable tool is used.
When the edge of the tip is cut off, you can start working. Considering that the mechanical method requires constant pressing on the lever, you need to constantly press on it. In this case, the glue will come out in doses. If you press the lever often, you will get a solid line. With rare pressure, it becomes possible to attach surfaces using a point method. If you need to glue large parts, liquid nails are applied in the form of a mesh/snake.
Using liquid nails to attach wall panels
Some types of adhesives set very quickly (in 1-2 minutes). If there is such a need, use a press on the area to be glued. In order for the parts to be firmly connected, it usually takes 12-24 hours for the liquid nails to dry completely. If the glue has come out in some places, use a rag soaked in solvent for cleaning.
Note: There is no need to apply the adhesive in excess, since in this case the strength level will be the same, but the drying time of the material will increase.
Using liquid nails without special tools
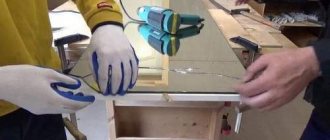
In this case, you need to put in a lot more effort. When solving the problem of how to use liquid nails without a gun, you should choose a wooden tool or wooden object that fits the size of the bottom of the tube. The fact is that the bottom of the container with the adhesive composition can become skewed if you use a tool of the wrong size, and then the composition will “go” in the opposite direction from the tip. To avoid this, take a piece wide enough so that it covers the bottom of the tube. This device is used to provide the pressure necessary for the release of liquid nails.
Regulating the process is much more difficult, especially if there is no physical training. In addition, the result can be very disappointing, since the material will appear unevenly and crookedly. The consumption of liquid nails in this case also increases. All these factors affect the quality of surface adhesion. As a result, the likelihood increases that the parts being glued will have to be cleaned of the adhesive composition, as the excess will be squeezed out. As a result, the appearance of the area where fastening work is being carried out deteriorates. However, if you already have experience in such work (without special tools), you can apply the glue in an even strip. The quality of the connection will remain high.
How to clean the surface
The procedure for removing excess or residues of liquid gas has several solutions and depends on the time of application and the material on the surface of which it is applied. Let's list the main ones:
- Fresh residues can be removed with a sponge and warm water (or mineral solvent);
- Dried adhesive can be removed with a special cleaner. It is sold in hardware stores;
- If cleaner is not available, a scraper or blade can be used, although this is not suitable for all surfaces;
- Another option for dried glue is increasing the temperature. Since liquid gas generators are operated at a temperature (as a rule) of no more than 50°C, then when heated to 55-65°C, the composition goes into a semi-liquid state and is removed with a scraper;
- An exotic option for old glue is exposure to direct sunlight. Again, we use the “weak points” indicated in the instructions. Staying under the rays softens the liquid gas, subsequently mechanical cleansing with washing is carried out (see the first option).
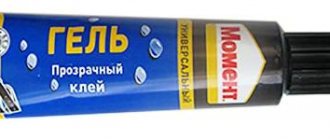
In general, liquid nails are an effective “lifesaver” for small household repairs. The photo above shows my personal choice. This glue from the company Macroflex has proven itself amazingly in many repair work, especially since it has a very affordable price. Don't take this as an advertisement, take my word for it, I know what I'm saying. I will end here. I hope it was informative... Subscribe to the blog, introduce friends and comment on articles. Hearing an outsider's opinion is always useful...
An anecdote on the topic: Few people know that in the Moment glue production workshop there is always a rosy and positive atmosphere.
Good luck to you in your family affairs and, of course, in construction! Bye!
Wisdom Quote: If all men thought alike, no one would gamble at the races (Mark Twain).
https://youtube.com/watch?v=3GI61aTm67Y
Product Features and Applications
Liquid nails are a construction and installation adhesive based on polymers and synthetic rubbers, which allows you to fasten materials of different structures, providing a high degree of adhesion (adhesion) of surfaces. The product is produced under several brands. The composition and properties of specific products may vary. In any case, manufacturers claim that the glue can withstand loads of up to 90 kg/cm². The product is sold in cartridge tubes with a volume of 0.3 liters or more.
The basic composition of liquid nails includes synthetic rubber, polymers and fine filler. It is the presence of the last component that distinguishes this glue from the rest. It allows you to firmly connect surfaces that do not fit tightly.
In the classic version of Liquid Nails, Texas clay, which has increased plasticity, is used as a fine-grained filler. Many manufacturers replace it with chalk (calcium carbonate), but its adhesive properties are worse.
An important point that you should pay attention to when choosing glue is the absence of toluene and acetone in the composition. The first component improves the adhesion characteristics of the product, and the second accelerates drying
But they are toxins for humans. A sign of their presence is a sharp, suffocating smell.
The main areas of use of liquid nails are fixation of various materials:
- ceramic tiles;
- cork panels;
- plastic;
- drywall;
- wood;
- aluminum, teflon;
- glass, mirrors;
- ceramics;
- chipboard, OSB, fiberboard;
- polyethylene;
- polystyrene foam;
- concrete, gas and foam blocks, bricks;
- heavy wallpaper on a natural basis and so on.
In addition, the adhesive can be used to seal seams and cracks in bathrooms, window and door openings, walls, furniture and so on. But its effectiveness compared to special sealants is questionable.
Considering the relatively high cost of liquid nails, it is not advisable to use them for connecting large structures. For example, you should not use it to tile the entire bathroom. But gluing individual parts is quite reasonable.
Nuances of choice
Construction stores often carry many brands. but give preference to the one that has the best “specialty” for the work you are going to do.
- For ceramics, acrylic gels are good. There are brands with increased resistance to humidity (which can be used in bathrooms) and low vibrations;
- Skirting boards, moldings, etc. It is better to glue with quickly hardening compounds;
- For heavy elements, choose high-strength LG;
For example, the well-known “Moment” has ten varieties, allowing you to more accurately select the desired option. Including: for polystyrene, wood, mirrors, concrete, cork, stone. There are especially strong (usually more expensive) compositions designed for the installation of heavy structures.
How to open liquid nails
Let's start with how to properly open a container with an adhesive composition. The formulations can be sold in aluminum cylinders that resemble cream or toothpaste, ranging from 300 to 900 ml. The mounting component is also squeezed out of such packaging manually.
There is a variety of packaging in special tubes made of thick cardboard or plastic. This type of packaging comes with a dispenser cone.
To use the adhesive:
- If the tube with liquid nails is made of cardboard, a cone is already attached to its top. In this case, you only need to cut off its edge at an angle of 45⁰. The farther from the edge the cut is, the wider the glue line will be.
- If the tube is made of plastic, first make a hole in the top of it. Then put on, secure the dispenser cone and cut off its top, as in the previous point.
What is it used for?
Recommended uses include a variety of products including wood, silicate glass, ceramics, organic glass, aluminum alloys, natural cork, plasterboard, foam polymers, siding, wood fiber boards or shavings.
High-strength adhesives can be used to secure sinks and other plumbing fixtures, window and door frames, baseboards, countertops and mirrors. Sometimes craftsmen use liquid nails instead of sealants; they are used to insulate seams, fill microcavities, cracks in walls, ventilation ducts, and corner joints of design structures.
Rating of the best quality water-based formulations
Water-based liquid nails (acrylic) are environmentally friendly materials that are used for finishing or construction work. They can be actively used when carrying out repair and construction work indoors, without fear of harming your health. These mixtures are excellent for adhesion of those materials with which people often come into contact in everyday life.
Water-based compositions are excellent for renovation work in children's bedrooms. They can also be used to firmly fasten furniture elements that need repair. They practically do not emit any odor. However, their strength indicators are slightly lower than those of similar solvent-based products. It is recommended to use water-based adhesive mixtures to adhere to those materials that will not be subject to heavy loads. It can be plastic, PVC or another surface. Which will not dissolve or be damaged by contact with the glue.
Construction adhesive Moment Montazhny Superstrong Plus MV – 100 (400 g)
Excellent as an adhesive mixture for adhesion of surfaces made of plastic, wood and other materials. Also, thanks to its characteristics and instant adhesion functions, it can be used to glue metal surfaces, tiles, polystyrene foam, drywall, MDF, polystyrene foam, chipboard.
When using this assembly adhesive, there is no strong odor, and all fumes generated do not harm humans. This product contains no solvents. It is made exclusively on a water basis.
Construction adhesive Moment Montazhny Superstrong Plus MV – 100 (400 g)
Advantages:
- Suitable for coupling different types of surfaces;
- The gripping force is 100 kg per 1 square meter;
- Long time to adjust the adhesion surface (15 minutes);
- Reasonable price (average price is 215 rubles);
- It is waterproof and also frost-resistant.
Flaws:
- It will take a long time for final drying (48 hours);
- Setting time is more than 5 minutes (15 minutes).
Mounting adhesive Master Teks acrylic Superstrong
It is an ideal, inexpensive, and best option, according to buyers, if it is necessary to glue various decorative elements, skirting boards or panels when carrying out interior work in a room. Can be used both in living rooms and children's bedrooms. It is an environmentally friendly material. Excellent for adhesion of surfaces made of wood, concrete, chipboard, polystyrene foam, MDF panels, plasterboard. The weight of one package is 200 grams, and the cost is 185 rubles.
Mounting adhesive Master Teks acrylic Superstrong
Advantages:
- Environmentally safe for humans;
- Reasonable cost;
- The structure is white, suitable for gluing laminate, parquet, as well as glass and ceramics.
- Resistant to moisture.
Flaws:
- Low level of initial grip strength (55 kg per 1 square meter);
- Sensitive to low temperatures (recommended for use at temperatures of at least +10 degrees Celsius).
Construction adhesive Ceresit CB 100
Excellent for adhesion of floor skirting boards made of wood or PVC. Can also be used for gluing cornices, borders, stucco decoration, ceiling plinths, rosettes. It is used during installation work, thermal insulation, and decorative boards indoors. During operation, avoid contact with water. The composition of the adhesive mixture is water-based. It is an environmentally friendly product. The weight of one package is 400 grams, the cost is 180 rubles.
Construction adhesive Ceresit CB 100
Advantages:
- The initial grip force is 100 kg per 1 square meter;
- Resistant to low temperatures (up to – 20 degrees Celsius);
- Acceptable price;
- Setting time is 10 minutes.
Flaws:
- Does not tolerate exposure to water;
- Full setting time is 2 days;
- Intended for interior use only.
The best brands of glue - selecting the composition for certain materials
Of course, useful tips for using the adhesive can be read on its packaging. But what if you come to the store and you need to choose an adhesive that is optimal for a specific material. Not all sellers are competent in such matters. Therefore, it is worth considering the highest quality compounds that have proven themselves in certain cases.
Most popular composition
One of the most popular compositions among buyers is Extra-Strength Moment Installation produced by Henkel. This is a good glue that is suitable for fixing heavy types of facing materials: natural stone, wood, metal siding. But if you use materials such as polystyrene for your work, then this glue will not suit you. In such situations, it is worth buying the Superstrong Moment Installation composition, made on a water basis. Do not forget that liquid nails of this type are not suitable for Teflon and polyethylene.
For work inside the house, composition LN601 from the manufacturer Macco is unrivaled. This neoprene backed adhesive is great for many construction and renovation jobs. It glues plywood, natural wood, chipboard, metal and plastic moldings equally well. However, this composition will not be able to cope with the installation of ceramic tiles and mirrors. Because of this, there is no point in buying it for bathroom renovation.
Another glue that will become a reliable assistant in repairs and construction is the Multi-Purpose composition of the Russian company Titebond. It is also made on a neoprene base and is suitable for wall cladding with metal, plastic, wood, fibreboard, chipboard and ceramics. Thanks to its good adhesion to brick and concrete walls, this adhesive will hold even the heaviest finishes. The only area where such liquid nails are not used is swimming pools. In addition, it is not suitable for working with polystyrene.
Experts often have their own opinions about what glue can be used when working with certain materials. Based on the words of the pros, water-soluble, quick-drying compounds Titan WB-50 or Solvent Free are ideal for installing ceramics. They withstand light vibrations and moisture very well. For the purpose of gluing mirrors, adhesives that do not contain substances that dissolve amalgam will be optimal. Among them, it is worth highlighting LN-930 and Zigger 93. When renovating a bathroom, it is recommended to use compounds with increased resistance to moisture. Among these, Nail Power and Tub Surround stand out.
How to use glue (instructions for use)
Before you start gluing any surfaces with liquid nails, you need to carefully study the instructions for use of the tool and glue itself. LG has a limited shelf life - check the date on the packaging. Water-based compounds cannot be used at temperatures below +5 degrees. It is advisable to ventilate the room during work.
Classic rules
Modern adhesive compositions have good adhesive properties, but for a strong connection of the glue with the base, you must adhere to the following recommendations and follow the instructions for using the liquid nail gun:
- Remove dirt, dust, and construction debris from the surface.
- Degrease the parts to be glued with an alcohol solution.
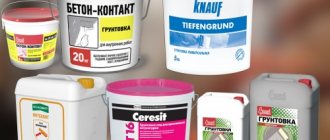
- Pre-treat porous material with a primer.
- Puncture the tube with glue and insert it into the gun, fix it.
- Apply the adhesive composition pointwise, in a snake, in a stack, or in strips.
- Connect the glued fragments tightly and press firmly.
- Remove excess liquid nails and leave the parts to dry.
Until the composition has completely hardened (approximately a day), mechanical impact cannot be exerted on the connected surfaces. If you need to glue flat fragments with a liquid nail gun, I use a press to fit the parts more tightly.
Use with gun
According to the principle of operation, the ZhG instrument resembles a syringe. The work process is briefly as follows: insert the tube of glue into the gun, securely install the container, and squeeze out the required amount of liquid nails. To insert a new cartridge, the rod is moved back all the way and the spare tube is “recharged”.
To open a sealed container, you need to pay attention to the type of blockage. If the container is plastic, simply cut off the sealed protrusion with a sharp knife and remove the blockage
Iron tubes are pierced with an awl or a nail. The method of applying glue is chosen depending on the type of surface: on tiles - dotted, on baseboards - in stripes, on large products - in a mesh or snake. The principle of “more glue - stronger adhesion” does not work in the case of liquid nails. Excessive amounts of the composition only increases the drying speed of the product.
Just recently, a new building material appeared on the market - “liquid nails” glue. Compared to its analogues, the quality and efficiency of working with it has increased significantly. For use at home, it is provided in a certain volume - from 250 to 1000 ml. Compared to PVA glue, this building material glues the parts and materials you need much better and stronger.
Glue composition: how to choose the right material for the job
In order to get the job done faster and better, you need to choose the right glue. They come in two types:
- with plastic clay in the composition - a more expensive and high-quality option;
- with chalk in the composition - a budget option.
The second option has worse adhesion to materials compared to the first
Another factor that you should pay attention to is the composition of the polymers. Some of them can corrode materials, and some may not glue what is needed at all.
Thanks to bit brand liquid nail adhesive, you can glue a variety of materials. Such as:
- Fiberboard and chipboard;
- various metal parts;
- ceramic tiles;
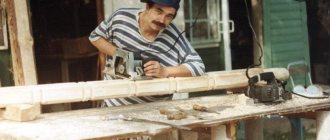
- bamboo wallpaper;
- glass;
- plastic.
Preparing surfaces for gluing
Before gluing, you need to carefully prepare the work surface. First you need to clean it well - remove any remaining dirt and dust, dry it completely and degrease it. To work with glue, you need to use a special mechanical gun, which, when pressed, squeezes out the required amount of material.
Then a universal tube is inserted into the gun, the working rod is pressed all the way to its lower part.
Glue, for more accurate gluing, should be applied to both surfaces. If the gluing area is small, then a few dots will suffice, but if the area is large, then you need to apply glue in the shape of a snake or mesh. After which, you need to wait 12-24 hours (depending on what material you are dealing with).
The drying time depends on the temperature and humidity in the room. The ideal option would be to wait a day after gluing to ensure a good result.
You can use bit brand glue when working with completely different materials and parts. The main thing is to use the glue for its intended purpose. If you don’t have a mechanical gun, you can use improvised means. With proper storage and use of glue, liquid nails, service life and quality of work increase.
How to work with the composition?
Before applying glue, it is necessary to clean and degrease the surfaces. The nails are applied with a 2 cm indentation from the edge so that the glue does not come out of the seam when squeezed. If the surface is uneven, then apply it pointwise. For small surfaces, you can apply it with a line, to give greater rigidity and increase the adhesive force. For example, for ceiling tiles it can be applied in a continuous line around the perimeter, for wall panels - in small sections.
The glue should be applied according to the instructions. If the nails are acrylic, then apply glue and press, holding for several minutes until it sets. If the nails are rubber, then apply glue, connect the surfaces, and immediately separate them so that the solvents evaporate, making the bonding easier. Leave for 5-10 minutes and finally connect, pressing. If the structures are heavy, then use supports.
If excess does appear, then before it dries, you can remove it by scraping it off with a plastic card like a spatula. Acrylic nails can be wiped with a damp cloth, rubber nails can be removed with a solvent. If the surface is porous, then such manipulations will ruin the appearance. In this case, it is better to wait until the excess glue has dried and carefully cut it off.
Rules for working with adhesive
The durability and strength of the connection entirely depend on following the rules and following the instructions, which are detailed on the packaging.
To glue two materials together, proceed as follows:
- Thoroughly clean the parts from dust and dirt, scrape off any remaining paint, and treat with alcohol or acetone. It is recommended to make notches on smooth material to make the surface rough.
- The glue is applied using a special gun in dots, stripes and zigzags. Do not cover the entire area. Using the gun is very easy: a can of glue is inserted into a niche specially designed for this purpose, and by pressing the trigger, the adhesive is supplied in portions to the intended location.
- The surfaces to be glued are tightly attracted to each other and kept in this position for at least two minutes. Within a few minutes it will still be possible to correct the part, and the glue will finally harden no earlier than in a day.
Sometimes the manufacturer advises doing the following: apply glue, attach the surfaces to each other, then separate them and wait 10-15 minutes until the adhesive sets a little, and only then finally connect the parts.
Pistol design
Before using liquid nails with a glue gun, you should understand its structure, operating principle and other features.
The tool consists of several components:
- body made of high quality plastic;
- a rod equipped with a special disk, and it is due to this that the load on the bottle of glue is distributed;
- a special tongue designed to fix the rod that exerts pressure on the cylinder;
- a trigger, due to which the use of the adhesive immediately begins;
- handle for ease of use of the tool.
View gallery
There are many models of this pistol available, but they all have a similar design.
Advantages and disadvantages
The use of a mechanized method has many advantages compared to manual application of liquid nails:
- simplicity and high speed of operation;
- ease of device control;
- pistol versatility;
- convenient design, reliability;
- possibility of applying the product in hard-to-reach places;
- obtaining an even, neat and beautiful seam.
Using a gun makes working with glue easier
You don’t need any special skills to operate a pistol—even a beginner can learn it. The container with the composition can be easily replaced if it runs out of liquid nails. The disadvantages include the high cost of really high-quality devices, although for one-time work you can buy a cheap mounting gun. In addition, the glue tool will have to be cleaned, and as quickly as possible - otherwise it will be difficult to rid it of glue drops
Battery devices need to be charged regularly, and for electric devices to work, it is important to ensure that there is a network nearby
Types of construction guns
Despite the existence of different types of mounting guns, they can all be grouped as follows:
- professional;
- household
Professional mounting gun Hilti
Professional pistols
Such devices are designed to regularly perform a significant amount of work and are more suitable for construction and repair specialists. They are necessary if speed of application of compounds is required, because their performance is at a high level. The cost of such devices is 2000-15000 rubles, so purchasing them for home use is impractical.
Depending on the design, pistols are divided into the following types:
- Pneumatic. The glue is pushed out under the pressure of the air flow, which is regulated by the controller and the locking lever, and is activated when the trigger is pressed. These guns can operate continuously. They are suitable for most types of liquid nail cartridges.
Pneumatic gun for adhesive composition
- Electrical. They are powered by the electrical network, are economical in terms of labor costs and composition consumption, and operate smoothly but quickly. The cost of such pistols is the highest. They cannot be considered mobile; they require a power outlet to operate.
- Rechargeable. They also operate on electricity, but are powered by rechargeable batteries (accumulators). Such devices can apply liquid nails even where there is no power supply. One charge is usually enough for 1.5-2 hours of continuous work.
Household pistols
There is no need to use professional devices at home. There are mounting guns on sale that are inexpensive and quite suitable for one-time work:
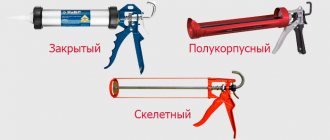
- Skeletal. The price of such devices starts from 200 rubles. They are an open aluminum “syringe” with a piston and two guides between which a cartridge of liquid nails can be clamped. The skeleton pistol will serve the master for quite a long time - at least 20 cartridge changes.
- Half open. They are considered a very budget option for the home, costing from 120 rubles, however, they can break after a couple of used glue cartridges. A weak attachment of the tube, which will dangle in the gun, and for this reason the glue seam will remain uneven and intermittent, can also cause inconvenience to the master. The problem can be solved by gluing the tube in the gun with construction tape.
Semi-open type liquid nail applicator
- Tubular. These are universal devices that look like hollow syringe tubes with a piston. The container with the cartridge is firmly fixed here, and it is also possible to use adhesives and sealants in “sausages” and other soft packaging. Tubular guns ensure uniform application of the compositions and are designed for fairly long-term operation (up to 50 cylinder changes).
How to remove the solution
Even when working with a gun, there is a possibility that glue will get on furniture, hands or other elements in the room. In this case, you will need to remove it immediately. To do this, it is advisable to use a solvent, but this option is only suitable for quickly removing fresh glue.
If the adhesive has already hardened, then only a special cleaner is used to remove it, and you can also use a scraper, but it can damage the coating.
A liquid nail gun, the instructions for use of which are indicated above, is considered an excellent choice if you need to use a high-quality adhesive to connect different specific surfaces. It greatly simplifies this procedure, and also ensures that the solution does not get on other objects in the room where the work is being carried out.
When carrying out repair and construction, finishing, installation work, as well as work on decorating a room, construction glue is used, better known in everyday life as liquid nails - Liquid Nails. This special construction adhesive is made on the basis of polymers and rubber and is supplied to the market in tubes of various capacities or in cylindrical cartridges (tubes). For the convenience of working with cartridges, it is customary to use a special construction (installation) gun for liquid nails, which is designed for dosed application of glue to the surfaces to be glued.
Liquid nails will help in tiling
This gun is used for working with various sealants, which are packaged in similar special tubes with a standard volume of 310 ml. This tool got its name because of the principle of operation - the adhesive composition is applied by pressing on the trigger, which is why it is compared to the weapon of the same name. Although the process of applying glue itself is more similar to the operation of a syringe.
When choosing liquid nails, study the instructions on the packaging to find out whether this construction adhesive is suitable for the types of surfaces that are to be glued.
Like similar construction tools, mounting guns are divided into two main types: household (mechanical) and professional (pneumatic and battery-powered).
Professional ones are usually used to apply all kinds of sealants, and three types of mechanical guns are used to work with liquid nails.
An inexpensive type of liquid nail gun is a semi-body gun. Such pistols are short-lived and not easy to use. The stand for the cartridge with construction adhesive seems to be cut in half and during operation the tube often warps, which interferes with the smooth movement of the rod.
For the home craftsman, there is a simple solution to this problem - the tube is tightly fixed in the gun body using wide tape. Wrap tape around the tube placed in the body, closer to the handle. At the same time, they protect the branded sticker, which is located on the case. There is a manufacturer’s warranty for such working tools, and in order for the gun, if necessary, to be returned under warranty, it is advisable not to damage this sticker.
The next type of mounting gun is the most popular among buyers and is called skeleton. It is a little more expensive than the half-body, but it holds the liquid nail cartridge more securely, allowing the glue to flow more smoothly. However, even here, tape is used to secure the tube tightly, since cases for inexpensive pistols are made of aluminum, which does not provide sufficient rigidity.
The most convenient for working with liquid nails is a tubular (syringe) gun. It tightly fixes the cartridge with glue or sealant, and is used not only for working with tubes, but also with foil packaging, which is used for packaging certain types of sealants.