Many people consider wooden slats to be a good-for-nothing waste material. But in skillful hands, it can change the interior beyond recognition. Thin wooden slats (buffels) will enrich and decorate the living room, bedroom, kitchen, office and even steam room. And it won't cost much
A wooden lath has two main advantages - it is sold in almost any hardware store and is relatively inexpensive (from 12 rubles per linear meter). It’s no wonder that it is so loved by architects, designers and crafty homeowners. Today we will offer the reader 7 ways to use this lumber in interior decoration.
Volumetric tree on the wall
This unique 3D decoration can be made with your own hands on the wall (and even on part of the ceiling) without any problems. To create a real masterpiece, it is not necessary to have the knowledge of a sculptor or artist.
Important: This decor requires a lot of space.
You will need:
- Master OK;
- Bucket;
- Marker and scissors;
- Acrylic paints and brushes;
- Scotch;
- A bag of dry plaster;
- A large sheet of cellophane film.
Progress:
- Let's draw a contour mirror image on the cellophane film with a marker, and when we cut out the drawn middle, we should get a stencil;
- We stick it on the wall with tape;
- Pour water into a bucket and spread the plaster;
- Using a trowel, carefully fill the empty stencil space;
- Remove the film after the mixture has dried;
- We apply several more layers of gypsum, making the last one round;
- When the solution has dried thoroughly, paint the sculpture with acrylic-based paints.
You can choose a wide variety of palettes. A “natural” image would look great in the living room, or a fabulous tree, unusually painted, on the wall in a children’s room.
How to make an original children's table from oak: step-by-step instructions
If you have oak scraps, you can make an original children's table.
Table 3. Instructions for making a table
| It is used for the manufacture of wooden furniture of light weight and at an affordable cost. Furnishings with a veneered surface have sufficient wear resistance and strength, therefore they are widely used in children's rooms, hallways, kitchens, dressing rooms and libraries. Upholstered furniture and interior doors are finished with oak veneer. |
| Solid wood furniture is distinguished by its originality and high cost. It is used for the manufacture of furnishings according to individual sizes: kitchen and bedroom sets, cabinets and walls, office furniture for decorating offices in a classic style. The products are absolutely environmentally friendly and have a noble appearance. |
| The most expensive and valuable variety of oak, which requires a long time to mature before it is used for the manufacture of exclusive furnishings. Furniture made from bog oak has a respectable appearance and a special greenish-black tone. Such furniture in the interior speaks of the high status and wealth of its owner. |
| Illustration | Description |
Prices for popular models of eccentric sanders
Expert advice
Table 4. Tips from a woodworking expert
| From the available oak board scraps, you need to select 4 elements of the required size. | |
| Two oak boards 90 cm long are cut and jointed to make a tabletop. | |
| The boards are glued together, the required tabletop shape measuring 50 x 80 cm is cut out, and the surface is sanded. The height of the finished product should be 50 cm. | |
| Grind the trimmings. | |
| The parts are tinted with stain. | |
| Decorative butterflies are installed and the ends of the tabletop are tinted. | |
| The trimmings are fixed with dowels and glue. | |
| Pre-made and stained legs made from oak round timber are fixed to dowels and glue. | |
| The product is varnished. |
| Illustration | Description |
Tip 1: choosing an idea
Prices for the popular range of circular saws
Video - Manufacturing technology of designer oak furniture
Decorative tree made from branches
To decorate the interior of your home, you can make large artificial trees with flowers.
Necessary materials:
- Hot glue gun;
- Twigs;
- Moss;
- Sea pebbles;
- Square flowerpot;
- Decorative flowers (can be paper);
- A piece of foam.
How to make a decorative tree yourself from ordinary branches:
- We fill the bottom of the flowerpot with sea pebbles and put polystyrene foam on them, and insert the prepared branch into it;
- Sprinkle it again with sea stones for good stability, insert moss on top;
- Now we decorate the branch. To do this, we glue decorative flowers randomly to a branch using a glue gun;
- After completing this procedure, such a decorative craft will rightfully serve as a decoration for your home or apartment.
On the Internet you can find many photos of trees made by yourself, choose the option that suits you and create your own masterpiece based on it.
Soap vase
The interior of a modern bathroom requires a detailed approach from the owners. To furnish a room, they carefully select not only finishing materials, but also household items.
Wooden accessories look great in a bathroom setting, but require that the surfaces be impregnated with oil.
Instructions on how to make a craft from wood:
- For creative work you will need a block of wood or a large wooden cut.
- The remaining bark is removed from the workpiece, and then most of the core is removed using a chisel.
- To get an excellent result, you can use a ready-made photo or project.
- It is important to try to keep the side edges of the vase at a sufficient height (reminiscent of an ushan, but without handles).
After cutting out the core, they begin to impregnate the wooden craft with moisture-resistant oil, leaving time for exposure (up to a day). Remaining oil is removed using a rag. A similar vase should be placed next to the mirror in the bathroom. The bright shine of acrylic varnish combined with the wood texture will highlight the interior of the room.
Bonsai in a pot
We offer another way to easily make an artificial bonsai tree with your own hands. The operating algorithm is simple:
- We select the container. A ceramic flower pot with holes for draining water is ideal.
- Fill the pot with soil. The soil should not be collected from the yard. It’s better not to save money and buy a ready-made mixture at a flower shop. Why is this necessary if the tree is still artificial? We will be growing moss or lawn on top, so good soil is essential.
- For the trunk of a decorative tree, we select a branch that is thick enough and intricately curved to resemble a spreading plant.
- We attach decor to the branches of the wooden frame. It can be made from matte paper, fabric, satin ribbons or any material. The more original the decor, the more spectacular the final result.
- We plant the lawn mixture in the ground and water it generously daily. Very little time will pass, and under the original tree a bright and lush summer lawn will spread out.
By combining natural and synthetic materials, you can achieve unprecedented results in the art of bonsai, turning your favorite hobby into a successful business.
Methods for joining furniture parts
If you look closely at solid oak furniture, you will not find any visible screws or other metal fasteners on it. The point is, in order not to spoil the appearance of the furniture, only internal fastenings are used. For beginners, it is best to use rebated fastenings or double-sided wood pins.
The seam connection is very simple, a protrusion is made at the end of one spare part, and a hole of the appropriate size is made on the one to which it will be attached. With this fastening method, accuracy is important, because if you make the protrusion larger, it can simply split the workpiece, but if you make the hole larger, the part will simply wobble. When working, you also need to monitor the depth of the hole; it should be several millimeters more than the ledge, since otherwise you will have gaps at the joint.
Double-sided wood pin, the easiest way to connect wooden parts. But it is not suitable for all nodes. After all, to use it, the part must be able to rotate freely. You cannot attach the top of a table or stool using pins, but you can quickly and easily attach the legs or vertical stands to the flower bed. To use a double-sided pin, simply drill a hole on the parts to be fastened, and simply rotate one of them to tightly fit the parts together. For DIY furniture, this is the easiest way to securely and beautifully connect parts.
Preparing tree branches for interior use
Before you start creating, you need to prepare the branches and prepare the required number of different wooden fragments. All other actions are aimed at long-term preservation of the composition. The following sequence of actions is suggested:
All selected branches must be free of contamination. Remove any remaining bark and damaged wood.
All wood that was harvested during walks in the park must be inspected for pest infestation. Forethought will not hurt, so treat it with special mixtures in advance.
The time-tested method of impregnation with vegetable oil to which herbs have been added has proven itself well.
After drying, the wood changes size and shape, and has such a feature as deformation. In order to avoid disruption of the composition, the wood material must be dried before production. This process occurs quickly under sunlight with good access to fresh air.
In order to avoid the appearance of fungus on the product, pre-treat the wood with antifungal compounds.
In order for the finished product to have a stunning look, it is better to coat it with varnish. But this process remains at the discretion of the author of the composition.
The tree branches used are taken into the interior composition as they are used in nature, pre-treated with disinfectants. Varnishing adds charm and style.
But the most expressive result is obtained when making a composition painted in one color.
It would be good if it was a contrasting tone to the interior. In this case, it will easily fit into any style. The most widely used colors are white and black, as well as silver and golden colors.
Classification of wooden doors by design
In the woodworking industry, there are 3 basic categories of doors made from natural materials, each of which has individual characteristics, advantages and disadvantages:
- Massive:
Design features: consist of boards knocked together with a thickness of at least 40 - 50 mm. They are distinguished by increased reliability, durability, and mechanical strength. As a rule, they weigh at least 40–60 kg and require a reinforced box and powerful steel hinges.
Scope of application: premium private residential buildings, loft and country style rooms, wood-burning saunas - for the entrance to the steam room. Suitable for the manufacture of sliding barn door structures.
Advantages: excellent aesthetic properties, completely natural materials, no need for filigree finishing of boards, the most reliable products in their class.
Disadvantages: increased dead weight, changes in geometry are possible during operation, require treatment with chemical compounds, or periodic maintenance and restoration.
- Panel:
Design features: consist of an internal frame, which is made using mutually perpendicular pine bars with a section of 40 x 40 mm or 50 x 50 mm. The internal space of the frame is filled with heat-insulating materials or cellular cardboard, after which both sides are finished with a facing made of veneer or pre-treated plywood. And also hardboard with laminated film.
Scope of application: apartments, private residential buildings, living rooms, dining rooms, kitchens, all rooms in which the humidity level allows the use of the finishing coating of the door leaf.
Advantages: veneer or other finishing coating can have any texture or shade, increased moisture resistance.
Disadvantages: some decorative panels contain dangerous chemical compounds that, when heated, irritate the respiratory tract.
- Paneled:
Design features: door leaves consist of cells formed by profiled bars of different sizes. Boards are inserted into the frame cells to act as fillers. Wooden elements can be locally replaced with translucent or mirror inserts.
Scope of application: private residential buildings, country buildings, external and internal doors in apartments, offices and other civil buildings.
Advantages: attractive appearance, elegant design, if damaged, each element can be replaced separately, high level of maintainability.
Disadvantages: difficulty in manufacturing, high cost of construction, require professional tools.
To select the desired door design, it is necessary to draw up a detailed sketch, as well as analyze the general style of finishing of the space being used.
We create bonsai
The tradition of creating bonsai was born in Ancient China more than two thousand years ago. The name “bonsai” is written in two hieroglyphs, which mean “bowl” and “tree”. Later, already in Japan, the unusual method was actively developed and rose to the rank of fine art.
It was the Japanese who brought the method to perfection, creating a special system of canons and proposing rules for exposure. Miniature trees are an aesthetic pleasure for perfectionists.
Many people claim that looking at an elegant bonsai, they are overcome by an extraordinary feeling of calm, tranquility, and anxiety goes away, as if by magic. Decorate the world around you, try your hand at creating amazingly beautiful products.
Do you want to create a luxurious miniature garden at home that does not require special care? Then an interesting master class will help beginners in creating a bonsai tree with their own hands.
Step-by-step instruction:
- We select materials for work. Any gifts of generous nature will be needed: intricately curved twigs, driftwood, juniper, spruce or pine branches, moss, reindeer moss.
- We preserve the branches. For processing, we will prepare a special solution consisting of denatured alcohol, acetone, and glycerin. We take everything in the exact proportion 1:1:2.
Important: The solution for preserving natural materials should be stored in a tightly closed container, as it has a pronounced chemical odor.
- Initially, we wash the branches under cold water, thoroughly cleaning them from dust and dirt, then place them in the solution for at least a week.
- Next, dry the decorative material and paint it if necessary. Let's reveal a little secret: before painting, you need to dip the branches in hot paraffin, the treatment will help to apply the paint evenly to the surface.
- Let's start making a decorative bonsai tree. Cut the branches to the required length and carefully glue each one to the base. To prevent the structure from falling apart, we will wrap the individual elements with wire; after gluing, it can be removed.
- We decorate individual areas with moss, reindeer moss, white sand or decorative pebbles. In our work, we will definitely designate the center of gravity of the structure in order to give the craft greater stability.
After completing the painstaking work, a unique live composition will open to your eyes. An eco-style bonsai will delight the eye for a long time; all that remains is to occasionally brush off the dust from the elegant creation.
Finishing of products
As decor, elements of artistic carving look organically on the surface of solid wood facades.
The texture and natural pattern of oak cuts do not require painting - it is recommended to use a treatment that will highlight the beauty of natural wood
By finishing furniture items, not only their appearance is improved, but also their service life is increased, as the wood becomes protected from external influences. The final processing is carried out in three stages.
Table 5. Finishing steps
| The manufacture of solid wood furniture should begin with choosing an idea and forming an idea of the appearance of the future product. You can get inspiration from videos, thematic magazines and articles. | |
| Tip 2: visualize the idea | To visualize an idea, you can use special computer programs or sketch a sketch on paper. It is worth performing several options so that you can choose the best one. A sketch drawn by hand allows you to determine the shape and general appearance of the product. |
| Tip 3: calculating the number and size of parts | Product detailing includes a list of main elements, parts, their sizes, methods and places of fastening. The assembly sequence of the product is determined. First, the frame is assembled, then the supporting elements. After this, the remaining parts are built up. |
Tip 4: Careful selection of material | When selecting material, not only the attractiveness of the texture, but also the direction of the fibers is taken into account. The type of wood cut is also taken into account. Radial cut material is recommended to be used for the manufacture of facades and front parts of products, since it is least susceptible to shrinkage, swelling and warping. |
Tip 5: Carefully measure each piece before cutting | It is advisable to take the measurement several times - an error of 5 mm can ruin all the work. |
Tip 6: Carefully configure your tools | Incorrect adjustment of cutting angles, poor adjustment of the width and depth of the groove, depth and thickness of the tenon lead to undesirable results - poor assembly of the product and mismatch of individual structural elements. It is advisable to have a sample piece. |
| Illustration | Description |
Video - Finishing wood
If you have seen handmade oak furniture at least a few times, then you understand how different it is, both in appearance and in durability, from modern options made from cheap substitutes. After all, solid wood products are different not only in their beautiful appearance, but also in their strength and durability. Natural wood has always been and will be a sign of good taste and sophistication; even solid pine furniture, if it is beautifully made, will look better than artificial materials.
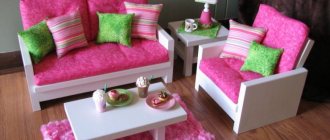
Satin ribbons
This tree will be a wonderful decoration for a wedding celebration. It's very easy to make. It is enough to show a little patience and imagination. The only difficulty that can arise is making flowers from satin ribbons.
So, to create a topiary you will need:
- About seven meters of satin ribbons.
- Threads, beads, yarn, lace for decoration.
- Glue.
- Wooden stick or plastic pipe.
- Flower pot.
- Crumpled newspaper or papier-mâché.
- Earth, decorative stones, shells.
Progress:
- According to the photo above, flowers are made from ribbons. On average, one topiary will require 15-19 roses.
- Now the crown is made. You can take ready-made papier-mâché, or you can crumple newspaper into a ball shape. The workpiece should be wrapped with yarn for greater density.
- The trunk is made from a branch or plastic pipe. Then it is wrapped with ribbon or decorated with lace.
- Next, using glue, the trunk is glued to the crown of the tree. The bottom of the trunk is placed in a pot and covered with earth and pebbles to make it heavier.
- Using threads, satin roses are sewn to the crown. In order for the flowers to hold more firmly, the workpiece is additionally fixed with glue.
- The pot is decorated with bows, lace and yarn. Flowers should be carefully straightened and, if necessary, decorated with decorative ribbons and rhinestones.
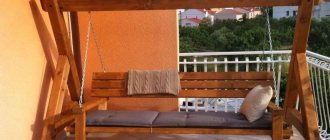
Headboard
A rather original way to use slats in the interior is to create a headboard for a bed. For greater expressiveness, such a design can be illuminated using LEDs, which, by the way, will serve as a night light if the residents of the house are uncomfortable in complete darkness.
Slats can correct imperfect room geometry. Vertical planks visually “raise” a low ceiling, while horizontal planks make the room wider
Tree with LED garland
The manufacturing process begins with a frame, for which aluminum wire is best suited. It easily bends at any angle, giving the future structure any configuration. A more realistic color is achieved by wrapping the white insulation of the wire with black electrical tape.
- Then, the finished frame is evenly wrapped with a garland, secured to the wire with black electrical tape. If desired, you can create additional decorations for LEDs in the form of decorative nozzles made of transparent plastic. Upon completion of the work, the manufactured tree just needs to be connected to the electrical network and checked for its functionality.
Thus, the question of how to make an LED tree with your own hands can be considered resolved.
- The main advantage of this method is considered to be ease of manufacture. The main disadvantage is the impossibility of producing large-sized wood. This is due to the standard length of the garland, which is not enough to fit on the entire tree. Therefore, this method is most suitable for the manufacture of miniature products, which are also very popular.
Advantages of choosing consumables
Both solid wood and panels made from pressed wood chips are materials without harmful impurities.
Working with wood has a number of advantages:
- Handmade wood crafts are quite durable.
- Beautiful appearance, which is preserved even without additional decorative processing. The photo of wood crafts shows how stylish the natural grain of wood looks.
- All wooden products are perfectly breathable, and the structure of the wood prevents the absorption of unpleasant odors.
- Wood does not cause allergic reactions, so crafts can be installed in a child’s room with a high allergic background.
With the right approach to pre-treatment (impregnation with moisture-resistant oil, antipyrine treatment on the part), the finished accessory becomes highly resistant to moisture. In this case, you have absolutely no fear of rotting or mold developing on the surface.
LED tree
Making a tree from individual LEDs is considered a more labor-intensive process. However, this method does not have the disadvantages inherent in ready-made garlands, which makes it possible to produce structures of any shape and size.
The main material is 5 mm LEDs. To equalize the voltage you will need resistors.
Direct manufacturing begins with soldering resistors to the LEDs. The LED contacts have different lengths, so the resistor legs are pre-shortened on one side. You need to solder the contacts of both elements very quickly so as not to damage the LED.
- Heat shrink tubing is then cut into the wires to cover the solder joints and resistors. It is necessary to leave space for soldering the power wire. The tube is inserted onto the resistor leg and heated a little with a lighter to give the insulation the required shape. This operation is performed with each LED.
- After this, you can begin making the tree itself. Most often, the trunk is made of thin plumbing pipes, and the branches are made of wire, approximately 50 cm long. The main part of the branch takes 45 cm, and 5 cm is left for attaching it to the trunk.
- Small branches are cut into sizes up to 10 cm. The number of LEDs on one branch must be calculated in advance.
- At the next stage, small branches are tied with electrical tape to large branches. It is recommended to make the number of LEDs on each small branch equal to the number of LEDs on the large branch. Each LED is secured using electrical tape.
- The wires need to be stretched along the entire length of the main branches, after which they are cut taking into account the bends of the small branches.
- The ends are wound to the trunk, after which all the pros and cons on each branch are connected. Their number should match the total number of branches. The wire connections are insulated. All that remains is to hang the decorative ornaments evenly and connect the finished tree to the electrical network.
Furniture facades
A simple frame, two pairs of hinges and a little imagination - and you can get an original facade for a clothes closet or kitchen unit. To be fair, it is worth noting that many housewives do not like such doors, since dust gets inside the furniture frame. And yet slatted facades have the right to life, if only because they decorate the interior and make it original.
Of course, in this article we have listed only the main ways to use slats in the interior. This inexpensive and easy-to-handle material offers many more possibilities. For example, you can assemble an original lampshade or tabletop for a coffee table from thin wooden planks. But before you start work, you need to purchase lumber, and not make a mistake when choosing.
To protect the wooden slats from moisture and temperature changes, as well as to add decorativeness to it, it is stained or painted, and then varnished
Making your own wood for the street
When making wood with LEDs for outdoor use, you must take into account the aggressive influence of the environment. Therefore, before you start making an LED tree for the street with your own hands, you need to determine the entire procedure in advance.
The general scheme of work will be approximately the same as for conventional structures intended for indoors. In the outdoor version, it is recommended to pay attention to a more thorough coating of the trunk and branches with high-quality materials.
It is also necessary to take care of good insulation of the LEDs after soldering them with resistors.
The heat shrink tubing should completely cover each pair. If necessary, all unreliable areas can be additionally insulated with black electrical tape. The same goes for wire connections in the plus and minus areas. Decorative items should be secured more efficiently so that they are not torn off by strong gusts of wind.
A set of tools necessary for work
When making door frames from wooden boards with your own hands, a home craftsman will need the following set of tools and consumables:
- To take measurements and apply markings:
- Laser or mechanical tape measure with a length of at least 3 m.
- Ruler with steel blade 1000 mm long.
- Carpenter's corner.
- Plumb line with nylon scissor.
- A marker or a simple pencil with a soft lead.
- For cutting raw materials:
- Cross-cutting machine with rotary bed.
- A miter box with a hand saw, which is usually included in the kit.
- A jigsaw with a set of different files.
- Circular saw with wood blade and protective cover.
- To process boards before assembly:
- Manual plunge router with a set of replaceable cutting elements of different diameters.
- A chisel with a hammer, the weight of the striker is from 300 to 500 grams.
- Trimming machine.
- File with coarse abrasive.
- Drill with disc abrasive sets.
- Looping machine.
- To assemble the canvas:
- Drill with a set of wood drills of different diameters.
- Wooden or rubber hammer, mallet.
- Screwdriver with a set of bits.
- Hand-held Phillips or slotted screwdriver.
- To install the door:
- Screwdrivers, screwdriver.
- A hammer drill for making holes in a brick or concrete wall for anchors for fastening the box.
- Wrench with cap nut and ratchet for tightening anchors in a box.
- Construction or laser level.
- Foam or sealant gun.
- To finish the door:
- Brushes, rollers.
- Pallet for mixing paint and varnish compositions.
- Rags for degreasing and cleaning fabrics.
- Vacuum cleaner for removing small sawdust.
- Consumables:
- PVA glue or epoxy resin.
- Polyurethane foam.
- Silicone sealant.
- Antibacterial impregnation.
- Varnish, paint, for finishing coating.
- Spacer wedges for door installation.
- Wooden sticks replacing self-tapping screws (if necessary), or the self-tapping screws themselves with different lengths, pitches and thread diameters.
All tools must be of high quality, in good working order, sharpened, cleaned of dust and dirt, and prepared for work. When purchasing consumables, it is recommended to pay attention to the shelf life of each composition, which is limited to 12 - 24 months.
How and from what to create?
- Drawing is the most original method; it does not require serious expenses. In this case, it is not necessary to contact an artist, just be patient, buy paints and go ahead. Don’t be upset if the outline of the drawing is not the smoothest, nature is diverse and there are no perfectly straight trees. For greater confidence, you can use a stencil.
- Applique is also an excellent option for applying a design. You can use various papers, preferably thicker ones (wallpaper, cardboard). Sometimes there are a lot of boxes left over from things, or several rolls of wallpaper after renovation, all of which can be used.
The idea can also be implemented using more rigid materials, such as gypsum, polystyrene foam, various wooden coverings (fibreboard, chipboard). This will require ingenuity and the ability to work with material.
You can use natural tree branches. For this you will need good technical glue, and the tree branches themselves. Before fastening, it is necessary to treat the tree branches so that they can last longer. This technique enhances the natural effect in the room. It can be combined with patterns and appliques.
- Sgraffito is a more complex decoration option; it can be used when the apartment is being renovated. It involves applying several layers of paint or other coating to the surface, followed by cutting out the design. The result is very attractive, it gives volume to the room and a unique visual effect. It can be applied to rooms that do not use wallpaper.
How to imitate a decorative tree? Various fabrics can be used. Any covering will be useful - burlap, linen fabric. This technique is popular and will add unusualness to the picture.
How to choose the right boards for making a door
To choose the right boards for making doors, you need to take into account a number of important nuances:
- The boards must be solid, without cracks, chips, delaminations and other mechanical defects
- There should be no traces of mold, mildew or rotting on the material.
- It is recommended to select boards only from dead trees, or the material must first go through a dehydrator.
- The maximum percentage of knots should not exceed 5% - 10%.
- All boards that will be used in the manufacture of the door leaf must be from the same type of wood, cut in the same year.
Experts do not recommend making door leaves from soft pine, since the comfortable service life of such products is usually limited to 3 to 5 years.
What can topiary be made from?
One of the advantages of this type of decorative products is that they can be created from a variety of materials.
So, you can make a tree with your own hands from:
- paper and fabric tapes;
- fabrics and lace;
- threads and ropes, sisal;
- beads;
- cones, chestnuts and acorns;
- nuts;
- paper;
- artificial flowers and leaves;
- napkins;
- newspapers;
- pasta;
- shells;
- caramel sweets;
- balloons (not inflated);
- packaging mesh for a bouquet of flowers.
And if you want to make a money tree with your own hands, then the crown will need to be decorated with artificial (or even real) bills or coins.
As an example, we have chosen for you a topiary decorated with cute paper flowers and hearts.
Stair railing
Buffels are perhaps the ideal tool for constructing stair railings. By sewing up a wall from floor to ceiling with vertical slats, you can create a reliable fence and completely protect yourself from accidental falls.
Topiary with candies
The highlight of this craft is that you will get not just a decorative product, but also a kind of vase for sweets. This option is perfect as a delicious gift for children, girlfriends, mothers, grandmothers, and loved ones.
Preparation
To make wood, take:
- Ball;
- Scissors;
- Double sided tape;
- Beautiful caramels (without wrappers);
- Stick for the trunk;
- Pot or box for base;
- Pot filler;
- Ribbons, paper and fabric flowers and any other decorative details.
The process of making topiary
- Make a hole in the ball for the barrel.
- Cover the ball with double-sided tape.
- Glue caramels on it.
- Fill the free space with decorative elements.
- You can also decorate the trunk at your discretion.
- Place the stick-trunk in a pot or box, cover everything on top with cotton wool, cardboard or something else and decorate with caramels, only in wrappers. Ready!
Oak furniture: material features
Oak has long occupied a leading position as a material for making furniture. Wood has a pleasant texture and a wide variety of shades (dark brown, yellowish, reddish, whitish), which allows you to choose the material for interior decoration in any color scheme. You can give an oak product the required shade using stain.
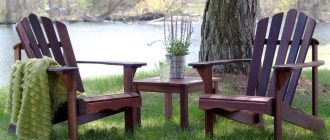
Designer dining group made of oak
Rustic style set
Benefits of oak wood
Oak wood has unique performance properties, among which are the following:
- Long service life. In antique shops and museums you can find samples that, even after a hundred years, have retained their original appearance and performance qualities.
- Oak has a dense structure, due to which the material is highly resistant to deformation and mechanical stress.
- Wood is not afraid of moisture, high temperature and temperature changes.
- The unique appearance and unique natural pattern allow you to create furnishings with a respectable, rich appearance.
- Oak is easy to process, which allows you to make products of any shape.
- Wood is not susceptible to insects and rotting processes.
- Furniture made from natural wood is environmentally friendly, safe and can have a beneficial effect on human health.
- One of the advantages is the possibility of carrying out restoration work if damage occurs.
Photo ideas
DIGITAL CAMERA
How to decorate the interior
Even a bed can be assembled from what is always at hand.
For those who want to make something original out of wood right now, we advise you not to delay taking a walk around the immediate surroundings.
You will find the source material very close and completely free:
- If trees in the area are cut with chainsaws, ask for several round or oblique cuts with bark. Dry the dies at home, sand the front and back sides.
It is better not to remove the bark so that the future picture looks more natural. Prime one side and you can start painting the landscape. Oil or acrylic paints are suitable.
Branches can be used to make wonderful decorations.
- Branches or snags of intricate shapes will make wonderful hangers in the hallway. Sort the thin branches, clean them and place them in a floor vase. Here's a piece of forest in a city apartment.
- You can use branches to make picture frames or mirrors. The corners are tied crosswise with decorative twine, leaving the ends of the sticks sticking out. The result will be a frame in oriental style.
- Do you have a lot of unused cutting boards in your kitchen? Put them in order by first cleaning them with emery cloth. Painted with taste, they will decorate the kitchen.
- Would you like to try burning, but don’t have a device? No problem, it will be replaced by an ordinary household magnifying glass. Get creative on a sunny day by getting used to a new “tool” on some unwanted plywood. Having found the correct distance from the magnifying glass to the board, you can successfully burn out the pre-applied contours of the patterns using the sun.
Picture frames made from branches.
- Exquisite shells will be made from multi-layer plywood. The more layers of veneer, the better. Cut out round blanks, then use a round file to make grooves from the middle to the edges diagonally. You will get wavy stains, like a real sink. Sand the product and varnish it.
Wooden partitions
Wooden partitions can be either movable or not. You can zone the space using different materials, from solid pine to thin branches or a tree trunk.
Such a partition can be made at intervals, leaving empty space. You can install small shelves in it to accommodate books or indoor flowers. This will make the partition even more functional.
You can easily mount a horizontal or vertical partition from branch cuts:
- Measure the space and write down all the parameters on paper;
- Make a sketch based on the measured parameters, drawing all the details;
- On the floor and ceiling or walls you need to make a base for fastening where the branches will be inserted;
- Now you need to saw off the branches to the required length and treat them with a special solution that will preserve the appearance of the tree and protect it from moisture;
- All that remains is to secure the branches to the base.
Elements of wooden decor
From solid wood you can make not only large decorative items, but also small elements:
- Watches - for them they often take a simple unprocessed cut, the bark of which is not cleaned, but remains. The more carelessness in the element, the more interesting it will look;
- Vases – you can paste over a ready-made glass vase with small curved branches or small saw cuts;
- Frame – for a mirror, a large cut is suitable, in which you need to cut a hole for the mirror;
- Fruit stand made from saw cuts;
- Candlesticks made from small tree trunks;
- Wall panel made from saw cuts.
Hangers
To create this functional decor you will not need a lot of materials, and the practicality of such a product is difficult not to appreciate. So, you will need a wooden frame and several tree branches with knots.
Stages of work:
- You need to assemble a wooden frame of the size that will be needed for the future shelf. You can take a ready-made open shelf as such a frame;
- Now the frame needs to be fixed to the wall;
- Cut the branches into several parts according to the height of the shelf;
- Place each branch with the branch facing forward so that you can hang something on it, like on a hook.
There is another option for creating such work:
- Draw a tree with spreading branches on the wall;
- Now you need to select the material according to the drawing. You can cut out elements of the required size from the boards;
- The material must be prepared for use: sanded, treated with a special compound or varnished;
- Next comes installation of the material directly on the wall;
- All that remains is to attach the hooks to the branches.
The first option is more compact, the second will require more space.
Advantages of wooden decor
Elements of wooden decor can be incorporated into any interior, the main thing is that it is in moderation. Such things will have certain advantages:
- Things made of wood are practically durable, so this decor will last a very long time. This will help save money and time on constant repairs, especially if the decor affects a large area, for example, an entire wall;
- Wood accumulates heat very well, so this decor will also act as thermal insulation. You can put it on the floor or decorate the walls with it;
- Each cut of wood has its own unique pattern, so using an array, you get an individual decoration for your room.
Material properties
For work, elements obtained as a result of end sawing of tree trunks are used. Tree stumps, trunks, branches and branches can be used as raw materials.
For blanks, you can take fresh wood. Drying parts at high temperatures promotes the formation of textured cracks on them.
The type of wood is selected depending on the type of product:
- Coniferous wood is excellent for making children's crafts, toys, trim, home interior parts,
- wooden elements of garden decor require hard wood species (birch, oak, beech) as raw materials.
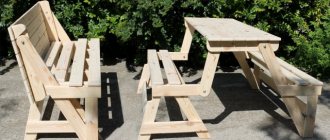
Furniture made from saw cuts
Using wood slices, you can make original and functional furniture for your garden.
It's easy to make a beautiful table.
- To make a table, you need to knock together the supporting part.
- Additional sides are made on top.
- The sections are properly processed, polished, and placed in a frame.
- The cavities between the tabletop parts are filled with epoxy resin.
- After drying, the product is carefully polished.
In a similar way, you can decorate a stool, a small bench, or decorate a gazebo.
The use of wooden saw cuts in the manufacture and decoration of home and garden interiors is gaining popularity. The material is safe for health. The products are characterized by low cost. And they perfectly complement the interior.
https://youtu.be/PXQRWG5Z-cwhttps://youtu.be/xlkWj92DQyw
_