Almost anyone who likes to build and make all kinds of homemade products can make a folding bench. You can build according to a ready-made project or make drawings and diagrams of a transforming bench with your own hands. The final result will depend primarily on the correct choice of design, and only then the selection of material and quality of work are important.
Transformers are convenient to use in the countryside due to the small size and weight of the bench
Design options for transformable benches
It is not difficult to choose the appropriate option, since most of the folding benches are very similar to each other in design and operating principle. There are more than enough drawings of a transformer bench available for self-production, so there is plenty to choose from.
Another thing is that not all homemade products are equally good at using in a summer cottage, so it would be right to first understand the structure of the most popular models:
- The most common folding benches are transformers with a metal frame;
- Similar models of “folding beds”, but made of wood. A wooden transforming bench, in its basic dimensions and characteristics, approximately corresponds to metal models;
- Wooden benches are transformers of the original author's design, differing in the type of folding, size and shape;
- Small-sized frame benches of various designs.
The design of such little ones is often copied by developers from classic swing transformers, but there are also original products with unusual designs.
The diagram involves disassembling and assembling the transformer without fasteners
Many summer residents prefer to make such transformable benches with their own hands, photo, for only one reason. Thanks to their well-thought-out design and small size, they fold easily, take up little space and can be transported to the dacha even in a car.
The classic version of a folding transforming bench
The most common are universal models of folding benches with a metal frame. The transformer may look different, but it is based on the same circuit. Formally, such a bench consists of three parts:
- The stationary part is a small bench that always remains in one position, regardless of whether the transformer is unfolded or not;
- The movable part of the bench, when folded, complements the stationary part, increasing its size in width. In the unfolded position it is an independent seating area;
- The back of the bench. With any transformer design, it is always connected by hinges to the moving and stationary parts.
The size of the table with benches, into which the transformer turns when unfolded, is equal to the dimensions of the backrest. Therefore, such schemes in the folded position always have unusually high back support, which only increases the level of comfort for tall people and children.
The design of the bench does not involve the use of clamps or clamps; everything is held under its own weight
Important! All hinge joints are bolted and bushed and no door hinges or hinges are used. This solution increases the rigidity of the structure and makes it possible to build a transformer at the lowest cost.
The step-by-step instructions shown in the photo below will help you figure out how to fold or unfold a transformer bench with your own hands.
Folding diagram - grab the back and seat and pull it towards you
The transformer rotates around the hinge and moves into table position
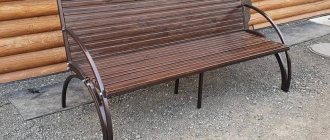
Elements of a metal structure can be rounded in the form of arches or rectangular. If you wish, you can find your own drawings for a transformable iron bench made in an unusual square style.
The shape of the racks does not affect the performance of the circuit and is determined only by the individual preferences of the future owners. One of the transformer bench models, available for DIY assembly, is shown in the video
Wooden benches - folding beds
Models made from oak or larch wood look more attractive, although the operation scheme is practically no different from their metal counterparts.
Important! The only significant drawback is the impossibility of completely disassembling the wooden transformer.
If a bench on a metal frame can be disassembled into separate parts and assembled in the spring, then wooden furniture will have to be hidden in assembled form in a country house for the winter.
Transformer benches with unusual designs
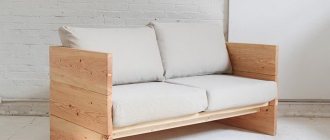
Folding benches do not have to turn into a structure of two benches and a table. For example, to make your own, you can choose a design for a bench with a reclining backrest. In this case, the transformer is assembled in the form of a set of sections that can easily be converted into a folding table.
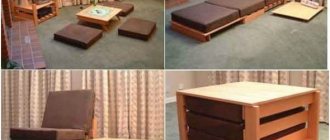
Another extremely interesting diagram of a transformer bench is presented below. The dimensions of the furniture do not differ from conventional models, but thanks to the special design of the seat and backrest, the latter can be quite easily hidden in the lower part of the structure.
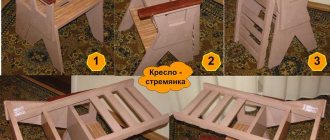
A very simple shop - the transformer is shown in the photo below.
In terms of its design and operating principle, it resembles a folder or suitcase. Of all the options given, this model is perhaps best suited for working in the country during the summer season.
The nuances of creating a metal structure
To create a metal frame for a transformable country table-bench, you can connect the component parts at different angles. This is allowed under one condition: if the metal profile cuts are perfectly smooth. You also need:
- Think about the angle of the end cut in advance.
- Cut the profile using an abrasive wheel or grinder.
- Before painting the finished transforming bench, thoroughly clean all seams and surfaces.
- Be sure to include welding electrodes in the list of consumables.
Holes for screw and bolt connections must be made with drills of different calibers. Then these holes are used to solder the frame to the wooden part of the product. If the drawing of a transforming bench includes rounded or curved parts of irregular shape, it is necessary to prepare a special device for bending pipes. As a metal profile, you can use the material from which the frames of garden gazebos are usually made.
A transforming bench must be strong and stable, and also match the height and weight of those who will sit on it. Under this condition, the product will last a long time. If you don’t want to make a bench yourself, you can pick up original models in furniture stores, the main thing is to decide on the size. Furniture in the form of a bench-table will look good both at home and in the country. However, provided that it is placed outside in the summer, the transformer must be brought into a warm, dry room for the winter.
Prepare a profile
Cut the pipes into pieces of the required size
Assemble the bench frame
Weld the elements
Make a second seat
Assemble the structure, install boards
Finish all parts
What tools and materials will be needed
For the manufacture of transformers, a square or round water pipe, wooden slats, timber, board, self-tapping screws and furniture bolts are traditionally used. To work with the material you will need:
- Angle grinder with cutting wheel for metal;
- Welding machine;
- Pipe bending device or machine;
- Marking tool.
If the transformer bench is planned to be made from wooden slats or timber, then you will additionally need to purchase a screwdriver and a sander with a sanding belt.
Most of the work on making a transformable bench will have to be done in a home workshop or garage. Regardless of the design scheme, the bench parts are made separately, welded or bent on a pipe bending machine, painted and transported to the assembly site at the dacha.
Product Features and Benefits
Transformable benches are simple but functional designs. The main difference from ordinary country furniture is the presence of special mechanisms. When folded, it is a simple bench; when unfolded, it is a spacious table with a pair of comfortable benches. The products are portable, so they are suitable for installation in any corner of the site. Folding bench models have a number of advantages:
- Compact - when folded, the bench takes up very little space.
- Multifunctionality - additional seats and a table appear due to simple manipulations.
- Durability – benches made from well-chosen material are characterized by a long service life.
- A simple mechanism - even a child can handle it.
- Versatile – suitable for use in a country house, country estate, or garden. Benches play a decorative role in landscape design and are comfortable furniture for family gatherings.
The folding model has an attractive appearance. It looks noble even without the use of decor. In addition, the bench is quite easy to make yourself.
Compactness
Multifunctionality
Durability
Simplicity of the mechanism
Versatility
Drawings, dimensions with descriptions and assembly diagrams of the transforming bench
At first glance, the structure of the bench seems so complicated that to assemble the furniture you must use drawings and a detailing diagram. Formally, this is true. If you make a transformable iron bench with your own hands in a private house, then the drawings can be successfully replaced with several sketches. It’s another matter if the parts for making the bench have to be ordered from a locksmith workshop. In this case, it will not be easy to assemble a transformer bench without details, drawings and dimensions.
Drawings of the most successful model of a transformable metal bench for a summer residence
According to the scheme, this design is no different from the rectangular options, but there are practically no welded joints, which means that most of the parts can be made using a homemade method. You can make drawings of a transformable bench from a rounded profile pipe yourself or use the bench dimensions given below.
Despite its decent size, this transformer circuit is rightly considered one of the most reliable and safe to use.
The only exceptions are the arches of the right bench and the base of the backrest. Additional bushings will need to be welded to the arcs to install the bolted connection. Few people pay attention in the drawings of a transformer - a bench made of a square pipe - to the presence of additional welded elements - bushings. Most people make the grave mistake of trying to drill holes directly into a square pipe. Due to the small cross-sectional size of the material, this is strictly forbidden, otherwise the profile may burst under load. If it is impossible to weld the bushings, for example, there is no welding, then it is better to find drawings of a transformer on a round pipe.
The table, also known as the back of the transformer, is assembled in a frame made of a metal profile, therefore, despite its small size, the strength of the tabletop is quite large.
Important! Unlike other models of benches, the size of which rarely exceeds 150 cm in length, in this scheme it is 180 cm, so vertical supports made of a round pipe are used.
This means that the transformer can withstand a significantly greater load than models with rectangular supports.
Drawings of a transformable garden bench made of wood
Building a bench out of wood may seem more complicated, but this is not entirely true. If you take a closer look at the drawing and detailing below, it turns out that the structure is simply planned out of more elements.
This is what a drawing of a classic transformer looks like - a bench made of wooden slats.
Diagram of a transformer with an attached bench. The dimensions of the structure can be changed, since the seat width of 183 mm is not enough for an adult
In fact, the most difficult stage is assembling the frame of the benches; it has to be done according to the details given below.
It is best to press steel bushings at the hinge points, and a bolt with a nut will be used as a rotary axis.
Briefly about the main thing
Folding garden furniture is convenient not only when there is a lack of space on the recreation area. When the table is not needed, it is removed with one movement of the hand, turning the dining set into a comfortable bench with a backrest.
To have this opportunity, learn how to make a transforming bench with your own hands. A simple structure can be made from either a metal profile pipe or wood.
This will require ready-made detailed drawings, since the most difficult thing is to manufacture all structural elements in exact accordance with the project. Combining them into a single whole is a matter of technology. After looking at the photos and videos in this article, you will surely cope with this task.
How to make a transforming bench from a profile pipe with your own hands
To assemble the best model of a folding bench, you will need the following set of parts:
- Two V-shaped swivel posts;
- A pair of central supports, rolled in the form of a semicircle with an additional welded joint and fastening under the backrest;
- Two L-shaped stands for assembling the back of the transformer. The vertical dimension determines the width of the folding table;
- Two sections of profile pipe to fit the overall width of the bench; they will be used to form the frame of the tabletop;
- A pair of rectangular frames, from which the bases for two benches will be made;
- Short sections of pipes, from which vertical supports for benches will be made;
- Wooden slats for lining table tops and transformable benches.
This set can be easily transported by car to a dacha or country house. In this case, a drawing is not required for assembly, since all elements of the transformer are easily identified without additional detail.
Important! The transformer bench is assembled using bolted connections, so you only need a pair of keys and a screwdriver to operate it. The wooden cladding is secured with self-tapping screws.
The general view of the transformer bench is shown in the photo below.
Assembling the posts and base of the bench
First of all, we assemble the stationary part of the bench - the transformer. To do this, we bolt half-arch supports to the rectangular frame on both sides. It is clear that the length of the bolts must be at least 60 mm.
Next, we attach the L-shaped elements of the back frame to the bushings welded on the half-arches.
The next step is to secure the V-shaped elements of the folding bench. The dimensions and curvature of the arc of the racks are not particularly important; the main requirement for the drawing is that all three elements must be located in the same plane.
We assemble the back and sew on the facing
To form the frame of the future tabletop, we sew horizontal crossbars from a rectangular profile in the lower and upper parts of the L-shaped sidewalls.
We fill the back space with wooden slats, everything as per the drawing. The dimensions and material of the cladding can be chosen arbitrarily; plastic or OSB can be used.
Next, we attach the second rectangular frame to the V-shaped elements. Its dimensions are similar to those of a stationary bench.
All that remains is to unfold the transforming bench, adjust and adjust the dimensions and gaps in the joints, and sew up the horizontal surfaces of the benches with a wooden board or timber.
Decoration
A transformable table-bench that is located outdoors requires special treatment. A stain is used for the wood, and a varnish with water-repellent properties is used on top. But even after this, it is not recommended to leave the products in the open air. The vagaries of the weather negatively affect its durability and appearance, so you can move the structure to the veranda or gazebo and cover it with a canopy.
If you create a bench with your own hands, you can decorate it in all sorts of ways. The decor on the seats and backs looks most attractive. For this we use:
- images painted with multi-colored acrylic paints;
- drawings using decoupage technique;
- charming pictures created with an electric burner;
- floral ornaments and patterns carved on wood;
- figurines of animals, fairy-tale characters, cut out with a jigsaw.
If the design was done correctly and the finished product is maintained regularly, its service life can reach 25 years or more. Often, wooden elements of benches are replaced with metal ones; it does not look so attractive, but the durability increases significantly. A convenient and practical garden bench is always relevant in a summer cottage or suburban area. Sitting on it, you can enjoy your vacation, admire the picturesque landscapes, and talk with loved ones. You can make such a useful piece of furniture yourself, which allows you to bring to life the most interesting design ideas.
How to make a transforming bench with a canopy
The easiest way is to use a ready-made bench design with arched posts. One of the options for building a canopy over a bench - a transformer - is shown in the photo below.
In general, a frame made of rectangular or round pipe is sufficiently rigid to support the weight of the canopy and posts.
The frame base of the canopy will be assembled from three half-arcs, bent on a pipe bending machine from blanks measuring 150 cm. The shape and curvature can be chosen arbitrarily. From this material you will need to cut the rear straight pillars and the front arc ones.
All four elements are welded using a welding inverter to the lower arched supports and the L-shaped sides of the backrest. The assembly can be done without a drawing; it is important that the vertical projection of the line of the center of gravity of the visor is in the same plane with the middle point of the bench. Otherwise, the transformer may tip over when unfolding.
Log bench
The site can be decorated in any style, but almost everyone moves away from standard approaches to solving the problem. Everyone wants to have something of their own. But not everyone knows that what is new is an improvement on the old. As an option for a new, but somewhat improved old one, this is the option of using a log as a bench. As a seat, you can use a log of large diameter, sawn lengthwise. A log of smaller diameter, also sawn lengthwise, is used as a backrest. Or a trunk with a smaller diameter, but cut closer to the edge. Narrow sections of logs are used as legs.
Log bench - quick and easy
The legs and seats are connected to each other using metal pins. Holes of slightly smaller diameter are drilled for the pins. The pins must fit into the holes with force. In this case, half of the pin is driven in by hitting the pin, and the other half is driven in by hitting the wood. As a rule, they do not hit the wood itself, since marks from the hammer may remain, but with the help of a wooden point. Such a connection must be reliable, although there are many mounting options.
Bench option without backrest
In the photo just above, you can see another option, in the “ethnic” style. Its organization is associated with the presence of stone, although this option is quite feasible if there is a log. A fairly thick log is used as a seat, and a part of a large diameter log is used as legs. In one and the other part of the deck, grooves are cut for the seat. An ax or grinder is used as a tool. Alternatively, you can use a chainsaw. These are not post-Soviet “Friendships” or “Urals”, which have significant weight, and are, perhaps, convenient for felling pine trees in Siberia. If you take the Calm chainsaw into service, then with its help you can make even lesser works of art.
It is possible to make a table from logs, which is simply necessary in the country. In the photo you can see the results of such actions. The tabletop is made of boards, and the rest of the ensemble is made of logs of different diameters.
Table with log benches
The next bench, built in this style, has a completely original design. Here, the legs and armrests are made of branches of various thicknesses, and the seat is made of processed, high-quality unedged boards.
How to make a transforming bench-table from wood with your own hands
First of all, you will need to make two identical benches with a trapezoidal structure of the legs. At the top of each bench, additional bars are sewn on both sides, the size of which is equal to the length of the lower crossbar. In order not to make mistakes in the assembly, you can use the drawing; the main thing is not to rush to drill holes for the hinges. Typically, bushings at the rotation points are installed after the final mutual adjustment of the dimensions of all elements of the transformer.
The next step is to make the tabletop, its dimensions are chosen as the size of the bench in width plus twice the thickness of the timber, from which a large rail and a triangle are cut - the support. The size can be selected according to the drawing or the length can be adjusted during the assembly process.
Inverted bench made from scrap materials
Used furniture can be given a second life if you approach the matter creatively. Often the household has a chair on a durable metal frame, which is very easy to convert into an inverted bench.
How to assemble:
- Free metal parts from all other parts. Clean the surface from rust and old paint.
- Cut 27x30cm stands from plywood or chipboard. Prepare a 20x50 cm rectangle for the seat. Dimensions can be arbitrary.
- Tie the parts together using a wooden block or board.
- Secure the metal frame of the chair to the sides.
- Cover with waterproof film or fabric, padding with foam rubber for softness.
This inverted bench is convenient to use when planting or weeding beds in the garden as a knee rest. To do this, you just need to turn the seat towards the ground.
How to make a transforming chair-bench for a gardener with your own hands
The simplest transformer, designed for one person, can be made from a profile pipe and a wooden slat. One of the options for such chairs is presented below.
The dimensions of the pipe are 25x25 mm; when unfolded, the circuit may be unstable
The design is based on a metal frame made of a 25x25 mm profile pipe. You can make it yourself or order it from welders according to the drawing.
The trick to this scheme is the use of folding metal frames, for which corresponding grooves are provided in the vertical posts of the chair.
The tabletop and seat can be made from slats and plywood.
Important! The only inconvenience is the incorrect location of the center of gravity of the structure.
A child can sit on such a bench without risk, but for adults it will be necessary to assemble a structure from two transformers.
What is the convenience of such a bench?
- Saving space on the site. In a small garden, a full-fledged recreation area (table + benches) takes up an prohibitively large amount of space and often interferes with convenient passage through the territory. When folded, the transforming bench is compact and unfolds only for the period of feasting, like a book-table in the living room.
- Constantly being outside. The owners of such a bench do not have to take the kitchen table out into the yard for every reception. The garden bench is treated with specialized anti-rotting agents and can stand under a tree throughout the warm season.
- Aesthetics. If you wish, you can create a bench that best matches the exterior of your home. For example, a massive wooden bench would be appropriate near a log house; next to a house covered with siding, a bench with a metal frame looks good; A modern country house should have a loft bench.
A transforming bench with a metal frame looks great against the background of a wooden gazebo
One of the main advantages of this design is the ability to make it yourself on a moderate budget. After all, you won’t need store-bought mechanisms, as when creating home furniture.
Design options
Despite the fact that almost all models of transformers use the same scheme, almost all home-made workers try to design a folding bench in their own way, to make its design more individual and attractive.
Preparing to create a bench-table
Selecting the optimal material for manufacturing
An element of furniture such as a transforming bench can be purchased at any hardware store, but you will agree that it is much more pleasant to accommodate guests and relax comfortably on a product of your own making, because it is not only a beautiful design, but also a source of pride for you. However, before you start working directly, you must definitely decide on the material from which the bench will be made.
As a rule, wooden materials are used to construct a high-quality bench. Moreover, in addition to natural wood, plywood or PVC can be used. Undoubtedly, the first option will be more expensive, but, as a result, it will serve you not for 3-4 years, but for about 35-40 years. In addition, wood has a number of advantages.
Advantages:
- Environmentally friendly material;
- Safety;
- Long service life.
An important note to pay attention to when using wood: before use, be sure to coat the bench with an antifungal agent and also paint it with varnish. This will be an excellent prevention of rot.
Project drawing
In order for the design to be of high quality and convenient, it is recommended to make a drawing. If for some reason you do not have the opportunity to do it, then a ready-made circuit would be an excellent solution. When drawing up a drawing or selecting it from the Internet, 4 conditions must be observed:
- The image of the final structure should be firmly fixed in your head. You can't miss it during construction.
- The dimensions of the future transforming bench must correspond to the area where the structure will ultimately be located.
- It is recommended to compare the entire progress of work with the drawing, so it must be clear and of high quality (in the case of printing a photograph from the Internet).
- At the very beginning, you should calculate and record the dimensions of the moving parts, which will subsequently be firmly fixed to each other.
Below is one of the drawing options on which further work will take place:
Classic version of the drawing
Tools and materials
To create a transforming bench we will need the following tools:
- Hacksaw;
- Roulette;
- Sandpaper;
- Chisel;
- Drill;
- Bolts with nuts.
The materials we will use during construction are listed below:
- Wooden beams;
- Edged boards;
How to treat a folding bench-table
In order for a folding bench-table made by yourself to last a long time and maintain a presentable appearance, the finished product must be treated with special compounds. Putty intended for working with wood is applied to the screws and nails. The mass is applied and distributed in an even layer with a special rubber spatula. Wait until the composition has completely dried, and then sand the treated areas with fine abrasive sandpaper.
Varnish is used as a finishing finish. The store offers a wide range of varnish coatings - from transparent, highlighting the texture of wood, to colored. If you apply several layers of colored varnish, the surface will become mirror-glossy.
When using noble types of wood, it is customary to highlight the beautiful texture of the resulting garden furniture. Oil or drying oil in natural colors will help with this. After varnishing, it is advisable to apply a weather-resistant furniture coating. The composition will protect against the harmful effects of precipitation.
If rough welds on metal parts are visible to the naked eye, go over them with an abrasive wheel. Next, spread the paint mixture with protective characteristics against corrosion. Now your folding bench is ready for use. If you have done everything according to the instructions, the bench will delight your household and guests for at least 7 years, and if treated with care, it can be longer.
Step-by-step manufacturing instructions
- We start by making parts that will later serve as the legs of the structure: to do this, we cut out 8 similar sections 70 centimeters long.
- We make cuts on the sections above and below at an angle of 10 degrees. This ensures your bench is balanced when installed on an incline.
- Then we make frames for two benches from edged boards: we cut out 4 elements, the length of which is 40 centimeters and 4 segments 170 centimeters long.
- Now we cut the corners on all the parts from step 3 so that we can make two oblong rectangles.
- Connecting rectangles. It is recommended to use screws or nails for this. Important! If you decide to use option 1, you first need to drill a hole.
- Let's start creating reinforcing elements in the frame. These parts will finally form the seat. This is where we need timber: it should be nailed at a distance of 50 centimeters from each other. Due to this, the structure will be reliably protected from lateral deformation.
- We attach the legs to the structure: to do this, 12 centimeters from the corners, we attach them to the seat using 2-3 bolts (must pass through the beam and part of the legs at the same time) so that they are firmly secured. It is also recommended to make grooves in the timber to cover the bolt heads, and remove excess under the nut using a hacksaw.
- We make a rectangle from timber that exactly matches the length of the benches - 70x170 centimeters. From the inside, the part is connected by additional stiffening elements. This rectangle will subsequently serve as a backrest or a table (depending on what position you give it).
- All that remains is to form a common structure from all the elements. Important! Since you will have to work with large parts, it is advisable to call an assistant rather than perform the manipulations yourself. We cut 2 beams 50 centimeters long and place them between the bench and a large shield. We fix them at the bottom of the shield, but on the side of the bench.
- We cut out 2 bars again, only this time 110 centimeters long. The bars are fixed on another bench in the center. This is done to make docking more convenient.
- The final stage of the technical side is the cladding. We cover the outside of the transforming bench with either laminated chipboard or edged boards.
You will end up with such a transforming bench
Finishing
Since the structure can be located both in the house and on the site, it can be covered in various ways.
- If your bench will be located indoors, then stain or varnish . As a rule, such a coating dries within 36 hours.
- If outdoors, then the optimal solution is to use waterproof paint that dries within 24 hours.
It is necessary to treat the structure with products, otherwise the wood may begin to rot under the influence of moisture and quickly become unusable. It is recommended to renew the paint every 2-3 years - this way it will be better protected from bacteria.
The transforming bench can be made in any color. Unusual design of the transforming bench To prevent the wood from rotting, treat the surface once every 2 years
Bright version of a bench with benches
The constructor bench will be an excellent addition to the site
Bright wooden benches
Optimal sizes and popular models
For beautiful wooden benches to be useful, it is important not only to have a back and armrests, but also to have the correct dimensions. Garden furniture with the following parameters will allow you to relax comfortably:. Seat height does not exceed 40-50 cm
In this case, the legs of an adult rest comfortably on the ground
The seat height does not exceed 40-50 cm. In this case, the legs of an adult rest comfortably on the ground.
For connoisseurs of exoticismSource pinimg.com
- Seat width: 50-55 cm, back height is also about half a meter or slightly lower.
- The backrest is designed with an ergonomic tilt of 20-40° (from the vertical).
- If the model has armrests, their height from the seat does not exceed 15-20 cm.
A combination of styles is always in fashionSource pinimg.com
Many designs are successful not only because of their beauty, but also because of their practicality. Our favorite models include the following bench models:
With a flower bed. Amateur gardeners are partial to furniture that has flower boxes or flowerpots built into its supports. The composition fits organically into any environment and at the same time allows the owners to demonstrate their hobby.
Practical solutionSource 6sotok-dom.com
Around the tree. Owners of a plot with a spreading, shady tree can take advantage of this advantage and build a circular recreation area. It will turn out compact, original and spacious.
Circular bench with decorative armrestsSource divo-dacha.ru
With a canopy. There are many options: from corrugated sheets and polycarbonate, to thick fabric and bamboo. Benches with a canopy in the form of an improvised pergola or trellis decorated with climbing plants look romantic.
Under a polycarbonate canopySource dizainexpert.ru
Transformers. The owners of small plots of land approve of the design, which turns from a bench with a back into a table with a pair of benches. Where you have to save space, a transforming model can gracefully transform a relaxation area into a dining area and back.
TransformerSource besplatka.ua
Bench built into the supporting wallSource pinimg.com
What is a garden bench used for?
It is necessary to analyze all the requirements for structures, consider what functions they perform, and decide what is suitable and what can be done without. Garden benches are used differently than furniture at home, plus they are located outdoors. Therefore, the following requirements are imposed on them:
- Convenience. Most often, the product has a backrest; you can add armrests on the sides. It is better to put pillows and make them removable so that you can put them away when the weather is bad outside or when the cold season sets in.
- Practicality. The product should not take up much space, clutter up space or interfere with movement. You need to select the size based on how much space is available. If there is very little space, choose a model without a back and place it against the wall so that you can rest your back.
- Appearance. Make a bench for your garden with your own hands so that it matches the surrounding objects. Take into account the color, style of execution, and other features, if any. Do not allow the product to look like a foreign object or not fit into the decor.
- Weather resistant. Garden benches and benches must withstand precipitation and temperature changes without harm to the material. Therefore, you need to select something that will withstand all impacts and last at least several years. Repairing or remaking furniture every year is a bad option.
- Dimensions. Make a bench for a certain number of people. If it is difficult to build a large version, you can make two or even three small products. Most often they are decorated in the same style to get a ready-made set.
- Safety. There are many requirements: the product must withstand the load, not sag under the weight of people and not wobble. All surfaces must be sanded so that there is no danger of being scratched or splintered. Place the bench firmly or concrete it in the ground, if necessary. Do not place it very close to a body of water.
Important! You need to consider where the country bench will be located. Outdoors it is better to use the most reliable materials
If under a canopy, then the adverse effects will be much lower.
If it is possible to take the structure outside for the summer season and bring it into a storage room or shed for the winter, it is better to do just that. The bench will last much longer; it gets damaged the most in winter.