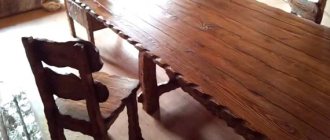
The modern furniture market offers furniture of various styles to suit every taste and budget. In the exhibition pavilions you can find luxurious, royal-like beds, armchairs, chests of drawers, which can be placed in a huge room.
You can also find more modest, but tastefully decorated, elegant sets. There is also very simple and cheap furniture.
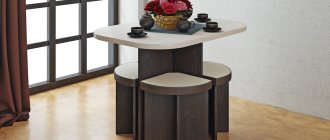
The transforming cube can serve as a bedside table, a table with poufs, an armchair and a full-fledged bed
A special feature is the transformer, which demonstrates extreme compactness, versatility of use and extreme simplicity. It fits perfectly into rooms decorated in a minimalist style and allows you to increase your living space, filling it with air and light.
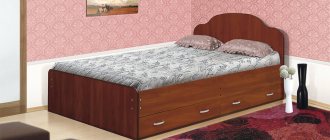
A double bed in the living room will not take up much space during the day and will become a comfortable bed at night
Drawings and assembly diagrams for such furniture
Let's consider the main advantages of transformers:
- compactness of products;
- design innovations in home style;
- it is potentially possible to connect two rooms;
- variety of products;
- the opportunity to make a creative original product (for yourself);
- development of carpentry skills.
Transformable furniture will fit well into a small apartment or house, as it can replace several full-fledged products at once.
Of course, it is easier for some people to purchase transformable furniture, but craftsmen will choose to make the necessary things themselves. Manufacturing drawings can be found on the Internet, on specialized resources, or you can draw them yourself.
It allows you to turn one room into another, for example, turn a living room into a bedroom and vice versa.
General principles of this scheme:
- take into account the size of the object where the described product will be located;
- accurate data of the entire structure;
- types of materials to be used;
- type of folding product.
A transformer for a small apartment will fit perfectly in a small room, and the multifunctionality of the furniture will satisfy all the owner’s needs.
Installation
Before starting installation with your own hands, it is advisable that you coat the transformer with varnish, which will help prevent rapid deterioration of wood elements, as well as increase the service life of the product and prevent rotting of wooden elements.
Installation is carried out as follows:
- The installation itself involves attaching the frame to the wall. This will help ensure the stability of the structure.
- Next, you can place the mattress on the mattress pad.
- It is advisable that nearby places be provided for storing bed linen - this could be a cabinet that will be located next to the bed or even attached directly to the transformer box.
- Such cabinets should be roomy enough to hide not only bed linen, a blanket, but also pillows.
As you can see from the information described in the article, making a transformable bed in the form of a folding wardrobe can take a lot of time, but with careful planning and making an accurate drawing, you can make such a bed quickly enough, especially if you have help. By making such a bed yourself, you can save up to 70%.
How to make a transforming mechanism for furniture
There are plenty of types of lifting mechanisms on the market today. Let's consider the equipment that is used for beds. The most popular devices: mechanical and gas springs. The first ones work by tensioning springs. The second type is spring shock absorbers (gas lifts). There is also a hinge mechanism - a design where a person puts more effort into raising the bed.
At the moment, manufacturers offer many interesting options.
Making a folding device is not easy, but it is possible if you follow the instructions:
- We make the top rail (corner) from metal parts;
- the bottom rail is flat (attached to the box);
- it is necessary to connect the slats with two metal, moving (bolted) vertical slats, one larger in size;
- We buy, for example, a gas lift and attach it to a metal base.
The mechanism of transforming furniture wears out quickly, which can lead to its premature failure.
Important! It is better to buy this mechanism in a specialized store. The sofa bed is made by hand, and the device, as a rule, is purchased.
Design
According to the type of design, a transformable bed can be:
- vertical . This product is a two-meter-long wardrobe, the head of which is fixed to the wall, and the sleeping place is hidden in the closet during the day;
- horizontal . Such models are equipped with a single bed attached to the wall on the side;
- roll- out These are the most common models in which the lower built-in part slides out and forms a spacious sleeping area. Such models are suitable for arranging children's rooms and adult bedrooms;
- lifting _ This product is equipped with a pneumatic mechanism that easily allows you to remove the bed into a niche in a wall or cabinet.
In addition, the transformable bed can be a folding pouf. That is, when folded, the product is a regular pouf, and when unfolded, it is a small sleeping place. Round transformable beds are also popular, ideal for small children. They are safe because they have no sharp corners.
If there are two children in a family, it is recommended to install a transformable bunk bed in the room. This design has one mechanism by which the product folds and unfolds.
As for additional features, transformable beds are unique and versatile:
- beds for adults can be transformed not only into wardrobes and sofas, but also tables, chests of drawers, closed shelves;
- children's models are equipped with: changing tables, chests of drawers, drawers. Such products can be supplemented with lighting or a canopy.
How to make a transforming sofa bed with your own hands
To create this sofa you will need the following tools:
- drill and various drills;
- hacksaw;
- screwdrivers;
- furniture nails (screws, self-tapping screws);
- tape measure and pencil;
- grinding materials.
Materials you will need:
- boards;
- plywood;
- hinges (or other mechanism);
- dye;
- varnish
It is necessary to select well-dried raw materials, otherwise the furniture parts may become deformed after assembly.
How to make a drawing of a transforming sofa bed with your own hands:
- the diagram must demonstrate the monolithic structure and each part separately, including the smallest elements;
- the correct drawing will make it possible to calculate the amount of material needed;
- It is also possible to find suitable projects on special resources on the Internet.
Drawings and diagrams must be made to a strict scale and clearly correspond to reality.
Installation is carried out as follows:
- We form a supporting structure from the boards and secure it with screws;
- we strengthen the box with transverse bars;
- we fix the casing at the end, and where the drawing suggests;
- attach the front pillar;
- We place a cross beam, focusing on this element, and attach an end board on top;
- we attach the plywood to the box (reinforce it with boards);
- We make a folding element from plywood, simply attach it to the end with a board;
- Now we connect the two parts with a lifting mechanism.
All dimensions should be clearly defined in advance.
Note! Proper drawing is the key to the successful implementation of your project.
Where to begin
A popular model of folding furniture is a transforming bed for a children's room, as it helps not only to compactly equip a sleeping area, but also to create an interesting play area for kids, and in some cases, a place to store toys.
It is not difficult to make such a structure, the main thing is to draw up the drawings correctly, prepare the necessary parts and components, and then, using carpentry tools, assemble it all in strict sequence in compliance with the technical conditions.
To make a transforming bed you will need the following materials:
- MDF boards, the thickness of which is 20 mm;
- durable plywood;
- nails;
- loops;
- screws;
- magnetic clasp.
To assemble the structure, the following tools are needed:
- circular saw;
- drill;
- screwdrivers;
- grinding angle;
- sandpaper;
- roulette;
- pencil.
Before you start work, you need to correctly draw up a project and drawings indicating the number, type and size of parts. In this case, the structure consists of a supporting box and a special base, which, when unfolded, is the inner part of the bed, and when folded, it is the outer part of the closet.
Making a lift bed
A bed that can be folded saves a huge amount of space in the apartment.
Taking into account the measured data, a bed assembly diagram is drawn up.
How to make this design:
- project preparation (drawing the drawings yourself or selecting the desired diagrams on the Internet, purchasing materials and tools);
- be sure to pay attention that there is a sufficient number of plates (lamellas);
- the bed frame is placed on reliable wooden beams;
- side markings are made;
- installation of the monolithic bed structure begins;
- a front panel is attached on top of the structure (this is the bottom - it can be covered with a laminated chipboard sheet);
- the bed frame is fixed to the wall;
- a lifting mechanism connects the body and the bed itself;
- We make boxes for clothes according to the drawing.
The set of accessories depends on the selected product model. You need to think through everything in advance, make a list of the necessary elements for assembling the furniture.
Additional Information. Choose a mattress according to your desires. Orthopedic options are popular today.
Required Tools
The set of necessary tools for making it yourself will also differ, depending on the type of furniture chosen. The general list will include:
- hinges for facades;
- metal or plastic connecting angles;
- drawer guides;
- electric drill with a set of drills;
- clamps;
- cutter;
- hammer;
- iron;
- jigsaw or hacksaw;
- measuring instruments.
This list may vary depending on the selected model
Wardrobe, bed, transforming sofa 3 in 1
What is this product? A wardrobe and a sofa during the day, and a bed at night. Of course, such a complex structure will consist of: a cabinet, a lifting device, fasteners, and a frame structure.
If a home craftsman has at least a little experience working with carpentry tools and the materials that are used to make it, he can make it himself with his own hands.
- four board sides are the frame;
- the pins in the frame must be secured with glue;
- for reinforcement, it is necessary to attach a rail along the entire perimeter of the resulting rectangle;
- the base of the bed is plywood or boards;
- the closet also requires a frame, which is made identically to the previous version for the bed;
- classic legs - bars;
- choose the lifting device according to your wishes (the spring mechanism also works well on these beds).
To make transformable furniture with your own hands, you need a drawing with accurate measurements of the product being designed.
Important! They buy or make transformable wardrobes not only for small houses. For a modern style, where the functionality of objects plays a huge role, you can often find a similar “troika”.
Necessary materials
The set of necessary materials will directly depend on what type of furniture the home craftsman chooses. However, there is a list that is present with any choice.
| Material | Main settings | Where is it used? |
| laminated chipboard | Plates with thickness from 10 to 22 mm | Manufacturing of cabinets and shelves with high bending strength |
| MDF | Durable sheets Increased moisture resistance and density | Countertops, bench seats, kitchen fronts |
| Tree | Solid wood, timber | Any products |
| Foam rubber | Soft, comfortable, inexpensive | For stuffing upholstered furniture |
| Glass | Thickness from | For decorating cabinets and shelves |
| Furniture fasteners | Different kinds | For all products |
| Furniture fittings | Various configurations and purposes | For decoration When decorating cabinet doors, drawers |
DIY transformable children's bed
Very often children's rooms have a small square area. And this room should have equipment for study and recreation. The bed occupies a large area, so transformers are often used.
To make a transforming bed with your own hands, you need to move step by step, without missing any important moments in preparing and performing the work.
Basic recommendations for making a transformable children's bed with your own hands:
- we make a bed box from boards;
- we make a wooden niche in the form of a rectangle, mount it to the wall using corners;
- we attach lifting equipment to the created objects;
- put on the mattress.
When drawing up a drawing, extreme accuracy and precision in the dimensions of the product are required.
Children really like the mechanism of this bed, so they will be happy to accept such transformations in their room.
Despite its apparent complexity, it is not very difficult to make.
Creating a transforming bed is not as difficult as it seems at first glance. The main thing is a little patience and following the appropriate instructions.
Transformable furniture in the interior takes up less space than standard items.
Finishing
If desired, the inside and outside of the box can be covered with a special material that does not allow moisture to pass through.
To make it decorative, a wooden product can be coated with stain, varnished or painted .
To make the transforming bed look believable and resemble a real closet when folded, fittings are applied to the outside.
Expert opinion
Smirnova Ekaterina Anatolevna
7 years of experience in interior design, professional architect
The end sides are decorated with PVC adhesive tape , which is applied to the product, heated with a hair dryer and pressed firmly.
Such furniture is not only functional, but also beautiful:
Photos of 50 design options for transformable furniture in the interior
Types of pendulum beds and their features
Like almost any type of bed, pendulum beds have many different shapes and configuration features. Let's look at their main varieties.
Shape: rectangular, round, oval
As a rule, cribs are rectangular in shape. However, recently, cribs of round and oval shapes have begun to gain popularity.
The diameter of round cribs usually does not exceed 90 cm, that is, they are intended for children from birth until 3-6 months, after which the crib needs to be changed. Often, round cribs are transformable and when the child reaches a certain height, they easily lengthen, turning into oval ones.
Photo: Pendulum crib and its varieties (by shape)
Oval shapes do not have any special advantages over rectangular ones and are usually a kind of “item of status”. Such cribs are not very convenient to place against a wall; as a rule, they look more beautiful and organic in the center of a child’s room. You should also keep in mind that the cost of mattresses and linen for round and oval cribs is slightly higher than the cost of similar products of standard rectangular shapes.
By type of pendulum: manual, automatic
The easiest way to rock is manually, and the pendulum mechanisms are triggered even by a slight push and, by inertia, rock several more times, which may well be enough to put a baby to sleep if he wakes up in the middle of the night.
Mom doesn’t even need to get out from under the blanket for this. This significantly saves the mother’s energy during long periods of rocking the baby.
An electric pendulum does the same work, but without human intervention. Some automatic pendulums have sound sensors and turn on when they “hear” that the child has begun to wake up. However, this function is not always convenient, since the mechanism cannot distinguish the place of origin of the sound and can rock an empty crib for 15-20 minutes just because a screaming child just ran past.
According to completeness: without drawer, with drawer, with chest of drawers
Many cribs have additional equipment, for example, under the berth there can be runners for a retractable linen drawer, in which you can also store toys and other children's things.
Some models have built-in children's chests of drawers with changing tables. This “hybrid” is very convenient to use and allows you not to waste money and effort on finding additional children’s furniture that matches the style and size. However, please note that these beds will be equipped with a transverse pendulum.
The simplest cribs do not have changing tables or cabinets, however, parents can independently add suitable size drawers, chests of drawers and other necessary items to the crib.
Mobility: on wheels, without wheels
Most cribs are equipped with wheels with locks, and some cribs, in principle, cannot be used without wheels. Cribs with legs (without wheels) are also found and, as a rule, belong to a lower price segment.
However, the presence of wheels is not so necessary: anyway, the crib spends most of its time with fixed wheels, which is not fundamentally different from a crib simply installed on legs.
Difficulty: transformable bed with pendulum
Transformer beds, as a rule, have a whole set of additional parts and even types of furniture that can be used by both a baby and an older child. Often, such a crib first has the size of a cradle, then it is extended into a crib with a side, and for an older baby it turns into almost a full-fledged bed.
Photo: Transformable bed and options for its transformation
Such cribs can also be equipped with a pendulum mechanism, of course, in configurations designed for the little ones.
According to bed size
The standard size of a sleeping place for babies is 120x60 cm. Larger cribs are less common - 140x70 cm.
The same dimensions are used by textile factories when sewing children's bedding.
But demand creates supply, and the widespread use of round and oval cribs has led to the emergence of other bed sizes:
- round with a diameter from 65 to 90 cm, with the most popular diameter being 75 cm;
- oval with dimensions from 90x60 to 125x75 cm.
Step-by-step instruction
Before proceeding with direct assembly, you need to carefully study all the diagrams, as they may differ from the instructions presented below:
- The work begins with connecting the fixed parts, namely the side part. The headboard must be connected to the side and bottom with screws.
- The upper bottom is secured on all sides.
- A movable sidewall is mounted. It is inserted into special grooves located on the side walls. Fixation is done using screws.
- The next step is assembling the pendulum. The guides need to be secured between its backs. In the span between the two guides in the upper part, the lower bottom is mounted.
- The back of the pendulum is placed in the lower part. Screws are used for fastening.
- The box is assembled in a manner similar to that of the pendulum.
- Checking the reliability of all fastenings.
If the design does not have a box, the procedure is greatly simplified. The process of assembling a transforming crib with a pendulum is carried out as follows:
- A frame consisting of a back and sides is assembled. Special slats for the bottom are installed.
- The middle bottom is placed on slats.
- A cabinet or chest of drawers is assembled, depending on the model.
- The cabinet is attached to the back of the crib using screws.
- Shelves are installed in the cabinet.
- The top bottom, side bars and headboard are installed.
- The lower part with the pendulum is mounted using screws.
After work, it is important to check for depressurization of holes, reliability of fasteners and resistance to loads. Then you can start using it. It is recommended to regularly check the condition of the crib to ensure the safety and comfort of the baby.
The finished structure should move without much effort, but should not tip over
It is recommended to regularly check the condition of the crib to ensure the safety and comfort of the baby. The finished structure should move without much effort, but should not tip over.
After reviewing the presented material, we can conclude that a crib with a pendulum is the best option for a child, having a positive effect on his sleep and health in general.
Parents can assemble the structure themselves using the instructions. This requires a minimum of tools and components. If all manipulations are carried out correctly, comfortable and safe use of the bed is guaranteed, regardless of the model.
Inspire us - share the material with your friends on social networks:
Real photos of children's rooms: