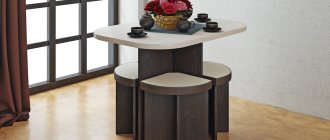
A table is not just a piece of furniture. In every house or apartment, it is also a place that gathers all family members around it. Therefore, if the table is not just a structure, but a witness of the past, imbued with the spirit of the times, it creates a special atmosphere in the house. But purchasing solid antique furniture is an expensive endeavor that few can afford. If you need to get an inexpensive antique table, a DIY table is the best way to solve the problem.
If we are talking about creating a piece of antique furniture yourself, then it will most likely be made of wood or wood materials, sometimes with the use of metal parts.
How to prepare furniture for decoration
- It is advisable to free the piece of furniture from its fittings (for example, handles).
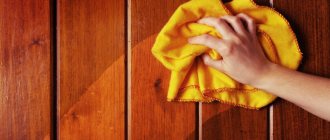
- Remove decorative or protective coating. Emery cloth will help to remove a layer of old paint, and at the same time remove dirt. It is better to wipe greasy, greasy surfaces with a cloth soaked in a solution of laundry soap. Then dry. Remove the varnish coating using special products produced by the chemical industry.
Attention! When aging furniture, there is no need to fill small flaws and cracks with putty. They will become part of the decor. Therefore, in the future they should be highlighted and emphasized.
Distinctive features of this design
Decorating an antique room involves many popular styles, including retro, country, Provence, rustic, shabby chic, baroque, vintage, Mediterranean. Despite the variety of design options, there are common points characteristic of such interiors:
- natural materials are used in furniture and decoration;
- for color design, shades of natural colors are chosen;
- decor and accessories include elements of national culture.
The style of the room must be consistent, otherwise the antique kitchen set will look alien.
Finishing materials that imitate natural minerals fit perfectly into the antique design. This could be marble or granite tiles with deliberate abrasions, cracks, or chips. Finishing in the style of open brickwork, as well as textured plaster, also looks appropriate. Wall cladding with wood will complement the interior in a rural or country style. This kitchen will resemble a country house or a cozy Alpine chalet.
Solid pine wood flooring is the best solution for rooms with an antique design. If your budget allows, you can choose a more expensive floor covering, for example, rustic tiles made by Italian craftsmen. The ceiling can be decorated with beams in combination with simple whitewash or plaster.
Accessories such as lamps, dishes or textiles must also correspond to the chosen direction. A forged chandelier or lampshade, curtains made of cotton and linen, pillows decorated with embroidery, homespun rugs, earthenware or copper dishes - all these cute trinkets will fill the space with the spirit of folk traditions.
Antique painting of products
The aging effect manifests itself when dark areas peek through light paint, and vice versa.
A popular method of aging wood is painting furniture products. Benches, cabinets and tables are usually painted. All kinds of chests of drawers and bookshelves look original. Preliminary preparation of the tree occurs as in the previously described techniques. You can speed up the processing process using a drill and a grinding wheel. When choosing paint, choose a washed out, fuzzy color. Professional carpenters recommend using paint that is used for interior wall and ceiling painting.
Painting aged wood in several layers
Before painting the product
- Remove the fittings.
- Remove the top layer of coating with sandpaper.
- Clean the working area from dirt and dust particles with a soap solution.
- The treated surface is dried.
- Carefully lower the roller into the paint and paint the product.
Surface painting begins with difficult-to-work furniture parts
It is recommended to start painting in an inconspicuous area to understand the entire process. You need to paint, forming wide and even strokes to prevent drips. Paint the corners carefully. The second layer of paintwork is applied only after the first layer has completely dried. Objects begin to age after varnishing. Aging occurs in this way:
- take fine-caliber sandpaper;
- sandpaper is used to process furniture parts that are susceptible to abrasion (corners, protruding elements).
The erasing process is controlled by a master.
Manufacturing method
Soft woods such as pine are best suited for artificial aging. You can, of course, work with hard ones, but such processing will require much more effort.
Furniture made from pine or other solid wood is an excellent alternative to boring molded products.In any case, regardless of the interior item being created, be it a chair, table or cabinet, we first draw up a drawing, according to which we prepare the individual parts and their further assembly. Having collected any piece of furniture, we prepare it for further processing. Next, we will consider the most popular techniques.
Individual furniture made of pine, oak, beech and other types of wood is quite popular among residents of our country.
Artificial pollution
The effect of artificial pollution of all existing ones has the strongest visual effect. We wipe the wood with wax, and the darker its shade, the stronger the effect. Wax fills depressions in the surface of the wood, thereby enhancing the desired effect.
The furniture takes on the appearance of time-eaten wood.
Patina
The patina effect (visual aging of the surface when the veins remain in their original form) is suitable for wood with the appropriate texture.
Aged furniture will delight its owners for a long time.
In furniture stores you can even find special paints that create a similar effect. Before starting work, the top layer of the selected furniture is thoroughly varnished. After the varnish has dried (usually within 24 hours), a special paint with a patina effect is applied.
Use professional furniture products.
The dried layer of paint is processed with sufficient force with medium-hard sandpaper. And thus the desired result is achieved.
Crackle
The crackle effect is artificial cracking of the surface. Produced by chemical compounds. We apply a special craquelure varnish to the surface and wait for the effect to appear.
The photo shows an example of furniture after aging using the crackle method.
Then we apply a pre-selected color on top of the varnish, which will visually enhance the effect. And at the end of the entire procedure, we cover the resulting surface with a layer of protective varnish to preserve the resulting aging for a long time.
Wooden furniture is an environmentally friendly product that has a long service life.
Coloring
In this case, the wooden surface is painted in several layers of color, often from the lightest to the darkest; the further to the final layer, the less effort is applied and the less surface is painted.
Furniture cleaning is carried out in a special room and wearing a mask.
Between adjacent layers, additional sanding is usually carried out, which enhances the effect.
Wood painting should also be carried out in specialized conditions.
As you can see, antique wooden furniture created with your own hands according to the above recommendations is a fascinating activity with the expected result of aging the selected interior items.
Paint bleed effect
After two coats of paint have been applied, lightly apply paint of a different color. This should be done using a dry brush, touching it only in certain places. For a greater contrast effect, it is recommended to use colors that differ in shades. For example, if the main color of the chairs is blue, then olive-colored paint may also show through on the surface. This technique is called “dry brush”, and such work can be done as follows. A dry brush should be dipped a little into the paint, and then wiped with a dry rag. The tool is now ready to apply an almost transparent layer of paint to the pre-painted base. This technique can also be used in cases where it is necessary to obtain the effect of old paint that has become ingrained into the wood.
Why is solid wood furniture still popular?
Some may call such furniture old-fashioned or boring, but the facts remain facts - they continue to be used to this day, although much cheaper and easier-to-process materials can now be found on the market. Why, despite this, such furniture products remain among the most popular? It's simple - solid wood as a material has a lot of advantages that other types of raw materials do not have.
It is better to make a do-it-yourself wooden bed for a child from coniferous wood.
Natural wood, first of all, is an environmentally friendly material. It does not contain harmful resins or other substances; it consists only of exclusively natural components. This means that you should not be afraid of allergies or any diseases when using solid wood furniture. This is especially true for people who already have certain pathologies, especially those related to the respiratory system, as well as for children whose bodies are quite sensitive to various influences. By the way, some of the wood species used to create furniture can themselves have healing properties, beneficially affecting the indoor microclimate and improving human condition.
Solid wood furniture
The next advantage is the unconditional beauty of the array. What could be better and more pleasant than the color of natural wood? Of course, in certain interior styles, a bright facade will be the best option, but in general, natural wood has been and remains relevant and suitable for many styles. This color of furniture is especially appreciated when using country, ecological style, etc.
Handmade coffee table made of wood and glass
Next we should talk about the durability of the material. When properly used, an array can serve for decades without losing its strength and quality. And with proper processing of raw materials, it will remain just as beautiful and aesthetically pleasing. The average service life of wooden products is 40-50 years. So wood is an excellent material for those who want to get furniture that will last forever. Plus, if necessary, it is quite easy to repair.
A wooden table for the kitchen made of solid wood is a classic type of furniture, which now will not be cheap
Also, wood is a malleable material and quite easy to process. This means that you can make a bed or nightstand out of it exactly in the form and style that you would like to see in your home. No other material allows you to change yourself as easily and simply as wood. Almost all design solutions and even the most creative wishes can be brought to life. In addition, any wooden product created with your own hands can be made so exclusive that such a cabinet or any other piece of furniture simply will not exist anywhere else.
Making a cabinet like the one in this photo will require the use of quite complex tools.
Advantages of wooden furniture
How to age a table?
To make an antique table with your own hands, you need to prepare drawings of the intended design, tools, materials and begin the creative process.
Required material
To create high-quality antique furniture, the following is used:
- natural wood from which furniture will be created;
- paints and varnishes (stain, varnish);
- high-quality fittings (locks, mechanisms, handles) that match the style of the intended product;
- decorative items.
Having prepared the necessary material and drawings of the desired product, processing of wood products begins.
Required Tools
When making an antique wooden table with your own hands, you will need:
- different caliber sandpaper;
- metal brush;
- hacksaw, saw;
- grinding machine with different attachments.
Tools for working with wood using the artificial aging technique
Interior accessories for a vintage kitchen
In creating a characteristic atmosphere of antiquity, specific interior accessories play a special role, such as:
- designer retro lamps;
- picturesque bundles of garlic and hot peppers;
- pots with herbs;
- strangely shaped glass jars;
- decorative textiles with checkered or small flowers;
- Cast iron frying pans and copper ladle hung on the walls.
To conclude this list of tips, it should be said that when decorating an antique kitchen, you don’t need to mindlessly copy other people’s ideas and design finds. The needs of each person are individual, and therefore a truly comfortable and cozy home is one that ideally matches the needs and tastes of its owner.
Toning with waxes
You can also give furniture and accessories an aged look using waxes. A particularly visible effect will be obtained if the surface has protrusions and indentations or if the surface itself is quite textured. Select wax depending on the desired effect: if you want to see a more pronounced result, take one that is more contrasting.
Laichah: You can combine several different types of wax when tinting to get a more interesting result.
- Decoration
For retro lovers: how to decorate an interior in the style of the sixties
Methods for aging a wooden surface
There are several special decorative techniques that allow you to visually age the material by changing its structure:
- Thermal. When using the thermal method, you must be able to use an open fire source. An open fire is directed onto a wooden surface, causing layers of material to burn unevenly (depending on softness/hardness), which creates the desired effect. Then the burnt wood is processed with sandpaper and coated with a protective varnish.
- Chemical. The simplest of the listed methods is the use of special chemical reagents. But it is not popular, since working with harmful substances can have a detrimental effect on health.
- The mechanical method includes several options. One of the most popular is to process the wood along the grain with a wire brush. In this way, the soft layers of wood are removed, creating an unusual relief structure. After this, the wood is sanded with sandpaper and then varnished.
You can also age the surface thanks to the abraded effect. Cover the product with 2-3 layers of the selected paint, after rubbing the areas most susceptible to abrasion with wax or paraffin. After the paint or varnish has dried, rub the treated areas with sandpaper.
If you want to put any of the methods into practice, we recommend that you first try it on a small piece of the material from which the table is made. If you like the result, move on to processing the main product.
Shabby and faded furniture
Two-layer painting is used here. Preferable shades are “coffee with milk”, “ivory” or “baked milk”, which are obtained by adding color to white paint.
- Apply the first layer - the base color, and wait for it to dry.
- The second layer is the prepared shade, which requires a clean brush to apply. You should also wait until it dries completely.
- Using coarse sandpaper, sand the surfaces to create the desired abrasion.
- To fix it, apply varnish.
Advice. Difficult and invisible areas are painted first.
Patination technique for wooden furniture
Patination is the process of imparting an exquisite antiquity to furniture, metal or plaster parts in various ways. To create a patina on furniture, it is necessary to unevenly apply dark acrylic paint, bitumen varnish or dark wax to the surface.
Follow these step-by-step instructions to patina your furniture yourself:
- First, apply a layer of acrylic paint of the selected base color to the primed surface. Let the surface dry. Then, using a dry brush technique, apply some umber in horizontal stripes.
- Take a small amount of bitumen varnish and, using a bristle flange brush, apply horizontal stripes with light pressure. Let dry. The drying time for bitumen varnish is recommended by the manufacturer.
- Using a bristle brush and some white acrylic paint, draw vertical lines across the entire surface of the piece. Let the surface dry.
Follow this step-by-step tutorial on how to patina furniture surfaces to create “old paint marks.” As a result, the surface looks aged.
There are several patination techniques. It all depends on what brush you choose to work with.
One of the simple techniques for patinaing furniture is to pull the brush in different directions. For this technique, good results can be achieved by using a synthetic or bristle paint brush.
By drawing the brush you can get uniform horizontal or vertical lines. Have no doubt, these lines will look very impressive on absolutely any wooden furniture, and you will be satisfied with the result.
After taking a new portion of paint, be sure to blot the brush on the paper, removing the excess. It should be almost dry.
Using the drawing technique, you can imitate brushing, in this case taking a little light paint on a dry brush.
Varieties and styles of carving
In modern furniture production, two types of threads are used:
- sculptural, the figure is worked out from all sides;
- relief, the design either protrudes above the product or is drawn along the background.
Carved furniture with your own hands will allow you to create an individual style.
The relief category is divided into five types:
- cut-out, a thematic image is created by completely removing the original background;
- muted, the background remains untouched;
- invoice, openwork thread is fixed on the plane;
- a flat-relief, three-dimensional pattern is applied to the background surface with uniform depth;
- geometric, the ornament repeats certain geometric shapes.
A patterned design on furniture can turn an ordinary piece of furniture into a work of art.
Furniture with carved patterns can duplicate any style of art. Empire lyres and laurel branches, fantasy Baroque motifs, Gothic openwork ribbon weaving are not the limit of the possibilities of this technique.
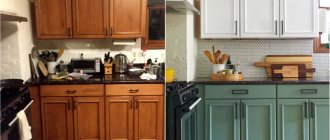
Preparatory work
Before you paint old furniture with your own hands, you need to do the following preparatory work:
- We clean all the parts. If remnants of the previous coating are found on the tree, they must be removed. We dismantle small parts;
- Grinding. The paint will not lie flat on the surface unless it is first sanded, removing any bumps or swellings that have appeared over time. You can watch how to remove the remnants of past decor in the available videos on the Internet;
- We remove dirt and dust accumulations;
- Apply an antiseptic primer. It is necessary so that during operation the tree does not begin to rot;
- If the furniture is in good condition and no chipped parts are found, then putty is not needed. Otherwise, you need to fill the chips with a special mixture for wood;
- Dry the cleaned and primed parts for several hours.
Cleaning the surface
Sanding the coating
Removing dust and dirt
Apply primer
Procedure (step by step instructions)
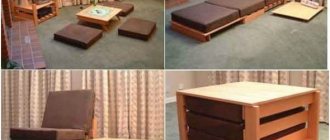
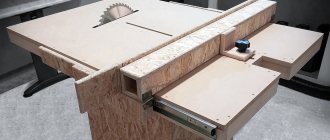
- Decide on the dimensions of the future homemade product. If the table length is greater than the standard values, it is necessary to install at least four racks.
- Pre-plane the boards for the tabletop and saw them to the required size.
- Place five boards in parallel, fasten them from below with self-tapping screws to the auxiliary cross boards. It is necessary to leave space for the table legs.
- Install the bars for the legs using metal corners and secure them to the tabletop.
- To prevent distortions and stability of the legs, pass the strips around the perimeter under the tabletop. If the table has more than four legs, an additional cross bar must be strengthened in the middle.
- Clean the edges of the table top with sandpaper on all sides.
- Cover the product with pest repellents (stain) and, if desired, apply a layer of varnish.
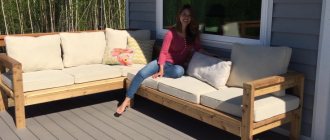
There are many ways to create a table with your own hands. The final version of the homemade wooden table we proposed can be seen in the photo.
Applying patina yourself
It is advisable to carry out patination work in the fresh air, using protective equipment. First, the necessary furniture or ordinary wood is prepared, and only then the coloring compounds are applied.
Preparation
If you have to work with solid wood furniture, first clean it with sandpaper or a wire brush to remove old varnish and paint. After this, if there is severe damage, they should be repaired with wood putty, dried and sanded again. Then the primer is applied to the wood and left to dry for about 10 hours - the exact time is indicated on the primer package.
The process of preparing laminated furniture for patination is slightly different. First, the surface is also brushed with sandpaper. Then an adhesive insulator is applied, and after it dries, a colorless polyurethane primer is applied.
Patination with stain
Patination with stain is one of the easiest ways to “age” furniture. To do this, a wire brush is passed over the surface of the furniture to remove soft fibers and highlight the texture of the wood.
Afterwards the painting process itself occurs - it can be carried out in different ways:
- sponge;
- brush;
- roller;
- spray.
There are several secrets for working with stain for more uniform coloring:
- simple - you need to wet the furniture with warm water, wipe with a dry cloth to remove excess. Then you can apply the composition;
- difficult - saturate the wood with a special conditioner. It is applied every 20 minutes until it stops being absorbed. After this point, you need to wait half an hour and only then apply paint.
The stain must be applied in two layers. Next, you can apply a metallic patina to the raised relief surfaces. The resulting result is secured with wax or shellac.
Classic way
This method is suitable not only for solid wood, but also for MDF or LSDP furniture.
In short, the sequence of actions is as follows:
- Apply the first layer of acrylic paint. There are no specific requirements for how to apply it correctly - you can make neat or, conversely, rough strokes. Leave for a day until dry.
- Rub off a thin layer of paint with sandpaper to create an antique effect. Polish with a rag.
- Apply a second layer of acrylic paint. It may be the same as the first one, different or have a metallic sheen. This layer should be thin, so it should be blended well. If desired, you can sand it with sandpaper. Leave for a day until dry.
- Cover with matte acrylic varnish and leave for half a day until dry.
Such simple steps will give your furniture a sophisticated and elegant look.
Craquelure
Craquelure is an unusual patination technique that results in furniture covered with a web of small cracks. There are several ways to create this effect.
Faceted varnish is the simplest of them. This is a special water-based mixture that cracks when dried. The more layers of this composition you apply, the more cracks you will get. Faceted varnish can be either transparent or colored: it can be applied to painted or untreated furniture - working with this type of patina is very convenient, which is reflected in its cost.
There is another way to achieve cracks on the surface of furniture - alternately layering paint and varnish. First, the furniture is painted with acrylic paint and allowed to dry, then craquelure varnish and matte water-based paint are applied. Then follows the finishing coat, which must be very thin so as not to hide the structure of the cracks that have appeared.
There is also a so-called two-phase craquelure patination technology. For this you need to apply shellac varnish in 2-3 layers, drying each one well. Then the surface is covered with craquelure varnish, after it dries, the resulting cracks are rubbed with bitumen wax and the entire furniture is covered with shellac. This technology makes cracks more noticeable, but less noticeable in structure.
Aging process
There are several particularly popular types of aging wooden products. It’s worth understanding their features before decorating your favorite old furniture. To enhance the effect, you can paste over the elements of the product using the decoupage technique; these design trends combine perfectly with each other. It must be remembered that the surface must first be thoroughly cleaned of the old coating, the fittings removed and the product primed. Sometimes handles, hinges and other decorative elements have to be replaced because they do not match the chosen style.
Stages of self-assembly of furniture, rules for decoding drawings
| Aging technique | Necessary materials | Tools for work | Stages of implementation | The resulting effect |
| Crackle | Special 1 or 2 phase craquelure varnish | Brushes with synthetic bristles, protective gloves | Varnish is applied as a finishing layer to a painted or varnished surface. | A network of cracks appears. Their depth depends on the thickness of the applied varnish layer. Suitable for wood, plastic, chipboard. Bronze or silver paint is often rubbed into cracks to enhance the effect. |
| Patina | Performed using acrylic, bitumen, wax, shellac, stain | Soft brushes for applying a layer of patina, rags for rubbing | The product chosen for patination is applied with light strokes to a previously painted and dried surface. Without waiting for complete drying, rub it in with a rag. | The appearance of many years of use and significant wear of the paint is created. Suitable for wood, chipboard, decorative metal elements |
| Coloring | Several different colors of acrylic paint or shades of stain | Soft brushes for applying compounds, sandpaper, rags to remove dust | The first layer of paint is applied with light strokes so that the wood texture is visible. After drying, lightly sand with sandpaper. The procedure is repeated with several different coating colors. | There is an effect of multi-layer coloring and many years of use of the item. This is the best way to age furniture in the Provence style. Choose pastel paint |
| Effect of artificial pollution | Hard dark wax | Apply by hand to protruding areas of the surface with small strokes in one direction along the grain | After application, go over the surface with a thick cloth | Getting into cracks on the surface, colored wax creates the illusion of many years of dirt |
Of course, in order for the furniture to turn out beautiful, stylish, and look truly antique, you should use high-quality materials and tools. You need to first study all the nuances of its manufacture and choose a style that will connect all the elements of the decor into a single interior composition. And the process of radically changing old products and restoring them to a new quality is very exciting and very budget-friendly, while at the same time allowing you to diversify a boring environment. After such decoration, old cabinets, chests of drawers, and shelves will fit perfectly into the fashionable interior.
Crackle
Patina
Coloring
Effect of artificial pollution
How to create an antique wood interior?
The aging effect manifests itself when dark areas peek through light paint, and vice versa
A popular method of aging wood is painting furniture products. Benches, cabinets and tables are usually painted. All kinds of chests of drawers and bookshelves look original. Preliminary preparation of the tree occurs as in the previously described techniques. You can speed up the processing process using a drill and a grinding wheel.
Painting aged wood in several layers
Before painting the product
- Remove the fittings.
- Remove the top layer of coating with sandpaper.
- Clean the working area from dirt and dust particles with a soap solution.
- The treated surface is dried.
- Carefully lower the roller into the paint and paint the product.
Surface painting begins with difficult-to-work furniture parts
It is recommended to start painting in an inconspicuous area to understand the entire process. You need to paint, forming wide and even strokes to prevent drips. Paint the corners carefully. The second layer of paintwork is applied only after the first layer has completely dried. Objects begin to age after varnishing. Aging occurs in this way:
- take fine-caliber sandpaper;
- sandpaper is used to process furniture parts that are susceptible to abrasion (corners, protruding elements).
The erasing process is controlled by a master.
Antique furniture made by yourself has a number of advantages:
- Saving money.
- Creation of a unique antique set.
- Possibility of using different working methods.
- Things contain the positive energy of the master.
- A self-created item that will fit perfectly into the room.
When creating furniture with your own hands, it is worth considering its appearance down to the smallest detail.
Wood aging methods
To create a “antique” interior made of wood in a room, several methods of artificially aging the material are used:
- chemical - can only be used for hardwood products;
- thermal or firing method - can be used for any type of wood;
- Brushing or mechanical methods are used to age oak and coniferous wood.
Features of brushing
For artificial aging, it is better to choose materials from coniferous wood:
- spruce;
- larch;
- pine.
They have a pronounced structure and pattern, which is formed by fibers of different hardness, which greatly facilitates the brushing procedure.
With the help of devices that destroy the top layer of wood, the “antique” effect can be achieved quite quickly. So, cracks and abrasions can be imitated in the following ways:
- On the surface of a log, board or beam, using the sharp angle of an ax, apply potholes of different depths and widths in a chaotic manner. The corners on the block are slightly cut off with an axe, but this should not look perfect. Next, all surfaces treated in a similar way are sanded with a stiff brush with steel bristles. But for grinding a large product, it is better to use a grinder or a drill with the required attachment. Grinding is continued until all the sharp edges that appeared when chopping with an ax no longer show the appearance of damage resulting from the aging of the product. The brush should only go along the grain. Then you need to sand using a special sandpaper, which removes protruding fibers, and then with a steel brush with soft bristles. Some soft fibers are removed by creating small depressions between the ridges based on the winter fibers of the tree. With the same brush you can additionally highlight cracks and knots;
- After finishing the processing of light surfaces on a new product, they need to be externally closer to those that have darkened over time. To do this, they are treated with acrylic paint or stain. Once dry, lightly rub the wood with medium-grain sandpaper, without pressing it, while removing paint from raised areas and ridges. Dark color should also be present in the spaces between the grains and in the gouges. The final finishing of the surface is coating with acrylic varnish of a transparent or light yellow shade and completely drying;
- brushing by hand using a brush with metal bristles. Can be practiced for small products, furniture and utensils made of wood. The soft fibers should be removed and the hardwood ridges left. Wood dust is removed with a hair brush; the degree of readiness is determined at your discretion in terms of achieving one or another degree of wear. Next, the product is painted and decorated according to the method described earlier.
Chemical and thermal method of wood processing
These methods can be called quite close, since such destruction of the top layer of material occurs practically without mechanical influences. However, both methods are quite dangerous; wood must be processed outside, observing all safety measures.
Heat treatment (firing) involves the destruction of soft fibers through exposure to open fire. During processing, the surface of the product is burned using a gas torch or blowtorch. The firing depth should be about 3 mm; if it is smaller, the “antique” effect will be more difficult to achieve. The process needs to be adjusted depending on your taste.
When the top layer of wood is charred, take a metal brush or drill attachment and scrape off the carbon deposits until the desired texture and shade are obtained. When aging wood, you don’t have to paint it, since it will already have dark and light areas. Finishing refers to sanding and varnishing.
But the chemical method of treating wood “antique” is carried out through alkaline action or ammonia. For this purpose, aerosols are used to clean slabs and drains. Before using any product, you need to make sure that it contains alkali
Also take precautions when using it
When contacted with the surface of a tree, such products partially burn the soft fibers, and the wood acquires a gray tint. After treatment, the surfaces should be rinsed with water and treated with a weak solution of citric acid and vinegar, removing what remains of the alkali. The vinegar should be 9 percent table vinegar, not an acid. After drying the product, if necessary, brush it and paint it.
Features of brushing
This is one of the most modern and fashionable ways to show how to age natural wood furniture. Medium-density wood is suitable for processing using this method - walnut, coniferous species, oak - it is this that provides a pronounced and very beautiful pattern of the treated surface. The name “brushing” comes from the English word brush: using special metal brushes, the surface is mechanically processed. Most often, the method is used to create interior items in country or Provence style.
The structure of the wood is heterogeneous; dense fibers alternate with looser ones, forming a unique pattern. Under the influence of time, the soft areas are destroyed, giving the tree relief. Today this process can be significantly accelerated, obtaining the desired aging effect in a very short period.
The surface is simply processed in several stages. First, hard metal brushes are used, which rid the wood of soft and loose fibers. The dense texture becomes distinct, and growth rings appear. Then they pass over it with special nylon brushes with abrasive inclusions, which remove roughness. For work, you can use a grinding machine, a drill with special attachments, or a milling cutter.
Wood that ages under natural conditions becomes brittle, loses elasticity, and cracks. Artificial aging of the product allows you to preserve the strength and all the properties of new wood using modern compounds.
The last stage is polishing using sesal brushes or thick felt. After this, the surface is primed and treated with the desired tint compositions, which further emphasize the beauty of the design. It is possible to cover the protruding parts of the surface with a dark stain that contrasts with the light color of the soft fibers. This technique will visually enhance the aging effect. The final varnish coating protects the surface from external influences and adds shine and gloss to it. Brushed boards are great for making antique furniture with your own hands. If necessary, products aged using this method can be returned to their original appearance by simply cleaning the surface.
Advantages of individual furniture design, stages of work
Hard metal brush
Nylon brush with abrasive inclusions
Sesal brush
Features of finished aged furniture
If you are not a fan of working with your own hands, then the best option would be to purchase furniture in showrooms and other retail outlets, or choose custom-made furniture.
Today, many furniture factories, as well as small private workshops, produce small-scale or even unique antique furniture, taking advantage of all the advantages of industrial technologies. When making antique furnishings, several techniques are used.
Selection of materials
A carefully polished board or beam of the correct geometric dimensions becomes faceless and can be used anywhere. The first and most obvious step to achieve a vintage effect is to use materials that have their own “character”, bear the stamp of time, and also correspond to the style of those times when furniture production did not yet have precision machines and woodworking equipment.
Accordingly, the products turned out to be somewhat clumsy and rough (at least when we are talking about the Middle Ages).
The word “vintage” comes from winemaking - it means the advantage of vintage wines aged for several decades over younger products. In clothing, design, and furniture, this means the revival of stylistic traditions of previous eras.
For example, putting a bureau in the office instead of a comfortable closet or desk, and in the bedroom - a high bed with nickel-plated balls - is clearly vintage.
In order to achieve the effect of aged furniture, parts of wood are taken to make it, in which uneven edges, knots, structural defects are preserved - all these elements imitate handmade work.
.
.
This technique is especially often used in the manufacture of countertops - during assembly, instead of the usual glued solid wood, slabs are taken, which have a unique pattern and shape. We can say that the table is not just aged, but also exclusive.
Expert opinion
Kokovin Dmitry Vasilievich
Furniture restorer
Slab is the name for cutting a tree (usually longitudinal), when the trunk is not cleared of bark and retains its natural shape - bends, knots, splits and other elements that are usually removed during factory production.
Chemical exposure
Furniture production has chemical reagents at its disposal that act on wood in a special way. They damage the top layer of cellulose, but do not act on all surfaces, but form grooves, furrows, spots and other “artifacts”.
The destruction of part of the wood mass imitates time damage, and the unique pattern makes the product unique. Using chemical action, you can even imitate the impact of wood-eating insects, only preserving the strength of the product and making such wear aesthetically pleasing.
Application of forged elements
Aged furniture is not only wood, but also metal parts that were actively used in the 16th – early 20th centuries. An indicator of the advanced age of the furnishings are forged hinges, edging, and corners. Forged dark hinges, handles, and locks are widely used.
Advice from the experts
You should choose four colors of paint: two bright ones, gray and basic white.
Use natural conditions for drying. Apply the next layer only after the previous one has dried.
Wax is applied to areas that are frequently touched and touched, creating a frayed appearance.
Putty creates volume, texture and relief, as if the product had been coated with paint many times.
When using the method of artificially aging furniture, 3-5 layers of paint are enough.
MORE: What rope should I use for packing?
After painting, the product is thoroughly sanded, removing excess paint.
Conclusion
Using fashion trends and color combinations, you can turn modern furniture into antique or vintage items. You don’t have to spend money on purchasing an old wardrobe or chest of drawers. Having chosen the appropriate method, you should try to “age” the necessary item yourself, turning it into an antique item.
Materials “like wood” and wood itself
It’s worth mentioning right away that the materials listed below are presented as a coating on a substrate, which is most often made of chipboard (chipboard) and MDF (fibreboard).
If you choose chipboard as a base for a polymer-coated countertop, remember: this material contains formaldehyde, which can evaporate. Therefore, careful lamination of cuts and chips is necessary.
Postforming
Postforming is essentially a plastic coating. The size of the slabs is 360 - 410*60, 90, 120 cm. The slabs are cut according to the required measurements. The joints are glued together with glue, sealed with sealant or tightened with special fittings (euro saw).
After cutting, the edges are treated with PVC or laminate edges. The connection of such a countertop with an apron is masked with a wall plinth or simply coated with a colorless sealant.
Pros:
- acceptable price;
- service life 10-15 years with proper care and high-quality joints;
- many design options;
- The large size of the slabs allows you to avoid unnecessary seams and joints.
Particularly sensitive aspects of this material are the fear of moisture, high temperatures, and mechanical damage.
These problems are easy to foresee. You just need to wipe the surface dry after use, place the hot pan on a stand, and cut food on a cutting board.
I will order for myself1I will not order
Fake diamond
Visual appeal and high performance characteristics make artificial stone popular for countertops. The advantages of this material are:
- strength;
- resistance to moisture and damage.
Many decor options, different colors and wood textures allow you to fit this tabletop into any interior style. These materials allow you to combine the advantages of stone-like polymers and the eco-texture of natural wood.
I'll order for myself I won't order
Quartz countertop
Quartz agglomerate contains quartz, binders (resins and glue), and pigments. Plates made of this polymer are solid, 20-30 mm thick. If you need more than 40 mm, use a 20-piece (30-piece) plate with a backing. The quartz surface is durable, resistant to mechanical damage and temperature changes. Externally, this surface resembles natural stone.
I'll order for myself I won't order
Acrylic table top
An acrylic polymer tabletop is a chipboard or MDF board covered with a layer of the desired texture 3-12 mm thick.
The main limitation of acrylic is that it scratches easily. This can only be corrected by polishing. The thickness of the acrylic cladding layer determines the wear resistance of the coating. The wooden surface in acrylic design is usually glossy. It is better to wipe it with a wet cloth without powders.
Pros of acrylic countertops:
- acceptable price;
- does not fade in the sun;
- does not absorb odors.
I'll order for myself I won't order
Natural wood
With the growing popularity of Provence, Scandi and loft styles in kitchen design, the demand for kitchen countertops made of wood has increased.
At the peak of kitchen design trends is untreated wood combined with light colors of other surfaces.
Wooden tabletops are made from lamellas (beams). They are glued together and impregnated with special compounds to increase strength, moisture resistance, aesthetics, and coated with varnishes to achieve the desired special effect.
A white wooden set in a classic style can be decorated with patina.
A wooden tabletop is significantly more expensive than a polymer one. Wood is difficult to care for, requires constant monitoring of dryness, and absorbs odors and dyes. In addition, the working surface during daily use requires systematic restoration of the protective layer (varnish, impregnation).
Of course, no polymer can compare with wooden raw materials in terms of environmental friendliness and safety.
I'll order for myself I won't order