Whenever it comes to making an item for a bath on your own, we consider it necessary to provide the reader with the most useful information, but we doubt that it is sought by a person who has no practical experience at all in the chosen field.
Because we need to start with mastering the tool and the basics of standard operations, the same fastenings in carpentry... But we are unlikely to be able to help someone who doesn’t know how to do anything yet. There are other resources and books for this. Therefore, let’s say right away: the tips and instructions below are designed for a person who owns a tool in both senses - both in terms of availability and in terms of the ability to use it.
So, where to start for someone who has decided to make a bathhouse bench with their own hands?
Bath bench: design features
The bench in the bathhouse is somewhat different from the usual one.
Firstly, its width and length are determined by the number of bathhouse users, their height and build. Secondly, such products involve the arrangement of several tiers, which is unusual for ordinary benches. Important! Hot air and steam in the steam room accumulate under the ceiling. On a 3rd tier sun lounger it will be noticeably hotter than on the lowest one. This point should be taken into account when planning the steam room and arranging benches.
There are 2 options for sauna benches - sitting and lying. The dimensions of the sauna bench depend on the purpose and the position that the steamers prefer to use:
- the minimum seat width is 30–40 cm for a sitting bench, for a more comfortable position 60 cm is recommended, and 80–90 cm is required for a lying bench; the value in the latter case may be greater: this is the width that a person occupies while lying down and placing his hands freely;
- the width of the step of the lower bench must be at least 40 cm;
- the distance between tiers is from 40 to 60 cm. As practice shows, the optimal range is 45 cm, the minimum distance from the floor of the bathhouse to the desired tier is 40 cm;
- a bench for a bathhouse is made with your own hands of a certain length, and the size is determined by the preferred position: in a sitting steam room, the length of the bench is equal to the width - at least 40 cm for each user, a 60 cm long option is more convenient; for sitting with bent knees, 90 cm is required, and for lying down, but with bent knees - at least 150 cm; The length of the bench for lying is 180–210 cm and is calculated according to the height of the tallest user of the steam room.
The size of the bathhouse benches depends on the location. If the benches are straight and placed along opposite walls, all of the above factors are relevant when determining the size. But with an L-shaped arrangement of benches, you can save on space.
Ergonomics
Ergonomics is the science of how to make things and processes comfortable for humans. In this case, we are talking about ensuring that the seats in the bathhouse do not cause inconvenience due to their size.
Of course, much when choosing sizes will be dictated by the size of the rooms themselves for which you are planning to make benches for a wooden sauna with your own hands. But the height of the seat is a point that is of great importance, but depends little on the size of the room.
It is preferable that the seated person's knees are not raised relative to the pelvis, so the seat should not be too low. However, too high is also uncomfortable - your legs will dangle in the air without support, which increases pressure on the vessels under the knees and in the hips. Therefore, we can proceed from the height from the floor to the knee bend of adults.
Various ergonomics manuals advise making the height from 30 to 50 cm. We believe that it is easier to derive the arithmetic average from the measurements of the people who will most often use this bathhouse.
The width of the seat depends on how they will sit on it - if they sit as usual, then 30-40 cm is enough, and if reclining, then 60 cm.
Those benches on which the steamer will lie must be long enough to accommodate him at full height, and also wide enough so that he can freely place his arms along his body. It is also better to measure such things on specific people.
BY THE WAY! Adherents of the Russian bath should remember that the height of the upper shelf on which the steamer lies is about 85 cm, and the shelves cannot be covered with clapboard to the floor, because the steamer’s feet are located under the bench or shelf.
Before introducing you to the drawings, we recommend that you take a look at our other material, which describes in detail all possible types of benches.
Means of protection
Many people believe that it is only necessary to protect the wood of a bench if it is not in a steam room. In fact, it is in the steam room that the tree needs protection most of all, but previously we had to abandon this idea, because at high temperatures any chemical tends to become volatile and poison the air that those steaming breathe.
But progress is progress - the Finns have plenty of compounds that are suitable even for their hot sauna, not to mention the much “cooler” Russian bath. Such impregnations can protect wood from water, darkening, rot, etc. In this case, the surface will not feel greasy to the touch.
IMPORTANT! Varnishes should not be used in a steam room - this is a fact.
But in all other rooms, except for the steam room, you are completely free to use any composition that can protect the wood from the action of water, bacteria, fungi, insects and rodents. If desired, you can also coat it with fire retardants - compounds that make the wood non-flammable.
Why it is necessary to protect wood in a washing room - it’s clear, water flows there. But the rest of the bath rooms are not entirely dry either. Be that as it may, the humidity in the bathhouse is high everywhere. So saturate and varnish with whatever you see fit.
Types and purposes
The type of benches and benches in the bathhouse is determined by the purpose of the room where this furniture is used. The steam room can be equipped with single-tier or multi-tier structures, this directly depends on the size of the room. The steam room is characterized by a stepped variety of benches. Simple bench-type seating designs are relevant for a steam room, if there is a need to increase the number of seats - in this case, lightweight portable options are used.
Stepped design
It is intended for use in small-sized bathhouses. The top of the bench is long and wide enough to accommodate an adult in a lying position. The small lower part is used for sitting or as a platform for climbing onto the upper shelf.
Three-tier
A three-level bench model is the best option for large steam rooms. Each participant in the bath ceremony chooses an appropriate level. On the lower bench sit those who do not like or cannot handle overheating. The second and third levels are occupied by those who like to steam while lying down. The third tier is the hottest, and the bench is the widest - up to 90 cm. The length of the upper benches must be at least 180 cm.
The standard scheme of three-tier structures assumes that each upper level will be wider and longer than the lower one. But nothing limits the imagination of the bathhouse owner, so the choice of bench options for the steam room is almost limitless.
Two-tier bench
Two-tier stepped bench
Increasing the tiering of benches increases the functionality of bath furniture. A person can lie at a higher height, then go down and sit on a bench. The width of the benches remains the same as for a single-tier structure.
Two-tier benches are usually made stationary. The support frame is attached to the wall, and the side posts are connected with cross members. There is an option to make the lower part portable so that you can put it away to dry after use. Access to the second level is made from a bench on the first floor or a staircase is provided at one end.
Single-tier structures
Such benches are designed for small-sized steam rooms and washing rooms. The best option is mobile structures that can be quickly installed in any room. They are simple and easy to use and easy to maintain.
Simple shop
An ordinary bench consists of two or three boards on supports, which are made from boards (a lightweight, portable option) or chocks (stationary due to the heaviness). The latter option is preferable for rooms with less humidity, since the base of the seat takes a long time to dry out.
No backrest. Simple Russian-style benches on powerful logs line the walls of the dressing room, where coupled owners and their guests gather for intimate conversation.
Between two benches against the wall there are small tables of the same style. A samovar and honey or beer with fish is a matter of taste. The atmosphere is conducive to complete relaxation, so the wall paneling should be comfortable for you to lean your back on if necessary. This option is more suitable for small baths with a small number of steamers.
With a backrest. If the premises are being prepared to receive a large company, the dressing room is designed as a comfortable rest room, where the table occupies the central part. Benches around the table with comfortable backs so that the body, relaxed in the steam, does not strain in search of support.
Types of wood used for benches
Corner bench for steam room
Raw wood immediately after cutting and cutting will warp under the influence of high temperature, the products will change geometry and become distorted. The moisture content of the material at the time of manufacture should not be higher than 15%.
When choosing a board, lumber with fallen, knots, and darkened areas is rejected. The number of knots also plays a role in smooth wood processing. The purchased boards should be free of rot, mold, and microcracks.
The type of wood is selected based on its thermal conductivity, the moisture resistance of the species is taken into account, and attention is paid to the strength and hardness of the material.
Linden
Linden wood has antiseptic properties
One of the classic wood options for furniture in a steam room, heated linden releases a pleasant honey aroma. Pliable rock belongs to the category of soft materials, and therefore requires pre-treatment to remove moisture. Linden spirit is considered a natural antiseptic.
Wood does not conduct heat well, so at high temperatures you can lean against it without the risk of getting burned. The products breathe, that is, they allow steam to pass through. Linden wood can increase the secretion of sweat, which is important for a bathhouse. The disadvantage is the ability of the material to darken over time.
Birch
It belongs to the group of medium-density rocks, does not heat up when heated, and resists moisture absorption. Durable material is well suited for benches. Requires ventilation from time to time, so it is preferable to make small wooden benches. Old tree trunks are more difficult to process.
There are about a hundred species of the species; pubescent and silver birch are used for the bath interior. The beautiful color varies from light brown to light yellow, sometimes with reddish colors. The aroma has antibacterial properties; the tree does not emit resinous components.
Pine
Pine releases a pine aroma at high temperatures
Available and inexpensive material of medium density. A bath bench made of pine wood is not built in the steam room, but is placed in the locker room and dressing room, since it releases resinous substances at temperatures above +40°.
The temperature in the washing room and shower is not high, so the resins in the wood prevent moisture saturation and prevent rot and mold from developing. Thermal conductivity is low, wood maintains an acceptable level of comfort when touched. It is easy to saw, plan, joint, glue well, and join with nails and screws. For finishing, stain is used to reveal the design.
Exotic wood varieties
Meranti. Wood color - red, density 610 kg/cm3. Due to the heavy and dense wood, meranti does not heat up and can withstand temperature and humidity changes well. The wood is smooth, non-fibrous, practically free of knots, and easy to process.
Material
Wood is a capricious material, or rather, sensitive to how it was prepared and dried. Therefore, you need to not just take the first board of a suitable species that you come across, but take a closer look at it, and, if possible, measure the humidity.
IMPORTANT! Because a tree that is improperly dried after cutting and cutting will definitely warp—it will “lead,” that is, it will either change its geometry or twist it.
When inspecting boards for carpentry, of course, first of all look at the number of knots . They are known to cause a lot of problems for woodworkers.
Also pay attention to the dimensions . Boards can be very uneven - both due to uneven shrinkage and due to cutting too quickly. The reasons may be different, but you will have to adjust it to the desired size later.
ON A NOTE! The presence of mold, rot and cracks on the purchased material is unacceptable!
And since we are telling you about benches for a bath, we need to clarify in a separate paragraph which types of wood are best suited for such purposes.
Steam room
Resin leaks
If the bench will be in a steam room, then immediately discard coniferous wood. They begin to secrete resin at temperatures above 40 degrees.
Deciduous ones are fine . For example, you can take aspen, linden, poplar, ash .
Washing
There are no high temperatures in the washing room, but the water flows generously. This is where you can use conifers - it’s the resins that make them more resistant to high humidity and prevent them from rotting.
Take the same pine - it is the cheapest. All others are also suitable - deciduous ones are also possible if you use water-repellent impregnations.
Rest room and dressing room
There are no restrictions on wood - make it from what you feel like. Humidity will be high here too, but you can freely use both impregnations and varnishes. So the choice is yours.
Which type of wood to choose
The material for benches in the bathhouse has strict requirements:
- high fiber density, which prevents the wood from splitting and cracking;
- low thermal conductivity, ensuring a comfortable temperature of the wooden flooring;
- resistance to moisture, allowing long-term use of furniture in difficult conditions.
It would seem that coniferous types of wood are suitable for a bathhouse: larch, pine, cedar, but they have a significant drawback that precludes their use for furniture in a steam room. When heated, resin appears on the surface of the boards, such secretions leave burns on the skin, so moisture-resistant coniferous wood is used for benches in the rest room or in the washing room.
Linden has become a favorite among materials for furniture in the steam room: it is easy to process, resistant to water and heat, and smells pleasant. Aspen is also good, but over time the wood begins to rot from the inside. Oak does not cause any complaints - this material has many advantages, but its cost is high. Benches can also be made from other types of wood: maple, poplar, birch.
Before making benches in the bathhouse, you need to find out the requirements for their design.
- Boards and beams used to make furniture for the bathhouse must undergo thorough sanding of the entire surface with a special machine or sandpaper.
- The corners of the benches must be rounded to avoid injuries and scratches.
- Furniture must be durable and reliable, designed for safe use by an adult.
- For antiseptic impregnation, it is prohibited to use synthetic liquids that release toxins when heated. The material is protected with special compounds based on natural oils.
- For better drying, the space under the bench is not sewn up.
- A gap of up to 10 cm must be left between the wall and the installed bench.
Requirements for bath benches
There are basic requirements that apply to such products installed in baths and saunas.
- A bench for a bathhouse, assembled with your own hands, should not be covered with varnishes or paints. To protect the product from the negative effects of moisture and temperature, special antiseptics are used.
- Built-in and mobile structures are installed only against blank walls without ventilation and windows, at a safe distance from heating equipment. During installation, a small technological gap is maintained between the wall and the bench.
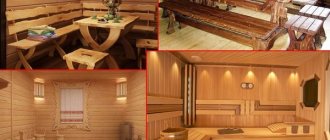
Photo
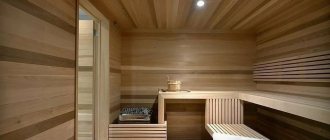
Steam room interior
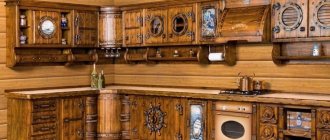
Creative furniture
Circular shelves
Bath furniture
Abashi shelves
Steam room shelves
If you are the owner of your own bathhouse or sauna, this is happiness
But no less important is what kind of furniture your oasis of healthy life will be furnished with.
Of course, wooden furniture is preferable. However, prices for ready-made furniture for steam rooms and recreation areas are steep. But don't despair.
Benches, benches, tables and even shelves can be made with your own hands. You just need to use the drawings and assembly diagrams presented in this article. And to consolidate the result, you need to watch the training video.
Blueprints
Below we present several drawings that we found on the vastness of the worldwide computer network. We do not claim authorship and do not know their authors, therefore we cannot provide links to primary sources (see appeal to copyright holders). We have taken the liberty of adding some explanations to these drawings.
Not the easiest bench. Please note that instead of timber for the legs, boards were used, mounted with both glue and screws. The connection of the legs with the spacer is done in a quarter. The long side of the bench is sheathed with boards according to exactly the same principle as the short side (see the blue blocks and their fastening - the same is perpendicular). The seat is also attached to the finished frame with self-tapping screws - you can make it simpler, only from bars, without an end strip on both sides (if you make one, then with a tongue-and-groove connection).
But this drawing is easier to implement. Please note that the legs are attached to the seat using a dovetail joint, which is additionally secured with pairs of plugs. A massive spacer will not allow the structure to wobble. It is noteworthy that the authors did not do without metal fastening - in the middle of the spacer it is supposed to drill a hole for a long self-tapping screw, which will fasten the spacer to the seat.
Here is a variation of the first drawing. This is no longer just a bench, but a whole sun lounger. First, a seat is prepared from polished boards 50x100 mm, which are fastened with two transverse bars. The legs are attached to the bars, and instead of the usual spacer or jib, the frame is sheathed on top (immediately under the seat) with a 25x150 mm board around the perimeter.
A small portable “banquette” can also be useful in a bathhouse. It is made extremely simply: the frame on which the seat slats are placed is attached to the U-shaped legs. By the way, the design is quite flimsy; it would be strengthened from below with a brace either in the form of a frame “O” (rectangle) or “I” (Latin “I” with transverse dashes). Everything is self-tapping.
Quite a simple model on dowels. The drawing shows that the authors considered a pair of dowels sufficient for attaching each side panel to the seat, and the transverse beam is attached with a tongue-and-groove connection, and the tenon, it seems, is machined from the beam itself. And in the sidewalls a hole of the appropriate diameter is drilled for the tenon. Such connections are mounted on glue.
In this design, it is not entirely clear why make a groove in the sidewall, if anyway the crossbar will then be attached to it using self-tapping screws? (Which will then have to be masked with putty.) The seat is secured to the frame using dowels.
But the option is generally the simplest and even hacky, which can even be made from moisture-resistant plywood. Of course, you can’t put such a bench in a steam room, but it may well fit somewhere in a waiting room. Since the fastening is not shown in the drawing, we dare to suggest fastening the structure with ordinary corners.
A simple and reliable bench with dowels and screws. All the details can be seen in the figure; in total you will need 8 dowels and 12 screws. Please note that the leg extensions (replacing the jibs) are attached to the legs with self-tapping screws through the grooves on top. And this construct is attached to the seat from the reverse side.
Variation on the theme of the cross beam. Judging by the appearance, everything was done using a board of the same thickness - 38 mm, that is, a sanded “magpie”. The fastening is not shown in the drawing, but it can be assumed that it can be fastened with self-tapping screws.
ATTENTION! Do not forget that it is best to install stainless steel fixtures in the bathhouse.
An interesting option, say, for a relaxation room. X-shaped legs look beautiful, and the way to make them is to make notches half the width of the board on both “legs.” Fasteners - glue and self-tapping screws.
How to make a bench with your own hands for a bathhouse
To make a regular portable bench for a bathhouse, there is no need to assemble a special frame. This design option is distinguished by its simplicity and ease of use.
The first stage is preparatory
At the first stage:
- measurements are taken of the premises in which the bench is supposed to be installed;
- a drawing of the bench is made, broken down by detail - the product is simple, so there are no excuses for lack of thought and approximateness, everything must be strictly defined at the level of the drawing, including the fasteners used;
- The wood is prepared according to type and quality.
Here is a comprehensive drawing of a bench for a bathhouse - it practically eliminates all questions about the need for such help as instructions for making and assembling it yourself
Material selection
Only a certain type of wood is used to make bath benches. Due to the high resin content in pine, which begins to actively release under the influence of high temperatures, this type of material loses its relevance. Iron hornbeam is also not used, although it has a high level of resistance to water and moisture. Its significant disadvantage is the strong heating, which leads to burns on the skin.
Among all types of wood, it is better to give preference to:
- Linden. It practically does not heat up even in a sauna and is resistant to steam. The material has a pleasant smell, but after a while it begins to darken.
- Aspen. Its resistance to steam and water is an order of magnitude higher than that of linden, but it is inferior in smell. This variety is the most mediocre in terms of attractive appearance. Aspen is valued for its resistance to mold.
- Larch. It is noteworthy that wood under the influence of steam and water only becomes stronger and can last for ten years without changing color or texture. The disadvantage of the material is its high cost.
- Cedar. This representative of coniferous species releases resin in minimal quantities when heated. It is chosen for finishing steam rooms and making benches due to its positive effect on the lungs and the entire human respiratory system. Cedar is especially useful for people suffering from asthma, bronchitis, and lung diseases.
- Oak. This type of wood has proven itself well when used as a material for making bathhouse benches. Oak has increased resistance to water and steam, and has high decorative qualities, but products made from it are best used for dressing room equipment. Given its density, it gets very hot in the steam room.
- Birch. It is used to make benches for bathhouses because of the medicinal tar released when heated. Thanks to its healing properties, it is possible to treat even the most contagious skin diseases.
To make a bench you will need:
- wooden beam with a section of 6×7 cm;
- slats 2-2.5 cm thick and 6 cm wide (for the seat structure) in the amount of 9 pieces;
- fasteners made of wood or metal.
When decorating a bathhouse, it is not necessary to use the same material for finishing the walls and making the bench. But the option in one style looks more impressive, although playing in contrast also has its own originality.
Required Tools
To carry out the work you need to prepare the following set of tools:
- saw;
- hammer, mallet;
- pliers;
- screwdriver;
- sander;
- roulette;
- level.
Advice! It is important to prepare all the tools in advance so that you don’t get distracted when making a bath bench.
Bench manufacturing technology
Step-by-step instructions for a do-it-yourself wooden bench for a bath include the following steps:
- Cutting the timber into 4 fragments, each 40 cm long.
- Assembling U-shaped racks. Two pieces of timber 60 cm long need to be knocked down to form transverse jumpers.
- Cutting according to the specific length of slats for making a seat. It is optimal to use slats with a length of 160-170 cm.
- Assembling the bench. The prepared slats need to be stuffed onto the jumpers, avoiding a gap of less than 1 cm between them. This is necessary to remove excess moisture and to expand/contract the natural material when exposed to temperature changes and high humidity. In addition, it is recommended to retreat 20 cm from the edge in order to achieve increased stability of the structure.
- Bench strapping. To create a strong bench, the legs and stands need to be connected using the remaining slats, 10-15 cm away from the floor. Special corners are also suitable for these purposes, but it is advisable to attach them from the inside of the product, otherwise a burn will appear on the skin at the point of contact. That is why it is advisable to recess the fittings used in the manufacture of the bench by 2-3 mm.
Finishing and decor
The finished bath bench must be treated with a natural-based antiseptic composition. If you want to make it in country style, then you need to adhere to the following algorithm of actions:
- Sand the surface along the grain with a brush.
- Clean with a grinder until a relief pattern is formed.
- Apply translucent glaze in two batches.
- Wipe the surface with a dry sponge; when it dries, remove the glaze.
- Cover the bench with varnish.
Making and giving the bench the desired appearance is quite simple if you follow all the recommendations regarding assembly and finishing.
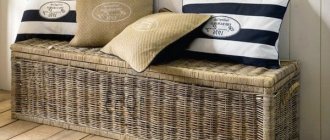
Rattan furniture
This is a relatively new trend. Rattan is a type of liana palm. The main distinguishing feature is the unique structure of the stem: a hard top layer, a soft and porous middle layer and a very hard “core”. Thanks to this “structure,” the material bends very well, and interior items made from it are amazingly durable.
Rattan furniture is appropriate in a dressing room or relaxation room, but is not suitable for a sauna.
The natural color of rattan is almost white, but most often products made from this material are painted. Rattan palm has practically no wood pattern as such. And the process of making furniture is very interesting: a frame is made from thicker “aged” vines, and then they are braided with younger and more flexible ones.
Recently, rattan bath furniture has become increasingly popular.
Rattan palm furniture is ideal for a relaxation room, but not for a sauna. Because under the influence of high temperatures the material loses its shape.
Visually, furniture made from artificial rattan is almost no different from its natural counterpart.
Homemade portable bench design
A portable bench without a back is the simplest and most affordable option for homemade bath furniture. It does not require installation to a special frame and can be used in a steam room, washing room and dressing room. Surely many will be interested in how to make a bench for a bathhouse out of wood with your own hands.
When making a sauna bench, an important step is the selection of a working drawing and assembly diagram.
You can develop drawings and diagrams yourself or look at our ready-made examples. They indicate the length, height and width of individual structural elements.
To assemble a sauna bench yourself, you need to prepare the following materials:
- bars for legs with a cross section of 5 cm - 4 pcs.;
- bars for struts and crossbars;
- wooden board 5 cm thick of the required length and width - 1 pc.;
- metal or wooden fastening fittings.
All work is performed in the following order:
- In the blanks for the legs, mortises are made on the inside to fix the crossbars made of timber.
- A crossbar is attached to each of the prepared legs using self-tapping screws.
- A seating board is mounted on top of the resulting structure.
- The struts are fixed to the crossbars and the seat with self-tapping screws.
Now the portable bench for the bath, which we assembled with our own hands, is ready for use. After assembly, the product is treated with a protective antiseptic composition.
Knowing how to make a bench for a bathhouse, anyone can show ingenuity and imagination in order to make a practical and functional product without much effort.
Useful video
Above there were drawings with crossed “legs”, so we decided that it would not be superfluous to show how this is implemented in practice. I found a video where the joint of the legs is generally done using a regular saw and chisel. Well, as it turned out, it just so happened, although in the end the bench turned out to be quite good:
*** That's all, we hope you have a complete understanding of how to make a bench for a bathhouse with your own hands. All that remains is to implement one of the options or come up with your own. We wish you good luck!
How to make beautiful and reliable benches in a steam room
In the steam room there are constantly sharp changes in temperature - from about 10 to 100 degrees. The wood is also exposed to hot steam. Not every natural material can withstand such tests, so it is recommended to select wood for a steam room based on its density, humidity and thermal conductivity.
A material with low density does not accumulate thermal potential and does not heat up even at maximum temperatures. Heat is absorbed by the fibers and the surface of the wood does not overheat. It is impossible to get burned on such furniture.
Manufacturing technology for a bench without a back
The simplest bench without a back consists of a seat and legs and is made as follows:
- Develop a drawing of a bench for a bathhouse, in which you indicate the dimensions of the component elements.
Make legs from 50x50 mm bars.
On the inside of the legs, make grooves for the cross beam.
Install cross bars into the grooves and secure with self-tapping screws. Sink the fasteners into the wood.
Connect the legs with long beams, which are attached to the top of the legs using self-tapping screws. Boards will lie on the beams.
Lay the boards on horizontal beams and secure with dowels or screws. Provide gaps between the boards so that water does not accumulate at the joints and flows freely.
Make places for the dowels in increments of 30-40 cm, then hammer the boards into place.
If metal fasteners are used for fastening, recess the head into the board. Mask the hole on top with a mixture of PVA and sawdust.
Sand and sand the bench. This requires special attachments. Use coarse grits first, then fine grits. Work carefully, removing small layers of wood.
Remove splinters and sharp corners from the structure using sanding discs.
Treat the bench with a protective compound intended for baths, for example, special oil. Apply 1-2 layers of oil.
Leave the bench to dry for the period specified in the instructions for the product.
- Do not use drying oil or varnishes; they emit unpleasant fumes when heated.
Footrest
You will need 5 planks 600x70x20 mm, 2 planks 400x70x20 mm and a block 50x50 mm for making the legs.
Step 1. Well-polished planks 600 mm long are laid out in a row on a flat surface. Gaps of 10 mm are left between the slats and aligned along the length.
Step 2. Place two transverse planks on top, placing them along the edges of the planks, flush with the ends. The product is secured with screws.
Step 3. The block is cut into pieces 3-4 cm high; these will be the legs for the stand. They are applied to the transverse strips at the corners and secured with screws. Finally, treat the stand with stain or colorless wood primer.
You can make the stand not with a straight surface, but with a rounded one, which is much more comfortable for the feet. How to do this is detailed in the video.
Colonial Rec Room Bench
If the appearance of the bench is not very good, you can change it and improve it. To do this, decide on the processing style and buy decorative materials. Go to visit your friends and take a photo of the benches in the bathhouse, and then choose a processing method. The colonial style allows you to make the bench noticeable and expensive.
The work is performed in the following sequence. Brush the bench elements with a wire brush and apply a layer of white glaze to the surface of the wood. Wait until dry and re-brush the wood with a wire brush. The furniture will be bleached with grooved brush marks. Apply a layer of varnish to the surface; after drying, the furniture can be used.
Doors
The frame of the cabinet door is made from planed boards. The dimensions of the door will be determined by the parameters of the furniture itself. Remember that the doors should be slightly narrower than the section of the product. These conditions must be met in order to gain access to all its sections equally. In this case, the closed cabinet doors should overlap each other slightly so that an unaesthetic gap does not form between them.
Let's sum it up
Thus, making furniture from lining, as in the photo, is not at all difficult. And in order to make this task even easier for you, the article contains a video with a detailed description of the work required for this. Go for it!
Placement of benches
In order to rationally use the space in the bathhouse, you need to think in advance where the benches and other pieces of furniture and accessories will be located. The optimal solution is to place the bench near a blank wall where there are no drafts. Installing a bench close to the stove is undesirable and unsafe.
The most effective option for placing benches in a bathhouse is considered to be a corner one, in the shape of the letter “G”. The upper and lower tier are installed along one wall, and the middle one is installed adjacent to them. There is also the option of placing benches in the form of a “compartment”, like on a train, where one tier is located above the other.
How to choose benches for a bath
There are various designs of bathhouse benches - movable, stationary, folding. Benches of various shapes and sizes are made for each room.
Steam room benches
It is customary to lie down in the steam room, rather than sit and warm up; the capacity of the room depends on the number of lying places. Therefore, specially designed benches are often installed in the steam room to increase the number of steamers.
Stationary benches are often installed in this room; they are also called shelves. In large steam rooms, the benches are made two-tiered, with an edge; in small ones, they make do with one wide bench.
Massive products are not placed in the steam room. Before making a bench for the bathhouse, measure the dimensions of the steam room. The minimum dimensions of a bench for a steam room are: length - 1.5 m, width - 40 cm.
Folding benches are installed in small rooms. Their design resembles seats in train cars. For manufacturing, a special mechanism is required, with the help of which the seat is rotated to a vertical position, pressed tightly against the wall and fixed. A folding bench in the bathhouse increases the area of the room.
Benches for the rest room and dressing room
In rooms with minimal humidity, you can install ordinary furniture. The rest room is where people truly relax, so benches should primarily provide comfort to visitors. The design of the shops and their stylization to match the surrounding environment also plays a big role.
When choosing benches for such premises, use the following recommendations:
- In the rest room, portable benches with backrests are made.
Furniture for the rest room can be made from any wood, after which treat it with antiseptic agents.
- In the relaxation room you can install one of the types of benches - sun loungers.
Benches for the washing department
Benches of the simplest design, without a back, consisting of two legs and a seat, are suitable for washing. They are installed along the walls in one row; shelves for bath accessories are usually attached above them.
The requirements for the shops are also simple. The bench must be strong and stable, able to withstand the weight of a person and a container of water. The legs should be as wide as possible in the transverse direction. The thickness of the bench parts is more than 40 mm.
Design
The decorative side of the shelves is no less important. Benches made from wood of different shades (dark and light) look interesting.
The choice of lighting color is individual. Red makes the steam room visually even hotter, green – relaxes, blue – gives calmness.
It is allowed to install spotlights on the ceiling directly above the shelves. This will make the room seem larger.
You can approach the decoration of corner seats creatively by designing a carved or wavy backrest.
There are benches that resemble the shape of a chaise lounge or where the upper tier very smoothly transitions into the lower.
Seats with separate backs and corner carved fasteners for hanging towels look good.
If the room allows, then a separate stand for slippers and shelves for soap products are equipped.
By playing with the shape, design of the benches, and their placement, the steam room can be decorated in both antique, high-tech or modern style.
Number of benches in the bathhouse
To determine the number of benches in the bathhouse, make a scale drawing of each room and place all the furniture on it, also to scale. Products should not be placed chaotically, they should not interfere with visitors’ ability to move freely. By drawing you can determine the number of benches and their sizes.
It is better to make a drawing before starting construction of the bathhouse, in this case you can use our recommendations:
- Place 4 benches in the rest room: 2 pcs. — near the table for sitting, 1 pc. — for folding things, 1 pc. - for lying down.
Place 4 pieces in the washing room: 3 pcs. — for washing while standing, 1 pc. - for washing while sitting.
- If the washing room has a shower, washing benches are not needed.
conclusions
There are so many types of bathhouse benches that your head may spin from the possible offers. It's okay, this little madness is only for the good of the cause. Better yet, come up with something of your own, because the idea of a shop “lies on the surface” - just choose the right quality wood, easy to process, take accurate measurements, make a drawing and get to work. The result of your labors will still have to raise you in your own eyes.
Here, bath benches have even become the main element of the washroom interior, relegating even the canopy to the background
If you still doubt the need to install a bench in your bathhouse, then the video in this article will try to convince you of this. If you are just going to start this piece of furniture, the video will offer several possible design options.
Did you like the article? Subscribe to our Yandex.Zen channel
Care instructions
After visiting the bathhouse, all wooden surfaces are wiped to remove moisture.
In the evening, after using the steam room during the day, all rooms of the bathhouse are cleaned. Puddles and leaves from brooms are removed from the floor. To reduce humidity, ventilate the shower room, steam room, and dressing room. The remaining water in the room will prevent the drying of multi-tiered bench structures that cannot be taken out into the fresh air.
Sometimes it is necessary to steam a room without visitors, bringing the temperature to +100°C. This will destroy harmful microorganisms, traces of which are not yet visible on the surface.