Any garden plot has a specially equipped recreation area where owners and guests relax and spend time. It can be a large complex equipped with many landscaping elements. However, the area of a standard summer cottage does not allow sacrificing a significant part and forces one to limit oneself to a small rest area, the central and main element of which is a garden bench with a backrest. It is purchased ready-made and made to order. But most owners prefer to make benches with their own hands. Let's take a closer look at this issue.
Types of garden benches
Garden benches are distinguished according to certain characteristics. Among the first are the degree of product mobility:
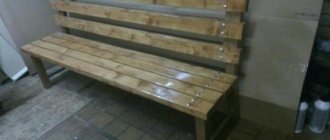
- Portable . Can be installed anywhere and removed for storage in winter or in bad weather. The size and weight of the benches should be limited so that it is possible to move them to one point or another on the site. In addition, for storage you will need to allocate space in a barn or other auxiliary room.
Portable bench made of wood
- Stationary . They are installed in a predetermined location and cannot be moved. To protect against moisture or other external influences, periodic painting and cosmetic repairs are required. The material for such benches must be strong and durable.
There are few designs of garden benches, the main difference is in the configuration:
- Ordinary shop . The simplest design, which is a board on supports of the required height. Its disadvantage is the inability to completely relax ; you have to hold the torso in an upright position with muscle effort. Usually such designs are made in conjunction with a table.
- Bench with backrest . The most convenient and comfortable type, allowing a person to lean back and completely relax . Such benches are versatile and effective , giving you the opportunity to sit down for a few minutes or spend a lot of time enjoying fresh air and pleasant conversation.
The small number of designs is compensated by a huge number of design and stylistic options for the implementation of benches. Different materials are used, various technological methods are used to create products according to our own design.
Prices for ready-made garden benches
Country benches
Original solutions
Along with the classical approach to the process of making benches, there is also an original one, although solving such a problem requires appropriate materials and tools.
For example, you can also build a bench from a large stone if you attach an appropriate wooden platform to it.
Bench made of stone and boards
If bamboo is available, a seat is also made from it, which will take on a more exotic look.
Made from bamboo, and whole
Or a stone.
Sitting in winter will be unpleasant, but beautiful...
It all depends on the flight of fancy. A real owner does not have unnecessary things or materials in his dacha. With a reasonable approach, you can attach any thing, and it will not just lie around in the country or lie like a dead weight in the garage or shed.
Preparatory work
Before you begin the actual manufacture of the bench, you should perform some preliminary steps. The main one is the creation of a project, drawing or at least a sketch of the product. This will help you decide on the size, shape and design, and clarify all the necessary ratios (height and width of the seat and backrest, other parameters). In addition, you need to decide on technological aspects - select the type of bench, the material for its manufacture, prepare the necessary tools, etc. Let's look at these stages in more detail:
Material selection
Each owner of a private home has some skills in working with this or that material. Obviously, this will be the determining factor when creating the project. In addition, you should consider:
- Strength, durability, decorative possibilities.
- Availability and accessibility of material.
- Possibility of processing at home.
- The number and availability of tools needed to complete the work.
Guided by these considerations, the choice of material is made. Possible options:
- Metal . Provides high strength and durability . Various technology options are possible - welding, forging, assembly from ready-made profile elements. Requires appropriate equipment and corrosion protection . As a rule, metal benches are made stationary due to their heavy weight .
Example of a bench with a metal base
- Wood . Working with wooden parts is simpler and easier , and almost every home craftsman has basic skills. The material allows you to implement many design ideas and create any shape . In addition, wood is a good heat insulator . The main disadvantage is the tendency to warp , crack , and extremely low resistance to moisture . If a wooden bench is not protected from contact with water, it will quickly rot. It is possible to manufacture both stationary and portable structures.
Simple and lightweight wooden bench
- Plastic . It is not susceptible to moisture, does not rot , and does not change linear dimensions. Light weight allows for portable structures. Disadvantages include exposure to ultraviolet rays , as well as fragility when subjected to strong cooling . But the main disadvantage of plastic is the lack of high-tech processing . Prefabricated products are usually used, but there are some designs made from plastic bottles or sewer pipes.
Original bench made of plastic bottles
- Concrete . Used for the manufacture of supporting elements. The process is simple, the main condition is the presence of a mold for casting . The main advantage is simplicity , complete identity of all supports, and the ability to manufacture a large number of elements. In addition, the bases of concrete benches do not need to be immersed in the ground - they are massive and can simply be placed on the ground. The disadvantage is the large weight of concrete, the need to observe a certain holding time for crystallization.
Massive bench made of concrete base
- A natural stone . Stylish and attractive designs that are created from improvised or specially brought material. Most often, stone bases are made with a wooden or removable soft seat.
Stylish stationary stone bench
- Combined designs . A combination of different materials is often used. For example, metal supports are made onto which wooden or plastic backs and seats are attached. Combined benches allow you to combine the strength of metal , the warmth and ease of wood processing , and realize the various decorative possibilities of materials in the most successful way.
When choosing what to make a bench from, you need to remember about tools . Each design option requires the use of a specific set of devices, hand or power tools, designed to work with a particular material. In addition, measuring devices will be needed; for stationary types, it is necessary to make recesses for filling with cement mortar. The list of the required set of tools should be compiled as completely as possible at the design stage, so that during assembly of the bench you will not be distracted by searching for any small details.
Stationary or portable
Stationary benches are installed on supports immersed in the ground and filled with cement mortar for strength and stability. They can no longer be moved to another place, so you need to carefully and thoughtfully choose a place for them.
Metal stationary bench
Portable structures are mobile, can be placed in any convenient place and moved anywhere. This is a convenient option if the site layout has not yet been finalized.
Portable bench made of wood
Such benches are used in more gentle conditions, are not exposed to precipitation, and experience less mechanical stress. However, the constant movement of products requires effort, and storage requires a specially designated place, preferably indoors. Sometimes they make both stationary and portable benches at the same time. The former form the basic version of a relaxation corner, the latter are used when the need arises - a large number of guests, events, and other situations.
Shape and dimensions
The shape of the benches can be different:
- straight;
- corner;
- round;
- rectangular.
Round bench placed around a tree
Most of these products are installed permanently. Dimensions are selected based on the characteristics of the site, the expected number of people and the ergonomic requirements of the human body.
Note! The heavier and more massive the bench, the more difficult it is for lovers of easy money to drag it away from the site.
Curved garden bench
There are recommended ratios in the proportions of benches:
Table 1. Recommended bench parameters.
| Parameter | Recommended value |
| Seat height above ground level | 400-450 mm |
| Seat depth | 400-500 mm |
| Seat width | 1500 mm |
| Back height | 900-950 mm |
| Backrest angle | 115-120° to horizontal |
These values were developed by leading engineers and doctors and allow a person to take the most relaxed and comfortable posture.
Children's shops
Children occupy a special place in the family, but large adult shops may be inconvenient for them. The garden is one of the favorite places for children to play, and, of course, you need to take care of their resting place. Children's benches are very similar to those we have already described above, but it is important to take into account two main differences: dimensions and design. If everything is clear with the first one, then what design should I choose for the children's shop?
Of course, the child will like the image of his favorite characters, animals and everything bright, colorful and interesting. The easiest way not to make a mistake is to ask your child what he would like to see on the bench or even ask him to help paint it.
Do not forget about the high-quality processing of children's furniture: it is important to sand all the details and irregularities inside and out. Children will touch everything, and the risk of getting a splinter is high. Do not neglect wood processing. Protruding screws and nails should also be excluded.
You can successfully combine a children's bench with a box for toys - this way you don't have to carry them from home and constantly remove them from the area. But building such furniture is somewhat more difficult; it consists of a large wooden compartment onto which a seat-lid is attached using hinges.
The bench can be absolutely anything: the Internet has provided a huge number of sources of inspiration! But the main source should, of course, be the imagination of the child himself.
Choosing a bench style and design
Design development is a multivariate and complex stage of creating a project. Every person can draw simple models on paper; others will require considerable imagination and artistic ability. The Internet can be of great help, where there are a large number of photographs of finished products made from different materials and in one style or another.
As a rule, site owners create recreation areas in the same style with all other landscaping elements, forming a harmonious image of the site. There are no restrictions in this matter; the criteria are only your own taste, sense of proportion and preferences.
Stylishly designed bench
You can also find ready-made drawings of garden benches online, with dimensions and other useful information. The use of ready-made images gives a tangible impetus to imagination and saves time and effort for those who find it difficult to independently design an original and attractive product design.
Choosing a place to install the bench
Find out how to make a swimming pool at your dacha with your own hands, and also check out the options and step-by-step installation in a special article on our portal.
Sofa with closed sides
One of the variations of the bench-sofa, only with closed sides.
To make it, they use old pallets, since their design matches the modern style of such bench models. If the bench is successfully made, this furniture will become a real boon for a loft-style garden. In addition, the material is inexpensive and very durable. Making them is much easier than it seems. The only thing that can complicate the process is working with fabric. Your spouse will help you in this matter, together with whom you will create a stylish relaxation corner with your own hands.
Step-by-step instructions for making a wooden bench
Let's consider the procedure for creating a wooden garden bench. The process of assembling a regular product, without complex decorative elements, will be described.
Tools and materials
You will need the following tools:
- Electric saw (circular).
- Jigsaw.
- Hand hacksaw.
- Electric drill.
- Manual or electric planer.
- Sander.
- Screwdriver with a set of bits, self-tapping screws.
- Hammer, pliers, screwdriver, pencil.
- Ruler, tape measure, square.
- Paint, solvent, brush or roller (optional electric sprayer).
Prices for popular models of electric planers
Electric planer
Set of tools
Attention! Only the necessary tools are indicated; the list can be expanded according to the requirements of your own project or technological need.
Materials:
- Edged boards 30-50 mm thick depending on the size of the bench.
- Bars with a cross section from 30:50 to 50:50 mm for assembling the planes of the back and seat.
The wood must be properly dried to the required moisture content.
Table 2. Weight of wood of different species depending on humidity.
| Wood species | Weight of 1 m3 of wood of different humidity | |||
| 15 % | 30 % | 50 % | 70 % | |
| Pine | 510 kg | 550 kg | 640 kg | 720 kg |
| Larch | 670 kg | 710 kg | 820 kg | 930 kg |
| Birch | 640 kg | 680 kg | 790 kg | 890 kg |
| Spruce | 450 kg | 490 kg | 560 kg | 640 kg |
Using the data in this table, you can roughly determine how prepared the material is for work. A moisture content of 70% is freshly cut wood, and 15% corresponds to the state of a chamber-drying solid wood that has been stored outside the chamber for some time. By weighing the appropriate number of boards, you can get an idea of the presence of moisture and the possibility of working with this material without drying.
Important! The planes of the seat and back can be made of boards, but the bars do not warp so much, dry out, and are less susceptible to cracking and being turned by a “propeller.”
Assembly order
Working drawing of a wooden bench
Step 1. Based on the drawing data, blanks are cut from the boards.
Cutting the blanks
Step 2. The surfaces of the parts are processed using a manual or electric plane.
We process the boards with a plane
Step 3. The oblique sections are cut off from the backrest supports and lower crossbars.
We are completing the preparation of the components for our bench
Step 4. The supporting elements are assembled. Self-tapping screws or nails are used, which simplifies but weakens the connection. When connecting parts, you should check the position of the parts using a square.
We start assembly from the bottom, supporting part
Step 5. The supporting parts are connected by the bottom crossbar.
Install a “spacer” between the support legs
Step 6. Planks are installed on top to form the plane of the seat.
Helpers will be very helpful!)
Step 7. The slats that form the back are installed.
Mounting the backrest
Step 8. The assembled bench is carefully processed with a sander, removing all sharp edges, irregularities, burrs or burrs of fibers left by the plane. It is recommended to remove the chamfers so that there is no danger of splintering your hands or other parts of the body.
We carry out final polishing with a grinder
Step 9. The sanded product is covered with several (at least 2) layers of paint. You must wait until the first layer has completely dried before applying the next one. Sometimes interlayer grinding is performed to increase the smoothness and accuracy of the surface. There are no special requirements for the number of layers; it is customary to be guided by the appearance of the product.
Painting our bench
Step 10. To create stationary wooden benches, you can use the same technological sequence, you just need to add the stages of digging recesses and pouring wooden or metal supports into the concrete bases.
Concreted support
The assembled bench is attached to them using threaded connections or regular nails. The stationary option increases the stability of the product, but complicates the periodic painting of the benches - they cannot be turned over to simplify the process.
Video - Simple DIY wooden bench
We calculate the amount of material needed
Whatever material you choose as the main one, make all calculations taking into account the standard requirements for benches of all types.
Remember that first of all, the bench should be comfortable. Do not neglect the ratio of the backrest to the height and depth of the bench and the length of the legs.
The height of the support is no more than 45 cm. The width of the seat is determined at the rate of 50-55 cm per seated person. The optimal backrest height is 90 cm - 100 m. Seat depth is 55 cm.
Before starting work, prepare the workplace. The necessary tools are prepared, and everything unnecessary is removed from under the hands.
Step-by-step instructions for assembling a metal garden bench
The design of a stationary metal bench is not difficult. It consists of supports concreted into the ground, to which corners are welded for installing a wooden seat and backrest. Installation of such products is accessible even to an inexperienced craftsman and does not require separate consideration.
Simple metal bench
It is recommended that people who have not undergone professional training use a profile pipe to assemble a portable metal bench. It is equipped with flat surfaces that allow parts to be tightly and securely installed end-to-end or overlapping. For assembly, a welding machine with electrodes or bolts and nuts are used. In addition, you will need:
- Grinder with cutting disc for metal.
- File for cleaning pipe ends.
- Ruler, tape measure, square.
- Chalk, pencil.
- Electric drill with a set of drills.
- Bolts and nuts for attaching the seat slats (or for completely assembling the bench).
- Paint, brushes or spray.
- Personal protective equipment - welding suit, mask, goggles, gloves, etc.
Prices for angle grinders (grinders)
Angle grinders (grinders)
Drawing of a metal bench from a profile pipe
Second drawing of a metal bench from a profile pipe
Procedure:
- According to the working drawing, cut to the length of the workpiece .
- Clean sharp edges with a grinder or file .
- Weld the details of the side supports according to the drawing data . You should constantly adjust the position of the parts along the square and check the length of the diagonals.
- Connect the side supports with the bottom crossbar, grabbing it with point contractions and carefully align the position with the square.
- Grab the backrest parts and check their position again using a square.
- Boil all connections to obtain maximum strength.
- Use a hammer to beat off the scale , and use a grinder to clean areas with sloppy seams.
- Paint the bench frame with two coats of paint.
- Punch and drill holes for installing the back and seat strips.
- Install the seat and backrest . For convenience, they are varnished or painted in advance.
Prices for various types of wood varnishes for outdoor use
Wood varnish for exterior use
Between applying layers of paint, it is necessary to wait for the layer to dry completely, otherwise the coating will not be resistant to moisture, will wrinkle or bubble.
Wrought iron garden bench
Forged garden benches are made by craftsmen with appropriate training and conditions. Products made using this technique are particularly beautiful, stylish, and create a special look for the garden area. Without skills, it is pointless to take on the creation of such structures, but you can order the production of individual parts or elements and assemble them with your own hands on the site.
Video - Making and installing a bench from a metal profile
Sometimes they do it even simpler - they assemble a metal frame, which is decorated with decorative elements ordered from a specialized workshop. The result is a highly artistic product, not inferior in appearance to solid forged benches from famous masters. Such samples require appropriate care, protection from external influences and corrosion.
Forged bench with a seat made of a solid wooden panel
Bench with table
Outwardly, it may seem that this design is complex and not every master will be able to repeat it. However, in reality this is not the case. This bench is very practical, and at the same time does not require many years of skill and expensive materials. Any owner can build a bench with a table. To do this, you will need to firmly secure the tabletop on dense wide trusses and place supports. The seats are secured to crossbars located across the supports.
As a reward for your efforts, you will receive a comfortable and versatile place to relax for the whole family.
Similar to the previous version of the bench with a table, improved and supplemented, it is able to withstand more serious loads. The load is not applied to the table body, but to the base under the table top. In fact, the entire structure consists of three parts - a table and two benches - and is supported by a frame at the bottom. It is this frame that makes the bench stable, but at the same time gives grace and neatness. A frame is made from a board, filled with flooring inside.
Below is a bench similar to the previous ones. Here the master tried to create a comfortable place for lunch and relaxation with the help of backrests. They are fixed by jumpers. But, despite the external convenience, sitting down and leaving such a table will be uncomfortable. Of course, such benches can become a real decoration and highlight of the garden, but they also have disadvantages.
For example, their dimensions, and, as a result, inconvenience of placement. Many small or large guests, and even family members, may find it uncomfortable to sit on a standard bench. In addition, it is impossible to install the bench on an uneven surface, only on a large and flat one.
Useful tips
We know how else you can decorate your site! We recommend reading our material on the topic – Hedge (fast-growing perennial evergreen).
Experienced craftsmen use some techniques to speed up the assembly or finishing of finished products. Let's look at some of them:
- Assembling metal benches with bolts allows , if necessary, to disassemble the structure and reuse the resulting material. At the same time, the nuts must be reliably protected from rust so that they do not have to be cut off.
- To make finishing easier, it is recommended to paint the parts before assembly . This applies to wood backs and seats attached to a metal frame, or other components that do not require welding. At a minimum, a first coat of coating is applied, although a full finishing can be done.
- When manufacturing heavy parts (concrete castings, massive welded supports for long structures), it is recommended to carry out work as close as possible to the installation site so that you do not have to carry the finished product over a long distance.
Simpler, but more convenient
Before we say goodbye to wooden benches for the time being, let’s try to make a bench without a back more comfortable. The easiest way to do this is to make the seat concave. But then the “spreading” loads on the legs intensify, and the seat loses strength - bent beams hold the load many times worse than straight ones.
The simplest solution to the problem is a box-shaped power circuit. Its excessive overall rigidity in this case will allow you to save on material by using thin narrow boards for drawers (furniture ties, spacers and load-bearing beams), and on labor intensity by using overlay joints on steel fasteners. The rigidity of the seat is ensured by installing intermediate cross beams, see drawings in the figure:
Drawings of a simple comfortable bench without a back
Note: for another version of a universal bench without a back (home, utility, garden), see next. plot:
Video: homemade bench without back
Canopies over benches
If there is no shade at the dacha where the bench is located, then a canopy is installed to protect from the scorching sun.
The canopy is installed separately or it becomes part of a structure, for example, a pergola. In the photo above there are 7 racks made of timber, the upper frame is installed on the timber. Since this is a pergola, the roof is formed by planks installed on the edge. The sides of the structure are filled with slats. The bars for the bench in the pergola are fixed to the pergola beam. The structure becomes a reliable support for climbing plants. Even annual vines will create coolness a month after planting.
Installing a large canopy will allow you to make a swing from a simple bench, which both adults and children will appreciate.
A huge number of different options for constructing benches made of wood and other materials will allow you to choose your own option. Having made a drawing and selected the necessary materials, you can make a garden bench with your own hands.
We recommend studying: DIY decorative mill for the garden step by step with photos
Bench protective covering
Wood and metal are processed separately. It is better to use a primer for the frame. Ideally, red lead will be used, which will protect the metal frame from corrosion for decades. Especially when you consider that at the dacha such garden furniture is under the snow for six months.
The wood can simply be painted. But if you first dry it, let it dry for a couple of days, then apply varnish in two layers, then such a coating is guaranteed to protect the wood from environmental influences.
In any case, color compatibility and design ideas are important. For example, if the frame is covered with Kuzbasslak, then it is better to varnish the wooden parts, this will emphasize the natural texture of the material.
We suggest you find out how many calories there are in one pear
( 1 rating, average 5 out of 5 )
Video
We suggest making a nice garden bench using the following video instructions:
Country bench with flower beds
With rounded corners
Bench painted white
Bench made of narrow planks
Log bench made with a chainsaw
Garden bench for a summer residence
Brick and board bench
Wooden table with benches
Source: StroySvoimiRukami.ru
A little about technology
Bolted joints are often used in garden furniture. If it is one-piece and not hinged, it is better to hide the heads of the bolts with washers and the nuts with them. The first is for the sake of aesthetics, and the second so as not to get scratched.
Connecting wooden parts with a bolt
To conceal the connection of wooden parts with bolts, in addition to a spiral drill for wood, you will also need a feather drill, on the left in Fig. Use a pen to select holes for the head and nut. After assembly, the remainder of the threaded body of the bolt is cut off with a grinder and the connection is tightened again, because when pruned it weakens. Then the holes are filled with wood putty; You can thickly mix the sawdust with Express glue (liquid nails) or PVA for wood. Not office grade PVA for paper!
As for the hinge joints, steel clips must be inserted into the bolt holes in both parts being connected; their diameter must be taken into account when drilling. Without clips, the bolt will quickly break the wood and the hinge will wobble haphazardly.
Bolt clips can be rolled from sheet metal or galvanized steel. In this case, 2-3 drops of motor oil are added to them twice a year, at the beginning and end of the season. If it does rust and seize, brake fluid will help out, the same 2-3 drops. The rust disintegrates from it and the hinge “releases” almost instantly. After the “brake” it is dripped with oil again.
The manufacture of garden furniture also requires tongue-and-groove connections, on dowels and dowels (through round wooden bosses). In this case, firstly, the wooden fasteners are made from the same wood as the parts being connected. For outdoor use, some strength must be sacrificed in order to ensure that the temperature coefficients of expansion, moisture capacity, swelling and drying of the wood of the entire assembly are the same. Otherwise, the connection will quickly become loose.
Dowel connection with wedging
Secondly, it is very, very desirable to make joints of “open sky furniture” with wedging, see fig. on right. Wedges are cut from hard, durable wood: oak, walnut, boxwood, dogwood. Their thickness is 2-2.5 mm, but not narrower, because... the achievable accuracy of the wood-to-wood connection is plus or minus 1 mm.
An important condition: the wedges must be oriented across the fibers of the attached part, otherwise it may split during landing and subsequently the connection will fall apart. If perpendicular (crosswise) parts are connected, then the wedges in the dowel (dowel) should be oriented at 90 degrees relative to each other
Otherwise, the production of country and garden furniture does not contain anything that would not be subject to ordinary working ingenuity.
Appendix: how to take grid dimensions
Let's look again at the drawing of a paired “romantic-philosophical” bench. How to calculate missing dimensions? First of all, we visually determine the type of oblique projection; in this case it is isometry, so both oblique axes are equal.
Then we take a longer part, for which the linear size is indicated; in this case, it is a drawer with a length of 1350. According to the drawing, using the Pythagorean theorem, we determine its length in fractions of the grid pitch. Correlating it with a known linear size, we obtain a scale factor. If the projection is arbitrary, then you will need to calculate 2 scales based on 2 parts, for each of the oblique axes.
Next, quite painstaking work begins: we determine the missing dimensions from the drawing in fractions of the grid pitch and multiply by the scale. For each pair of parts to be joined, we check the fit, taking into account that the accuracy for wood is 1 mm. If, for example, the tenon turns out to be thicker than the groove associated with it, it’s clear that it won’t fit, you need to look for where the error crept in. If it is already more than 2 mm, this is also not good, it will wobble and the error will begin to accumulate in the calculations. And if the tenon fits into the groove with a gap of 0-2 mm, everything is tip-top, calculated perfectly.