Wood is a wonderful material for making furniture: durable, aesthetic and durable. Products made from it turn out to be elegant and practical, and if they are made by hand, they will be especially pleasant and loved, since the home craftsman puts his love for home and family into his work.
The kitchen is one of the most important rooms in any family's home.
If your kitchen is small, then you can make a narrow piece of furniture.
DIY kitchen buffet
A buffet is not just furniture, it's style. Maybe, after looking at the photo, you decided that this was a poorly restored old sideboard? Not at all, everything is as planned. All this ostentatious “shabbyness” is a carefully designed design. Of course, it's a matter of taste. Some people prefer boring modern kitchens, while others like the original retro style kitchen interior. If you want to make a similar buffet for the kitchen with your own hands , then here you will find detailed plans, drawings with dimensions of parts and step-by-step photos.
True, from the photos presented by the author it is difficult to grasp the assembly sequence, especially if you do not yet have much experience in making furniture. Therefore, to get more information, you can use the link located under the gallery. The site has detailed instructions with a description of each stage, as well as lists of materials and tools that you will need for the job.
Author: Jamison Rantz Photo Source: rogueengineer.com/diy-farmhouse-buffet-plans/
Wardrobe design
The first step in making a wardrobe is designing it. To do this, you can schematically draw a cabinet with all dimensions, designation of internal compartments, cabinets and drawers.
This “old-fashioned” approach is quite lengthy and inconvenient, especially in the presence of high technology. Nowadays, almost all companies use special computer programs to design furniture, allowing them not only to evaluate the future result, but also to fully calculate the specifications of the product.
One of such programs is “Basis-Furniture Maker”.
This is a fairly powerful design tool that includes a number of supporting programs. The basis is designed to create both simple and quite complex furniture elements. If you are interested, you can go to the manufacturers’ website and familiarize yourself with it in more detail.
To design a cabinet, it is not necessary to complete the full “young fighter course”.
A fairly simple and accessible interface allows even beginners to use the program effortlessly. To install Basis, you need an emulator, since it uses hardware protection, but for “confident PC users” this has long ceased to be a problem.
https://youtube.com/watch?v=tTqmnsTgKRU
If you have never used Basis, you can watch demo videos on design.
In our case, this is the video “Basis-Closet 7.0 Video Clipboard Construction”. Viewing it will clearly introduce you to all stages of design, as well as the capabilities of the program.
It will take a little time (about 30 minutes), but even a beginner will be able to figure out what’s what without any problems.
Designing a wardrobe in the Basis-Furniture Maker program takes about 1 hour, taking into account the calculation of the specifications of the necessary materials. Manually it would take much longer and would not eliminate possible errors in the calculation.
The process of creating a virtual closet includes the following steps:
- choice of wardrobe dimensions;
- dimensions of the bottom, base and lid of the cabinet;
- selection of material and dimensions of the rear wall and its stiffeners. The back wall is made of fiberboard, and the stiffeners are made of chipboard;
- division of the internal space of the cabinet into horizontal and vertical sections;
- filling the resulting sections with boxes (if necessary);
- entering basic door parameters;
- adding a mezzanine and open side sections (if necessary);
- designation of the ends that need to be edged;
- selection and arrangement of fittings;
- printout of drawings of individual cabinet components and specifications.
If you wish, you can also print out a three-dimensional image of the finished cabinet, which can then be used to easily assemble it.
The benefits of making it yourself
If a home craftsman is comfortable with carpentry tools, it will not be difficult for him to please the housewife and make a buffet with his own hands, which is necessary in any kitchen.
For maximum convenience and comfort, you should equip it with not only beautiful, but also functional furniture, such as a buffet.
An excellent solution for any home is to install a corner kitchen cabinet.
A self-made kitchen cabinet has a number of advantages over its “store-bought brothers”:
- you can choose a unique design for it;
- choose the material to your liking;
- use original fittings;
- choose the color scheme of the buffet that best matches the kitchen interior.
To make the interior original, you can make it yourself, putting your soul into the work, using any materials.
The most important nuance when installing such a cabinet is calculating the trajectory of the door opening.
In addition, wood products are extremely beneficial for health: they do not contain toxic compounds and do not emit harmful substances, but they fill the room with the aromas of essential oils.
Sideboards and buffets for the kitchen do not have much difference and are very similar in appearance to each other, because... The ancestor of both is considered to be the closet.
A kitchen buffet is an excellent solution for your kitchen interior.
A wooden sideboard is durable and comfortable. It will last for decades and is easy to restore and repair.
A sideboard made of natural wood will look rich and elegant, but at the same time it will cost a much larger amount.
Another important advantage of making a kitchen cabinet with your own hands is the ability to make it in an original configuration and size that best suits convenience and comfort.
To get a beautiful product without spending too much, you can make the furniture body from cheaper raw materials, such as chipboard, and the facades from more expensive and beautiful ones.
Necessary materials
In the friendly family of kitchen furniture, the sideboard occupies a special place - it reigns in the kitchen and bears the features of an elegant sideboard and an ordinary cupboard. Previously, furniture was made “to last,” so the most durable and high-quality wood, well-seasoned and processed, was chosen for its manufacture.
This furniture option is practical, beautiful and takes up little space.
Today's offer of building materials allows you to choose the necessary option for making a buffet with your own hands. But one of the most popular bases for kitchen furniture has become MDF, fiberboard, chipboard and solid wood. The latter does not require additional characteristics, being distinguished by strength, durability, and beauty. As for wood boards, each of them has its own effective properties and disadvantages.
- Fibreboard is resistant to moisture and temperature changes. It is light, strong, durable, affordable and not difficult to process. A buffet made from this material can be quickly assembled. It can be made functional and visually attractive. Most often, such plates are used to install the back walls of wall cabinets, drawers and shelves.
- Chipboard is available in a variety of colors. This is a durable and inexpensive material from which you can make a comfortable, spacious and original cabinet that can easily fit into any kitchen interior. Among the significant disadvantages are emissions of formaldehyde into the air. To reduce their harmful effects on human health, it is necessary to place furniture made from chipboard away from heat sources.
- MDF is used quite widely today. It is manufactured using modern technologies, therefore it is an environmentally friendly material. It has high moisture resistance, which makes it more suitable for use in the kitchen. It has a soft, easily processed structure, which allows it to be used to create a variety of decor for furniture fronts of buffets and to give products a variety of shapes. The only drawback is the fairly high price compared to the cost of chipboard.
- Solid wood is a special chic and a demonstration of high taste. Environmentally friendly, natural material.
This means that you will simultaneously receive moral pleasure from the work done, even if it seems somewhat labor-intensive to you.
The following tree species are most often used to make buffets:
- pine, durable and easy to process;
- larch, strong and not subject to the destructive effects of moisture;
- oak, practically eternal, does not rot and does not require varnishing.
Kitchen cabinets can only be appreciated by true connoisseurs of beauty and art.
Depending on the place where the hand-made buffet will be installed, you can use different materials. For a dacha or summer kitchen, you can make a kitchen cabinet made of plastic, simple in design and inexpensive.
After all, with the help of this product you will be able to restore order in this part of the house, and it will become the “highlight” of the interior.
An original sideboard in a mansion kitchen, made of MDF or solid wood, with unusual shelves and niches, will look expensive and presentable.
Today, a buffet is a kitchen cabinet, which is completely closed at the bottom, and its upper part is made in the form of a display case.
What types of kitchen buffets are there?
In the classical sense, a buffet is a rather massive closed cabinet located on the floor, and on top of it is a cabinet with glass doors.
However, here it is necessary to clarify that doors can be of two types:
- Completely transparent, displaying all kitchen utensils, which are neatly arranged on shelves, for everyone to see;
Transparent model
- With a small transparent window through which only part of the entire contents of the buffet is visible.
A very unusual model with small windows
There can also be an open countertop between the top and bottom. Frequently used items, vases with fruits or flowers, and all kinds of figurines are most often displayed on it.
Note the built-in countertop
Based on shape and size, the buffet can also be divided into several types. But the most optimal of them is a two- or three-door cabinet with a glass display case. Lots of convenient drawers, shelves, and an open display case – very functional.
Advice! The lower closed cabinet can easily accommodate large kitchen utensils (pans, jugs, pots, wide dishes) and even small household appliances (steamer, blender, bread maker). And in the upper showcase you can put decorative items, for example, an expensive tea set.
True, such a buffet requires quite a lot of space, so it is unlikely to be suitable for small kitchens. The approximate dimensions of this beauty are: width from 120 to 200 cm, height about 200 cm, and depth about 45 cm.
However, there are also buffets that are more modest in size; they are lower and not so deep. You can also fit a corner model of a sideboard into a compact and harmonious design. It has a semicircular shape and fits perfectly into a corner without interfering with free movement around the kitchen.
Compact buffet for a small kitchen
Varieties
Buffet is different from buffet. This piece of furniture can be used not only for the kitchen or living room (this is the domain of classic sideboards). There is also a distinction between a sideboard and a display cabinet. Each model differs in the presence or absence of open shelves, as well as the number of drawers.
The classic model is, after all, a kitchen option, or, as a last resort, it can be placed in the living room combined with the kitchen. Numerous shelves and drawers contain not only dishes and cutlery, but tea, coffee, confectionery and spices. The housewife uses the free niche as a worktop, for preparing snacks, brewing tea or effectively serving ready-made dishes.
The classic model is mainly used in the kitchen.
A sideboard is for a classic living room. Initially, sideboards were low buffets without an upper compartment. Modern models look very similar to their predecessor, and differ only in the absence of a niche. The sideboard has a lower cabinet with two (sometimes three) doors, and an upper compartment with glazed facades. Thanks to such “showcases”, it is possible to display expensive and spectacular dishes.
A sideboard is usually located in a classic living room.
A display cabinet is another type of antique sideboard. This model is considered ideal for the dining area, as it allows you to display decorative items and dishes and also provides easy access to them. Can be with open or glazed shelves.
A display buffet is usually located in the dining area and also has a decorative function.
Deciding on design and construction
Making your own kitchen cupboard opens up a wide field for the imagination of the home craftsman. He can make it, in accordance with his vision and ideas, in various styles:
- retro;
- high tech;
- art;
- minimalism and others.
Modern buffets for the kitchen can be made, guided by a step-by-step description of this process.
Cabinet designs can also be very diverse, including corner and round.
All homemade products radiate the coziness and warmth with which it was made.
How to make a buffet for the kitchen
Most of these products use hardwood plywood. The outer layer of plywood is a hardwood veneer such as oak or birch. This way you get the look of hardwood at the expense of plywood. Plus, it's very smooth, making it easy to work with! The sheets of plywood are large, so they may be difficult to transport in a passenger car; they certainly won’t fit in the trunk. kitchen buffet assembly is actually very simple. You make the box first and then add the trim and doors. It is convenient to use a Kreg Jig to make a box. You can add a small piece in the middle to act as a sagging support brace. Simply cut a small piece of plywood and attach with glue and screws. You can also use a Kreg Jig to make doors. Make pocket holes on the short scraps and attach to the longer ones. For the doors, you will have 4 long pieces without pocket holes as shown in the photo, as well as 4 small pieces, each with pocket holes on both ends. Attach these things using wood glue and 3cm screws to create rectangles. After this, attach the mesh to the doors. How to make a buffet with your own hands is shown in step-by-step photos .
Photo source: www.shanty-2-chic.com/2015/01/diy-sideboard-free-woodworking-plans.html
Add a back wall and a front frame
1. Cut out strips G for the back wall (“List of materials”, Fig. 2).
Adjust the offset of the router bit and rout a rabbet along both edges of each G plank on opposite sides.
For assembly you need three clamping bars and six long clamps. Make sure the shelves are fully seated in the grooves and aligned with the front edge of wall A.
2. Mill rebates 10 mm wide and deep along both edges of each plank G, but from different sides (Fig. 2a, photo I), so that the ridge of one plank overlaps the rebate of the next one. Then, on the inside of each plank, mill a 3mm rounded edge (called a “nail”) (Fig. 2a and Photo J). Finish sand the inside sides of all planks with 220-grit sandpaper.
To decorate one edge of each plank with a narrow nail profile, simply adjust the offset of the 3mm fillet bit to create a slight offset.
After installing the facade frame, the internal surfaces will be less accessible, so it is advisable to start finishing them now.
3. Apply masking tape to the front edges of cabinets A-E, to which the façade frame will then be attached (photo K), and apply a finishing coat to the interior surfaces of the cabinet, as well as the inside sides and edges of the back strips G. We first applied a generous amount of linseed oil to reveal the texture, wipe off the excess and dry for 12 hours. Then three layers of shellac polish were applied, slightly diluted with denatured alcohol to make it easier to work with a brush. Intermediate sanding after drying was done with sandpaper No. 320.
4. Remove the masking tape. Cut out the top and bottom crossbars H, I and posts J. Glue the bottom crossbar in place (Fig. 2) and secure with clamps.
5. Mill a 10mm shoulder fillet (“nail”) on one edge of each J-post (Figure 2b). Glue the posts to the body (photo L) close to the bottom crossbar and secure.
With the profiled edge of post J aligned with the outside of wall A, glue the piece in place and press with clamps.
Using a square, align the first plank G flush with the partition D. Secure only one edge with 4.2 x 32 mm screws.
6. Glue the top crossbar H in place, pressing it against the J posts.
Mark the overhanging G strips and then file them to the final width.
7. When the glue has dried, turn the case over with the front side down and attach the back strips G with screws (Fig. 2, 2a, photo M), starting from the center. Use a couple of small coins to even out the gaps between the slats.
8. The extreme strips at the ends of the body will protrude beyond the walls A. Mark their width and file them (photo N) before securing them with screws.
Drawings, diagrams
Before starting the manufacture of any furniture, you must draw a drawing indicating the dimensions. The procedure is as follows:
- Determine the installation location and its dimensions.
- Draw a diagram by hand with the location of the main parts and elements inside the cabinet body;
- Create a drawing based on the drawing.
- Make a specification of all assembly elements, indicating dimensions and quantities.
- Select the type of wood from which you will make the china cabinet.
Peculiarities
Wooden cabinets fit perfectly into any interior. This allows them to be used both in city apartments and in the country. It is enough to correctly calculate the dimensions and determine a suitable design that will be an ideal complement to the appearance of the room.
Wooden cabinets have many advantages:
- environmental friendliness - only natural material is used that is not subject to chemical treatment;
- heat and water resistance - when heated or wet, the cabinet will not lose its properties and will not be damaged;
- variability - you can create your own unique closet with maximum convenience and ideal design;
- decorations – wooden furniture can be decorated with carvings, paintings or various inserts;
- placement methods - the cabinet can be built in to save space or placed in a classic way;
- possibility of disassembly - wood allows you to disassemble the furniture many times if necessary;
- elimination of damage - if scratches or chips appear, it is enough to sand the damaged area and treat it with paint, mastic or putty.
Creating a wooden cabinet yourself is not difficult and does not require large financial costs. In some cases, the process of preparing parts and assembling evokes such pleasant emotions that it turns this work into a hobby.
Required Tools
To make a kitchen buffet to your liking, you will need an individual set of tools, but among them there are those that you cannot do without, regardless of what material, design and configuration of the product the master chooses.
In the classic version, there are work surfaces. This part is always decorated with decorative elements.
Standard set:
- drill;
- wood drills;
- jigsaw;
- a circular saw;
- Sander;
- screwdriver
and other tools and devices that should be at hand.
The most common are closed cabinets.
Cabinet shape
For interior design, it is important to choose the right shape for the future cabinet:
- Classic pencil case. The most convenient type of furniture, especially for a small apartment. The height of the pencil case can reach the level of the ceiling, which allows you to increase its capacity. One door is installed, usually a traditional hinged model.
- Linear cabinet. It is a design with a solid body, inside of which there are shelves, compartments for hangers, and racks for shoes. Hooks on the side walls and drawers can be installed.
- A corner cabinet is the best option for saving space. It has two bodies juxtaposed at an angle of 90 degrees relative to each other.
It is quite rare to find a radial cabinet, the front facade of which has a rounded shape, often equipped with mirror surfaces.
How to make a buffet with 3 sections
The buffet, with its relatively small size, holds many useful things - dishes, serving elements, tablecloths, napkins and much more, which makes it a convenient addition to any home.
Buying a new buffet is an expensive proposition. Of course, it’s cheaper to make a buffet with your own hands , but making a completely buffet from scratch is also not easy, and not everyone has such an opportunity. Here is an option to solve this problem.
You can buy three cheap nightstands that come with doors and drawers (not the fake drawers used for a sink) and set aside one day to just put them together. This buffet will serve you for many years. Buy pretty legs separately and add moldings for a decorative look.
How to do this, look at the step-by-step photos.
Author: Jennifer Stimpson Photo source: www.thisoldhouse.com/how-to/how-to-build-sideboard-stock-cabinets
What do you need?
Many people think that making furniture is an incredibly difficult and overwhelming task, and before starting work, you should at least read the book “How to make a cabinet with your own hands.” But that's not true. In fact, the production of a comfortable, spacious and beautiful piece of furniture can be divided into appropriate stages: preparation of the necessary tools and materials, production of individual parts, assembly, installation.
First of all, you need to decide what the cabinet is for and where it will be located. After all, the furniture will serve for many years, so this issue needs to be taken seriously. Often cabinets are installed along the entire length of a blank wall, in the opening of the interior partition. As for cabinet furniture, you can use it to divide a one-room apartment into zones; this type will look good in a Khrushchev-era building.
Next, you need to calculate the dimensions of the cabinet. It should be taken into account not only the width and height, but also the distance between the shelves and their number. For clarity, you need to transfer your idea to A4 sheet. This will also help you decide on the material for the product: wood, lining, MDF, fiberboard. Often the frame is made of wooden beams and the doors are ordered separately. Making it yourself is a good alternative for your home or garden. The design of the cabinet can be adapted for small-sized apartments; it will look advantageous in a Khrushchev-era building.
DIY corner buffet
This corner buffet will turn an empty corner into a convenient place to store dishes and other accessories, both in the kitchen and in any other room.
The design is quite simple, and if the dimensions do not suit you, there is nothing difficult in changing the drawing and making the corner cabinet a little wider. Just use 1x12 boards instead of 1×8 boards for the back. According to the plans, the shelves are made from 1x12s boards, so they will be approximately 28cm long.
So first measure your angle. Do you have 55 cm of free space? Then you can start.
Buffet dimensions:
- 72" (183 cm). Width and depth may vary depending on design.
Parts Dimensions:
- 1 PC. 1 × 8 72" (183 cm) long back
- 6 – 1 × 12 30 1/2″ (78 cm) long, both ends cut at 45 degree angle
- 2 – 1×3 72" (183 cm) long front side trim
- 2 – Side panel 16 1/4" x 72" (41 x 183 cm) size for precise fit
2 – 1×4 length 26 1/2” (68 cm) top and bottom adjustment, size for precise fit- 1 – 1 × 2 26 1/2″ (68 cm) long table top
The doors are the hardest part because most of us don't have a router or circular saw. If you have the necessary tools, you can make a door insert as shown in the diagram. Doors should be no more than 20mm thick, so the panel will need to be inserted into the door frame. There are other options, you can make an overhead door. See the diagrams in the photo gallery for the assembly steps.
Photo source: www.ana-white.com/2010/12/plans/corner-cupboard
Facade options
The appearance is largely determined by its facade (front panels, doors). Depending on the design, they can be:
- Solid - continuous canvases. Such facades are durable and easy to use. Since they have no seams, they are easy to wash and wipe clean.
- Frame - a base with a frame. Typically, such structures are made from different materials. Externally they look very attractive, but otherwise they are inferior to solid facades.
For decorative framing of panels use:
- Carving (patterns applied to wood). This is a classic design option for buffets.
- Engraving is a design or inscriptions applied to metal or other durable metal.
- Glazing. Option for decorating the top of the buffet. If you don't want the contents of the shelves to be visible to everyone, use stained glass instead of regular transparent glass.
- Veneering. The facade is covered with a thin layer of natural wood. As a rule, this is an excellent option for saving money, since a sideboard made of MDF with veneer is no different in appearance from a piece of furniture made of natural wood.
Manufacturing process: step-by-step instructions
Before you take up the tools, you need to clearly imagine what kind of buffet you will make, and reflect your thoughts and ideas on the drawing, indicating all the details of the product.
A sideboard is part of the kitchen furniture.
First, the largest elements of the product that form its basis are prepared according to the available drawings, taking into account the necessary parameters. In order not to disturb the assembly order and not to lose the necessary parts, experienced home craftsmen advise numbering all parts.
It has the shape of an ordinary cabinet with a closed and an open part.
After completing the preparatory work, the cabinet is assembled in the following order.
- Preparing the side parts of the furniture, drilling holes in them. It is worth paying attention to the advice of experienced craftsmen who recommend using a depth limiter to control the distance between the recesses. Its use allows you to protect furniture parts from through drilling.
- Connection of buffet partitions
- Connection of the upper part of the product and the outer side parts. The top of the product is located on the end fasteners, and the side parts and bottom are pushed all the way.
- Installation of internal parts. First, the buffet body is mounted on the rear ends. Screws are used to secure the lower part, and mounting angles are used to connect it to the upper part.
- Assembly of base parts and their fastening. To mark the plinth, a drawing of kitchen furniture is used, according to which the panels are fixed on bars located at the corners of the structure.
- Decoration of the façade. The plate is placed in its place, and protrusions of the required size are left on the sides. They are needed for hanging doors and fixing the back panel.
- Securing the back wall. The sideboard body is laid out on its side to secure the canvas in the required position.
- Installation of doors and hinges. The left and right doors, the bottom and the top are marked with marks, after which the hinges are installed according to the marked marks. The cabinet doors are mounted in place, securely fastened on the hinges.
- Installing furniture in its permanent place, installing shelves and drawers, checking the quality of installation and ease of use of the product.
The designs of such cabinets vary.
However, in other designs you can also find kitchen furniture with engravings, plinths and cornices on the facades.
dimensions
Initially, you need to decide where the cabinet will be located. This will allow you to decide what dimensions it will be.
- Height. Technically, only built-in structures can be implemented under the ceiling. If the cabinet is a cabinet, with side walls and a roof, the distance from the ceiling should be at least 15-20 cm. Otherwise, you simply will not lift it due to the diagonal of the sidewalls - after all, any cabinet is assembled “lying down”. The removable mezzanine greatly facilitates assembly and allows you to reduce the gap between the cabinet roof and the ceiling to 10 cm.
- Depth. For a wardrobe with hinged doors, the optimal depth is 50-55 cm, with a longitudinal rod for hangers. In a compartment, sliding doors “eat up” about 10 cm, so the depth increases to 60-65 cm. For bookcases and pencil cases with shelves, a depth of 35-40 cm is usually set. Narrower cabinets, 20-30 cm, must be attached to the wall, since they will unstable.
- Width. An arbitrary parameter, limited only by the length of the wall. For cabinets with hinged fronts, two-door, three-door and four-door options will be easier to assemble.
The first step - measurements - is especially important at the design stage of built-in and partially built-in wardrobes.
A wardrobe for a balcony also requires extreme thoughtfulness and accuracy when taking measurements. In conditions of limited space, any design flaws are fraught with complete rework due to the impossibility of installation.
Buffet finishing
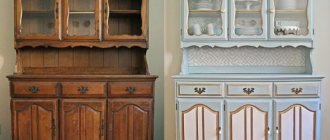
Probably, many will agree that the new furniture looks impeccable, but, alas, the price is not at all pleasing. If you suddenly inherited your grandmother's sideboard, consider yourself lucky! After all, as you know, furniture used to be made for work, with the expectation of long-term use. And you can bring it into the proper, and most importantly, desired, form yourself, without spending a lot of money on it.
Five ideas for decorating old furniture
We offer you several interesting options for remodeling kitchen furniture.
Even at home, a kitchen buffet with your own hands can be transformed from seemingly shabby furniture into a real interior decoration!
- Painting and replacement of kitchen facades. An old wooden or painted surface must be thoroughly cleaned of grease stains and dust, washed with warm water and detergent and dried. Next, a light sanding with fine-grit sandpaper will be required. If there are cracks in the furniture, we fill them with a special wood putty. The already dried surface must be re-treated with sandpaper (only with medium-grain sandpaper). This is followed by a primer with universal paint and light sanding.
Snow-white cabinets with replaced doors and fittings
Then you need to apply the selected paint in two layers. The cabinets in the photo above are painted white, and some of the doors have been replaced with new glass ones. New metal fittings were also selected. Beautiful dishes complement the overall composition.
Attention! Instead of replacing the doors, you can add a beautiful design to the old doors.
With application of ornament
- Decoupage technique. Here you will only need special napkins or a pre-printed design, scissors, brushes, glue and acrylic. With a little imagination and effort, you will get a truly original and spectacular thing!
Stunning buffet decoupage! And all this with your own hands
- In this version, the cabinets are painted in a delicate light green color, and a colored stencil is applied to the doors. You can experiment with any shades!
With stencil application
- Bright furniture! All with just paint, new fittings and charming curtains. You might like this option.
A kitchen that plays with bright colors is amazing!
- Black and white contrasting furniture. Quite an interesting solution for modern kitchen interiors in high-tech, art deco, minimalism or modern style. And all unnecessary decorations from cabinets in the form of carvings and balustrades can always be removed.
Black and white version
Completion
1. Apply finishing coat to all surfaces that have not been previously finished.
2. Install doors with hinges and latches. Congratulations, you have completed the project!
Buffet for the kitchen in Provence style
Provence is unity with nature, soft waves of the sea, gentle sun, endless fields of lavender with a charming aroma, clean air. Provence is a style that combines elegance, comfort and simplicity, which has several features:
- soft shades;
- use of natural materials;
- direction for “antiques”;
- emphasis on detail.
Elegance and lightness fit into a style with a wide range of convenience. Provencal interior design is based on comfort and simplicity, and the unobtrusiveness of the lines allows you to enjoy the furniture for a long time without any desire to change the situation. This used sideboard for dishes meets all the criteria of the Provence style, the main material is a solid board made of natural wood. Maple, linden and moisture-resistant plywood 18 mm thick were used for production. The design of the sideboard is made in an antique style, although the frame turned out to be massive and complex, but in full compliance with the style. You can read the manufacturing instructions on the website, and below see the master class on assembling a buffet in the Provence style with detailed step-by-step photos.
Author: Vadim Portnov Photo source: www.dd-space.com/2014/01/provance-bufet.html#more