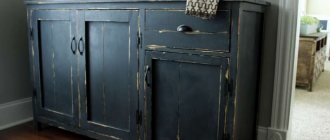
Restoration of an old sideboard with before and after photos.
Everything new is well forgotten old. Few people have not heard the saying, and it can also be correlated with the restoration of old furniture. Vintage items, also known as antiques that have seen several generations of families, are becoming increasingly popular. However, in Soviet times, many items had the same appearance, since they were mass produced but were famous for their quality.
Restoration of an old kitchen cupboard
That is why most houses in the post-Soviet space are still filled with them. But it all depends on your desire: restoring your grandmother’s sideboard with your own hands will add originality to any interior.
Restoration of a kitchen buffet in shabby chic style
Decoupage on a kitchen cabinet - a beautiful handmade item
We restore an old cabinet: repainting, aging, decoupage
Before you start working, you need to figure out (or better yet, sketch in color) what the finished product will look like. Having considered this point, you can begin purchasing the necessary materials. We will need:
- synthetic paint brushes of medium hardness (one for paint and one for varnish - at least two centimeters wide);
- wood paint;
- sandpaper (harder and finer);
- water-based varnish for wood (matte or glossy - at your discretion);
- acrylic primer for wood;
- masking tape;
- paraffin candle;
- napkins for decoupage or drawings printed on thin paper;
- PVA glue;
- spray bottle with water.
Pneumatic airbrushes, spray guns, texture guns
Step-by-step instruction
Step 1. First of all, you need to remove all the fittings, and you need to start work by cleaning the surface of the cabinet from old varnish. To make the work go faster, it is better to use a sander, but if you don’t have one, you can sand the cabinet manually.
To treat the surface of the wardrobe, a small round nozzle is enough
Step 2. The entire surface of the cabinet that is planned to be painted must be coated with a primer. You need to apply the composition with a brush in one layer, and then dry for the time recommended by the manufacturer (usually the primer dries for at least three hours).
The primer is usually colorless
Step 3. Cover with masking tape the parts that we do not plan to paint. We paint the remaining elements with a brush in one layer. Leave to dry, then, if necessary, cover the surface with a second layer of paint.
The first layer can be applied with white paint, the next layer is colored.
Step 4. Apply paraffin. We need to use a paraffin candle to treat those areas that we plan to make aged (for example, the side edges). This technique will allow you to remove part of the paint layer and expose the previous one. This achieves the “scuffed” effect that is relevant for old furniture.
Paraffin should be applied in a fairly dense layer.
Step 5. Next, the cabinet needs to be covered with another layer of paint - this time it should be slightly lighter than in the previous layer (you can add white paint and stir). Doors and protruding elements can be painted in a different shade or color if desired, after sealing the joint lines with masking tape.
Strips of tape will allow you to draw even boundaries between shades
Step 6. We decorate individual elements (in our case, drawers and door ends) using the decoupage technique. To do this, apply a napkin with a pattern to the surface of the cabinet, moisten it with water from a spray bottle, then smooth it with a brush. Afterwards, cover the napkin with a layer of PVA glue and wait for it to dry.
PVA glue dries in about 20-25 minutes
Step 7. We varnish the finished cabinet in two layers (each layer must be dried according to the instructions).
Result of work
Main stages of work
To restore an old chipboard or solid wood cabinet, it is important to do the work in stages. The master will have to take the following steps: Preliminary determination of the final furniture style
Here you need to look around, evaluate the color scheme of the room. Understand her general style. After all, as a result, the furniture should fit into the overall interior.
Preliminary determination of the final furniture style. Here you need to look around, evaluate the color scheme of the room. Understand her general style. After all, as a result, the furniture should fit into the overall interior.
Dismantling an old cabinet. It is necessary if the doors do not fit tightly or sag. In addition, you will have to disassemble the furniture in order to change the drawer pull-out mechanisms and check the fastenings of the shelves. If necessary, change them too. In general, disassembly means removing all moving parts.
Minor repairs. At this stage, all elements of the cabinet need to be washed, cleaned of dirt, soot, and dust.
It is important to take the old fittings and go with it to the store to purchase new ones. Be sure to stick to the style you choose for your new cabinet.
As soon as the most difficult stages of repair are completed, you can begin decorating.
Decorative elements
If the main covering of the buffet is in good condition (or, for example, you want to preserve the charm of antiquity, while only slightly updating the appearance of the item), you can add various decorative elements. The easiest way is to apply designs on the doors or walls of the buffet. For this, it is most convenient to use ready-made stencils (even a person who does not have any special talent for drawing can use this method).
However, some rules must be followed:
- Clean the area where the design is applied from dust and dirt, and coat with varnish.
- Place the stencil in the desired location and secure it.
- Dilute the paint to medium thickness (too thick or liquid composition will not work).
- The coating must be applied with a sponge in a thin layer 1-2 times.
- After the paint has dried, cover the finishing area with protective varnish.
Several ways to remake
There are several approaches that can be used to significantly restore and transform old Soviet-style furniture.
The "antique" method
- For this method you will need, among other things, craquelure varnish. Your sideboard will be noticeably different from what it was before and after the restoration. Here are the step-by-step actions and their descriptions:
- Clean the old coating using sandpaper; if necessary, you can use spatulas. As a rule, they are required when an old sideboard has several layers of oil paint.
- After cleaning, coat the surface with craquelure varnish. The effect of a cracked surface will appear.
- Wait until the surface is dry and cover it with paint or clear varnish. Cracks will show through the paint and create the illusion of a cracked surface.
- With paint, the effect is even more enhanced. Replace the handles with vintage ones, and your sideboard will delight you for many years to come.
Example photo before and after remodeling
Decoupage method
For this method, buy additional decoupage napkins, PVA glue, and white paint. Choose napkins depending on the theme and taste. They can be very diverse, from floral themes to scenes from the life of high society.
Step-by-step description of the work:
Treat the surface of the sideboard with sandpaper and cover all defects, chips and cracks with putty. Cover the finished cleaned surface with stain and let dry. You can walk around the corners of the sideboard with a wax candle for an aging effect. Cover the surface with paint either white or pastel colors
Let it dry
Using a metal brush, carefully brush the surface, giving it an “old” effect. We cover the napkins with PVA glue and glue them onto the sideboard doors, smoothing them out from bubbles
We dry it with a hairdryer for speed. We coat the entire product with varnish. Replace the handles with new ones in the Provence style
Your new wardrobe will amaze all your guests with its beauty. If you need to replace the glass, you need to change them, choosing something in the style of your new sideboard.
These are just two processing methods, but there are many more. Restoring furniture that has already seemingly served its purpose is a very exciting activity. It will allow you to save your budget, gain interesting skills, and bring a lot of pleasure from the work process and the final result.
From an old sideboard - an “antique” sideboard
Antique furniture is always in fashion - it adds an aristocratic touch to the entire interior. It’s nice that this technique can be done with your own hands, which means it’s cheap. There are several techniques for artificial aging, choose the one that suits you best.
Method 1 – craquelure varnish
Additionally, you should purchase craquelure varnish in specialized stores; all other materials were described above.
Description of works:
- After removing the old coating and sanding with sandpaper, apply a special craquelure varnish to the surface. It has the ability to transform the entire surface into a canvas cracked, as if from old age;
- After the previous composition has dried, you need to apply paint or clear varnish to the surface of the sideboard.
After all the procedures, you will receive an “antique” sideboard in a surprisingly short time. It should be noted that using paint in this method is more preferable - the effect will be brighter.
Method 2 – mechanical aging
For this method, you need to prepare two stains on different bases, a shellac primer and restoration wax.
Description of works:
- after cleaning the old varnish or paint, apply water-based stain as a base;
- lighten with a moistened sponge those places that are more visible;
- after drying, you need to sand the areas that will be darker;
- now apply the stain again with a different base;
- After the second layer of stain has dried, fill all places with shellac primer using a brush;
- using a wire brush, rub in the restoration wax, moving it along the fiber;
- After the wax has dried, wipe the sideboard with a soft cloth;
In fact, there are many more ways to age. Uniquely beautiful masterpieces are created using the “shashel” method, but this can be done by those who are familiar with carpentry.
The uniqueness of antique furniture
Antique wooden furniture has remained popular for several years now. This can be explained by the many advantages it has:
- It harmonizes perfectly with different colors and textures in the interior.
- Can be used for any style.
- Creates a cozy atmosphere in the room.
- Excellent workmanship.
There are several solutions:
- Buying furniture from an antique store is an option for those with an unlimited budget. This fact can be explained by the fact that genuine antique furniture or restored compositions are very expensive due to exclusivity.
- Purchasing modern furniture that has been artificially aged. But even for this you will have to spend money.
- Aging furniture with your own hands. To do this, use what you have at your dacha or in the house. This approach will be a solution for those who have creative abilities and good imagination. Next, we will tell you how to age furniture with your own hands.
Step-by-step instruction
When moving on to the actual implementation of restoration work, you should follow consistent instructions. This will help you carry out the restoration correctly and avoid common mistakes.
We disassemble and remove all removable parts
To make restoration of the sideboard easier, it is recommended to disassemble the product so that each part can be processed separately. When disassembling, you should remove all parts, remembering their location for further reassembly in reverse order.
Shelves
As a rule, the shelves in the buffet are not held in place by fasteners and are located on several metal parts that are built into the walls. With this design, it is enough to lift the shelves and pull them out of the sideboard.
Accessories
You can unscrew the fittings using screwdrivers. To restore the appearance, repair or replace, remove hinges, door handles, legs and other elements.
Glass
To avoid breaking the glass inserts in the sideboard during restoration, you must first remove them. If the glass is inserted into wooden frames, it is easier to remove them completely. In situations where individual glass elements cannot be removed, they are covered with paper or masking tape.
Cleaning old coating
Having dismantled the buffet, they began to process the old coating. You can remove the top layer using a spatula or a special furniture scraper. Then the surface is rubbed with fine-grained sandpaper so that the wooden pile does not create problems when degreasing and applying paint. The polished elements, as they are processed, are removed to a clean place for further stages of restoration.
Washing and degreasing
After cleaning the old coating, the parts of the sideboard are shaken off dust and degreased. To effectively degrease the surface, you can use white spirit or regular alcohol. After applying the product you need to wait for it to dry.
Puttying
The degreased parts of the sideboard are inspected for delamination and unevenness, after which the cracks are puttied. When performing work, the following recommendations should be taken into account:
- the width of the spatula should be slightly larger than the crack or unevenness in order to cover the defect in one movement;
- Before direct use, the putty must be thoroughly mixed;
- if the gap on the wooden surface is too deep, it is better to fill it with putty several times, allowing each previous layer to dry.
The puttying process itself is simple: apply a sufficient amount of the mixture to the spatula, and then, pressing it to the surface, make a downward movement. An additional movement is necessary to remove excess material if it remains.
Grinding
The use of an automatic grinding machine allows you to speed up and simplify the work process. Work should be carried out in a garage or outdoors, since sanding produces a large amount of waste, including dried paint, dust and pieces of varnish.
Padding
The following types of primer can be used to treat a wooden sideboard:
- Alkyd. Used if the wood has not been pre-treated. The primer allows you to make the surface smooth and even. Drying time is 12-16 hours.
- Polyurethane. The composition is based on polyurethane synthetic resins, solvent and tonic additives. The material is suitable in cases where it is planned to cover the sideboard with parquet varnish.
- Silicone-acrylic. After applying this type of primer, the wood becomes more resistant to fluctuations in atmospheric humidity.
- Aerosol. It differs from other varieties in the way it is used. If in other cases you need to use a brush and roller, then here you will need to spray the structure. The advantages are the ability to treat hard-to-reach places and quick drying.
Painting
It is better to start painting with the main surfaces of the buffet, and then move on to the decorative elements. As a rule, the paint is applied in two layers, but if you want to leave the visual effect of aging wood, one thin layer will be enough.
Decoration
There are several options for decorating a prepared wooden surface. Using various techniques allows you to change the appearance of the sideboard and make it more sophisticated.
Decoupage
Decoupage involves decorating wooden surfaces with decorative appliqués using napkins with images. Drawings are cut out from napkins and transferred to wood. The surface is then covered with acrylic paint and varnish to preserve the design.
painting
Having the proper skills, you can start painting on wood. For painting, it is enough to use brushes of the appropriate size and paint of the desired color.
Varnish
Applying varnish to a wooden surface not only transforms the appearance and changes the visual perception, but also protects the sideboard from external influences. Wooden furniture elements can be varnished immediately after processing or after painting.
Antique finish
A special type of finishing helps to restore a sideboard and at the same time preserve its ancient appearance. To add antiquity, you can use several techniques.
Craquelure varnish
When starting to restore a sideboard, craquelure varnish is applied between layers of acrylic paint and left for 35-40 minutes. After drying, the varnish creates a cracking effect on the entire surface of the applied paint layer.
Mechanical aging
For mechanical aging of a wooden surface, you need to use a stiff brush, with which some of the fibers are removed. The created relief can be restored with paint and varnish to emphasize the structure. The final result depends on the degree of surface treatment with a brush.
Gold plated paint
You can paint a Soviet sideboard gold using materials created from artificial components. The most common option is decorative acrylic paints that imitate gold color. To apply the material, it is allowed to use foam rollers, a spray gun and brushes.
Depending on the type of paint chosen, it can be applied in one or several layers, and then polished and varnished, providing a visual resemblance to gold.
The benefits of making it yourself
If a home craftsman is comfortable with carpentry tools, it will not be difficult for him to please the housewife and make a buffet with his own hands, which is necessary in any kitchen.
For maximum convenience and comfort, you should equip it with not only beautiful, but also functional furniture, such as a buffet.
An excellent solution for any home is to install a corner kitchen cabinet.
A self-made kitchen cabinet has a number of advantages over its “store-bought brothers”:
- you can choose a unique design for it;
- choose the material to your liking;
- use original fittings;
- choose the color scheme of the buffet that best matches the kitchen interior.
To make the interior original, you can make it yourself, putting your soul into the work, using any materials.
The most important nuance when installing such a cabinet is calculating the trajectory of the door opening.
In addition, wood products are extremely beneficial for health: they do not contain toxic compounds and do not emit harmful substances, but they fill the room with the aromas of essential oils.
Sideboards and buffets for the kitchen do not have much difference and are very similar in appearance to each other, because... The ancestor of both is considered to be the closet.
A kitchen buffet is an excellent solution for your kitchen interior.
A wooden sideboard is durable and comfortable. It will last for decades and is easy to restore and repair.
A sideboard made of natural wood will look rich and elegant, but at the same time it will cost a much larger amount.
Another important advantage of making a kitchen cabinet with your own hands is the ability to make it in an original configuration and size that best suits convenience and comfort.
To get a beautiful product without spending too much, you can make the furniture body from cheaper raw materials, such as chipboard, and the facades from more expensive and beautiful ones.
Expert advice
Many people very often believe that to embody a vintage or retro style it is worth using antique wallpaper, which, due to its age and unusual patterns, can be called vintage. However, professionals do not recommend doing this, since these are building materials whose service life may be limited.
If you find old, but beautiful wallpaper from your grandmothers' time, this is far from a guarantee that it will serve you for a long time. Nevertheless, sometimes the designers themselves choose such building materials for non-standard wall decoration.
To be sure to choose the right design for decorating the walls in your home, it is best to use the services of specialists, since vintage and retro styles are not as simple as it might seem at first glance.
It is also best to give preference only to trusted brands and brands that produce decent wallpaper products. And excellent manufacturers of such building materials are not only foreign, but also domestic.
Decoupage of an old sideboard - the atmosphere of Provence
To perform decoupage you will need to supplement the list of materials and tools.
Materials for decoupage:
- new “antique” handles and door hinges;
- napkins for decoupage;
- PVA glue;
- White paint;
- furniture varnish;
- sandpaper;
- stain;
- wood putty;
- metal brush.
You can buy napkins for the decoupage technique at a craft store. Choose those that you like, but in a floral theme of blue, lavender or burgundy. If you have chosen furniture handles with ceramic inserts, then this pattern should be in harmony with the image on the decoupage napkins. We dealt with the old coating in the previous sections. In addition, you need to replace all the old hinges for the doors, repair skewed drawers, and also make other repairs, if necessary.
Let's get started with a step-by-step description of how to decoupage a sideboard with your own hands:
quickly wipe the entire surface of the sideboard with a damp cloth so that no moisture is absorbed;
cover all cracks with wood putty;
go over the entire surface with sandpaper, removing all defects;
cover the wood with stain and let it dry;
now is the time for a unique aging technique - apply wax to all corners, drawing on them with a wax candle;
coat the sideboard twice with white paint, however, all pale pastel shades are well suited for Provence, especially mint and lavender;
After the paint has completely dried, remove the wax by carefully manipulating it with a metal brush. This is a simple and effective technique for simulating antiquity;
We coat the napkins with PVA glue and glue them to the lower or upper doors, carefully smoothing them out to remove air bubbles;
To make the glue work faster, direct a stream of hot air from a hair dryer at it;
Cover the decoupage areas with clear varnish. Do the same with the aging areas.
The new Provence style sideboard is ready, the only thing I would like to add is that if there were glasses in the sideboard, they can either be painted over or replaced. And, of course, don’t forget to place a bouquet of lavender in a white ceramic vase on it.
Errors when pasting
You tried your best, but something went wrong. It doesn’t matter, almost everything can be fixed safely.
Bubbles? If they are small, then simply pierce them with a needle: squeeze out the air that gets in where it is not needed and carefully smooth the problem area with a cloth. With larger ones, an ordinary syringe will help - inserted inside, it will draw out all the air, and the hole will easily disappear when smoothed.
Folds? Whatever helps dry your hair will also work great on your hair. Run a hairdryer over the folds and they will smooth out. Don’t get too carried away, otherwise, by getting rid of one trouble, you will invite another.
Crooked? If you remember to leave a margin of 1 centimeter for each fragment when taking measurements, then you definitely won’t panic: an ordinary stationery knife will correct the situation, which can be used to remove the excess, and joining will easily cover the traces of your “cunning” operation.
Required Tools
Before you begin restoration work, you should prepare the tools that will be useful for processing a wooden surface. Having the right list of tools at hand, you will be able to quickly complete the job without being distracted by searching for equipment.
Furniture scraper
A metal scraper is often used instead of a spatula to remove paint coatings. The tool effectively cleans the surface of excess paint, grout, adhesives and polyurethane foam. The presence of a rubberized handle with a textured coating makes the scraper easy to use. The fastening mechanism ensures strong fixation of the specially sharpened blade.
Foam sponge
Thanks to its high density polyurethane, the sponge helps remove dirt from any surface. It is better to purchase a foam sponge with a large area to speed up the process of cleaning the sideboard. This type of sponge has the following advantages:
- absorbs water and cleaning agents well;
- forms a copious amount of foam;
- does not leave fibers or streaks;
- It is easy to wring out and dries quickly.
Brush set, water-repellent varnish
To paint a wooden surface, you need brushes of different sizes. Large brushes are used to paint the main area, and small brushes are used for hard-to-reach areas. After painting, a water-repellent varnish is applied to the sideboard.
Wax, stain or acrylic
These products are used to restore the shade of wood and improve the appearance of the sideboard. Of the proposed options, oil-based stain is most often used, which allows you to make the color of the wood as natural as possible. The stain is absolutely safe for human health and the environment, dries quickly and protects the surface from destruction.
Wood clamps
A clamp is a device with a clamping mechanism for holding products during processing or when gluing individual parts. Using clamps, the tree is secured in a stationary state, which simplifies further work. The design of the clamps includes an F-shaped frame or brackets
Also an important component is the moving part, which compresses or releases the fixing elements. The moving element is activated by force
Glue, high-quality nail polish remover
You can remove the old layer of varnish using a special solvent, which is sold at any hardware store. Glue will be needed in situations where the sideboard has begun to delaminate or some decorative elements are not securely fixed.
Accessories
Door hinges and sideboard handles wear out over time, no longer properly fulfill their purpose and lose their original appearance. During restoration, the fittings should be replaced by purchasing new sets.
Electric jigsaw
Using a jigsaw, you can cut wood and make curved cuts without much effort. Modern types of tools are equipped with speed controllers, noise and vibration dampers. For safety reasons, there is a protection above the support saw of the electric jigsaw that protects against accidental contact with the sawing element.
Marker
You can apply markings for cuts and installation of decorative elements using a marker. It is better to use a permanent marker so that the applied markings are not erased during the work process.
Fasteners
Fasteners are used to secure the top of the sideboard to the base. You can also use wall fasteners to secure the buffet in one place, ensuring it is stable and immovable.
Padding
This process is not complicated, but painstaking: you can reupholster an old chair, an armchair or a sofa. Dense natural fabrics are better suited for reupholstery. The first step is to disassemble the furniture and inspect it - this will help you understand how exactly the material is attached to the wooden frame.
If the upholstery is old, damaged or smells, it is recommended to remove it and strengthen the frame with metal plates. Sometimes the filler requires replacement. In the case of reupholstering Soviet armchairs that are popular today, we recommend adding foam rubber: the product will be softer, more comfortable and more solid.
Calculate the amount of fabric with a margin
It is important to fasten it tightly so as not to create folds. The material is fixed with a furniture stapler
DIY buffet restoration
Most of the good old furniture from Soviet times was taken to the dacha in the 70s and 80s. To put it mildly, it was not used carefully. Carved sideboards, oak, walnut, antique and 60s, rustic, white painted, with mirrors and stained glass just beg to be put in order with your own hands.
How to restore old furniture with your own hands
1. Decide. Why is this being done? What should happen?
2. Assess the depth of damage and your strength. Will you do this in an equipped workshop or at home?
This is especially important when choosing varnish or paint, solvents and cleaners
3. Draw up a work schedule.
4. Carry out work in strict sequence: clearing, carpentry, finishing. Usually this is done the other way around. First they paint, and then it turns out that the veneer has lifted, the paint or varnish did not lie evenly on the old coating. A layer of white paint does not hide dark spots. No matter how much you paint, they still show through. There are cracks on the walls that became more noticeable after painting in light colors. The wood has been eaten away by furniture beetles. The antique mirror has become tarnished, which was not noticeable under a layer of dust before. A couple of legs are missing...
It is imperative to restore old furniture with your own hands (restoration refers to a set of actions to preserve the item). Try new materials, study technologies, analyze mistakes, go towards the goal. Perseverance and perseverance are the foundation of success.
If you have any questions about the restoration of an antique sideboard, sideboard, table, cabinet, antique chair, sofa, or any other antique furniture, please ask questions by phone or via our email.
Estimated cost of restoration (price as of January 9, 2019)
| Price, rubles | |
| Chair | 5000 — 20000 |
| Armchair | 10000 — 30000 |
| Sofa | 30000 — 60000 |
| Cost, rubles | |
| Table | 10000 — 40000 |
| Buffet | 30000 — 80000 |
| Closet | 30000 — 80000 |
Restoration of paintwork
By sending us a completed form with photographs, as well as asking a question, you will receive complete information about the item (what it is, material, age) and the cost of restoration work. Next, the restorer will come to the site, inspect it, and determine the final price of the restoration.
The final price will not change. Departure is free.
Planning an interior design in an antique style
Before you start work, you should carefully consider the design of the future room. You need to make a list of all the Soviet period items that are available.
It is welcome to draw up a drawing of each room, where you can draw a diagram of the arrangement of objects. This approach will allow you to:
- Make a list of required materials.
- Get an accurate idea of what the result will be.
- Purchase the necessary funds in sufficient quantities.
Pre-planning allows you to speed up the work process. You can purchase everything you need in advance to get started. Don't be afraid to show your imagination. Vintage items will allow you to enjoy creativity.
Using Soviet furniture you can decorate a room in a retro style
The result will give you pleasure. Your apartment will turn into a cozy nest, designed for a comfortable stay.
How to make a wardrobe or chest of drawers from a sideboard
The difference between a wardrobe and a sideboard is, perhaps, not so much external as functional.
A sideboard is usually understood as a cabinet in which dishes and kitchen textiles are stored. Personal belongings are stored in the closet. The top doors of sideboards traditionally have glass. The bottom of this piece of furniture consists of drawers. Cabinets are often made entirely of wood, although glass and stained glass are also used here.
- If you need to convert a sideboard into a cabinet, you can replace some of the glass elements with wood, or made of plywood, chipboard, etc.
- Another option is to transform the glass from transparent to colored and non-translucent using a special film.
- Also, most likely, you will have to change the color of the sideboard so that it fits seamlessly into the living room.
- It’s not uncommon lately to see master classes on converting old unnecessary sideboards from the Soviet era into multi-colored cabinets for children’s games.
- The chest of drawers is a vertical series of drawers. It is installed in bedrooms and living rooms, allowing you to store personal items and clothing out of prying eyes. If the lower part of the sideboard consists of drawers, depriving this item of the top, you can get a chest of drawers. In some furniture models, individual elements can be detached from the overall structure without problems, in other pieces you will have to use a saw.
So, as you can see, there are many ways to give old furniture a second life. The main thing is to have a desire to work with your hands, as well as a good imagination.
Are you wondering how to make a cabinet out of a sideboard? Then watch the following video, where a wardrobe will be made using the example of an old sideboard-chest of drawers:
https://youtube.com/watch?v=XDdWusGHOqE
How to pack things for moving?
It is not advisable to transport furniture with things inside. The design is not designed for dynamic loads: shelves and drawers may break out of the guides or stops. However, the boxes can be used as packaging containers. To do this, things are tightly packed into them, and the box itself is wrapped in film, then tied with tape or twine.
How to pack for moving:
- Fittings, fasteners, small parts are laid out in bags.
- Doors without glass and mirrors, horizontal and vertical elements of the box are wrapped with fabric or thick paper.
- Glass or mirror elements are packed in bubble film.
During the move itself, the parts are folded in the transport so that the heaviest elements lie at the bottom.
This video shows how to pack furniture for moving:
Restoration of wooden furniture. 12 cool ways to update old furniture.
Old furniture can be slightly changed in appearance and then it will fit perfectly into your intended interior.
What ways are there to update furniture?
1. Decor with paper.
Do you want to change the color of your furniture to an unusual, non-standard one? Old wallpaper and pieces of beautiful paper are perfect.
The paper is glued to the cleaned surface of the object using PVA glue or wallpaper glue.
The principle is the same as when gluing wallpaper - after applying the glue, leave the paper for a couple of minutes to get wet
It would be a good idea to update the furniture in the nursery using old maps.
The idea, by the way, is very popular.
Remnants of wallpaper and beautiful paper are also suitable for decorating furniture.
Great idea to update the sides of the drawers with paper. It turns out quite original.
2. There are ready-made stickers - sticky paper. With its help, you can update the surface of furniture with unusual patterns.
Old furniture is often updated with regular vinyl film.
People with imagination get creative with film. One drawback is that if it is not glued correctly, the film is short-lived in use.
But the film is good for beginner furniture renovators; it will cover all the imperfections and cracks.
There is a film with figures of various animals and flowers. Typically this film is used for a children's room.
3. Decorative elements.
If the furniture is boring, you can decorate it with plastic elements that are sold in construction or art stores.
You can also cut the elements out of plywood with a jigsaw if you don’t find any ready-made ones for sale.
4. Decor with fabric.
Furniture is still decorated with fabric today.
There is also a new technique for working with fabric, Patch decor.
Pieces of fabric soaked in PVA glue are used to paste furniture in different orders in the Patchwork style.
Patch decor uses not only fabric, but also various elements made of fabric and cord.
New fittings
An important stage in the reconstruction of old furniture is the replacement of fittings
First of all, you should pay attention to the condition of the hinges. They need to be replaced if they are rusty or damaged.
The location of the hinges is changed if pieces of material are torn out at the places where they are attached. The resulting holes are sealed using putty or sawdust mixed with PVA glue.
It is also necessary to check the condition of the guides in the cabinets. If necessary, they can be replaced with higher quality fittings. The extension system can be roller or ball. The second type of guides is considered more reliable. They ensure silent drawer opening.
The last stage is replacing the handles. They should be chosen taking into account the design of the furniture. Handles can be completely metal or combined - with ceramic or glass elements. For antique furniture, bronze fittings are suitable.
Beautiful examples
This photo shows a buffet restored in the Provence style using decoupage. The combination of two non-standard colors (lilac and pale green) creates the effect of ease of perception. This color scheme has a positive effect on the mood of the beholder and evokes a positive emotional response.
Here is a sideboard that has been restored while maintaining the natural wood tone. This solution makes it possible to bring its visual design closer to the original and helps the observer to feel the presence of antiquity. A similar effect is achieved thanks to the tinting paint coating and darkening the protruding parts.
Veneering
This method allows you to give shabby wood furniture an updated look. For home veneering, natural rotary-cut veneer is usually used. With its help you can restore door leaves, facades and countertops.
The base requiring rework must be smooth and sanded. Thin veneer, sold in rolls, should be straightened by wetting it with a damp sponge and placing it between two heavy slabs. Then the canvas needs to be trimmed along the edges to get rid of uneven edges. The veneer is glued with contact glue, which is evenly applied to the base in two layers. The sheets are fixed using an iron heated to 50º - ironed through the paper. After drying, the joints are sanded, and oil, varnish or stain is applied to the finished product.
The photo shows the process of finishing the table with veneer. The width of the canvas is usually 30 cm, so joints during use are inevitable.
Removing chips and cracks
Therefore, if you are not sure that you will be able to carry out repairs at home, it is better to contact a specialist.
If you decide to do it yourself, you need to stock up on the necessary minimum tools:
- White spirit (nail polish remover);
- Stain of the desired shade;
- Wood primer;
- Fine sandpaper (100, 180, 300, 800, 1200 and 3000);
- Wood putty;
- Masking tape;
- Roller or brush.
Clean the damaged area from the varnish coating using white spirit, treat the wood with a primer, then putty.
After drying, level the putty with the surface using sandpaper. Remove dust with a damp cloth and apply stain to obtain the desired shade.
It is important to apply the stain exclusively to the putty area, without getting it on the wood. Otherwise, the wood will change color, and then major repairs will be impossible.
After complete drying, you can varnish. The varnish should be applied with a brush or roller, depending on the area of the area.
Each new layer can be applied only after the previous one has completely dried and preliminary sanding with sandpaper with a fraction of 600 or 800 units.
First at 1200, and then at 2500 or 3000. When finished, wipe with polish or furniture wax until a glossy surface is obtained.
We produce pasting
Collecting the necessary materials
Before you start work, you need to take care of the tools and material. Here's what we'll need:
- sandpaper (sandpaper), an appropriate attachment for a drill or grinder, to prepare the surface for pasting;
- in some cases a hair dryer, but not necessarily;
- measuring instruments - ruler, tape measure, corner;
- tools for markings and markings - pencil, pen, marker;
- cutting tool - knife, scissors;
- primer and wood putty for preparatory work;
- tools for applying compounds - roller, brush, spatula;
- rags for smoothing and removing glue;
- PVA glue.
Using a grinder to sand surfaces
As you can see, the list is quite impressive. If you don't have some materials, buy them. By the way, if the fittings of your furniture are worn out, then you can change them too. For example, a handle, a new handle for a cabinet will not cost much, but will add color to your newly made wallpapered furniture.
Preparatory work
Before wallpapering furniture, you need to take care of the surface on which you will apply the material. We need to make it suitable for such work, so we will perform the following manipulations:
Typical domestic kitchen cabinet after decoration
- To make it easier to work with a cabinet or bedside table, you need to disassemble it and remove all the fittings from it.
- The next step is to sand the decorative surface and remove the entire layer of varnish from it. This can be done using sandpaper, which is very labor-intensive; it will be easier to put the appropriate attachment on a drill, grinder or screwdriver and go over the varnish.
- If your furniture is made of solid wood and has not been treated with anything, then it is recommended to go over it with sandpaper to create some roughness.
- In the next step, we remove all dust from the skin using a damp cloth. Give the furniture some time to dry.
- After examining the dried surface for defects, we decide whether it needs to be puttied. If the cracks and grooves are not so large, and the wallpaper for pasting is embossed, you don’t have to do this. If the defects are deep, you will have to level the surface with putty, maybe even in several layers.
- As you probably already guessed, after the putty has dried, the putty areas must be treated and leveled with the general surface. This is also done with sandpaper.
- Now the surface of the cabinet is almost ready, all that remains is to prime it for better adhesion to the wallpaper.
Carrying out the preparatory work will ensure 80% of success, even if you cannot hang the wallpaper beautifully the first time, you will already have a basis for further experiments.
Pasting
Pasting furniture also takes place in several stages:
Furniture wallpapering work
- First of all, it’s worth making blanks from leftover wallpaper. To do this, the item is carefully measured and the dimensions are transferred to the wallpaper. Some patterns are cut out in accordance with the size of the closet or bedside table.
- Next, the prepared surfaces are coated with glue. You can use wallpaper glue, but it is better to use construction PVA, it will glue the materials together better. You need to carefully apply the cut pieces to the surface of the cabinet, trying to immediately level the canvas. This is not so difficult to do, since the patterns are small in size.
- It is recommended to stock up on a large number of dry rags or rags to smooth the sheets and remove any remaining glue from them. A special pressure roller will help to press the pieces more tightly.
- After wallpapering a cabinet or other furniture, you need to give the glue some time to dry, and only then screw on the fittings. Usually a few hours are enough, but in the case of large items, it may take a day.
As with standard wallpapering, try not to create drafts in the room; there is some chance that the sheets will not stick well.
Expression of imagination in the kitchen interior
Actually, this is the whole technology of decorating pieces of furniture with wallpaper. Definitely, after these manipulations, your cabinet will look better, certainly more interesting than if you painted it.
You can glue the cabinets yourself, as you can see, there is nothing complicated here, you just need to put in a little effort, patience and accuracy. In addition, restoring such items with your own hands will give you confidence in your own abilities and confirm your design abilities. Try it, maybe the world doesn’t yet know the name of the new, successful designer.
Unnecessary junk or luxury item
Many people try to immediately get rid of old furniture as soon as the opportunity arises. Yes, of course, a new modern interior is wonderful, but few people will be surprised by it now. Therefore, think before you take the old sideboard that you inherited from your grandmother to the landfill; perhaps it will become the main decoration in the interior of your home. This is especially true for furniture from the beginning of the last century; today, it is a real rarity into which you can breathe new life.
It is important to understand that restoring a sideboard with your own hands is not such a difficult task, but it will require some time and skills. You can contact restoration specialists, they will be happy to get to work and do everything you need, just call them. But such a pleasure will be very expensive, and the process of professional restoration itself is quite time-consuming
Advice, roll up your sleeves and try to do this work yourself. This will not only cost you much less, but it can become a very exciting activity, help you master some of the skills of a restoration artist and enrich you spiritually
But such pleasure will be very expensive, and the process of professional restoration itself is quite time-consuming. Advice, roll up your sleeves and try to do this work yourself. This will not only cost you much less, but it can become a very exciting activity, help you master some of the skills of a restoration artist and enrich you spiritually.
Where does the process of restoring old furniture begin?
Restoring an old sideboard requires studying some issues related to the history of the product, especially if it is antique. You should first try to determine in what time, era it was made, from what materials, conduct an examination for damage, possible loss of some elements, in a word, look at the future masterpiece with passion.
You may need to order the manufacture of some parts from wood craftsmen, but it is worth paying attention to one fact. Restoring a Soviet sideboard will not require any deep knowledge or special skills from you; there can be many design solutions; sometimes it’s enough to change the color of the product and buy vintage handles, and the thing will sparkle with new colors. When we are talking about truly unique antique furniture from a famous master, made from valuable types of wood with special virtuoso execution, then it is still better to give it to specialists for restoration, since without any knowledge you can simply ruin an expensive thing. If you decide to breathe new life into an old sideboard yourself, you need to properly prepare for this
Perhaps the restoration requires some non-standard solutions, parts made from special valuable types of wood, the advice of a knowledgeable, reputable cabinetmaker will not hurt you
If you decide to breathe new life into an old sideboard yourself, you need to properly prepare for this. Perhaps the restoration requires some non-standard solutions, parts made from special valuable types of wood, the advice of a knowledgeable, reputable cabinetmaker will not hurt you.
Buffet as a designer find
In order to make a unique, inimitable piece of furniture from an old sideboard, you need the eye of an artist - a designer and hands that grow from where it is needed. There are a huge number of techniques for restoring old furniture, ranging from partial restoration and refreshing the color to completely changing the appearance. The method of decoupage, painting, mechanical aging, varnishing, gilding, and many other methods that entirely depend on your taste preferences can be used here.
Many designers, taking antique pieces of furniture to remodel, completely change the color scheme, adjusting it to the overall look of the room, using new handles, inserts, adding details and all kinds of decorations. The main thing here is not to overdo it and not slip into bad taste, which is the sin of many amateur craftsmen when they first turn to this activity.
We create it ourselves
If you don’t have a suitable old piece of furniture, but you are eager to create, don’t despair, there are many techniques for creating a buffet with your own hands.
Made from wood and other materials
Since hand-made is now in fashion, on the Internet you can find many master classes on creating sideboards, chests of drawers, tables and other furniture with your own hands.
- So, for example, you can create a buffet from clapboard. This material is usually not used in the manufacture of factory furniture, but it is easy to process, and therefore is excellent for a homemade sideboard. In addition, the lining resists moisture and temperature changes well. In this version of the sideboard, bars for window frames are used as a frame. The drawer is made of plywood, and the front panels are covered with veneer.
- You can make a buffet with your own hands from wood. Of course, this will require more solid skills and close familiarity with carpentry tools. The lower part of a wooden sideboard is usually held together with pegs and glue. The back part and drawers are held on with screws, and other planks and horizontal surfaces are attached with glue and nails.
- Quite often, sideboards are made from chipboard and MDF.
The technology for making a buffet can be divided into several stages:
- Project development. Before starting work, you need to create a drawing of the future sideboard. This piece of furniture usually includes the following components:
- The body, that is, the lower part of the sideboard, represented by the tabletop, sides and back;
- Top box;
- Shelves;
- Box;
- Doors;
- Fastenings and handles.
- Manufacturing of parts. If you do not have sufficient skills, the components of the buffet designed by you can be ordered from the workshop. Having decided to create a sideboard yourself, in addition to the material, you will need a number of tools, in particular, a jigsaw and a circular saw. Having made the frame, you can supplement it with purchased doors. This solution is appropriate when the material for the buffet is chipboard or MDF;
- Assembling finished parts together. Here you will need a screwdriver (or drill) and fasteners. The assembly is performed in the following sequence:
- Creating a frame;
- Attaching backdrops to the frame;
- Hanging the upper part of the sideboard and installing supports, which can be decorative balusters;
- Installation of shelves;
- Door fastening.
- Finishing. After the buffet is assembled, we begin decorating. Glass and mirrors are inserted, cornices and trims are added, crystal and dishes are displayed.
DIY Asian style sideboard
In Provence style and more
Of course, only a professional carpenter can create a full-fledged classic buffet with his own hands. In addition, such a product will require expensive wood, glass and various metal decorations.
It is much easier to create a sideboard or buffet with your own hands in one of the rustic styles, for example, Provence or country. The materials used in such interior items are cheaper, and the finishing on them is much simpler.
- A rustic buffet should be practical, which means it should have drawers, closed and open shelves. The tone chosen for it is light (white in Provence and natural wood colors in country).
- Aiming at country, the wood is not painted, but carefully sanded and varnished.
- Sideboards in the Provence style are created by artificially aging the wood using white paint, and then complemented with patterns, among which small flowers predominate. The easiest way to recreate the French provincial style is to use the decoupage technique.
- Minimalist styles (high-tech, Scandinavian) are unlikely to need a buffet. Here, greater preference is given to wardrobes, niches and shelves.
- A sideboard in the Rococo style, like other furniture, should be turned and carved. However, even if your buffet is devoid of openwork, you can add some decorative elements to it yourself to get closer to the desired style.
So, curlicue painting, asymmetrical overlays made of bronze and copper, and plastic inserts imitating gilded metal will come to the rescue. You can purchase fancy door handles. If it is possible to make a replacement, match the curved legs to the buffet.
A buffet in an English interior is trendy. Here he acts as the custodian of not only porcelain dishes, but also the owner’s library. Such a sideboard should be made in darker and richer colors.
Photos of old sideboards and cupboards after restoration with your own hands