The fashion of wearing Soviet-style dresses to the last school bell is becoming increasingly popular. A brown dress of a simple cut, a snow-white collar and an apron became symbols embodying a fond memory, a tribute to those years spent within the walls of the school. When dressing up for the holiday of farewell to their teachers and comrades, girls wear a school white apron, which not only emphasizes their figure, but also creates a festive atmosphere. This outfit noticeably distinguishes the graduate from the crowd of well-dressed guests and attracts attention with its cleanliness and formality.
When preparing for the last call, many try to find a ready-made school uniform; if you can buy a simple brown dress, then with an apron things are much more complicated. It is difficult to find an unusual, elegant addition to a dress; stores offer simple, simple models. Not every graduate wants to be like everyone else, but the uniform is the same - dress and apron, but at the same time completely different. To stand out from others, you can sew a school apron yourself using a pattern; it’s not as difficult as it seems; by following the step-by-step instructions, you can create an exclusive addition to your dress.
School apron pattern: we sew an elegant accessory for any occasion with our own hands
It has been many years since school aprons were a mandatory addition to the school uniform. Now this item of clothing remains only as an outfit for girls for last bell and the first of September.
Aprons are sold in stores, they can be ordered on clothing websites or made individually by a tailor. But sewing such an apron yourself will not be difficult even for an inexperienced needlewoman.
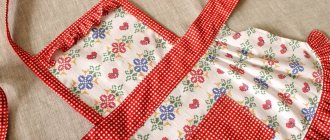
The main thing is to choose a beautiful fabric and put in a little effort. Lace aprons look gorgeous, but you can choose a different fabric to suit your taste.
There are a great variety of them: organza, satin, guipure, lace, sewing (fabric with embroidery), tulle. As you can see, the choice is huge.
Follow our master class, and you will get a ready-made pattern for sewing a cute school apron from guipure, using which you can make this item of clothing yourself.
Let's look at sewing a school apron with do-it-yourself patterns
First you need to determine the length of the straps. It differs in people with different heights and varying degrees of completeness. To find out this measurement, you need to add the length of the shelf and the length of the back. Or run a measuring tape from the front waistline to the back waistline. The straps can be narrow sewing or a piece of fabric.
To determine the length of the apron itself, it is enough to bring the centimeter from the waist to the required level. The width is calculated as follows: half the circumference of the waist plus an addition for folds. Using the diagram given above, we substitute our measurements and build a pattern on tracing paper or graph paper.
We cut out the belt. Its width is 3 cm, and its length is the waist circumference plus 30 centimeters for the bow. You can use ready-made narrow sewing. If you are cutting from fabric, consider the allowances. You can also widen the ends of the belt – the part with the bow.
Expert opinion
Smirnova Ekaterina Anatolevna
7 years of experience in interior design, professional architect
Cut out the shelf insert. We leave allowances on the sides and bottom of 3 cm, we will finish the top with sewing. If the edges of the fabric have already been sewn, then it should be placed along the top of the product.
Let's start assembling the apron:
- We attach zigzag or overlock sewing to the frill of the straps. We put a decorative stitch along the front side
- We attach a frill to the bottom of the apron, also finishing with decorative stitching
- We sew the straps to the insert. We attach frills to the straps, making folds. There should be more of them closer to the shoulders. As always, we make a finishing seam.
- Sew the belt to the top.
- We make small symmetrical folds at the bottom of the apron. We connect the top of the apron with the bottom, not forgetting about the finishing lines.
- During the fitting, we determine the place where the straps connect to the belt. We attach it.
Second option.
This product can be sewn a little differently. How to do it?
Cut out the bottom of the apron. The diagram shows a part with a bend.
Pattern of straps, belt, shelf inserts.
The apron is ready! All that remains is to put it on with a suitable dress, and the girl’s festive school outfit will be completed.
Pattern
To create a pattern, it is not necessary to have special knowledge in the field of drawing. It is enough to use a simple diagram from the Internet and substitute your own values taken from the measurements. A first-grader's school apron includes a top with a bottom panel, straps, a belt, an apron and a frill. Some models come without a bib and have a fairly deep neckline. In this situation, the straps are hemmed in front to the waistband.
It is important that for all designed parts it is necessary to make allowances for hemming and sewing. If you plan to process parts using edging, then there is no need to make allowances.
School apron pattern
How to sew a school apron
It is not difficult to sew it with your own hands. Accurate adherence to instructions, careful attention to taking measurements and the cutting process, as well as a great desire to look different from everyone else, will help you cope with this task.
Necessary materials
Let's get to work. To get started you will need the following.
- Paper, pencil and ruler to make the pattern.
- Centimeter for taking measurements.
- The material from which the apron will be made (thin cotton or lace, guipure, organza, etc.).
- Scissors, thread (contrasting color: for basting and for sewing the product).
- Pins to attach the pattern to the fabric for cutting.
- Sewing machine and the basics of operating it.
Materials and tools for sewing an apron.
How to take measurements
It is better if someone close to you helps you take the necessary measurements, since an independent “measurement” may have errors.
Let's take the classic model as an example.
If desired, any variations and styles can be realized on its basis.
So let's start with the waist circumference. The measurement is determined by the narrowest point on the body. This will be the length of the future belt on the apron. For ties you need to add about 1 meter more.
Next, the hip circumference is determined. This is a measurement based on the convex points of the buttocks.
The next indicator is the length of the apron. To do this, measure the required length from the waist. Usually, the apron is made 2-5 cm shorter than the dress. In general, this value depends on personal preferences and wishes.
The length of the apron strap is measured as follows: a centimeter is passed from the waist up over the shoulder to the waist at the back.
To determine the size of the “breast,” it is better to cut out a paper model and hold it to yourself in front of the mirror. If you are visually satisfied with everything, leave it, but if you don’t like it, then you can experiment a little with the width and height. The main thing is not to “overdo it” with the width, otherwise the straps will constantly fall off your shoulders.
Try the pattern on yourself.
Pattern of the upper parts of the apron
Now you can start the material. Remember the saying about the sevenfold dimension? Carefully transfer the pattern to the fabric, make allowances, double-check and only then pick up the scissors.
Patterns and their placement on the fabric may look like this.
Of course, you can, without much effort, take a ready-made pattern from the Internet or an old magazine. Only such schemes are made according to standard standards, but in reality this rarely happens. Therefore, it is preferable to take your own measurements and create a pattern yourself.
In order not to make a mistake with the required amount of fabric, you can first lay out the pattern pieces on the table and roughly determine what width and length will be required.
Using a paper pattern, we cut out the fabric for the apron without taking into account the length of the frill, and we also cut out the frill itself and the straps.
Typically, patterns are placed on fabric folded in half. This allows you to make the parts symmetrical and more even.
You also need to determine the length of the apron itself.
Important! There must be seam allowances. Depending on the texture of the fabric, they vary. On average, if the fabric does not fray, add 1 cm.
Stages of sewing an apron
So, you can start creating a masterpiece.
At the first stage, we process the breast: we fold the upper part and stitch it.
The bib should be slightly narrowed towards the bottom.
Then we connect the chest and straps.
The straps are made double.
We fold the two parts of the left strap face to face, and place the breast between them. Let's sew.
We do the same with the right strap. Then, turning it inside out, we add finishing stitches.
The outer edges are folded inward and also sewn with a finishing stitch.
The top part is ready.
The manufacture of the lower part of the apron begins with processing the bottom of the part.
Finish the edges of the bottom of the apron.
Then the belt is sewn to the top.
Prepare the belt in advance.
It is important to control that the middles of the parts coincide. Then the lower part of the apron and the chest are connected with straps and a belt. If desired, you can use braid, lace or ruffles. They are sewn to the bottom of the product, to the straps, making them a little wider on the shoulders to create “wings,” and also to the upper part of the chest.
At the very end, the straps are sewn to the back of the belt.
Last call apron made of white guipure
Guipure is an airy and light material. It is hardly possible to think of a more suitable fabric for such a special occasion as the last bell before the prom.
The apron will require about 3 meters of fabric with a width of 0.6 m, and 8 m of sewing for finishing (4 cm wide).
First we cut out the base of the lower part without frill.
Bottom part.
Then we make the straps. In this case, the straps will be sewing.
Please note that the length of the cut material for the strap should be the length we actually measured at first plus half of this value.
To make a frill, multiply the length of the strap by 1.5. The result is drapery of the required volume. Then we cut out the breast.
Apron breast.
And finally, we decide on the belt. This will also be sewing.
We also cut out the belt from guipure.
As a result, before approaching the sewing machine, you get something like this design.
The outlines of the future product are already visible.
First, the overlocker is used to attach the sewing to the frills of the straps.
Getting the straps ready.
Then we connect the straps to the chest.
We try to handle the material carefully.
Sew the frill to the bottom.
The folds should be distributed evenly around the entire circumference.
Now we sew on the belt. To do this, its middle needs to be aligned with the middle of the breast and the middle of the lower part. Baste.
We combine the middle of the belt and the middle of the upper part, make a basting, laying in small sweets.
During the basting process, make the planned folds on the bottom. Sew. And then add a finishing stitch.
We tuck the belt, not forgetting to make a finishing stitch.
To finish the work, sew the straps on the back. And here there is a little trick. It is better if the straps at the point of attachment to the belt are narrow. Then the frill looks impressive. If you leave wide straps, then the overlapping frill turns out to be very rough and ugly.
We try on the apron one last time and sew the straps in the right place. The apron is ready!
It is worth noting that in addition to the classic apron style, there are many interesting options. For example, crocheted aprons. Regardless of what technique the work is done in: knitted from motifs or a solid fabric, such models turn out to be very unusual and effective.
If you want to stand out from the rest, you should pay attention to beautiful last call aprons.
Last call, like graduation, is a very important and touching event. I want to look decent. And by making an apron for your school uniform with your own hands, you can not only look great, but also feel comfortable.
How to take measurements
To sew an apron you need to take very few measurements, but if you have any difficulties, you can see the article How to take measurements for a dress. When creating a pattern, keep in mind that the apron should be 5-6 cm shorter than the school uniform (skirt or dress).
In the old days, the head teacher put her palm to the bottom of the apron, and if the dress was higher, then you could go home.
Measurements of a school apron for a girl, size 36: Apron length - 40cm. Half waist circumference - 34cm. The length of the straps is 67cm. Strap length measurements are taken from the back waistline over the shoulder to the front waistline.
How to wear an apron correctly
When choosing an outfit for the last bell at an educational institution, many graduates want to appear at the celebration in the student uniform that they wore in distant Soviet times: a dark brown dress and a white apron on top.
Dark brown dress and snow-white apron.
The tendency to dress up in this way has become a kind of trend. But what the overall look will be depends directly on the model of the student’s apron. This product adds completeness to the image and can hide certain flaws in the figure. The student looks neat in it and by today’s standards, in exactly this form (in general) – even stylish.
In general, making a product such as a student’s apron is not difficult if you take the measurements correctly, cut it out and carry out the pre-sewing preparations. Sewing work is also not difficult if you follow the diagram. Success will be achieved by very careful handling of the fabric.
Construction of a USSR school apron pattern
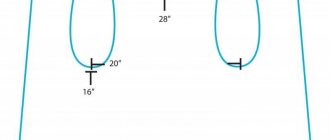
Draw a rectangle ABCD with sides 40 cm (length) and 29 cm (1/2 of half the waist circumference according to the measurement plus 12 cm for all sizes). From point B along line AB we put 7 cm, and from point C to the left along line CD we put 8 cm (for all sizes). We connect points 7 and 8.
Depth of the first fold. From point 7 to the left we put 6cm, and from point 8 to the left 5cm (for all sizes). We connect points 6 and 5.
Distance to second fold. From point 6 we set aside 3cm, and from point 5 to the left 4cm (for all sizes). Connect points 3 and 4.
Depth of the second fold. From point 3 to the left we set aside 6cm, and from point 4 to the left 5cm (for all sizes). We connect points 6 and 5.
Divide along the side seam line. From point D to the left we set aside 3 cm (for all sizes). From point 3 up 0.5 cm. We first connect points A and 0.5 with a straight line, and then from point 0.5 to point D we draw a smooth curved line.
LiveInternetLiveInternet
Quote from Arnichka's message
Read in full In your quotation book or community!
Graduation is coming soon - we are sewing an apron and a school uniform) Yes, yes, by the last bell))
SCHOOL UNIFORM FOR A GIRL USSR SAMPLE
In Fig. 1 shows a school dress (uniform). Bodice, cut at the waist, with pleats along the shoulder and waist lines, button closure. The skirt has two pleats at the front and back, and small gathers along the sides. Turn-down collar. Long sleeves with cuffs. The fabric is wool or cotton.
Drawing the style lines and preparing the pattern Prepare the main pattern of the dress and long sleeves according to the measurements taken. Draw the style lines on this pattern. Back. Divide the depth of the back dart into two darts (Fig. 2, a). Continue the middle lines of the darts down until they intersect with the bottom line of the dress. Extend the waist and bottom lines to the right 5 cm. Connect both points 5 with a straight line for allowance for gathers. Before. In the middle of the front, from the neck down, set aside 2 cm (Fig. 2, b). From this point draw a smooth line to the neckline. From the middle of the front along the waistline from point 2, set aside 2 cm to the right for the bodice fastener. Mark the loops: the first one - 2 cm below the neckline, the rest - at a distance of 6 cm from one another. Continue the middle lines of the darts down until they intersect with the hem line. On the skirt from the waist line and along the bottom line, set aside a 5 cm allowance for gathers. Sleeve. Leave the main sleeve pattern unchanged. Cut out a cuff with a length equal to the circumference of the wrist (17 cm) plus 2 cm. Collar. Draw a rectangle ABCD (Fig. 2, c). The vertical lines are equal to 9 cm. The horizontal lines are equal to the length of the sprout and neckline of the dress - 18 layers plus 2 cm. From point A, put down 2 cm, from point B to the left - 2 cm. Connect both points 2 with a smooth line. From point B, set aside 2 cm upward, connect this point with a straight line to point 2 on the horizontal line and a smooth line with point D. Preparing the pattern. Number the details of the skirt. Cut the pattern along the lines of the waist and pleats on the skirt. Cut off the excess part of the pattern. Layout and cutting Fold the fabric in half along the grain (Fig. 3). Place part No. 1, the middle front of the skirt, to the fold of the fabric. Transfer the hip line from the pattern to the fabric. Measure along this line the depth of the first fold of 10 cm and attach part No. 2. Measure the depth of the second fold 10 cm and attach part No. 3. Draw the braces of the folds along the lines of the darts. Place parts No. 4, No. 5 and No. b in the same order as parts No. 1, No. 2, No. 3. The layout of the bodice pattern, sleeves and other parts is shown in Fig. 3. Note: The front bodice should be made looser by increasing the depth of the pleats. To do this, cut the pattern along the right side of the dart from the shoulder line to the waist line and spread it along the chest line and at the shoulder by 3 cm. Sewing Sew folds on the shoulder and waist lines, as well as side and shoulder sections. Sew out the loops. Sew the collar. Sew in sleeves. Sew the folds on the skirt, sew in a pocket on the right side, cutting the inner fold of the fold from the waist down by 10 cm. Hem the bottom. The processing of individual units is described on pages 265-287. SCHOOL APRON WITH STRAPS In Fig. 4. shows a school apron with straps to which the chest and wings are sewn. The skirt has pleats along the waistline, two on each side. The length of the apron should be 5 cm shorter than the dress. The fabric is wool or cotton (marquisette), black or white. An apron made of white fabric is trimmed with three to four horizontal folds along the bottom line of the skirt and along the chest line. The width of the folds is 0.5 cm, the distance between them is 1 cm. Drawing lines of the style and preparing the pattern
Prepare the main pattern to the waist of the dress in a size corresponding to the size of the apron. Draw the style lines on this pattern. Back. Prepare the back pattern in unfolded form. Set aside 3 cm from the sprout to the right along the shoulder (Fig. 5, a), 8 cm from point T to the left. Connect points 3 and 8 with a straight line. From point 3, set aside 4 cm to the right, from point 4, draw down a line parallel to straight line 3 - 8, and at the intersection with the waist line, place point T1. From point 4 on the continuation of the shoulder line, move 8 cm to the right. Connect points 8 (on the shoulder line) and T1 with a straight line. Divide it in half and move 2.5 cm to the right from the division point. Draw the wing line with a smooth line, connecting points T1; 2.5; 8. Place marks at the intersection of the straps and the middle of the back. Before. Place 3 cm from the highest point of the neckline to the left along the shoulder line (Fig. 5 b), 4 cm along the waist line from the middle of the front. Connect points 3 and 4 with a straight line. From point 3, continue the shoulder line to the left and set aside 4 cm; from point 4, draw a line parallel to straight line 3-4, and at the intersection with the waist line, place point T2. From point 4 on the continuation of the shoulder line, move 8 cm to the left. Connect points 8 and T2 with a straight line. Divide it in half and set aside 2.5 cm from the division point. Draw a line for the wing, connecting points 8; 2.5; T2 with a smooth line. To build the chest, set aside 12cm in the middle of the front from the waist up and from this point draw a horizontal line until it intersects with the side of the shoulder strap. Preparing the pattern. Cut the pattern along the marked lines. Cut off excess parts of the pattern. Layout and cutting
Fold the fabric in half with a fold along the longitudinal line. Measure 45cm plus 5cm for seams - the length of the apron skirt. Place the straps, wings, belt, and chest on the rest of the fabric as shown in Fig. 6. Sewing Hem the sides of the skirt with a narrow hem using a machine. Hem the bottom of the apron with a 4cm hem. Baste the folds on the wrong side along the marked lines. Hem the wing sections with bias tape. Baste the trims right side to the front side of the wings, stitch them at a distance of 0.5 cm from the edge, fold them inside out and hem them with a hidden seam. The finished width of the binding is 2 cm. Hem the top of the breast with a 2 cm fold. Baste the right sides of the upper and lower straps to the side sections of the breast and stitch them all together. Baste the wings to the edges of the upper straps and stitch. Turn the seams inside the straps, bend the sections of the lower straps by 0.5 cm and hem them over the edge. Sew the straps at the back crosswise along the marks. Then baste the underside of the waistband to the undersides of the skirt and chest, aligning the middle of the skirt and chest. Baste the right side of the upper part of the belt and stitch it all together. Fold the section of the belt over the apron, bend it 0.5 cm, close the machine stitch, baste and stitch along the edge of the hem of the belt. At the ends of the belt, sweep out loops and sew buttons.
SCHOOL APRON TYPE DREAKING In fig. 7 shows a school apron of the cape type, without shoulder seams. The fabric is cotton or wool, black or white. Drawing the style lines and preparing the pattern Prepare the pattern of the main dress up to the waist line. Draw cut lines on the pattern. Back. Set aside 2 cm from the sprout along the shoulder line and the middle of the back (Fig. 8, a). Connect both points with a smooth line. Continue the shoulder line by 8 cm. Set aside 6 cm along the waist line from the middle of the back. Connect points b and 8 with a straight line. Divide this line into four equal parts. From the lower division point, set aside 2 cm to the left; from the top point of division - 1.5 cm to the right. Draw a smooth line (as shown in the drawing) through points b; 1.5; division point; 2; 8.
Before. Place 2 cm from the highest point of the neckline to the left along the shoulder line (Fig. 8, b), 4 cm from the neckline down the middle of the front. Connect points 2 and 4 with a smooth line. Continue the shoulder line and set aside 17 cm from point 2 (the remaining part of the shoulder is 9 cm plus 8 cm). Set aside 7 cm along the waist line from the middle of the front. Connect points 7 and 17 with a straight line and divide it into four equal parts. Set aside 2 cm from the upper division point to the left, 1.5 cm from the lower division point to the right. Through points 17; 2; division point; 1.5; 7 draw a smooth line as shown in the drawing. Preparing the pattern. Cut the pattern along the back and front style lines. Cut off excess parts of the pattern. Layout and cutting
Fold the fabric in half along the grain. Place the pattern on the fold of the fabric, as shown in Fig. 9. Connect the end shoulder points of the wings with a smooth line. Draw the line directly on the fabric with chalk or a sharp piece of soap. For a skirt, you need to measure one piece according to the length and add 6 cm to the seams. The width of the skirt is equal to 1/2 of the semi-circle of the waist plus 10 - 15 cm for gathers. Prepare a belt pattern with a length equal to the waist circumference plus 3 cm for the fastener, 3 cm wide (finished). Sewing Process the neckline with a 3 cm wide hem. Hem the sections of the wings with bias tape 2 cm wide. Gather the skirt along the waist line with thread twice. Baste the belt to the wrong side of the skirt and wings, matching them in the middle. Then baste the right side of the top of the waistband and stitch everything together. Fold the edge of the belt over the skirt of the apron, fold the belt 0.5 cm, close the machine stitch, baste and stitch along the edge. On the left side of the belt, sew two loops in the longitudinal direction, on the right side - sew buttons
Author: Poltava Sections: clothing Added: 2011-06-05
The apron is an integral part of the Soviet-era school uniform. On weekdays, it was customary to wear a work apron made of black fabric with a school dress, and on holidays - a festive ceremonial apron made of white fabric, often decorated with lace, and sometimes even made entirely of satin or guipure.
Work apron
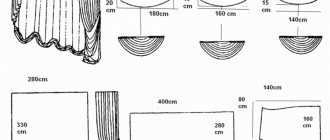
To draw an apron pattern, measure the length of the front and the length of the back of the dress to the waist. On a vertical line, mark the length of the back, shelf and apron. Create an apron pattern as shown in the picture. This apron is made from black fabric.
Ceremonial apron
The principle of constructing a ceremonial apron is not very difficult, since the pattern drawing is given with digital indicators.
The outline of the bottom of the apron should be 5 - 7 cm higher than the bottom of the school uniform dress.
The width of the bottom of the apron is 79 - 80 cm (depending on the width of the fabric), group folds are laid along the waistband of the apron.
See also:
Making a pattern and sewing a school uniform
source here https://www.handworker.ru/odejda/vykroyki_shkolnyh_fartukov/
Author: Poltava Sections: clothing Added: 2011-06-05
The dress is a school uniform - intended for school-age children (see picture).
The student uniform is sewn from smooth dark fabric (brown, dark blue, burgundy). A mandatory addition to the student dress is a school apron. They wear the uniform with a black apron during working hours, and with a white apron on holidays.
The dress should be strict: pleated or multi-wedge bodice, smooth or with pleats. Long sleeves with cuffs, turn-down or stand-up collar. With a turn-down collar, the clasp for free dressing should be in the front; with a stand-up collar, the fastening is done at the back.
To draw a pattern drawing, you need the following measurements (in cm):
neck circumference 16 chest circumference 36 waist circumference 33 hip circumference 39 back width 15 armhole height 15 front length 33 back length 30 product length 75
sleeve length 48.
An allowance of 8 cm is allowed for a loose fit.
Construction of a drawing.
Place point A on an arbitrary straight line (see figure).
Back
.
Waist length
. From point A, put down the waist length of 33 cm, place point T. From point T, draw a line to the right.
Armhole depth
. From point A, set down the depth of the back armhole 17 cm, place point D.
Back width
. From point A, set off the width of the back plus 1 cm to the right (15 + 1 = 16 cm), put point C. From point D, set off the width of the back plus 1 cm to the right, put point C1. Connect points C1, C with a straight line.
Sprout width
. From point A, move 1/3 of the neck circumference to the right, place point P.
Sprout height
. From point P, set aside 1/3 of the width of the sprout, place point P1. Connect point P1 with a smooth curve to point A.
Shoulder bevel
. From point C, put down 2.5 cm, place point P. Connect points P, P1 with a straight line and extend it by 1 cm - we get a bevel of the back shoulder.
Extension of the back at the armhole
. From point C1, move 4 cm to the right, place point G2. From point G2, lower the straight line down to the waist line. Mark the mutual intersection with the waist line with point T3.
Auxiliary points of the back armhole
. From point C1, set aside 4 cm upwards and place point C2.
From point C1, draw an angle bisector of 2.5 cm, then connect all the points with a smooth curve - we get the contour of the back armhole.
Bevel along the side line
. From point T3, set aside 1.5 cm to the left and 2 cm to the right to bevel the sides of the back and shelf.
Clasp allowance
. From points A, T, set aside 2 cm to the left and connect the allowance points with a straight line - the outline of the fastener on the back is formed.
Shelf
.
Construction of the bodice shelf
. To determine the width of the armhole, from point C1, set aside 1/4 of the chest circumference plus 3 cm to the right (36: 4 = 9 + 3 = 12 cm), place point B. From point B, draw a line upward.
Back waist dart
. From point T, set aside 5 cm to the right, draw a line up 6 cm, build a closed dart 2 cm deep.
Bodice width
. From point G on a straight line, set aside the chest circumference plus 8 cm (36 + 8 = 44 cm), place point G1. From point T, also set aside 44 cm to the right, place point T1. Connect points T1, G1 with a straight line, continuing it upward.
The height of the front armhole is determined by measuring the depth of the armhole. FROM point G1, set aside 20.5 cm upward, place point A1. From point A1, draw a straight line to the left; Mark the mutual intersection with the armhole line with point E.
Shelf neckline
.
From point A 1
, set aside 1/3 of the neck circumference 5.3 cm to the left, place point B. From point A1, set down 1/3 of the neck circumference plus 1 cm (5.3 + 1 = 6.3 cm), place point B1. Connect point B1 with a straight line to point B. Go 1.5 cm deep in the center of line BB1, draw a smooth curve - we get the outline of the neckline.
Shelf shoulder bevel
. From point P on the back, put down 4 cm, place point P1. Connect points P1, B with a straight line.
Shelf shoulder width
. From point B, mark the back shoulder width of 12 cm on line BP1 and place point P2.
Auxiliary points of the shelf armhole
. From point B, set aside 4 cm upward and place point B1. Draw a bisector of an angle of 2 cm; connect the resulting points with a smooth curve.
Folds on the shelf
. Along the waist line from point T1, put 6 cm to the left, put point E1, then put another 3 cm, put point E2.
Along the shoulder line, set point P2 to the right 5 cm, place point E3, connect it to point E1 along the waist line - we get the outline of the first fold. Draw a straight line up from point E2 parallel to line E1E3 - we get the outline of the second fold. From point T1, put 1.5 cm down and place point T2. Connect points T2, T3 with a straight line.
Shelf tuck
. The dart at the waist of the shelf is made under the last fold.
The skirt is made with folds according to the principle of a skirt for a Matoros costume.
Sleeve
It is built on the same principle as for a preschool dress. Only the calculation of the sleeve width changes. In our example, the sleeve width is equal to the chest circumference; the sleeve will have a slight gather. To construct a drawing of a sleeve pattern with a smaller gather, you need to subtract 4 cm from the chest circumference. The height of the sleeve is determined from 1/4 of the chest circumference plus 3 - 4 cm. Further construction of the sleeve sleeve is shown in the figure, where all segments are indicated by numbers.
Collar
. To draw a drawing of a collar pattern, take the measurement of the neck circumference plus 2.5 cm; draw a horizontal line on which to set aside 18.5 cm. The height of the collar is 5 cm. Further design is shown in the figure.
If a school uniform is sewn with a fastener on the back, you need to make a stand-up collar (see figure). If the uniform is sewn with a fastener on the shelf, then the collar is made turn-down. To do this, construct a rectangle based on the neck circumference and collar width (in our example, the collar width is 8 cm). Further design of the collar pattern is shown in the drawing.
Cutting and sewing The apron consists of two parts: an apron and straps with an insert. The layout of the school apron pattern on the fabric is shown in Fig. 134. The apron, insert, belt and sub-belt are cut along the grain of the fabric, the straps - along the transverse or oblique thread. When cutting at the bottom of the apron, 3-4 cm is added to the hem, 1.5 cm is added to the sides, and 2-3 cm is added to the depth of the transverse folds for each fold, the number of which is made as desired (3-4 folds).
When cutting the insert, 2 cm is added to the hem along the upper cut, and 3 cm to the transverse folds. After cutting, snares are laid along the lines of the lobar folds. The middle of the apron and insert is marked with an interfacing seam. The side sections of the apron are folded inside out by 1.5 cm and hemmed with a hem. The lower edge is folded inside out, placed in the first transverse fold from the bottom and stitched simultaneously with the fold. Then the remaining 2-3 transverse folds are sewn in. Longitudinal folds are laid along the snare and swept. The insert is prepared and the upper trimmed edge is folded inside out and sewn with a hem stitch. Then a group of folds is sewn on the insert. The outer edges of the straps are hemmed with an oblique strip 2-2.5 cm wide. The strips are placed on the trimmed edge of the straps with their right sides and sewn with a seam 0.5 cm wide. The strip is folded inside out, the trimmed edge is folded 0.5 cm and stitched or hemmed with blind stitches . To process the inner edge of the straps, split strips are cut out, the length of which is equal to the length of the straps, and the width is 2.5 cm. The strips are applied with the front side to the front side of the straps, an insert is inserted in front between the straps and the strip and ground down. The strips are folded to the inside out of the straps, the trimmed edge of the strip is folded 0.5 cm and adjusted or hemmed with hidden stitches. To the underside of the apron, at a distance of 5-7 cm from the edge, at the place of the fastener, a sub-belt is basted and attached, to the front side of which an insert with straps is applied, aligning the middle of the apron with the middle of the insert. At the back, the rear ends of the straps are applied to the belt and basted. Then, with the right sides, the belt is placed on the underbelt, basted and stitched, after which the belt is folded over the apron, the trimmed edge is folded 0.5 cm and, closing the stitching seam, it is sewn in a circle. Two loops are cut and sewn in the left front part of the belt, and buttons are sewn to the left back part.
School aprons are probably already outdated and are no longer a mandatory attribute of girls’ school uniforms, as they were in Soviet times. But the fact that a white school apron is a beautiful decoration of the uniform and is a symbol of the school era is unambiguous. That is why not a single last bell rings without a first-grader in a school dress with a white apron. When preparing for one or another school holiday, many would like to buy an apron, white or black, guipure or satin. But it is not always possible to buy it in a store of the model or size you need. And when ordering from an online store or studio, you will have to wait a long time. The simplest solution is to sew it yourself. After all, school aprons, especially those of the Soviet type, have simple patterns and sewing technology. To help you in this case, we offer an article on how to sew a school apron with your own hands. Based on this pattern of a school apron, the most “real” apron of Soviet times, size 36 (photo), you can model any other model, and use increments to increase its size.
Apron measurements: apron length - 40 cm, half waist circumference - 34 cm, strap length - 67 cm. Measurements for the length of the straps are taken from the back waist line over the shoulder to the front waist line, the apron should be 5 - 6 cm shorter than the skirt or dresses. Constructing a drawing of a pattern for a school Apron Draw a rectangle ABCD with sides 40 (length) and 29 cm (1/2 of half the waist circumference according to the measurement plus 12 cm for all sizes). From point B, along line AB we put 7 cm, and from C to the left along line CD we put 8 cm (for all sizes). We connect points 7 and 8. Depth of the first fold From point 7 to the left we put 6 cm, and from point 8 to the left 5 cm (for all sizes). We connect points 6 and 5. Distance to second fold. From point 6 we set aside 3 cm, and from point 5 to the left 4 cm (for all sizes). Connect points 3 and 4. Depth of the second fold From point 3 to the left we put 6 cm, and from point 4 to the left -5 cm (for all sizes). We connect points 6 and 5. The brace along the side line is set aside 3 cm from point D to the left (for all sizes). From point 3 up 0.5 cm. Connect points A and 0.5. After this, we connect points 0.5 and D with a smooth concave line. Apron strap Draw a rectangle ABCD. Length 35 cm (1/2 the length of the strap according to the measurement plus 1.5 cm for all sizes) and the width of the strap is 8 cm. From point B, extend the horizontal line AB to the right by 5 cm and connect it to point C. Draw the apron belt rectangle ABCD, the vertical lines of which AD and BC, constituting the length of the belt, are equal to 36 cm (waist semicircle plus 2 cm for all sizes), and the horizontal lines AB and CD, constituting the width of the belt, are equal to 4 cm (for all sizes) . Insert for a school apron We draw a rectangle ABCD, the vertical lines of which AD and BC, constituting the length of the insert, are equal to 13 cm (for all sizes), and the horizontal lines AB and CD, constituting the width of the insert, are equal to 5 cm (for all sizes). From point D to the right along the line SD we set aside 1 cm and connect the intended point with point A.
Cutting and sewing All details of the school apron pattern are cut along the length along the grain of the fabric. An exception is made for wide shoulder straps with tails. In this case, cut along an oblique or transverse thread. When cutting, the following seam allowances are made: along the top of the apron - 0.5 cm, along the side cuts - 2 cm, along the bottom - 2.5-3 cm. The number of folds along the bottom of the apron is made as desired. To do this, the lines of the proposed transverse folds are marked on the pattern, then the pattern is cut and the parts are spread on the fabric to the width of the fold. After cutting, a snare is laid along the fold line. Increase on the seams of the school apron : 2.5 cm at the top, 1 cm at the side sections and bottom. When cutting the straps and belt along their contour, make a seam allowance of 0.5 cm. After cutting the parts, use a spacer seam to mark the middle of the insert and apron. Then they start sewing. The side sections of the apron are folded inside out by 2 centimeters, the trimmed edge is folded in by 0.5 centimeters, basted and machine stitched to the edge. The lower section of the apron is folded inside out by 2.5-3 centimeters, basted and stitched. The folds are swept along the snare and stitched from the front side. Then they begin to prepare the insert. The top of the insert is folded inside out by 2.5-3 centimeters and stitched. Next, the insert is inserted between the straps, and then the apron and insert with straps are inserted into the belt. It is better to stitch the belt with double stitching. The fastener is marked on the left side of the belt, where two loops are cut and sewn out in a longitudinal direction, and buttons are sewn on the right side of the belt.
If you do not have the opportunity to buy or sew a school uniform and a school apron for graduation, you can contact our online studio “Skirts Plus”. A school dress along with a guipure apron can be bought for 2,500 rubles, including delivery by mail.
Pattern of the upper parts, apron belt
Apron straps. Draw a rectangle ABCD. Its length is 35cm (1/2 the length of the strap according to the measurement plus 1.5cm for all sizes), the width of the strap is 8cm. From point B, extend the horizontal line AB to the right by 5 cm and connect it to point C.
Apron belt. We draw a rectangle ABCD, the vertical lines of which, AD and BC, make up the length of the belt equal to 36 cm (waist semicircle plus 2 cm for all sizes). The horizontal lines AB and CD, making up the width of the belt, are equal to 4 cm (for all sizes).
Additional apron insert. We draw a rectangle ABCD, the vertical lines of which AD and BC, constituting the length of the insert, are equal to 13 cm (for all sizes), and the horizontal lines AB and CD, constituting the width of the insert, are equal to 5 cm (for all sizes). From point D to the right along the line CD we set aside 1 cm and connect the intended point with point A.
It is not difficult to create a pattern for such an apron. But it will be too simple.
Expert opinion
Smirnova Ekaterina Anatolevna
7 years of experience in interior design, professional architect
It is advisable to decorate its straps with ruffles. Instead of gathering fabric, you can sew an openwork braid, “round off” the corners of the lower part a little more and also stitch the braid along the edge.
Be sure to decide in advance how the belt will be fastened; if it is tied with a bow, you need to take this into account when cutting or make a separate pattern for such a belt.
Sequence of sewing an apron
The side sections of the apron are folded inside out by 2 cm, the trimmed edge is folded by 0.5 cm, basted and stitched to the edge using a sewing machine.
The lower section of the apron is folded inside out by 2.5-3 cm, basted and stitched.
Sweep away the folds and secure them on the front side.
Then they begin to prepare the insert. The upper part of the insert is folded inside out by 2.5-3 cm and stitched. Next, the insert is inserted between the straps, and then the insert with the straps is sewn to the apron waistband. It is better to stitch the belt with double stitching.
The button fastener is marked on the left side of the belt, where two loops are cut and sewn in a longitudinal direction, and buttons are sewn on the right side of the belt.
The apron belt can be tied with a bow
Other articles:
USSR school uniform for girls
Wearing a school uniform with a white or black Soviet-style school apron has recently become very fashionable. The old Soviet school uniform from the USSR for girls looks very impressive, especially with a white apron on a dark dress.
How to make and sew a school collar
How to make a pattern for a simple school collar pattern. Processing of a turn-down sewn-on guipure collar for a school dress.
Sewing a dress with your own hands
How to sew a dress with your own hands. Technology and sequence of sewing dresses for beginners.
Skirt with elastic
How to make a simple pattern and sew various models of a skirt with an elasticated belt.
Pattern and sewing of the Tatyanka skirt
In this article you will learn the calculations for constructing a “Tatyanka” skirt pattern, and how to sew such a skirt with your own hands.
How to hem a skirt
Read this article if you don’t know how to hem a skirt, including one made from chiffon. Finishing the bottom of the skirt with a hidden seam.
How to replace a hidden zipper
The hidden zipper in the skirt cannot be repaired; you cannot replace its slider; you need to change the zipper. How to install a hidden zipper on a dress or skirt.
How to calculate fabric consumption
The fabric consumption for sewing a school apron depends on the size of the girl, as well as the style of the apron, the width of the straps, the length of the belt, the number of folds and frills. But on average, 1 meter of guipure or satin with a width of 150 cm is enough to sew a school apron of any size.
We sew knitwear without skipping or looping
Many who have tried to sew knitwear on a regular sewing machine have noticed that the machine often refuses to make a beautiful and even stitch. Gaps form in the knitted stitching, the bottom thread loops, and sometimes breaks. Why does this happen and how can I fix it?
How to make a pattern and other tips for beginners
How to make a pattern, what tools are needed for this. These and many other tips for beginners.
Types of models
At the moment, it is not difficult to make a simple and elegant apron model from guipure, lace fabric, cambric, satin and nylon. Guipure is the most popular material, the difference between which is its lightness, affordable price and attractive appearance.
Lace is a fabric that is similar to guipure, but has a denser structure. Batiste is considered a simple material, easy to cut and care for, without any special details.
Has an affordable price. The atlas is a modern variation of the previous canvas.
Outwardly it is similar to silk, but has a more complex structure for sewing. Nylon is considered a synthetic fabric, quite rarely used to sew a school apron with your own hands.
Taking measurements
Measurements are the basic dimensions of a person's figure, which are obtained by measuring his body. They can be removed using a measuring tape along the right side of the figure.
Expert opinion
Smirnova Ekaterina Anatolevna
7 years of experience in interior design, professional architect
They are filmed and recorded on paper. To do this, the waist is girded with braid.
The tape does not stretch or loosen. To create an apron, you need to measure the line of the middle of the front with the neck, chest, waist, hips and middle of the back.
Note! The waist measurement allows you to determine the waist length, the semi-circumference of the hips - the width of the product, the length of the bib - the length of the product to the waist, the length of the bottom of the apron from the waist to the hips - the size of the product to the end from the waist. Accordingly, measurements of the chest and hips allow you to find out the volume of the product.
As for measuring the back, this is required in order to find out the volume of the product at the back.
The nuances of working with guipure
Guipure is a difficult material to sew and cut, so novice needlewomen do not use it to create things like an apron. It is great for creating creative, light and airy collar pieces. Also used as an addition to an already finished apron. Many experienced needlewomen use it as a base.
Note! It is difficult for novice craftsmen to work with guipure due to the inability at first to carefully process the threads and make patterns correctly so that the material does not begin to climb and turn into lumps. All a novice craftswoman can do is add guipure inserts to the apron, taken from ready-made products or purchased in a store.
Types of aprons
Today, stores offer a huge selection for every taste and color. Let's look at the main types of this accessory:
- 1. Kitchen - used in home life and in kitchens in restaurants and cafes
- 2. Children's - often found in handicraft and art classes
- 3. Workers - used by carpenters and other industrial workers
- 4. School - well-known formal aprons for girls
Also, returning to childhood, one can recall the classification of aprons by cut from Soviet technology textbooks:
Types of aprons by cut
You can also divide them into other types: with and without a bib, by the presence of pockets, etc.
Sewing an apron
The sequence of how to sew a school apron is exactly the same as for other products. First, an action plan is created, a sketch is thought out, and patterns for the girl are created based on it.
First, the base of the apron is sewn, namely the front part and the white skirt. Next, a belt is attached throughout the product.
At the end, the belt is complemented with ruffles and other decorative trims. A button is sewn on and a corresponding hole is made for it.
Note! Before final stitching of all parts, it is imperative that a preliminary fitting is done with turned patterns.
Pattern of the upper parts of the apron
It is not necessary to have an idea of how the top pattern is made or how to sew it to the bottom. To do this, you need to take a ready-made step-by-step diagram, substitute your values from the measurements and cut out the corresponding parts.
It’s best, if you have one, to make a pattern using an old apron. To do this, you need to cut it out or attach it to new fabric, and then outline everything.
What a standard pattern for creating an apron for size M looks like can be seen below.
Pattern of the upper parts of the apron
Connection of upper and lower parts
Connecting the top and bottom is easy. All you need to do is use a sewing machine and make a double stitch on the back of the materials. The connection can also be made at the waist, but this is more difficult.
Connection of upper and lower parts
The apron belt can be tied with a bow
The final piece of the future apron is a belt. It's very easy to make.
To do this, you need to make a pattern and fold the fabric in half. Then sew by hand or use a sewing machine and sew the product from the inside out.
The finished belt can be inserted into special loops or come separately with an apron. You can tie it in the usual way, or you can use an interesting idea - tie it with a bow.
Be sure to iron it well before attaching it to the finished product. The product itself also needs to be carefully ironed. In the case of guipure, you should use plain water or a steam generator so as not to accidentally burn the apron or make a hole.
Note! If desired, the belt itself can be supplemented with accessories or beads. Some craftswomen often resort to embroidery.
In general, creating a school apron is not a difficult task if you take the measurements correctly, create a pattern and do some preliminary preparation. It is also simple based on a diagram or master class. It is worth pointing out that only by careful handling of the material, only by fully following the master class, can you achieve success in your intended task.
Decor features
If desired, the belt itself can be supplemented with beads or interesting accessories. Some needlewomen often resort to embroidery.
Additional Information! Frills will add special charm to an apron sewn for the last school bell.
Wardrobe Master class Graduation Beginning of the school year Sewing apron school cutting Threads Fabric
So today we start sewing this school apron. Over the next 2 days I will replace the sketch with the finished work, while the drawing is still in progress.
To sew the apron, I took 1.1 meters of guipure with a width of 1.5 meters. 1.
We measure the waist circumference, 2. the length of the strap, determining it either simply by measuring from the waist line along the front to the waist line along the back over the shoulder in a straight line, or simply adding DTs (the length of the back to the waist) and DTp (the length of the shelf to the waist), 3.
We measure the center of the chest (along the protruding points of the chest), 4. the length of the apron from the waist down and its width.
5. Determine the finished width of the strap, the width of the frill, and the height of the chest insert, depending on your desire and model.
I have it ready: frill: width - 11 cm strap: width - 3 cm, length - 82 cm insert: width - 12, height 15 apron itself: width 45 cm, length - 35 cm waist circumference - 80 cm center of the chest - 18 cm
Expert opinion
Smirnova Ekaterina Anatolevna
7 years of experience in interior design, professional architect
I will show you how to draw the lines for cutting an apron using a black example, since it is easier to see. Fold the fabric in half, aligning the edges
Here I showed you right on a piece of fabric where and what is located, but I draw and cut right away, it’s easier for me.
We determine the length of the frill by increasing the length of the strap by 1.5 -2 times. since my frill is not very wide and it is cut in a straight line, I take the minimum value 82 X 1.5 = 123.
But since our fabric is wider, I cut it out to cover the entire width of the fabric, which is quite normal. We measure the width of the frill + 1 cm allowance from the edge, i.e.
12 cm. We put marks in several places and first draw one straight line.
and then we draw another similar line at the same distance, since we should have two frills. We cut the fabric along the drawn lines
there remains a piece with a length of 86 cm, I am quite happy with this length, since the girl is still growing and I will sew with the possibility of later increasing the length of the straps, so I cut out the strap to the entire available length. From the edge we measure the width of the strap multiplied by 2 + 2 cm, 3 X 2+2=8 cm in guipure the edge is very narrow and does not need to be cut off; in other fabrics we first cut off the edge, then measure the width of the strap part. We draw a line parallel to the edge or cut and cut it out. Since our fabric is folded in half, it turns out that we are cutting out two straps at once
Now we are left with a piece of fabric with a width of 134 cm, if we sewed an apron without a bow at the back, then we would have had enough of one belt piece equal in length to the waist circumference + allowance for the fastener + 2 cm for processing. But we have a bow and so we will make a belt with a seam.
My seam will be located in the center, but you can cut the belt out of 3 parts and place the seams at the level where the apron will end, or at the place where the straps are sewn at the back. In general, the seam can be located anywhere if there are problems with the fabric, but the main thing is that there are no seams on the bow itself.
So I cut two strips across the entire width of the remaining fabric, marking a distance of 10 cm from the cut obtained after cutting the ruffles (this includes the double width of the finished belt + 2 cm)
We lay the remaining piece of fabric so that the fold width is equal to 1/2 the width of the apron +1 cm 46:2+1=24 cm. We measure the length of the apron + 2 cm (I left 5 cm since I plan to increase the apron in length) 35+5 =40. Cut out the resulting rectangle
Next, all that remains is to cut out a piece for insertion. I cut out a rectangle with sides 15 cm X 20, later I will fold the top edge and only after that I will cut out the insert itself.
the remaining piece of fabric makes me think that less fabric could have been used, but then the frills would have to be cut out with seams, and I don’t like that. But if you still have to sew stitched ruffles (from several parts), then try to place the seams either on the shoulder or at the back.
When cutting guipure, the longitudinal and transverse lines are not so important, but you noticed that I still follow the direction. The lobe direction line coincides with the technological requirements, only when cutting the frill we slightly violated them deliberately (although this is also permissible because the frill can be cut out in three ways: along the lobe, along the weft and along the bias),
After reading MK, you may ask why we measured the center of the chest, because we didn’t need it when cutting. So, we need the center of the chest to determine the width of the insert.
Its width should be equal to the value of Cg (center of the chest) minus double the width of the strap. 18-6 =12.
When we calculate everything exactly, the sewing line for the facing will be in the finished product exactly along the protruding points of the chest and the apron will sit balanced on the figure. later we will need this value again to find the location of the tucks
School apron - pattern and master class
The fashion of wearing Soviet-style dresses to the last school bell is becoming increasingly popular. A brown dress of a simple cut, a snow-white collar and an apron became symbols embodying a fond memory, a tribute to those years spent within the walls of the school. When dressing up for the holiday of farewell to their teachers and comrades, girls wear a school white apron, which not only emphasizes their figure, but also creates a festive atmosphere. This outfit noticeably distinguishes the graduate from the crowd of well-dressed guests and attracts attention with its cleanliness and formality.
When preparing for the last call, many try to find a ready-made school uniform; if you can buy a simple brown dress, then with an apron things are much more complicated. It is difficult to find an unusual, elegant addition to a dress; stores offer simple, simple models. Not every graduate wants to be like everyone else, but the uniform is the same - dress and apron, but at the same time completely different. To stand out from others, you can sew a school apron yourself using a pattern; it’s not as difficult as it seems; by following the step-by-step instructions, you can create an exclusive addition to your dress.
Master class on making a white apron from guipure, taking measurements and cutting
The apron model can be very different - long, short, round, square, with abundant lace frame, with or without folds, the type of the finished product is limited only by imagination and the amount of material. But all versions of the school white apron include one set of pattern pieces - the largest bottom part, a bib, two straps, a belt and frills.
To create the pattern, use the basic pattern of school aprons.
To complete the work of sewing a school white apron you will need
The necessary set of tools and parts to start working on an apron for a school uniform is a measuring tape, a sewing machine, an overlocker, if this machine is not available, then replace the overlock stitch with a regular zigzag, which is available in any sewing machine, guipure fabric, 1 m is enough, with a width of more than 1.5 meters, guipure ribbon 4 cm wide and 10 m long, it can be replaced with a suitable lace ribbon, white thread, English needles, scissors.
How to take measurements
The pattern is made taking into account height, waist, hips, chest, length of straps and belt. All measurements are taken in school dress. For more accurate calculations, you will need the help of another person.
The length of the belt depends on the model - the apron will be fastened with a button or tied. Measure the waist volume, add 3.5 cm to the resulting value if the model has a button, 35 - 45 cm if it has ties. The width of the belt is no more than 3-4 cm. In the guipure model, the belt is made from ready-made ribbon or lace.
The length of the apron is calculated to be 3 - 6 cm above the hem of the dress. Otherwise it will look ugly.
The width of the apron along the bottom edge is made equal to the volume of the hips. The top edge is made equal to half the waist volume, plus 4 cm for folds or darts. The lower edges of the resulting pattern are rounded, since a frill of guipure ribbon or lace will be sewn along the edge.
Pattern of the upper parts of the apron
The pattern for a school apron can be taken from a magazine with the dimensions already adjusted to the standard. However, due to the specific structure of the figure, the final result may be disappointing, so even the finished pattern must be adjusted so that it fits the figure.
The required length of the straps is obtained as follows: a measuring tape is applied over the shoulder to the waist line in front and to the waist line from the back, width 4 cm. For a frill, depending on the model, take a guipure tape equal to or 10 - 15 cm longer than the straps.
The bib pattern has the shape of a rectangle, narrowed towards the bottom, the width of which should not exceed the distance between the protruding points of the chest, and the height - 5 - 6 cm above the chest volume line.
When cutting, it is necessary to take into account allowances of 1 cm on each edge.
Sequence of sewing an apron
Step-by-step instructions for sewing a school apron with your own hands:
Step 1 – Fold the straps in half and sew them with a straight stitch on a sewing machine. The frills are applied to the straps, stitched using an overlocker or zigzag; when the model has frills with folds, it is necessary to evenly distribute the folds before starting overcasting. The seam is ironed to the side of the straps, and a straight line is laid on the front side.
Step 2 – Using the same principle, sew the frill along the largest part of the apron.
Step 3 – Sew lace onto the top of the bib, slightly pleating it.
Step 4 – The straps are connected to the bib, ironed, and a finishing stitch is sewn.
Step 5 – Connect the bib with straps to the belt.
Step 6 – On the bottom of the apron, sew folds, forming something similar to darts, they should be symmetrical.
Step 7 – Connect the top and bottom parts, iron them, and add a finishing stitch.
Step 8 – Put on the apron and, with the help of an assistant, determine where to attach the straps to the belt.
Video master class on sewing a white school apron
The second version of the pattern for a school apron made of crepe
The peculiarity of a crepe apron is that it is made entirely of one material.
To make an apron, in addition to tools, you will need snow-white crepe 2 m long and 1.5 m wide, thread and elastic.
Pattern
For sewing, the school apron patterns obtained during the previous construction are suitable. However, it should be borne in mind that the material looks very beautiful and you should not skimp on frills and folds.
Master class on how to cut and sew a school apron
It is not at all difficult to sew a school apron from crepe with your own hands; the sewing technology is almost the same as when assembling an apron from guipure with small additions. When cutting, it is necessary to take into account seam allowances.
Prepare the frill for the lower part - one edge is gathered with an elastic band. The width of the frill is 6 – 8 cm, the length is 2 m. The other edge is processed using an overlocker. Connect the edge of the frill with the elastic band to the bottom part, stitch and stitch.
The upper cut of the bib is processed using an overlocker, folded to the wrong side, and a finishing stitch is applied.
For the straps, cut out two parts with a fold, connect them and stitch along the edge.
The frills for the straps are tapered at the ends, processed on one edge using an overlocker, and threaded on the other with an elastic band. The frills and straps are connected, ironed, and stitched.
We connect the straps and the bib.
The belt is cut out in one piece with a fold. They stitch, turn, iron. Connect the upper part, the lower part and the belt.
The apron is ready.
Video MK - cutting
Other school apron patterns
portniha.com
Addition to uniform dress
As a rule, people think about a school apron before the last bell, when it is necessary to prepare a festive uniform. You can buy it or sew it yourself. The latter option is preferable if a suitable pattern is available. Drawing of an apron model, designed for clothing size 36, the optimal cutting option.
To make the apron look festive, it can be complemented with flounces, folds and lace. Finishing stitching and guipure braid can be used as a decorative element. Before sewing, it is recommended to purchase good quality satin or guipure fabric.