Mosaic is an ancient method of creating patterns from small pieces of colored glass, ceramics and other materials. If earlier laying mosaics took a lot of time, since you had to select each piece of material and lay out the design, now, with the advent of mosaic tiles, it is possible to quickly finish the surface of the walls. Let's consider the advantages, types and methods of laying mosaics.
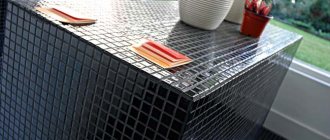
Spectacular mosaic tiles in the bathroom Source designm2.ru
The reason for the popularity of mosaics
Mosaic is a type of inlay that allows you to create amazingly beautiful images. Small multi-colored pieces of solid materials are arranged according to a pre-created sketch. There are two ways to perform a composition:
- direct set - mosaic elements are pressed into the ground;
- reverse set - the particles are placed face down on some kind of substrate, secured, the substrate is removed, and the seams are rubbed with adhesive.
To create mosaics, natural and artificial materials are used - glass, metal, enamel, pebbles, ceramics and others. When arranging the pieces, they lay out various patterns and drawings - thematic, folklore, geometric. People with creative abilities create real masterpieces of decorative art.
Laying mosaics on the wall is possible in any room with high humidity - in the bathroom, toilet.
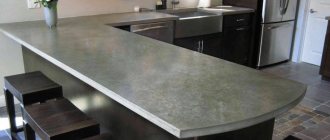
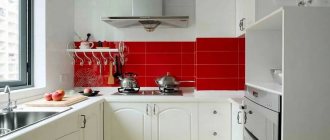
Mosaic inserts look good in the kitchen interior Source pinimg.com
The pattern does not change color and does not deteriorate under the influence of steam or high temperature. Mosaic is easy to care for - the surface can be easily cleaned with a damp cloth and detergents. Mosaic finishing retains its original appearance for a long time, but when installed correctly.
Let's figure out how to put a mosaic on the wall so that it pleases the owners for many years.
Manually laying out patterns with small stones and glass takes a long time. To facilitate cladding, tesserae were created - square matrices with mosaic elements fixed on a grid. Mosaic tiles vary depending on the material:
- ceramic - have the same properties as tiles. It is characterized by high wear resistance, moisture resistance, strength, heat resistance, and ease of maintenance. May have a matte or glazed surface;
- glass - spectacular, but requiring careful selection of glue so that it does not shine through the material. They require complex care, as they are not resistant to aggressive environments and do not tolerate cleaning with abrasive agents;
Glass mosaic Source stroipark.com
- metal - made of aluminum or stainless steel. Mosaic looks unusual and is used to create exclusive interiors. Difficult to maintain and install;
- made of natural stone - expensive, allows you to create a luxurious design. Installation is carried out using ordinary glue or cement-sand mortar.
See also: Catalog of companies that specialize in finishing materials and related work
Definitions
In order not to be confused with terminology, let's clearly formulate what we are talking about.
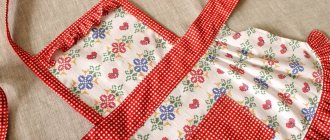
- Apron . This is the area of the wall above the sink, stove and kitchen work surface. Most often, it is limited from above by the upper cabinets of the set, but a variety of options are possible. When cooking, washing dishes and other kitchen work, this part of the wall is most often exposed to splashes of water and hot fat, vegetable juice and other contaminants. Read more in the article What to make an apron from in the kitchen: practical options.
Apron - part of the wall in the kitchen work area
- Mosaic . Small tiles are usually of different colors. It can be used to form a painting, a drawing, or an abstract set of color spots.
Why might you need mosaic tiles for a kitchen backsplash? For the same purposes as any other coating. Thanks to it, the wall of the working area will become not only beautiful, but also protected from contamination.
An apron will not only protect the wall from damage, but will also improve the interior
Subtleties of laying mosaics
Let's take a closer look at how to glue a mosaic on a wall. First of all, you need to prepare tools and materials:
- knife;
- grinder;
- glue;
- pencil;
- electric drill;
- bucket;
- grout;
- putty knife;
- mosaic tiles.
Laying includes the following steps:
- cleaning, priming, sanding, drying walls;
- surface marking - mark the layout of the tiles with a pencil;
- applying the adhesive composition to the wall and sheets with a spatula;
- mosaic installation - the tile is pressed to the surface with glue and pressed with a roller or spatula;
- removing the backing - run a wet sponge over the surface and remove the paper backing diagonally, pulling at the corner;
Removing the backing Source dizainvfoto.ru
- moisturizing and grouting;
- cleaning the tiles diagonally with a damp sponge;
- polishing with a dry cloth.
Preparing the walls
The main secret of high-quality mosaic cladding is perfectly smooth walls. The plane must be flat, without differences horizontally or vertically. The best way to achieve smooth walls is to plaster them along the beacons.
I will talk about plaster briefly, since this topic deserves a separate article.
- The walls are cleaned of old finishing and plaster. We remove all layers that do not adhere well.
- If the wall is too smooth, use an ax to make notches to increase adhesion.
- We prime the walls and install beacons. First, the outer beacons are installed. They are attached to the wall using gypsum plaster and are leveled in one plane. Then threads are stretched between them and intermediate beacons are placed. The step between them should be less than the width of the rule, that is, for a 2-meter rule we take a step of 1.5-1.8 m.
The beacons are installed level in the same plane. Notches on the wall to improve adhesion.
We apply plaster and wait until the walls dry. It is advisable to use cement plaster for tiles and mosaics, but gypsum plaster (Rotband) is also suitable for the kitchen.
Glue
Many people are interested in what to glue the mosaic onto so that it holds firmly. The adhesive composition must be carefully selected to match the properties of the wall surface, material, and operating conditions.
Special tile adhesive
The easiest way is to purchase a special adhesive for tiles at a building materials store, made on the basis of Portland cement with the addition of plasticizers. This is a ready-made composition that only requires dilution with water to the required thickness. The glue ensures reliable adhesion to any surface. This glue is not suitable for glass mosaics due to its light gray tint.
Tile adhesive Source purplemint.ru
Polymer glue
The acrylic-based mixture ensures reliable fixation of mosaics made of any materials on various surfaces. This is the best ready-made adhesive for rooms with humid air. Dyes are added to the composition, which makes it possible to use it to create interesting design solutions. Before use, stir and apply to the surface. The glue dries quickly, forming a glass-like mass.
Size and consumption
The most common form of mosaic blank is square . Usually its side is 30 or 32 centimeters. There are also larger options: for example, with a side of one meter. Most often, some kind of drawing is already depicted there. Of course, such a panel will be expensive. In addition, the workpiece (matrix) can be round, rectangular or any other irregular shape.
Inside the matrix there are pieces of tiles - they are called chips or honeycombs . A standard chip is a square with a side of 2 or 5 centimeters. But there are also extreme versions of chips: for example, with a side of 1 or 10 centimeters.
How to determine consumption?
Even a renovation novice can cope with such a simple task. Here are the step-by-step instructions:
- Measure the length and width of the proposed apron.
- Decide on a mosaic and find out its dimensions.
- Calculate how many whole matrices will fit along the length and height of the apron.
- Calculate how many centimeters remain free and how many matrices are required for this.
Let's say the selected matrix is a square with a side of 30 centimeters. The apron size is 60 cm in height and 130 in length. The height is exactly two rows of mosaic (60/30=2). The length is 4 complete matrices (130/30=4.33). These 4 matrices will cover only 120 centimeters, which means there are still 10 left. It is important to multiply these 10 centimeters by the number nearby. As a result, there are 20 free centimeters, for which one workpiece is enough. And we multiply the resulting 4 by two rows - 8 matrices.
Thus, for an apron 130 by 60 cm, you will need 9 mosaic blanks measuring 30 by 30.
But it is advisable to always take tiles with a margin of 10–15% , since sometimes defects occur and there are errors in calculations. Or in a few years the mosaic will be damaged and will have to be replaced - in this case, a pre-purchased “spare” will save you. If there are doubts about the accuracy of the calculations, consultants in the store can always double-check the data received.
Nuances
Each type of mosaic tile requires compliance with certain gluing rules.
Let's look at how to glue mosaics on a grid.
The sheet is held with the front side facing you, and the back side is immersed in the adhesive Source colibrimosaic.ru
Gently press it against the wall with a roller or spatula so that the distance between the mosaic squares is the same. Remove any remaining glue and wait until it dries completely.
Important Tips
- To maintain the same distance between parts, cross-shaped dividers are installed in the spaces between the plates. The crosses are then removed before the glue is completely dry.
- You can install the mosaic not only from bottom to top, but also in any direction, since it is light in weight.
- It is recommended to glue decorative panels at temperatures from +10 to +30˚С.
- To prevent mold from forming in the gaps, the surface is treated with a fungicidal coating.
- When cleaning the surface from glue and grout, avoid hard abrasive materials. You may scratch the parts and they will lose their shine.
Recommendations
Knowing how to lay a mosaic correctly, listen to the advice of experienced craftsmen:
- do not press the sheets against the wall with your hands to avoid unevenness;
- to prevent the glue from drying out, the surface area should be no more than nine tiles;
- dilute the glue to a medium consistency, since a thick composition dries quickly, and a liquid one sticks;
- carry out installation at a temperature not exceeding +25 degrees;
- Apply mosaic adhesive on the mesh in a layer of no more than 3 mm, so that excess solution does not complicate the grouting.
Recommendations will help you avoid mistakes.
Mosaic masonry looks both solid and in combination with other materials. Source keram-market.ru
TOP manufacturers
- Axton mosaic adhesive. It is used for interior decoration with mosaics in bathrooms, showers, and kitchens. Axton glue is available in the form of a dry mixture for mixing. Has high adhesion to concrete, brick and plaster.
The diluted mixture is viable for 2 hours. Economical consumption, allows you to apply glue in a layer of up to 5 mm. Axton provides reliable fastening without loosening or falling out of mosaic chips.
Briefly about the main thing
Mosaic tiles allow you to quickly and inexpensively tile the surface of any room. The variety of types makes it possible to choose the best option for different wall surfaces.
The basic requirements for creating a beautiful and durable mosaic are knowledge of what material the tiles are suitable for the room, and what glue to use to glue the mosaic.
Mosaic allows you to implement any design idea at low cost. The cladding looks impressive, and its properties are not inferior to ceramic tiles.
After studying the instructions on how to lay mosaic tiles, you can decorate a bathroom, toilet or other room yourself. It is important to adhere to the rules and recommendations for laying mosaic tiles.
How to use it correctly
Before starting work, cement mixtures must be mixed with a solvent, and in reactive compositions, the base and hardener must be combined. Dispersive ones do not need to be stirred.
The rules of use are the same for almost all adhesives:
- Mix small portions - this is what the masters recommend. Reactive and cement mixtures quickly thicken and become difficult to work with. The density prevents the mass from being evenly distributed, so the decorative elements are laid unevenly.
- Apply the glue to a small area of the wall in a thin layer. After gluing the decorative elements, the adhesive mixture is applied further. Coating large surfaces causes the adhesive to begin to polymerize before the tile is attached. This reduces the quality of adhesion.
- Most cement mixtures are produced in packages of 25 and 5 kg. If you plan to decorate large areas, it is cheaper to buy in large packs.