Do you want to decorate your interior with unusual furniture, but don’t yet have the skills for complex products? Then you should pay attention to tables made of epoxy resin. The result of the work in most cases exceeds all expectations.
This tabletop is quite wear-resistant. The coating is hard, not afraid of mechanical damage, and protects moisture-sensitive materials well from corrosion and rotting. The hardened resin can easily be washed with water, even with household chemicals.
Master class No6. Table stream made of slabs and epoxy
Table-stream made of slabs and epoxy
First, prepare slabs of suitable sizes and shapes. Cut the tree in half as shown in the photo.
Preparation and cutting of the slab
Process the slabs - align them to bring them to the same plane. In the example, a hand router with a circular saw is used for this, as well as a homemade milling machine.
Pre-treatment of slabs
Using a hand router with a disc cutter
As a result, the wood will reveal its structure, the boards will become even and of the same height.
Slabs after pre-treatment
Assemble an airtight mold for pouring. In the example, this is glass covered with film (not the best option); the wood is clamped with clamps.
Assembling a sealed frame for pouring
Prepare epoxy resin according to the manufacturer's instructions.
Preparing epoxy resin for pouring
Added dye to the composition
After this, proceed directly to filling.
Epoxy pouring process
It must be poured in one or several layers, depending on the brand of resin
Another photo of the process
Remove air bubbles using a hair dryer.
Air bubbles are expelled with a hair dryer
Once the resin has hardened, sand it and then polish it.
Grinding hardened resinUsing abrasives of different grain sizesAfter grinding, the surface is polished
Photo of the result of the work
Coat the surface with protective Danish oil. Install the legs (you can use ready-made ones, as in our example).
Ready-made stream table made of slabs and epoxy
Epoxy Resin Selection
Epoxy resin is a synthetic polymer. This material is not used in its pure form. It exhibits its properties only after contact with the hardener.
Depending on the combination of components, you can make resin:
- hard;
- liquid;
- high strength;
- rubbery.
After creating a drawing - project, you can select consumables. When choosing a material, the following characteristics should be taken into account:
- the material must be transparent. Then it will be possible to achieve any visual effect: make a 3 D effect, install lighting, insert any objects;
- life expectancy. The material you choose should harden slowly. This will make it possible to form patterns, ornaments and give the product the desired shape;
- no shrinkage. The material should not lose volume when poured;
- degree of viscosity. A material with low viscosity and good fluidity will fill even the most inaccessible areas and prevent the formation of bubbles inside the product.
Advice. The EpoxyMaster composition has proven itself well, with which you can make a tabletop that is resistant to peeling and cracking.
Fill
A tabletop made of epoxy resin is poured with your own hands using a certain technology. You can learn more about it using the video. Many professionals share their experience by showing a master class. But the algorithm of work can also be described verbally.
- First, solid wood or other decorative elements are laid out. Naturally, if there is a base, it is placed underneath. Please note that some elements may float in the liquid resin, so it is useful to take care of them statically.
- The dye is added to the resin before the hardener. To thoroughly mix the paint you need to use two containers. First, the composition is mixed in one container, then poured into another container and mixed again. This will avoid the presence of unpainted areas, which are usually localized at the bottom of the container. Only after the paint has been completely mixed is the hardener added. It will not be possible to indicate the procedure here, since it is necessary to follow all the recommendations from the instructions for a specific brand of epoxy.
Modern compounds are made using new technologies. They do not tend to form bubbles, but this phenomenon cannot be completely avoided. Even if the wood has been pre-treated and coated with a thin layer of resin, bubbles are common. It can be minimized by layer-by-layer pouring, and you can get rid of bubbles by heating the resin. Don't overdo it. You need to keep an eye on the bubble. As soon as it starts to float, heating should be stopped. An excellent tool is a hair dryer.
Removing bubbles is not a one-time procedure. Even if they are not present at the moment, they may appear after a certain time while the resin is liquid. After pouring the layer, professionals advise periodically heating the resin for 2-3 hours. It is dangerous to use a torch as the epoxy may ignite.
Master class No5. Coffee table made of saw cuts and epoxy resin
To create such a design, prepare sections of wood with a diameter of 10-15 cm (can be the same size or different). This round, neat table will become a true decoration of your living room!
Coffee table made of saw cuts and epoxy resin
To work you will need the following:
- jigsaw or hand saw;
- epoxy;
- bendable plywood (pieces 20 cm wide, their total length should be 100 cm) or, alternatively, plastic corners;
- tree cuts;
- packing tape;
- brushes of different widths;
- a grinding machine or grinder and the corresponding attachment for it;
- scotch;
- “sandpaper” of different grain sizes.
Materials and tools for creating a table
The base in this case is made of branches with a diameter of no more than 15 cm. The branches are pre-cut into sections 10 cm high.
The branches are sawn into equal sections
Step 1. Create a shape from a strip of bendable plywood by connecting the ends with a furniture stapler or tape.
The form is assembled from plywood
Step 2. Place the packaging film on the work table in two layers: place the first inside the plywood circle, and the second behind it. This will create an airtight “bath”.
The film is laid in two layers
Step 3. Place the saw cuts inside the circle, close to each other. Start from the center and gradually move towards the periphery.
The saw cuts have been laid
Step 4. Prepare epoxy resin - mix the components in the required proportion.
Preparing Epoxy Resin
Step 5. Fill. First fill the voids between the cuts, then gradually fill the entire circle, not reaching the edge 0.5 cm.
The assembled base is filled with resin
Step 6. Dry the resin, and the heating should be uniform, without ultraviolet radiation and temperature changes.
The product must dry
Step 7. Perform finishing treatment - remove the film, level the edges, carry out three-stage grinding with three types of abrasives, and finally coat the tabletop with varnish.
The film is removed. The edges of the table top are leveled. The surface must be sanded with three types of abrasive.
Step 8. You can also make the legs from branches, but they are thicker to support the weight. Sand the branches and treat with an antiseptic. Fix the legs with screw fastenings. That's it, the table made from saw cuts is ready!
Tabletop after varnishing. All that remains is to install the legs
Advantages and disadvantages
No material can be called absolutely perfect. The user only chooses which advantages are decisive and which disadvantages he is willing to neglect. Epoxy resin is no exception in terms of material for making furniture, in particular countertops. Some of the properties described earlier can be considered advantages, but they may not be so obvious in context, so here is a more specific list of the pros and cons of the resin. They will help the master choose the right brand, because minimizing shortcomings is on the list of his priority tasks.
The polymer does not shrink. In this regard, everything is extremely simple. Whatever brand of resin the master chooses, he will be able to avoid shrinkage, since this unique quality is inherent in all types of epoxy resins, regardless of the hardener. After pouring the resin, due to its fluidity, it forms a smooth surface. Experienced craftsmen advise using more viscous compounds for the production of jewelry and souvenirs. As for filling countertops, preference should be given to material with low viscosity
The resin should penetrate into the corners of the mold, as well as fill all the cavities of the decorative fillers. It is recommended to handle the surface with care, however, it is quite durable. It is not susceptible to chips and cuts, and recommendations are given to reduce risk factors. Epoxy tables can be installed in any room
The resin is resistant to moisture, because in industry it is used as a material for waterproofing. This is a very important property, since furniture in the kitchen experiences temperature changes and high humidity. The transparency of the resin does not decrease even with prolonged exposure to sunlight. Here the compound looks more advantageous compared to plastic, which turns yellow, cloudy and cracks over time. Finally, it is necessary to note the variability of color design. The high degree of adhesion of the polymer allows you to create various design projects, both in terms of filling and color.
Now let's move on to the disadvantages. They also need to be taken into account when choosing a compound.
- One of the requirements is strict adherence to the proportions of the main component and hardener. This drawback will not in any way affect the procedure for selecting a brand of resin, since all manufacturers impose such a requirement on users.
- If modern jewelry resins are safe even in a liquid state, then when working with epoxy for countertops it is necessary to follow safety rules and use protective equipment. Cured resin does not emit toxins and does not harm health.
- When the resin is cooled sharply during its polymerization, suspensions in the form of flakes are formed, so it is necessary to strictly observe the temperature regime. Usually the resin is preheated to 50°C degrees, but if the flakes appear due to the low temperature in the room, then the finished tabletop needs to be heated and cooled in a less intense way.
Requirements
It should be noted right away that you won’t be able to save on material.
Those resin modifications that are low cost are unlikely to be suitable for creativity, since they do not meet the requirements presented below. Among the technical parameters, the minimum layer thickness is of practical importance. No craftsman needs instant hardening of the resin. After pouring, the compound should have time to fill all the cavities, and air bubbles should come to the surface. In addition, if there is decor, you may need to make some adjustments to its placement. If you take resin in a volume less than recommended, it will begin to set very quickly, which will negatively affect the quality of the product. As a rule, the first layer of resin is used to fix the decor at the base of the tabletop.
Many beginners prefer to choose brands of resins that allow them to fill the countertop in one go, but there is a certain nuance here.
- Firstly, layer-by-layer filling allows you to create three-dimensional images when decorating each layer.
- Secondly, the large volume of resin that has to be poured at one time can cause intense heat generation during curing.
If the master decides to opt for a resin with a maximum layer thickness of 5-6 cm, then preference should be given to those models that have a long lifetime, because it guarantees a low reaction rate of the interaction of the components.
Typically, final curing takes about a day. However, you need to read the instructions to clarify this parameter. The fact is that the next layer can be poured only after the previous layer has completely cured. The remaining selection criteria are related to the cost and popularity of the manufacturer. If the cost is very easy to determine, then the rating of manufacturers and suppliers will have to be studied additionally. It is useful to take advantage of the advice and tips of experienced craftsmen. We will give several examples of popular brands that, in all their parameters, meet the requirements for filling countertops.
How to do it?
Drawing
To make it more convenient for you to make furniture, you should make a drawing in advance. With its presence, you will not make mistakes when working. The drawing should indicate the exact dimensions of the product, the shape of the product, and the design. When choosing these sizes, personal needs and room dimensions are taken into account. When choosing sizes, you can build on both general standards and personal wishes. The main thing is that the product is stable and able to withstand loads.
Tools and materials
Before starting the work process, you must put on:
- special paper painting suit;
- respirator;
- latex gloves;
- headdress (shower cap).
To make a product with decorative elements, you will need the following materials:
- formwork made of plexiglass or plywood;
- decorative elements;
- sandpaper for sanding;
- epoxy resin based adhesive.
Tools you will need:
- scales or measuring cups for diluting materials;
- pliers;
- building level;
- plastic spatula;
- gas burner or hair dryer (to remove air when pouring).
Manufacturing
You can purchase epoxy resin for decorative work in the store in ready-made kits. These kits include both hardener and resin.
Important. The solution must be prepared according to the manufacturer's instructions, observing all proportions. To mix the components you will need:
To mix the components you will need:
- Prepare 2 containers of the required sizes and a stirring stick.
- Next, measure out the required amount of resin and pour the hardener into it.
- Mix the mixture thoroughly until a homogeneous mass is obtained.
Important. If the solution is not mixed well, the mass will not harden well. After preparing the solution, you can begin making the countertop:
After preparing the solution, you can begin making the countertop:
- We place the workpiece strictly horizontally. Otherwise, there will be unevenness and sagging on its surface;
- The mold for filling is cleaned and dried in advance. The work surface should not get wet;
- It is recommended to work with the material at air temperatures above 22 degrees Celsius. But remember, the higher the temperature, the faster the solution will harden;
- If bubbles form inside during pouring, they can be removed using a syringe or cocktail straw.
Solid wood table top
When making a single-color tabletop with a base, the stages of work are as follows:
- Degreasing the working surface. The wood is pre-primed with resin, as it absorbs liquid.
- Next, an epoxy mixture is prepared and poured into the mold.
- After this, leave the furniture for 10-15 minutes. If bubbles appear during work, remove them.
- After 2 days, we grind the surface and polish the product.
- A week later, after the material has completely hardened, the table is ready for use.
Fill with decor
To make a product with decor, you need to prepare a filler. It could be: coins, pebbles, bottle caps, multi-colored sand. The work process takes place in the following sequence:
- Dust is removed from the working surface, degreasing and preliminary painting are carried out if necessary.
- We make the sides at the required height so that the resin does not flow onto the floor. It is recommended to pre-cover the flooring with polyethylene. If resin gets on the floor, it will be extremely difficult to remove.
- Place decor on the base. If it is light in weight, you need to use glue. Otherwise, the decor will simply float under the weight of the resin.
- If the decor has a simple shape and small height, filling can be done in one layer up to 5 mm. If you are pouring large and embossed objects, the pouring is carried out in several stages and with breaks.
- After the resin has hardened, the surface must be sanded and varnished. This will extend the life of the countertop.
Important. Pour resin in a thin stream into one point
This will prevent voids from forming in corners and hard-to-reach places.
DIY table - technology
When combining wood and resin, you also need to pay attention to the wood itself.
Any piece of wood is not suitable for a tabletop; slabs are used for this purpose; these are pieces of expensive wood that are chamber dried. The most popular options are slabs made of oak, poplar, and ash. The species must be a hard wood.
When the material is available, they decide how it will be arranged. And they move on to preparing it. It is necessary to create a flat surface, it is processed with a milling cutter and sanded. Places that will come into contact with the resin must be covered with it. This will seal the holes to prevent air from escaping and causing bubbles to form.
Afterwards you can proceed to pouring the epoxy itself.
During drying, the resin must warm up, those areas where bubbles appear are heated.
Necessary materials
You shouldn’t be distracted when carrying out work, so it’s better to prepare the necessary materials and tools in advance. You will need:
- Epoxy resin;
- A corrector for epoxy resin, it helps to level the surface, or a gas burner, working with it is somewhat more difficult;
- Sealant for formwork processing;
- Separator, either wax, Vaseline, oil;
- Dyes, if necessary, give a different shade to the coating;
- Drill and screws;
- Level;
- Sander;
- Plane;
- Mixer;
- Glue;
- Plastic and materials for the formwork base;
- Containers for preparing the composition.
You shouldn’t be distracted when carrying out work, so it’s better to prepare the necessary materials and tools in advance.
Preparation of epoxy
Manufacturers include instructions with their products on how to prepare them for use. Preparation is carried out immediately before starting work. You must strictly follow the specified proportions and rules. Typically the composition consists of two components: resin and hardener.
After thoroughly mixing the components, you can proceed to adding the hardener. Mixing is best done by hand; the components should be well mixed. In this process, bubbles may also appear; they are removed using a hair dryer, and this is done carefully.
Different viscosities are used for different types of tables:
- Liquid, drains easily, can fill all cavities, intended for coating using decorative elements;
- Semi-liquid is suitable for round countertops;
- Thick, used only for restoration work on vertical surfaces.
Preparation is carried out immediately before starting work.
Manufacturing process
The first step is to prepare a form into which the composition will be poured. For this purpose, he uses any type of smooth sheets; they are made higher than the thickness of the wooden parts, connect them together with sealant, carefully covering the joints so that the resin does not leak out through them.
Having placed all the necessary elements on the surface in the intended places, they proceed directly to pouring the resin. After all, it hardens quickly. You need to pour the prepared solution starting from the middle, so it will be evenly distributed over the surface. If the table is made large, then the filling is expanded. After filling the entire composition, it is leveled using a trowel. After leveling, leave the product to dry.
You need to pour the prepared solution starting from the middle, so it will be evenly distributed over the surface.
Difficulties
The theoretical description of any process always seems elementary, but when it comes to practice, certain difficulties arise. It’s good if the master knows about all the nuances in advance. After all, unexpected difficulties can slow down the process, and in some cases this will lead to damage to the material.
The first snag that awaits the novice master is the production of high-quality formwork. It is necessary to understand that a viscous resin still remains fluid. All cracks must be properly sealed. If the epoxy starts to flow out of the mold, then the process cannot be reversed, that is, there is only one chance to fill it. In this case, the sides of the formwork must be strictly horizontal.
When mixing the main component with the hardener, it is important to obtain a uniform mixture. Otherwise, zones with different densities are formed
Uneven curing or areas of liquid resin will negatively impact both the appearance and durability of the countertop.
Some sources contain recommendations for pouring, which indicate that in order to obtain a slab of the correct geometric shape, you need to pour resin over the entire area, and if necessary, push the elevations into the corners with a spatula. In fact, the filling technology is fundamentally different from the recommended one. First, you should moisten the corners with resin so that no air cavities form in them when pouring. Resin is poured into one point. It is useful to use a stick; one end of it is placed in the mold, and the composition is poured over the stick.
The real problem is the appearance of air bubbles. You won’t be able to avoid this, but you can reduce their number and effectively deal with the remainder. An area of resin is heated with a hairdryer and bubbles come to the surface.
The entire procedure should be carried out with extreme caution so as not to provoke even more bubbles.
Wood and epoxy resin table top for living room
Is an epoxy resin table appropriate for a living room? Of course, but only if it matches the interior as a whole. Yes, and there are some special requirements for the table in the living room. They are as follows:
Epoxy resin tables are often placed in living rooms because their glossy surface helps create a festive atmosphere.
- Quite large sizes. It is supposed to seat at least several people.
- Ergonomic shape. Protrusions that maintain natural lines add originality, but sitting in such a part of the table is uncomfortable.
- The design of the chairs should match the appearance of the table and form a single composition with it. This requirement is aggravated by the fact that such tables are not covered with tablecloths.
Making tables from epoxy resin for living rooms is also acceptable because it can create a glossy surface that helps create a festive atmosphere.
It is better if the table in the living room has straight lines around the perimeter. As decoration, it is appropriate to use a blurred pattern of epoxy inserts, as well as a bright one-color design that harmonizes with other shades in the room or is an interior accent.
The following requirements are imposed on the table in the living room: large size, ergonomic shape, design must match the interior
Ornaments will decorate the living room table in an interesting way. The manufacturing process of such products is somewhat more complicated, since the voids should not have arbitrary, but specific sizes and locations.
The highlight of the room design: an epoxy resin table with lighting
Epoxy resin without additives is an almost amorphous substance. Only additional components make it an excellent creative material. In addition to the ability to change colors and shades, epoxy resin can turn into a luminous material.
Related article:
Illuminated furniture pieces are appropriate in any interior and rooms with various purposes. The living room table will become bright and festive, an illuminated dressing table will add intimacy to the bedroom environment, a kitchen countertop with luminous end parts will add a lively touch to the everyday functionality of the work area.
Tables made of epoxy resin with lighting will look appropriate in any interior and room
Making tables made of wood and epoxy resin with lighting does not require the use of complex technologies. In addition to the hardener, you must purchase luminescent powder. The desired glow intensity can be achieved by changing the proportion of powder and resin: the more luminescent additive, the brighter the glow.
There should not be an excess of luminous material, it is annoying. Therefore, tabletops with a large illuminated area are appropriate only for infrequent use and to create a special atmosphere. In the interior of living rooms, small lighting is preferable.
Filled shallow cracks, the outer sides of the tabletops, leveled with luminous material, will ensure sufficient decorativeness of the products.
Original and fashionable trend: river table made of epoxy resin
A fairly popular product is a river table made of epoxy resin. The price of the models depends on the quality of the solid wood used, the amount of epoxy material consumed and the manufacturing technology. There are a lot of design options. It can be a narrow river insert, or a wide one, with islands, complemented by decorative object elements. The basis of any composition is the same arrangement of the tabletop parts: wooden inserts along the edges, between which epoxy fill is placed.
River tables made of epoxy resin are especially popular.
The high price often forces you to start making such a table yourself.
When creating a model, you should pay attention to the following points:
- The surface of the boards must be perfectly flat. “Helicopters” will make a product that is not only unaesthetic, but also functionally inconvenient.
- It is necessary to make a test dose when coloring the resin. An unsuccessful color can not only disappoint, but also simply not correspond to the decorative idea.
- When making a river table from epoxy resin with your own hands using decorative parts, it is necessary to fix light elements, otherwise they will float when pouring.
- Any bubbles that form should be removed by piercing them with a needle.
The high price of such a product as a river table forces you to start making it yourself
Creative decor ideas
A popular option is a river with filling. Most often, the base is wooden slabs. A solution is poured between them, forming a river between the two banks. The maximum effect is achieved by adding blue dye to the solution.
The slabs can be replaced with saw cuts with unevenness, knots, and cracks. The disadvantages of wood after pouring turn into advantages. Products with a marine theme are also created. The filling is seaweed, pebbles, and shells. Even more original decor is made from photos or other color images. The pictures are glued, filling starts from the center.
The most spectacular luminous models, during the production of which a phosphor is added to the solution (in a ratio of 1x3). In the dark, the areas between the decorative elements create a magical effect.
Features of working with resin
- When working with epoxy resin, you must strictly adhere to the proportions of components specified by the manufacturer.
- The room should be dry. Do not allow moisture to get into the resin so as not to spoil the product. The optimal temperature for work is +22 °C. When the temperature drops sharply, white flakes appear in the pour. Therefore, temperature changes must be avoided until the resin is completely dry. Do not work with the material at low temperatures, as the resin may delaminate.
- The colder the room, the thicker and more difficult the material to work with. The higher the room temperature, the faster the resin hardens.
Expert opinion Daniil Dmitrievich Korzhavin Designer of stylish home furniture
Do not speed up the drying process. If you heat the surface from above, the tabletop may become deformed.
- Mix the hardener with the resin slowly and carefully. Active stirring can lead to the formation of air bubbles in the mixture, which are difficult to get rid of.
- The components must be connected carefully. If the mass is not uniform, then poorly hardened areas and sticky spots will form on the countertop. To prevent this from happening, craftsmen recommend pouring the resin from one container to another several times. In this case, you need to mix the mass in the thickness, trying not to lift the tool to the surface.
- If bubbles do appear, you can get rid of them. While the resin has not hardened, the problem area is heated with a construction hairdryer.
- Cloudiness can also be eliminated. Thus, masters claim that the mass becomes transparent again, as soon as it is heated to a temperature of 60 °C.
- Experts recommend mixing no more than 1–5 kg of resin at a time (depending on the size of the table). A large volume of working solution can harden directly in the bucket in a matter of minutes. It is recommended to use only modern hardeners such as Etal-45M.
Industrial uses of epoxy
The permanent emergence of new chemical compositions significantly expands the scope of use of epoxy. With its help, it has now become possible not only to glue large objects together, but also to make replacements for metal parts in different designs from it, which will significantly reduce both the cost and weight of the product.
The main areas of application include:
- Manufacturing of composite objects. Fiberglass and carbon fiber are made in a similar way by impregnating synthetic fabric with resin. Afterwards, these materials can be actively used in object-oriented modeling, when creating cars, airplanes, ships, and missiles.
- Furniture manufacture. These can be both ordinary options (for example, kitchen countertops), and real exclusive household decor (slab tables and countertops, artificial rivers and waterfalls, etc.)
- Production of waterproofing/electrical insulating materials. The resin acts as a dielectric and is also waterproof.
- Making jewelry and jewelry work. Resin jewelry looks great and is inexpensive.
- Repair and installation work. Using resin, you can treat a cracked tabletop, renew a floor, repair a small boat (a leak in a wooden fishing boat), patch up a car body, etc.
Working with resin is many times easier than working with ceramics/metal.
Master class No1. Beautiful coffee table made of epoxy resin
Stylish coffee table made of epoxy resin
Step 1. So, to prepare the composition you will need 2 components - a base (“A”) and a hardener (“B”). First of all, be sure to read the manufacturer's instructions.
The photo shows the base component (“A”), which must be mixed with the hardener
Step 2. It is also better to check the transparency of the composition before starting work. Make a test sample and place a piece of transparent glass in it. If it merges with the resin, then it has satisfactory transparency.
A piece of glass is immersed in transparent resin
Step 3. It is better not to use a mixer for mixing (except at the lowest speed) to avoid the appearance of bubbles; instead, use a clean stick. Mix the components as much as indicated in the instructions.
Using the corrector, you can remove cosmetic defects (bubbles and sagging) from the surface of the product without using a hair dryer or burnerStep 4. Before mixing, find the maximum thickness of one layer of fill in the instructions. Usually this is 5-10 mm, although there are also modern types of compositions that are poured with a layer of less than 5 mm. Also note that the temperature should be room temperature and humidity should be a maximum of 70%. Be sure to use a respirator while working to avoid inhaling fumes from the material.
Thickness of epoxy resin filling layer
Step 5. Use a release wax or similar product that will allow you to disassemble the mold once the resin has set.
Release wax will help you disassemble the mold
Step 6. If necessary, you can use dyes, but remember that different manufacturers have different shades (follow the recommendations in the instructions). Distribute the dye evenly throughout the composition.
It is important that the paint is evenly distributed throughout the composition
Step 7. Prepare the mold for pouring. Epoxy resin is very fluid, so seal the seams with silicone caulk.
Sealing mold seams with silicone sealant
Step 8. Maintain the correct ratio of components - the normal thickness of the composition depends on this.
When mixing components, observe the proportions
Step 9. If you prepared the solution correctly, it will turn out to be slightly thicker than water.
If the solution is prepared correctly, it will be only slightly thicker than water
Step 10. Assemble the base of the future structure. In our example, it has a rather complex configuration, but you can use a simpler design with four legs.
Assembling the table base
Step 11. The height of the mold should be 5 mm greater than the thickness of the future countertop. Let us once again remind you of the need to carefully seal all joints.
Table top mold
Step 12. Pre-coat the wood with several layers of varnish so that after pouring no air escapes from it. Wait until the varnish is completely dry.
Wood must be prepared in advance
Step 13: Pour resin to the desired thickness (in one or more layers if required).
Pouring epoxy resin
Step 14. After 3-7 days, dismantle the mold (the specific time depends on the number of layers).
The form is dismantled
Step 15: Sand using a sander and 800 to 1500 grit sandpaper. Then polish the tabletop with a felt pad.
Sanding the finished countertop
Step 16. Attach the tabletop to the base according to the design features of the table.
At the end the tabletop is attached to the base
Instructions for making a table top
Inside the frame, the elements that will form the tabletop are laid out on the film - wood, chipboard, plywood, metal. If you plan to coat them with epoxy resin, then they should be lower than the sides of the formwork.
Next, the resin is poured, starting from the center. The composition spreads over the form under its own weight. If necessary, carefully level the surface with a clean, dry spatula.
1-Pouring the epoxy resin 2-Drying the resin 3-Sanding the product 4-Final finishing
Leave the first layer until completely dry. This may take up to several days. The top of the mold is covered with film to prevent dust or other debris from entering. When the layer has completely hardened, repeat pouring and drying until the desired thickness is formed.
Complete polymerization of epoxy resin occurs in approximately 24 hours. This depends on the thickness of the layer and the properties of the hardener. Therefore, gradual filling takes a lot of time.
Next, they move on to sanding to get rid of irregularities. Although some manufacturers produce products that do not need to be processed after hardening (this should be indicated in the manufacturer's instructions).
Coarse sandpaper
Fine sandpaper
Grind the hardened resin with waterproof sandpaper with a coarse grain, and finally with the finest dusting. Recommended skin numbers are from 80 to 2000. The stove is watered all the time. Then finishing is carried out with abrasive pastes.
The next stage is finishing. Standard coatings are applied to wood - protective impregnations, waxes, varnishes. The part of the tabletop formed with epoxy resin must be covered with film or mounting tape.
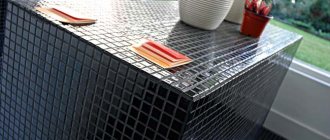
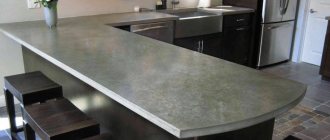
Epoxy resin table: types and design features
Most often, countertops are made using epoxy resin. The most popular design options for such products.
| View | Image | Description |
| Baseless transparent type designs | To make these tables, resin is poured into a mold. The result is a transparent tabletop. | |
| With a base made of natural wood or chipboard | In this embodiment, the resin protects the main surface from moisture and mechanical damage. | |
| Combined | The use of pouring and natural wood in various combinations and combinations is a favorite design technique. |
Let's look at the features of the listed varieties of epoxy countertops.
Transparent structures without supporting surface
For the manufacture of such structures, a casting mold is used. It can have the most bizarre geometry - the more complex, the more interesting. These countertops are most often used to create coffee or coffee tables. Craftsmen use built-in neon lighting and add inclusions of natural materials to the fill. Adding water to the filling looks especially impressive - you get real “cosmic” objects. Considering the lack of a base, you need to treat tables made of liquid glass with care and not subject them to excessive load.
Interesting ideas for countertops made of wood and epoxy resin
Epoxy does not necessarily have to be colorless - to decorate furniture it can be tinted or even made matte. Moreover, all inclusions in such a product will be clearly visible even through a thick layer of chemical glass. An interesting idea is the use of luminescent dyes. The surface of a base, such as a tree branch, is treated with a substance that can glow in the dark. After pouring, you get a very original product.
A favorite technique of designers is to frame a wooden tabletop with epoxy filling. Even boards from old boxes can be used as a base.
An original design option is obtained if you use laminated chipboard with a marbled coating as the base. No less impressive are paintings and still lifes, which are used as the basis for filling the tabletop. In short, the design options are endless. Epoxy resin allows you to create and imagine – this is its main advantage. Here are just a few photographic examples of tables made of epoxy resin and wood.
Related article:
Wooden tables with epoxy resin coating and different fillings
By adding various decorative elements underneath the filling, interior artists achieve amazing effects.
You can achieve the same effect using as a basis drawings and ornaments made from natural materials: shells, dried flowers, colored pebbles, cones
You can use a collection of coins or grandma's buttons, a set of tools, or just a scattering of bolts and nuts. A dilapidated tree looks especially colorful in such a fill: a rotten stump covered with moss, sun-scorched boards or a piece of log bleached by sea water. All these things will be frozen in resin forever, like prehistoric midges in amber.
As decoration you can use river pebbles, marble chips, a scattering of beads and sparkles.
What tables made of slab and epoxy resin look like
A slab is a solid solid slab. Can be stone or wood. In our case, a stone slab is too heavy a base for a table. But wood is an excellent base for a tabletop. How to determine a slab:
- This is a longitudinal cut with raw edges;
- wood thickness – from 5 to 15 cm;
- The solid wood is solid, without gluing or other joints.
A cut from a large trunk demonstrates a rich texture and intricate pattern
Such massive elements are preserved in their original beauty with all the knots and uneven contours. Nowadays such products are in trend, and many designers use them in interior compositions. Fortunately, now it’s not so difficult to buy a countertop made of epoxy resin or order it individually from a good craftsman.
Epoxy resin table in the shape of a river
One of the most popular forms is a tabletop with an epoxy insert in the shape of a river. A special highlight of this type of product is given by the uneven edges on the two wooden parts. Previously, such tables were made with colored glass, but now epoxy has finally replaced this technology. Such tables can be round, rectangular, oval or square - the filling allows you to use any shape and size. In the depths of the “river”, craftsmen place sand, stones and shells, and the filling itself is painted in blue tones. It turns out very picturesque, check out these examples.
Good in any interior
Epoxy resins are oligomers that, when mixed with hardeners, form cross-linked polymers. The material is resistant to halogens, some acids, and alkalis. It is used to prepare glue, plastics, varnishes, plastic cements and other materials. Recently, epoxy has been increasingly used in craft furniture production.
There are few disadvantages to using an epoxy countertop. For example, there is no need to subject the hardened resin to prolonged heating to avoid melting. Another drawback is the presence of toxic substances in the composition. Therefore, some craftsmen advise opening homemade furniture with varnish in order to bind toxic substances and prevent them from getting into the air.
Their epoxy resin tables come in several types:
- with a board (plywood) base - resin is used as a decorative layer and to protect the wood;
- entirely made of epoxy resin - such countertops can withstand minimal loads (for example, coffee tables);
- combined - resin inserts are combined with wood, metal, and other materials.
Furniture pieces with a partially or completely resin tabletop look especially impressive. Translucent material transmits light well. Therefore, LED lamps or strips are often built inside to create an additional light source. It will not replace a chandelier, but as a night light or decorative lighting it justifies itself and looks very impressive, especially in the evening.
The resin is used both in its pure form and with various fillers - shimmer, color, phosphor. Thanks to additional components, you can create the most unusual effects - a starry sky, a flowing stream, a stone or mineral surface.
In addition, a wide variety of decor is used. These could be coins, photographs, or just beautiful images. Dry plants and insects are placed inside: the resin acts as a good preservative: the organic matter underneath does not deteriorate and retains its color for a long time.
Epoxy table goes with most popular styles. Furniture combined with wood will easily fit into country, loft, modern, fusion, boho, bauhas, grunge, kitsch, minimalism. Models with metal look organically in industrial, rustic, steampunk, futurism, techno, etc. spaces.