A shelf is a functional decor for any interior and an excellent way to organize space. Separate and combined products make it possible to conveniently store a wide variety of items: books, dishes, souvenirs, audio, video equipment, etc. You can make a glass shelf to accommodate any stylistic direction. This material does not burden the space at all, allows sunlight to pass through, allowing the most efficient use of natural and artificial lighting.
Glass has a number of undeniable advantages:
- Environmentally friendly, hygienic material that is easy to wash and disinfect. It can be used in the manufacture of glass shelves for the bathroom, kitchen, and on a closed loggia.
- Does not absorb foreign odors.
- It does not lose its original characteristics for a long time, retains its transparency and desired shape.
- Insensitive to moisture and sunlight.
- Thick glass, like triplex, can withstand increased loads, for example, the weight of a TV or other home appliances.
- Glass products have a beautiful appearance.
- Low cost of material.
The use of lights or special holders that attach the shelf to the wall creates the impression that objects located on a transparent surface are floating in space. This effect allows you to make a small room more spacious and adds charm and lightness to the atmosphere. A relative disadvantage of the material is its fragility, but this phenomenon can be successfully combated by using triplex or making hanging shelves from plexiglass. Experts do not recommend installing any glass structures in children's rooms.
Simple glass shelf
Glass shelves can be installed almost anywhere: on a wall, a windowsill, or they can fill a corner of a room. With the help of professionals or with your own hands using a special tool, glass is given different shapes: from rectangular or round to more complex shapes. A small simple glass shelf is always useful for placing shampoo, toothbrush, soap in the bathroom, and in the living room you can put photos of loved ones on it, souvenirs reminiscent of memorable dates, interesting places.
Important information
Experts advise that when starting to select a material, design and independently manufacture a glass shelf, you should take into account some important facts:
- When cutting glass, the result may have an error of 1 mm.
- The edges of the product must be polished.
- When choosing mounting hardware, you need to take into account the thickness of the glass used (ranging from 4 to 10 mm).
- If possible, use tempered glass. It is not dangerous, as it is almost 5 times stronger than usual.
What you need to prepare for work
To make your own glass shelves, you need to purchase materials and tools in advance:
- Glass about 7 mm thick. Depending on the interior of the room, you can choose tempered, colored, black, gray, bronze, matte (or satin), transparent glass with printing or with a sandblasted pattern.
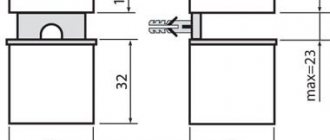
- Fastening elements. A popular model of devices is the “pelican”. You need to buy 2 of them per 1 transverse element. This project will use a metal profile.
- Glass cutter.
- Drill.
- A grinder with a grinding wheel attachment.
- Building level.
- File.
- Duct tape.
- Polishing paste.
- Scissors.
- Roulette.
- Ruler.
- Pencil.
- Cardboard for the template.
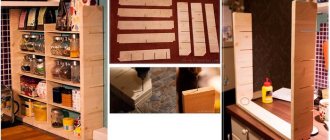
Work order
You need to start by preparing a template for one or more shelves (if they are of different sizes and shapes). Before making a cardboard model, you need to determine the exact dimensions of the shelf and the configuration of the wall surface. This will ensure optimal fit of the product during installation.
- Draw and cut out the template to full size. Slightly round the corners of the shelf where it meets the wall.
- Clean the glass from dirt. Use regular detergents for this material. Check: the glass should be at room temperature during operation.
- Cover the flat working surface with a cloth (rag) and place the glass on top of it.
- Place the template on the glass. Using a glass cutter, cut a piece of the required size under the ruler.
- Wear cloth gloves before you begin finishing the edges. Clean the contours of the shelf using a file dipped in kerosene (turpentine).
- To sand the edges, use a grinder with a grinding wheel. Then polish the edges with a grinder and a felt wheel using polishing paste.
- Select a location on the wall where the shelf will be installed. It should be smooth. Using a building level, mark the location for the shelf on the wall with a horizontal line. Mark the locations for fasteners.
- To install the fasteners into the wall, drill holes.
- Using an aluminum profile, check the correct marks for the fasteners.
- Insert dowels into the holes.
- Insert the bracket into the drill in place of the drill.
- Install the screws into the dowels. Place washers on the protruding parts of the screws.
- Screw the brackets onto the wall screws.
- Use a level to check that the brackets are installed correctly.
- Attach duct tape to the back edge of each shelf. This will protect the glass from friction against the metal parts of the fasteners.
- Place the glass on the holders. To prevent it from slipping, put special rubber tires on the metal parts.
Preparation of tools and materials
Before starting assembly, prepare the following accessories:
- Fastening elements (screws);
- Screwdrivers or screwdriver;
- Jigsaw for cutting material;
- Level and roulette;
- Drawing tools (pencil, chalk).
Beginners should know what a rack can be made from; for this you will need:
- Beam;
- Reiki;
- Shelves.
The selection of materials for the future shelving is done taking into account climatic conditions and purpose. The location of such structures in damp areas will cause corrosion of metal elements, and the wooden base will begin to rot. To avoid such phenomena, you should use varnish and other protective coatings.
If you plan to use MDF or chipboard for shelves, then the material must be sawn before processing. You can do the procedure yourself using a jigsaw.
In the absence of tools, cutting is done in special stores. Many materials are suitable for making shelves: cut boards, thick glass, plywood, plastic.
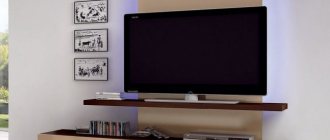
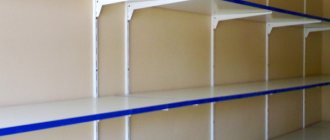
Glass shelves on the wall with lighting
When installing a glass shelf in an aluminum profile, which is located along the wall, it is possible to decorate the product with LED lighting. The design will take on an original look, which will become the accent of a modern minimalist or high-tech interior.
- When purchasing a metal holder, be sure to ensure that the size of the groove for installing glass matches the thickness of the shelf.
- Cut the profile to the length of the glass shelf blank. Remove burrs from the cut areas so that they do not become an obstacle when attaching the LEDs.
- Attach the profile to the wall with screws. Prepare markings for wall mounts. Prepare the holes. Place dowels in them. Attach the profile with screws, installing them in the hole of the dowels.
- The profile, which is fixed to the wall, already contains a plastic spacer tape. It protects the LED from touching the aluminum profile to prevent short circuits. Place the LED strip on top of the plastic spacer. This task requires accuracy and attention.
- All that remains is to place the glass in the groove of the profile. Experts advise using a rubber hammer to facilitate this process - lightly tap the glass into the groove of the aluminum holder.
Your fantastic shelf is ready!
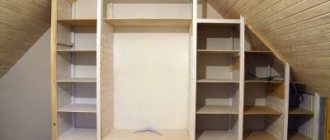
Preparatory activities
Before you build a rack with your own hands, you need to do the following:
- Choose a place where it will stand.
- Measure the length , width and height of the free space.
- Come up with the shape of the rack and sketch it. If it’s a garage, balcony or storage room, then you don’t have to be particularly sophisticated; the rack can be made in a regular shape, standard sizes, it all depends on the capabilities of the room. To save space, it is better to make it up to the ceiling.
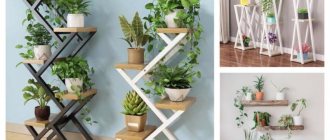
For residential premises, the shape of the rack can be different, it all depends on your imagination and skill.
DIY racks for cans.
- Decide on the items that will be placed on the shelves; their sizes depend on this.
If you decide to make a rack for cans with your own hands, then a shelf width of 25–30 cm will be sufficient; for larger items, the size increases in accordance with their volume.
The length of the shelves is also calculated based on the weight of the stored items: shelves up to 150 cm are suitable for light items, and for heavy items (for example, books), it is recommended to make the length no more than 90 cm to avoid sagging. It is better to use steel frames for metal tools.
- Select and prepare the material from which the rack will be made . Wooden frames must be made from dry, planed boards and bars of the correct geometric and linear dimensions (see How to make a rack from bars with your own hands). For shelves, you can take plywood, boards, plastic, glass, laminated chipboard or MDF panels, but at home these materials are difficult to cut efficiently and accurately to size; it is better to contact a specialist.
- Prepare the tools and fasteners necessary for the job. You will need: a jigsaw or hacksaw, a screwdriver, dowels or screws, a tape measure, a level.
Important! The material is prepared taking into account operating conditions: for wet rooms (bathroom, cellar, balcony, etc.), it is recommended to coat wooden parts with antiseptic and water-repellent compounds, and metal with an anti-corrosion agent.
Advantages of plexiglass
A good material for wall and floor shelves is plexiglass. It is a transparent plastic that looks like glass. Plexiglas has a number of advantages:
- Safer (compared to glass), durable and impact-resistant.
- Has little weight. 2 times lighter than glass.
- Has high thermal insulation characteristics.
- Easy to process and polish with special paste.
- Can be cut into elements of the desired shape and size with a hand saw or jigsaw.
- Acrylic blanks can be given the desired shape by bending. To do this, heat the bend area with a hair dryer (on one side only). Gently bend and leave to cool for 5-6 hours.
That is why almost everyone is able to make plexiglass shelves with their own hands for an apartment or office.
It is best to glue plexiglass parts with dichloroethane. But since this substance is toxic, precautions should be taken. The disadvantages of acrylic products also include (compared to glass shelves) high price and ability to burn.
Shelving in the interior
A rather practical question is where the rack can be used. There are a lot of options:
- In the kitchen and dining room for storing dishes, kitchen utensils, and household appliances. Separately, a closed compartment can be added to the rear wall of the structure to accommodate cleaning equipment.
- In the living room for arranging a home library.
- In a children's bedroom, the rack can be used as shelves for toys and school stationery.
Shelves with attractive decor can be used as furniture for zoning a room, for example, separating a kitchen from a living room in studio apartments.
When combining a kitchen and an insulated loggia, a miniature shelving unit allows you to focus attention on each of the resulting areas (for example, a dining and working area). Using step-by-step instructions, you can make a practical shelving unit for your garage with your own hands.
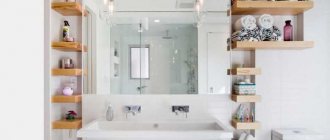
Plexiglas shelf
Like a glass shelf, an acrylic shelf is an ideal product for the bathroom. It is not afraid of moisture, fungus, is easy to clean and looks aesthetically pleasing. Even in the smallest bathroom there is room for a three-tier corner structure. Here you can place shampoo, soap and other hygiene products.
To make such a shelf from plexiglass yourself, you need to prepare. Buy:
- Plexiglas sheet. When choosing a material, give preference to a denser one. Proceed to cutting after making a pattern from cardboard and choosing the place where the shelf will be mounted.
- Level. Allows you to attach the plexiglass shelf to the wall as smoothly as possible.
- Electric drill. Needed to attach the shelf to the wall.
- Accessories. You will need screws, dowels, and shelf holders.
- Electric jigsaw for cutting material.
- Screws for fastening the shelf parts. Choose fittings with a special coating that can protect the metal from high humidity.
- Screws with dowels for mounting the shelf.
- Thick cardboard for making patterns for shelf parts.
- Building level.
- Ruler.
- Pencil.
Disadvantages of shelves
Glass shelves, like any other design, have their drawbacks. Among them, it is worth highlighting the following two:
- For example, the overall simplicity and transparency of the shelf is a drawback for some. For example, if you place books on such a stand, the glass will be practically invisible. Some people think this is quite bad.
- The second disadvantage is, of course, the fragility of the structure. However, it is immediately worth noting that it does not appear too often, but still occurs. While the same wooden structures are almost impossible to damage. Glass, in turn, can be damaged not only by breaking it, but also, for example, by scratching it with some object. This also discourages many from placing just such structures.
How to connect power to an LED strip with your own hands
The tape is usually sold in 5 m reels with lighting effects in different colors. Such a large length is usually cut off, and only then connected to the electrical wiring. In our case, you will need 60 cm of tape along the length of the product.
You can connect it using an LED connector. This is the fastest and easiest way to connect wires to the tape contact - you just connect the contacts and snap the cover. If you choose an LED with several wires, then each of them needs a separate connector.