Knit a cover for a stool: what is needed for this
If you are thinking about knitting seats, you should decide on the reason for their creation. What function they should perform determines what shape, threads and style to choose in the final result.
Hand-made products will help add individuality to the environment.
Functions and nuances that are worth considering:
- Camouflage function. Sometimes it happens that furniture acquires a certain defect. To hide the flaws of a stool or even a sofa, you can use homemade capes and covers with a back. In order for the future product to fully cope with its purpose, it is worth considering in advance the size and density of the weaving, so that in the final result the defect will not be visible through the cape.
In such a situation, there is an original way out - to make a chair cover. - Decorative function. If your goal is to create a product “for the soul,” one that will attract the eye and complement the interior, then you need to first of all include the designer’s thinking. In this case, the harmony of the color scheme with the surrounding objects and walls is important, as well as such nuances as ornaments and patterns, which can become the highlight of any style.
DIY knitted cover for a stool for the kitchen. - Comfort function. If the stool is too hard, or, conversely, the sofa is leaky, and because of this it is too soft and low to sit on, then with the help of a seat it is quite possible to smooth out the situation. In order for the product to cope with this, you need to choose the appropriate quality of threads, pay attention to their thickness and weaving density, the number of layers.
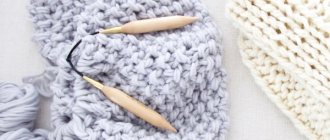
If there are no balls in the house, you can buy yarn.
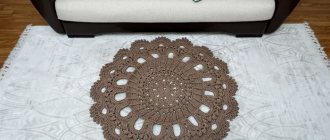
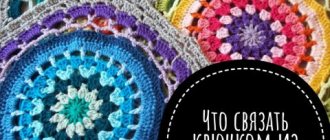
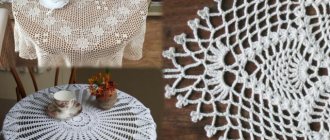
Trying to make an unusual round rug in a master class
A round rug can easily be placed on a square chair and this will not spoil it in any way, so this shape is preferable to a square one.
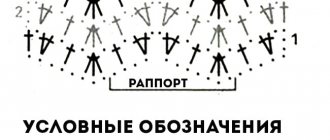
Let's look at two diagrams and descriptions.
Knitting density: 10 cm width = 7 stitches with double yarn.
For lifting the first column.s/nak. replace with v.p., st. s/2nk. – on 4 v.p.
Lush stitch - knit an unknitted stitch.s/2nak. (there are 2 loops on the hook) - twice in one loop, you get 3 loops on the hook, and we knit everything in one pass.
A knitted rug according to this description will measure about 38 cm.
- We connect 4 vp in a circle, the second row 10 b/c.
- Next 2 columns/2nak. in one loop in a circle.
- 1 column b/nak., 2 column b/nak. in one loop - the whole row.
- Then a row of 2 lush pillars. in one loop, ch 3, skip 2 loops.
- Then 1 column b/nak. x 2 times, 3 columns b/nak. into the arch of the bottom row - in a circle.
- 2 columns/2pok. in one loop, 1 post/2nd. x 4 times – and so on.
- Last row – 1 column b/n., 1 v.p., 1 column b/n. x 3 times, 1 vp, 1 column b/n. x 2 times.
The knitting pattern can be seen below.
The product according to this scheme will have a diameter of about 51 cm.
- We dial 4 v.p. and connect them in a circle, knit the second row 12 stitches.
- Then 2 columns/2nak. into each pillar.
- Further in a circle, 1 column b/nak., 2 columns b/nak. in one loop, 1 column b/nak., 2 column b/nak. in one loop.
- Next circle: 2 columns/2k. in one column., 1 column.s/2nak. x 2 times, 2 columns/2k. in one column., 1 column.s/2nak. x 2 times, etc.
- Then circle: 1 column b/nak. x 3 times, 2 columns b / nak. in one loop, 1 column b/nak. x 4 times and repeat further.
- Lush column, 3 ch, skip 3 loops, 2 lush columns. in one column, 3 ch, skip 3 loops, fluffy column. and further in a circle.
- 1 column b/n., 4 columns b/n. in the arch of the bottom row, 1 column b/nak. x 2 times, 4 columns b/nak. in the arch, 1 column b/nak. - round.
- Then the row is 1 column/s/2k. x 11 times, 2 columns/2k. in one loop.
- Next 1 column b/nak. x 6 times, (1 st. b/n., 1 v.p., 1 st. b/n.) in one loop, 1 st. b/n. x 6 times. etc.
The products are ready, you can try them on. Of course, sizes may change after washing, so take this factor into account when knitting.
As you can see, there is nothing complicated about this and, if you follow all the instructions, you will get a nice seat for the chair.
If you have experience in knitting, you can make a chair cover from individual motifs. It looks very nice, but requires a little more effort.
Rugs crocheted or knitted bring not only aesthetic pleasure, they can also hide the shortcomings of chairs or armchairs well. Thus, by replacing old seats with new ones, you can periodically change the decor in your home and update the interior.
Tips for beginners
Experienced craftsmen who have been knitting for a long time and know many tricks that will help you spend less money and time on a product and at the same time make it as beautiful and durable as possible. What should a beginner pay attention to?
A set of identical covers for stools, made by yourself.
The basis
To preserve the finished product for as long as possible, it should be based on a dense base. The lining fabric will help not to lose the beauty of its appearance over time and will not allow it to spread out and become shapeless.
Knitted covers for stools in the same style.
Leftover yarn
To create one cape, it is not necessary to buy new skeins of thread. Use the remains in a wide variety of variations and, perhaps, such a work of abstract art will become the most original detail of your home interior.
Knitted round seat cover.
Border
If a novice needlewoman miscalculates in determining the size of the future product and misses by a smaller margin, such a cape can be modified by tying several rows of borders.
Knitting methods
What the final product will look like depends primarily on the knitting method. If you need a thinner and airier fabric, use a crochet hook. If you have planned a voluminous stuffed blanket, pick up your knitting needles.
There are many instructions on the Internet, follow them and you will succeed.
Each subsequent required type of loop can be examined and studied in detail in the diagrams used.
What threads to take?
It is better not to choose pure cotton. It quickly deforms. Choose either a yarn that combines natural and artificial threads, or pure synthetics.
The main thing is to learn how to knit simple pattern elements, which are made from chain loops, simple stitches, and stitches with slip stitches.
Thick napkins, which should become an insulating layer on a bare stool, should be made from wool yarn.
The thickness of the threads should be large enough. It is worth considering the knitting method. If the product is crocheted with your own hands, the threads should not be too thick.
For knitting covers for chairs and stools, you don’t have to limit yourself in the thickness of the yarn.
If the pattern for knitting pillows on a stool involves the use of threads of different colors, their type and brand should still be the same. This will help avoid height changes.
With bumps
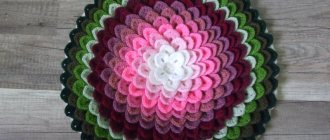
This funny rug looks larger than a regular one and retains heat better. It will fit perfectly into the nursery environment, giving it comfort and originality. To make such a product:
- A column is made and several double crochets are knitted from it. It should turn out that they have the same vertex.
- There should be as many double crochets as there are segments of the carpet.
- Each column is knitted with a zigzag from the beginning of the next row.
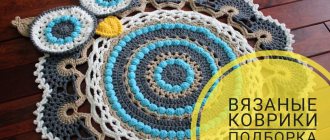
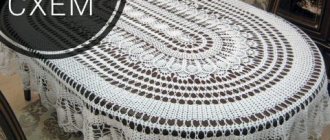
Crocheted rugs for stools: patterns and descriptions
Next, we present a division into subcategories, which will certainly help you decide what shape to choose for the future product and its ornament.
Round bedding
The simplest option is a round knitted chair cover.
For a crocheted stool cover, it is best to use thick acrylic yarn and a large hook.
The thing will be voluminous, softer, and sitting on such a stool will be a pleasure.
Diagrams and descriptions of round-shaped products are based on the following operating procedure:
- pick up air loops and connect them into a ring;
- wrap the ring around the first row of single crochet loops;
- further, this base can subsequently be used for any pattern of a round rug.
DIY knitted cover for a stool with a gradient effect.
Square seat
A very interesting and simple option is the scheme for creating a square seat from colored stripes. To do this, you need to knit a pair of stripes of various shades.
Square cover for kitchen stool.
Airy and light case with a floral pattern.
The required strip length is easy to calculate. It should be the same as the length of the seat. The width of the stripes themselves should be the same. It is important to calculate that the total width of half the stripes should be equal to their length. This will create a perfect square from many small squares.
This is where leftover yarn of different colors comes in handy.
Place some of the strips horizontally and the same amount vertically. And intertwine them alternating the top and bottom in a checkerboard pattern. Thus, you will receive a fashionable piece of furniture in the patchwork style.
Rectangular option
To create a rectangular cape, you can use the same pattern as for a square one. Only the stripes will not have to be the same length, but different. The length of half should correspond to the length of the seat, the other - to the width.
Handmade rectangular chair covers.
Video: Yarn from a T-shirt. Knitted Improvisation
The yarn is ready, let's start knitting! We take the thickest hook that is in the house and start knitting. Remember, the ease of work and density of the mat depends on the size of the hook. We knit an air loop and carefully hem it with thread No. 40 to match the knitted yarn for convenience. And we start knitting:
Row 1: 2 chain stitches and 11 double crochets.
Round crocheted rug for the floor for beginners: step 1
2nd row: 2 chain loops and 2 double crochets from each loop (according to the diagram).
Round crocheted rug for the floor for beginners: step 2
3rd row: 2 double crochets and 2 double crochets from one loop (according to the diagram).
Round crocheted rug for the floor for beginners: step 3
Row 4 and subsequent ones: according to the pattern, each time adding one double crochet in each section.
Round crocheted rug for the floor for beginners: step 4
We knit the last row to the end and tighten the last loop tightly. As at the beginning of knitting, we hem the edge with thread No. 40 for strength.
Round crochet rug for the floor for beginners: step5 Round crochet rug for the floor for beginners: step6 Round crochet rug for the floor for beginners: step7 Round crochet rug for the floor for beginners: step8 Round crochet rug for the floor for beginners
Please note that this rug can be knitted with either plain or multi-colored threads.
But it is important that the colors come in sections, and not ripple like our grandmothers. This is the trick that distinguishes fashionable models from grandma's rugs
It is this trick that distinguishes fashionable models from grandma's rugs.
Options for geometric patterns
- squares;
- stripes;
- circles;
- zigzags;
- parallel lines;
- triangles;
- diamonds.
Choose the color at your discretion, based on the color scheme of the interior.
A beautiful case made of multi-colored flowers.