Women will confirm that the most successful interior ideas are born precisely at the moment when you can’t count on men’s help. In such a situation, it is better to wait for radical changes, but simple changes should not be postponed. Hang a new picture or shelf- a woman can completely cope with such a task herself, without a man. True, under one condition: you need to approach the matter seriously and thoroughly, having studied this article.
First of all, you need to decide what you can afford. If the wall (that is, the base for fastening) is reinforced concrete or brick, then there will be no problems. Such a design can withstand a fairly significant load, say, a hanging rack completely filled with books and magazines. Walls made of porous materials (gas and foam concrete blocks, slotted bricks) and plasterboard partitions require more gentle handling; heaviness is contraindicated for them. These walls will support paintings in baguette frames, photographs, shelves with CDs or decorative vases - nothing more. But if you really need to load the plasterboard partition, you will have to first strengthen its frame.
The next step is the selection of fasteners. To hang a shelf, you need to install at least two dowel or anchor units in the wall. They, in turn, are a system consisting of three components: a base, a plastic or metal sleeve (dowel, anchor) and a spacer element (screw or conical bolt of a steel anchor).
Hanging technology is simple
: a hole of a given depth is drilled in the wall, a sleeve is hammered into it and a screw is screwed in, which will attract the object being hung.
It is important that all components of the dowel (anchor) assembly have the same strength, which also corresponds to the applied load. The most reliable anchor will not save a weak wall. A sleeve that is not strong enough will slip out even from reinforced concrete or solid brick. A screw or anchor bolt will simply break under excessive load. Therefore, it is necessary to choose the right fasteners. In everyday life, a tandem of a plastic dowel and a screw of one type or another is usually used. In this case, the base material and the expected load are taken into account. In other words, each dowel has its place. In difficult situations or for fastening building products, steel anchors are used.
The choice of screws depends on many factors: the weight and purpose of the object being hung, the properties of the base (main wall or partition), and the element being fixed (hinge or bracket).
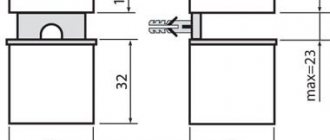
In this case, the required screw length must be equal to the sum of three values:
anchorage depths
(A),
screw diameter
(Øа),
thickness of the element to be fixed
(h).
The screws have a thread run-out at the end. To ensure the necessary expansion of the sleeve, after fully tightening, the tip of the screw should protrude beyond the end of the dowel by the amount of one of its diameter. And finally, the depth of the hole (L) should be slightly greater than the length of the anchorage (also by the size of the sleeve diameter).
Free space is necessary to compact the drill flour, which is formed during drilling and negatively affects the adhesion strength of the dowel to the base material.
How to hang a shelf on a hollow or solid wall: mounting methods
Hi all! Creating a beautiful and practical interior in a frame house, in a country house or in an ordinary high-rise building often becomes the task of the immediate home owner. One of the pressing issues is how to hang a shelf on the wall.
This procedure may seem extremely simple and mundane. But not everyone knows how to act so that the fasteners are not visible, or what to do correctly if the walls are made of PVC, that is, of plastic panels, brick, shingles, lining and other common materials.
Today I will try to answer key questions, talk about the features of installing shelves and existing installation methods. You will get some answers from the video. And if you still have questions, you can always ask them in the comments.
Safety precautions when installing shelves
To avoid injury and damage, you must strictly follow safety precautions. Before starting installation, be sure to:
- Wear gloves, safety glasses and a mask.
- Check the power tool: there should be no mechanical damage. Before you start drilling into the walls, check if it works well.
- Make sure that there is no electrical wiring in the place where you plan to hang the shelf.
- The workplace must be comfortably equipped. Remove all objects that may interfere.
Mounting methods
Let's start with the fact that you can only get by without a drill or hammer drill as a tool for installing shelves when installing light decorative structures on soft walls, which can simply be penetrated with a self-tapping screw and a screwdriver.
But usually you need to use an auxiliary power tool. Especially when you need to install a heavy shelf that will be subject to a significant load on the wall:
- from plasterboard;
- made of concrete;
- brick;
- from aerated concrete;
- from foam blocks;
- wooden, etc.
The first thing you need to pay attention to is the material from which the walls are made. Here it will become clearer to you whether you can do without drilling the wall or not.
When planning how to mount shelves on a wall, the type or method of fixation plays a key role. To do this, you need to study the installation options to choose the most acceptable and suitable for you.
- No visible fastenings. This is a hidden fastener that allows you to make the fastenings invisible, and make the shelves themselves light and elegant. Suitable for brick, concrete, foam and aerated concrete walls. If this is a plasterboard partition less than 10 cm thick, it is better not to use installation with invisible fasteners;
- On brackets. It will not be possible to hide them, and therefore the brackets will remain visible. To save money, some are mounted on plastic or metal corners. But to create a beautiful interior, it is better to use appropriate brackets. Visible brackets do not suit all interior styles;
- Using holders. Relevant for shelves made of glass. There are rubber or silicone based gaskets that protect the glass from destruction. Shelf holders have different types and configurations, including suction cup options;
- On hinges and corners. The most common and easiest to implement method. Using hinges and corners of certain sizes, you can reduce or increase the load that the shelf can withstand. Fastening is carried out using guides or on metal stands;
- Through the bar. Relevant for hollow walls, where it is not possible to fix the shelf directly to the wall. First, a metal or wood strip is mounted, and the shelf itself is fixed to it. Suitable for those whose walls are made of thin plasterboard, hollow brick and other similar materials. Here it is important to fix the bar at the maximum number of points. Some fasteners will go into the void, but others will definitely catch. It will not be superfluous to know in advance about the location of the partitions.
The greatest number of questions are raised by fastening with invisible fasteners, as well as working with plasterboard walls. They are proposed to be considered separately.
The nuances of invisible fasteners
It makes no sense to talk in detail about this method of installing wall shelves if you carefully understand only 3 main issues.
- Thickness of the wall used. Installation with invisible fastening is possible in situations where it is a brick or concrete wall. Moreover, the concrete partition must have a minimum thickness of 105 mm, and the brick partition - 250 mm. If the parameters are smaller, you will have to use additional elements. Cinder block and plasterboard walls with a thickness of less than 100 mm are suitable only for hanging decorative shelves on which there is no load or it is minimal;
- The thickness of the shelf itself. It is not recommended to use shelves that are too thin or too massive. The material should not sag, must be dry and have a high-quality finish. If the load on the shelf is minimal, the thickness is selected from 30 mm. If the shelf is for books and other heavier objects, the thickness is taken in the range of 45-60 mm;
- Fastening. Fasteners are selected based on point 2 and the purpose of the shelf itself. Invisible fastenings are made in the form of a hinged loop and a rod. The loop is mounted on the back of the shelf and markings are made. A hole is made in the wall and a plug is inserted inside. Next, all you have to do is screw in a screw or self-tapping screw to the desired depth and attach the hinges to them.
Be sure to consider the expected load to avoid unnecessary problems. The higher the load, the more hidden fasteners need to be used. Remember to have a sense of proportion.
Working with plasterboard walls
Installing a shelf, and even one heavy enough to accommodate heavy objects in the presence of plasterboard walls, is not so easy. But you can also find a way out of this situation.
Experts offer several options for installing shelves on such walls.
- Using embedded beams. Considered the best option. Mounted directly to plasterboard sheets when mounting to the wall. The bars are fixed in the area where the shelves will be placed;
- Wall mounting. The option is not the most difficult. Here you will need to purchase Molly fasteners, umbrellas or butterfly dowels. They fit easily into the wall, do not scroll and allow you to hold a shelf with additional weight on them;
- Through profiles. Through holes are made in the area where the metal profile passes. Self-tapping screws are chosen approximately 5-6 mm longer than the sheet of drywall. Next, the shelf is installed on the wall;
- Using anchor reinforcement. This option is suitable for those who need to install shelves that will withstand heavy loads. Here you will need to make a hole, insert a plug and thereby secure the reinforcement.
I can’t say that installing a shelf is something really difficult and impossible even with the hands of a beginner. But you still need to adhere to certain rules.
How are you doing with the installation of shelves? What difficulties and problems arose during the work? How did you solve these problems and what ways out of a difficult situation did you find? Write about it in the comments.
Thank you everyone for your attention! Subscribe, ask relevant questions, invite your friends to join us and expect a lot of new materials on our website!
Types of materials
Types of materials used to create shelves:
Decorative plasterboard shelves in the bedroom
Kitchen wooden spice rack
Chipboard bookshelves
Beautiful glass shelves for decorative items
Plastic shelves for bathroom
metal (using a welding machine).
Wall-mounted metal box shelf for the kitchen
How to hang a shelf on the wall
There is probably no person who would not have to face the need to make repairs in his apartment at least once in order to update soiled wallpaper, whitewash a blackened ceiling, or replace, for example, worn-out linoleum with parquet. Some resort to the services of construction organizations to solve this problem, others (to save money) carry out repair work themselves. One of the stages of this operation (finishing work) is described in this article.
The finishing process includes placing each decorative element in its place, one of which is considered to be a shelf attached to the wall. How to hang it on the wall so as not to affect the attractiveness and design of the room.
Useful tips
Even if you think that you don’t know how to hang a shelf correctly, you shouldn’t immediately call a professional. All you need to do is show a little effort and diligence, and you can easily get the job done. If, for example, you also need a shelving unit hung in the closet, then you can first practice on it, and then move on to working in rooms where there is finishing.
In addition, the greater the planned load on the fixed rack, the stronger the fasteners should be used. After all, over time, they may weaken, and the shelf will fall with all its contents. And this is extremely undesirable. Therefore, it is not recommended to skimp on bolts, as this can have negative consequences.
Attaching a shelf to a wall surface
The successful outcome of actions related to attaching a shelf to the wall surface is greatly influenced by the type of fastener. Therefore, before you begin this operation, you need to familiarize yourself with the types of fasteners.
- Invisible fasteners. When installing a shelf, the fastening elements are hidden in a brick or concrete wall. The result is a design that is refined and lightweight. It should be remembered that invisible fasteners cannot be used when attaching a shelf to plasterboard walls.
- Using brackets. If it is impossible to hide all the fastening parts, the best option would be to purchase corners made of plastic or steel; you can also use a set of decorative fasteners to make the structure attractive. It should be remembered that the brackets are not compatible with any interior.
- The most common fastening method, quick to implement, practical, simple and capable of matching any design, is hinges. The methods of their manufacture have different effects on the installed structure. And not everyone can fix them on their own. Therefore, to secure the product on the hinges, it is better to contact specialists.
- Use of glass holders. The rubber seals found in this fastener can reliably protect the surface of the area at the fastening site. Shelf holders of this type have different designs, one of which is a model with Velcro, secured at the bottom and a support at the top.
Common mistakes when installing shelves
Inexperienced people may hang the shelf incorrectly, and errors will appear after installation is completed. To avoid this, remember that:
- The length of the drilled hole should be slightly longer than the length of the screw.
- Foam concrete is a rather low-density material, so ordinary hardware cannot be used for fastening. They will not stick to the wall, moreover, they can destroy it. Plastic dowels, metal fasteners and chemical anchors should be used.
- If the load vector is directed perpendicular to the axis of the drywall sheet, the wall will simply break. To avoid this, special dowels for drywall are used: Driva dowel, butterfly dowel and Molly anchor.
- Heavy structures are attached exclusively to load-bearing walls.
- You need to carefully select fasteners that will match the type of shelf and be suitable for the wall material.
Step-by-step instructions on how to hang a shelf on the wall
In the section of the wall where the shelf will be attached, it is necessary to check the wall to ensure that electrical cables are hidden in it.
How to properly mount a shelf on the wall:
- To begin with, the master decides on the location of the fastener parts, when choosing which to take into account the features of the interior and the purpose of the shelf (for example, bookshelves have a larger width compared to the structure for plants). Having selected a shelf of the required length, the craftsman leans it against the wall at the site of intended installation. Using a level, you can check whether the shelf is horizontal in relation to the floor. After this, a line is drawn along the bottom of the shelf with a simple pencil.
- If you need to install a shelf in a tiled wall, you can try to make a hole between the tiles to avoid its destruction and check the horizontal position of the structure. If it is necessary to drill a hole in the surface of the tile, the fixing point is marked on technical tape glued to the tile in a cross pattern. Then the hammer drill bit will not slip. The depth of the hole being drilled should be slightly larger than the size of the dowel, which should be completely recessed into the wall. With this sequence of dowel installation, destruction of the tile slab will not occur.
- The weight of the stand must be evenly distributed over all fastening elements fixed in the wall using self-tapping screws, the distance between which should not be large, otherwise the product will hang in the center and there will be a need to create another fastening point in the middle (to increase rigidity). In general, it is necessary to install so many fastening elements so that the load acting on the structure (together with the load) is minimal. So, for shelves made of 15 mm fiberboard attached to the wall, the step between the fastening elements should be no more than 55 cm; for MDF models – no more than 65 cm.
- The fastener is leaned against the surface of the wall so that the positions of its top and the line drawn by the marker coincide. Next, the placement of one hole is outlined, the vertical installation of the fasteners is checked, after which the location of the remaining holes is outlined.
- When drilling holes, the master must use a drill, the cutting part of which is made of a material intended for processing this particular type of wall. Fastening elements with a small shoulder are fixed using self-tapping screws with dimensions of 50 (depth) by 5 (diameter) mm. Shelf holders with a long arm are fixed using self-tapping screws measuring 50 (depth) by 7 (diameter) mm.
Finally, let us remind you that even if you have the ability to install shelves using slats and fasteners, or process walls made of plaster or wood, you must take the work associated with attaching the shelf to the wall surface very seriously. In the absence of such skills, it is better to resort to the services of a specialist who, at low financial costs, can do this work efficiently.
Non-standard solutions
It is not always possible to find the right mounting option for shelves, or the homeowner/designer has a special design idea. Then human imagination comes to the rescue, giving rise to unusual methods of solution.
Shelf with straps
Instead of loops, sometimes they use rings with hooks, water pipes, and fittings. Sometimes belts, chains, and rope are used.
Shelves on pipes with fittings
Unusual things with a different purpose create a unique style for the room and complement interesting design ideas.
Honeycomb shaped shelf
You can take non-standard fasteners and hang shelves in an unusual way. Not strictly horizontally, at an angle, forming corners, honeycombs, diamonds, making storage space of an unusual shape.
Non-standard arrangement of shelves at an angle
Concrete wall in a residential building: advantages and disadvantages, repairs
In the construction of modern houses, one of the most popular materials is concrete mortar. If previously it was used only for pouring foundations, now it is used to make almost all load-bearing structures of a building.
Ease of use, wide availability and low cost of this material have led to the fact that most modern multi-storey buildings are built using monolithic frame construction technology, so a concrete wall, as well as the floor and ceiling, is present in almost every residential apartment.
Original concrete wall decoration in a modern interior.
However, when moving into a new house, not all residents understand where to start renovating an apartment or, for example, how to hang a carpet on a concrete wall.
Drills are different drills
If we're talking about tools, we can't help but mention the equipment; drills (drills) and bits. To drill various bases, you need appropriate drills. Moreover, different drills are inserted into hammer drills and drills. The differences relate primarily to the fastenings. For household hammer drills, the cartridges are marked SDS+. This means that installation of the equipment is done by hand, without the use of special keys (which are needed when using professional equipment). A burse is inserted into such a cartridge using an SDS+ mount (shank). For drills, drills with cylindrical shanks are used.
Reinforced concrete and brick walls are drilled with drills made of hard alloys. In addition, there are drills for wood, aerated concrete, metal, etc. For the sake of convenience, they are painted in different colors (at least that’s what the Bosch company does). For example, “gold” drills are coated with titanium nitrite, which increases the service life of the equipment.
To the beginning of the INFORMATION SECTION
Features of houses made of monolithic concrete
In order to comprehensively study the pros and cons of living in a residential apartment of a monolithic frame house, this article will consider some aspects of arranging life in a room with concrete walls.
The reader will also be presented with brief instructions that describe how to prepare a room for wallpapering. In addition, here you can see recommendations on what to drill a hole with before hanging a shelf on a concrete wall, as well as some other useful tips.
Construction of a residential building using monolithic frame technology.
Types of concrete wall panels
Having settled in a new house, before carrying out repairs or starting work on the decorative design of the home, you should understand that not all wall panels of a residential apartment must necessarily be made of monolithic reinforced concrete.
In modern construction, there are several technologies for using concrete mortar in the construction of residential buildings and structures.
- External and internal load-bearing walls, as well as interfloor ceilings, are most often made using monolithic frame construction technology from high-strength reinforced heavy concrete of the appropriate grade and strength class.
- Internal walls and interior partitions, provided that they are not load-bearing structures, are usually constructed from various types of lightweight concrete.
- For the manufacture of technological partitions and thermal insulation elements, building blocks made of ultra-light gas-filled cellular concrete can be used.
The photo shows an interior partition made of lightweight concrete.
Note! In addition to monolithic frame construction, there is also a technology for constructing external walls and load-bearing structures of buildings from prefabricated blocks or panels, which are also made from heavy grades of structural concrete.
Advantages and disadvantages
Like any building material, each type of concrete wall panels has its positive and negative sides.
- Monolithic panels are distinguished by very high strength, durability and load-bearing capacity, they are well resistant to moisture, high and low temperatures, as well as other atmospheric factors, therefore they are used for the construction of external and load-bearing walls of buildings . However, due to their high density, these materials have low thermal insulation ability and therefore require additional thermal insulation.
- Interior partitions and internal walls are designed for low loads , but even with a small thickness they have high heat and sound insulation properties, and are well suited to drilling and other types of mechanical processing without the use of special tools.
- Structural elements made of gas-filled cellular concrete are not designed to withstand load-bearing loads , but at the same time, very low thermal conductivity and low price make it an indispensable material for arranging thermal insulation of building structures. This material is very easy to machine, but before applying the topcoat it requires continuous puttying to seal open pores.
How to hang a shelf on the wall
During fastening, the type of fastener itself is very important. Once you get acquainted with the mounting methods, you can easily select the desired option:
- Invisible fastener. Using this method, you can hide the fasteners, and the structure on the wall will look light and elegant. It is best that the wall is made of concrete or brick. It is not recommended to use this fastener for walls covered with plasterboard.
- Brackets. In this case, it will not be possible to hide all the elements; they will be noticeable. To save money, you can buy steel or plastic corners. If you need to give your shelf an attractive appearance, choose decorative fasteners, but always in pairs. One nuance needs to be taken into account - the brackets may not fit every interior.
- Loops. This is the most popular method - simple, practical, quick to implement, and at the same time can fit into any design. The manufacturing features of the hinges allow for different loads on the shelf. Not all types of these fasteners can be secured in practice with your own hands. In certain cases, you need to contact professionals.
- Glass holders. These fasteners have rubber seals that protect the surface at the fastening site. Shelf holders come in different designs; there are models with Velcro that look beautiful. They are fixed at the bottom, and a support is placed at the top.
Attention! A corner kitchen will look especially good when choosing glass holders for mounting.
Tools and materials
For fastening you will need:
- electric drill;
- level;
- screwdriver;
- perforator;
- self-tapping screws;
- anchor;
- glue;
- jigsaw;
- drill;
- set of fasteners;
- wrench;
- hammer;
- marker.
What should the wall be like?
When choosing a fastening option, it is necessary to take into account not only its attractive appearance, but also the method of fixation to the wall, which can be made of various building materials:
- Concrete walls are characterized by strength. Therefore, it is almost impossible to attach a self-tapping screw to this wall. You must first try to make the hole.
- Today, drywall is often used for finishing. Butterfly anchors are used for this material.
- If the walls are made of wood, then fixing the shelf will not cause problems. The only difficulty may be finding a place to make the hole. Afterwards, the shelf must be brought to the marked points and tightened with self-tapping screws. To fix the product to a wooden surface, you do not need to buy additional tools; the self-tapping screw can be screwed in with a regular screwdriver.
Types of shelves
Basically, shelves are divided by design, methods of fastening and materials of manufacture. The most common types are the following:
- Classic shelves. Most often you can find this type of shelf in stores, because it is easy to install and reliable;
- Shelves with hidden fasteners. Unlike ordinary shelves, these are mounted on the wall using special fittings that are invisible;
- Floor structures. They are otherwise called shelving, and some believe that they are a type of cabinet. But racks differ from them in the absence of doors, and sometimes even a back wall. Such designs look light and do not clutter up the space, so they are especially relevant in the minimalist style and in small rooms. Also, the rack is inferior to the cabinet in terms of shelf depth.
The installation method is influenced not only by the type of structure, but also by the material of manufacture. In addition, the quality of the shelves, functionality and their appearance depend on it. Some styles require special furniture made from natural materials. For example, a plastic shelving would be inappropriate in Provence - only wood is used here. But for a loft or hi-tech it’s worth looking for metal shelves.
The shelves are made from:
- Tree. These can be either expensive species, or chipboard, MDF, etc.
- Metal. Usually the frame is made of it, but some shelf models can be completely metal.
- Glass. Glass shelves can often be found in a bathroom or shelving design. It can be matte or transparent.
- Plastic. The cheapest type of shelves, which is not durable or high quality. Plastic shelves are hung mainly in the children's room, in the kitchen or in the bathroom.
Hang a shelf on the wall: step-by-step instructions
Before you start drilling walls, you need to make sure that there are no electrical cables in the work area. There are devices for detecting hidden electrical wiring.
Mounting instructions:
- First of all, you need to accurately determine the location of the fastener, taking into account your interior. Shelves for books may differ in width from the same products for plants. Select a shelf of the required length and lean it against the wall in the area of intended fastening. Set it horizontally using a level and draw a line along the bottom.
- Before drilling tiles, you need to check whether it is possible to secure the product by making a hole between adjacent slabs. This way the tile will remain intact and you can be sure that the stand is fixed clearly horizontally. If you still need to drill a hole in the tile, then you need to mark the attachment point on masking tape glued crosswise to the surface. This will make it possible to avoid the hammer drill from slipping. You need to drill a little larger than the size of the dowel, since it must be completely recessed into the wall. With this installation of the dowel, the tile will not crack when screwing in the screw.
- The weight of the stand should be distributed over several fasteners installed in the wall using self-tapping screws. The distance between the fasteners should not be very large so that the product does not hang down in the center. The number of fastenings will depend on the load being installed on the stand. For products made of fiberboard with a thickness of 15 mm, it is best to choose a distance between fasteners of about 55 cm. For models made of MDF, it is advisable to choose a distance between fasteners of approximately 65 cm.
- Place the fastener against the wall so that the top is in the same position as the line that was drawn with a marker. Mark one hole, make sure it's vertical, then mark the remaining holes. In the same way, you need to mark the holes for other fasteners.
- When making holes, you need to use the type of drill that is required for the material from which the wall is constructed. To fix fasteners with a small shoulder, choose 50x5 mm screws, for shelf holders with a long shoulder - 50x7 mm.
You need to approach the fastening of shelves very carefully, even if you have some installation skills with slats and fasteners, wooden or plaster walls. You should always carefully select fasteners and tools for fixation. You can hang the shelves yourself without any apparent difficulties, but if you don’t have any skills in attaching shelves, then it is advisable to seek help from an experienced craftsman. His services will be inexpensive, but they will be performed with high quality.
Shelf installation process
If you bought a shelf along with fastenings in a store, then the first thing you need to do is read the instructions on how to attach it. After all, some modern models have their own algorithm for attaching the shelf to the wall. You should especially carefully look at the instructions if the shelf has invisible fasteners, since in this case you need to use exactly those fasteners that the manufacturer recommends, otherwise you won’t be able to hide them.
Video on how to quickly hang a shelf Before attaching the shelf, you need to choose a place where it will be located. But you shouldn’t rush to drill into the wall right away; before fixing the rack, you need to measure everything so that it hangs beautifully and evenly.
The first thing you need to do this is to attach the shelf to the wall, and mark with a pencil on the wall the place where one of the bolts will be and put a mark there. Be sure to mark the center of the holes.
After this, we measure the distance between the centers of the fastenings, and from the mark made we measure the same, and put a vertical line.
Type of fastening
Then we simply apply a level to the wall and place a horizontal line in the area of the previous mark. The intersection of these lines will be the center of the bolt hole. You can check this by simply placing the shelf back against the wall.
Then you need to carefully make holes in the wall. To do this, you need to use a drill of the same diameter as the fasteners. If you take a smaller drill, the bolt simply won’t fit into the hole, and if you take a larger one, it will simply wobble and fall out.
In addition, when drilling, it is important to keep the drill level so as not to widen the hole, since in this case the fastening may also fall out, especially if you are using dowels rather than anchor bolts. Additionally, the hole should be deeper than the length of the mount you plan to use. After all, the drill does not remove all the debris from the hole, so you need additional space inside so that you can easily install the shelf.
When the mounting points are ready, you can hang the shelf. This also needs to be done carefully; if the fasteners do not fit into the hole, then you just need to lightly tap them with a hammer. First you need to install the shelf itself, and then install the fastenings. It's much simpler and easier.
Well, in the end you just need to tighten the anchor bolts or dowels until they stop.
The fasteners attached in this way will hold the shelf securely and firmly.