Drywall partitions quite often become a lifesaver in designing an apartment renovation. Just a few decades ago, walls made of brick or concrete were erected in their place, which was quite troublesome and required a lot of financial costs for the purchase of materials and the work of specialists. Therefore, the design of partitions was used extremely rarely, when it was really necessary. Nowadays, with the advent of such material as plasterboard, the construction of false walls has become completely commonplace, which you can cope with yourself. How to make a partition from plasterboard, as well as its positive and negative characteristics will be discussed in this material.
Plasterboard sheet - what is it?
Gypsum plasterboard (GKL) is a modern building material that belongs to the so-called dry construction. Allows you to get a flat, smooth wall surface without resorting to the long and costly procedure of leveling the walls with plaster.
A gypsum board sheet consists of a layer of gypsum covered on both sides with sheets of cardboard. When choosing, you need to take into account that there are four types of drywall:
- Normal - for rooms with normal humidity, covered with gray cardboard.
- Moisture resistant – for rooms with high humidity up to 75%. Suitable for use in bathrooms and toilets. Painted green.
- Fire-resistant - used for the construction of hearths and fireplaces. Non-flammable, easily tolerates heat, painted pink.
- Acoustic - with increased density of the gypsum base and reinforcement. Has improved sound insulation properties. Suitable for finishing walls and ceilings of bedrooms and recording studios. Painted blue.
The advantages of gypsum boards include environmental friendliness, ease of installation, low weight, and the ability to create curved structures. The main disadvantage is fragility - drywall does not withstand impact loads well and crumbles easily.
Therefore, when using it in children's rooms, hallways and other rooms where critical loads on the walls are possible, you need to think through everything carefully. And if the strength of gypsum plasterboard is not enough, you can use gypsum plasterboard.
Interior use
There are specialized options for drywall, namely arched. This type will help you easily build any non-standard partition from sheets of plasterboard. It is very convenient that for each individual style of room decoration there is its own design option.
There are other additional functions for partitions made of this material. For example, you can easily install additional lighting for the room in the partition. In this case, all communication wires will remain inside the structure.
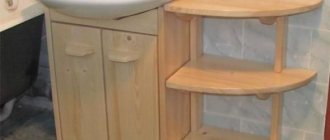
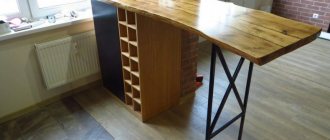
Very often in modern times, plasterboard partitions are made in the form of niches for placing cabinets. Just add a wardrobe door and a hanger to the niche and you don’t have to buy a wardrobe.
This type of partition is also suitable for a place for a TV. This same place can be shelves for books, photo frames and other small items. Next we will look at how to make an interior partition.
Gypsum fiber sheet - what is it?
Gypsum fiber sheet (GVL) is a building board made of gypsum mixed with cellulose and reinforced with reinforcing mesh. The material is very strong, high density. GVL is initially non-flammable, since its components are mixed with gypsum, and with the addition of special components it can also be moisture resistant.
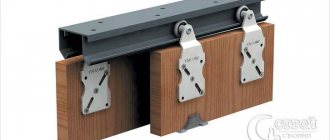
High strength makes it possible to use GVL for leveling not only walls and ceilings, but also floors. And the high density allows you to mount furniture on the walls, easily withstanding a force of up to 80 kg per anchor.
- But these same advantages also determine its disadvantages. If drywall is easily fastened with ordinary self-tapping screws, then the gypsum board must be secured by pre-drilling holes or using self-tapping screws.
- Greater strength gives almost a third more weight and makes installation more difficult. Well, the cost of GVL is almost twice as high, which is also a very significant indicator.
Functionality
Decorative niches provide a lot of possibilities in the living room interior:
Plasterboard structures can visually lengthen walls or increase the height of ceilings; this technique is often used in non-standard rooms.
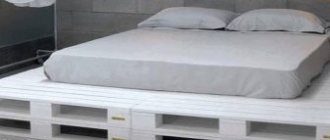
- Walls with niches and windows allow you to zone the room. Every household member, whether a teenager or an elderly person, needs a personal living space where he can retire. A plasterboard module, even in a tiny room, can create a recreation area: a sleeping place, an aquarium, a section with a TV.
- Niches allow you to hide defects in walls and ceiling space; they themselves create the necessary stylistic accents in the interior, making it more original and exclusive.
- The owners are provided with a place to store accessories, figurines and memorabilia dear to their hearts. Depending on the size of the niches, they perfectly accommodate household appliances and electronics, furniture and other household items (beds and armchairs, stereo systems, fireplaces, TVs).
- Plasterboard structures not only serve as an element of room decor, but also allow you to save money that would have been spent on leveling the walls and purchasing cabinets, shelves, chests of drawers and other storage systems.
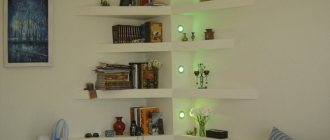
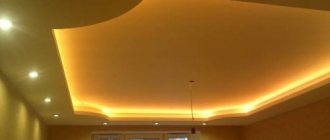
Thanks to the built-in LED lighting, you can use the niche as a night light. Stepped transitions made of plasterboard allow you to create an interesting design of the ceiling space and simplify the installation of spotlights. Plasterboard modules do not take up as much living space as cabinet furniture, which is important for miniature rooms.
Options for using partitions
There are several options for using plasterboard partitions:
- Moving or changing the size of doorways;
- Increasing the number of rooms in a room by erecting false walls;
- Zoning is the division of a room into functional zones.
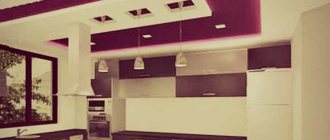
As an example, separating the cooking area from the living room in a studio apartment. And if the walls do not carry a special decorative load, then partitions for zoning can give scope to the designer’s imagination, becoming bookshelves, decorative niches and much more.
How to choose a partition design for different rooms
You can make a plasterboard room partition for the interior yourself or turn to a professional for help. In any case, you first need to decide on the design: will it be a niche, a figured arch or a cabinet.
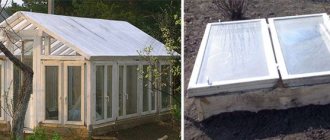
An interesting idea is to design a partition that is not completely blank, but with glass, leaving a window in its upper part. This option is suitable if you need to divide one room with a single window, for example a bedroom from a living area, and ensure that natural light penetrates into both parts. When planning a partition, you need to take into account the dimensions and the main role of the room.
Materials for constructing the frame
To construct the frame, profiles made of ferrous or galvanized metal with a thickness of 0.5 to 2 mm are used. Galvanized metal is less susceptible to corrosion, so it can be used in damp areas. If the work is carried out in rooms with normal humidity, a corridor or a bedroom, then there is no point in overpaying for galvanizing.
Guide profiles ranging in size from 50/40 to 50/100 are laid horizontally. And rack-mount ones, with sizes ranging from 50/50 to 100/50, are installed vertically.
It is possible to construct a frame from dry wooden beams of comparable dimensions. If the goal is to achieve maximum sound insulation, then the wooden frame will resonate less, transmitting sound, and the room will be quieter.
Useful tips
If the room is designed in a classic style, symmetrical shelves and recesses will look best. This will help the whole composition look more static. Asymmetry will be appropriate in minimalism and hi-tech. Here you can hang the TV not in the center of the wall
This option is more often used in rooms divided into zones. It is important to decide before starting work whether the TV will stand on a stand or hang on the wall. The size of the niche will depend on this. Play with color - if light colors predominate in the room, then the niche should be several tones darker, and vice versa.
- If you have a lot of time and a desire to make your niche original and unique, then a mosaic pattern will be the ideal solution. Such work may take more than one week, but the result will definitely exceed all expectations.
- Less complex, but no less beautiful decorative elements will be flowering shrubs around the perimeter.
- When drawing up a drawing and work plan, for convenience, you can divide the wall equally with a pencil, outlining the contours of the future niche in advance.
- There are several types of drywall. For any niche, first of all you need to choose a moisture-resistant option. You should choose the desired thickness based on the shape and dimensions of the niche, as well as the weight of the items for decorating the shelves.
- Some of the wiring can be laid under the baseboard. Modern plastic models just assume such use.
- It is often more convenient to completely assemble the frame first, and then attach it to the wall.
- If the niche goes all the way to the floor, then there probably won’t be enough wall slats for mounting. All parts of the structure should also be secured from below.
- If the finishing includes wallpapering, it would be advisable to treat the entire niche with a primer for better adhesion.
- It is better not to use a wall with a window to build a niche, as this can disrupt the lighting in the room.
- Even at the planning stage, it is necessary to take into account the location of all sockets, and also think about which of them will be used and where the electrical wires will run.
- When calculating the dimensions of a niche, remember that over time you may purchase another plasma of a larger size. But even if the new technology does not fit into the existing “framework,” this will only be another reason to start a small construction project again and show imagination and ingenuity in a new style.
- Don't be afraid to use wood for finishing. This will take more time than just painting or putty, but will add warmth and coziness to the overall picture.
- If you use pieces of glass or mirror to decorate a niche, you must follow all safety precautions. It is best to use a thick fabric bag (or better yet, several) and a hammer for crushing. Make sure that small fragments do not spread across the floor after finishing work. It is better not to allow pets into the room during finishing work.
Required materials and tools
- Guide and rack profiles,
- Drywall sheets,
- Damper tape,
- Dowel – nails 50*40,
- Self-tapping screws,
- Gypsum based putty,
- Hammer,
- Screwdriver,
- Metal scissors,
- Stationery knife,
- Building level,
- Putty knife,
- Tape measure and pencil.
Marking the future wall (step by step instructions)
The best solution for marking is a laser plane builder or laser level. Having established the level, we get ready-made marking lines that you can work on immediately, or you can transfer them to the walls with a tapping thread or a simple pencil.
In the absence of a laser, a regular building level, plumb line and tape measure are used. The location of the future partition is marked on the floor, not forgetting to mark the space for the door opening, if one is planned. And from the floor, measuring with a plumb line, markings are made on the walls and ceiling.
Color solution
The most common way is to paint it the same color as the wall, although sometimes lighter shades of color are used. Many people start experimenting with colors, falling into the trap: dark colors create the impression of a “hole” on a light wall. Designers recommend sticking to light shades of paint and looking for your own color scheme, avoiding overly dark colors. It is best to paint a small niche several tones lighter than the wall. Then the objects in it will look more refined and elegant.
A niche for television equipment or an aquarium requires the same color as the wall as a whole. Fortunately, the reflection that will be inevitable will allow the niche to play with new colors.
Decorative niches in the same color scheme as the wall
If you want to decorate your kitchen with niche shelves, try making them like picture frames. It will look very impressive, but at the same time warm and cozy. For the kitchen, you should also make a more durable structure, since the housewife may need space for heavy kitchen utensils: frying pans, casserole dishes, pots, and so on.
Functional niches in the kitchen
Installation of guides
The next step is installing the guides. Having cut the guide profile to size using metal scissors or a grinder, stick the damper tape on the profile surfaces that will lie on the floor or walls.
This will avoid the transfer of vibrations from the concrete foundations to the profile, which will significantly reduce the noise level in the room.
The marked and pasted profiles are attached to the floor with dowels - using 6/40 nails, into holes drilled with a hammer drill, every 40 - 60 cm, but at least three pieces per profile.
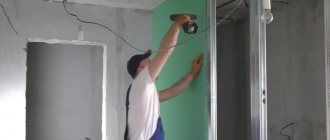
Installation of racks and sheathing
Having finished with the power circuit, install vertical racks. They are installed every 50 - 60 cm. The profile is fastened together with a cutter. The tool punches a hole in the metal and moves apart parts of the profile, fastening it together.
Some craftsmen attach the profile to each other with self-tapping screws, which is not acceptable. With this type of fastening, the heads of the screws protrude above the surface, preventing a tight fit of the drywall sheet and the surface turns out to be uneven.
Plasterboard partitions: advantageous advantages and some disadvantages
Such designs rightfully occupy a leading position due to many positive characteristics, namely:
Along with numerous advantages, it is worth mentioning some of the disadvantages of these designs, which, however, are quite few. Drywall does not have high strength compared to stone, concrete or wood.
Consequently, it is subject to various mechanical influences. Although drywall has a certain degree of hygroscopicity, with direct and prolonged contact with water, for example, in the event of flooding, it will very quickly deform and become unusable, which will entail alteration of the structure. That, in fact, is all that should be taken into account before starting work.
Read also: Stylish plasterboard arch in the interior of an apartment - 40 photos
Sheathing and sound insulation
The next step is installation of drywall. The sheets are attached to self-tapping screws, the length of which should be 1 cm greater than the total thickness of the gypsum board sheet and the profile. Shorter screws will not create the required force.
An important point: the head of the screw is recessed into the sheet by 1 mm. If you screw it deeper, there is a high risk of crumbling the drywall, which leads to a loss of strength of the entire structure. To make this task easier, you can use a special screwdriver attachment.
Having sheathed the frame on one side, fill the space between the posts with sheets of mineral wool to improve sound insulation and sheathe the second side.
The finished wall is puttied with gypsum putty, filling the joints of the sheets and marks from the screws, and the finishing is carried out.