Today, a two-level plasterboard ceiling fits into interiors of different stylistic orientations in apartments and private houses. But such designs are distinguished by a host of features that a conventional flat ceiling surface lacks. Before installing a two-level ceiling, you should carefully read all the nuances of such a solution.
Peculiarities
Two-tier structures are used in cases where the height of the room allows. The structure of such ceilings is a spatial frame made of metal slats, covered with sheets of plasterboard. Typically, ceiling gypsum plasterboard with a thickness of 9.5 mm is used.
Advantages
Despite the fact that plasterboard for ceilings is quite thin (for comparison, wall plasterboard is 12.5 mm thick, and reinforced plasterboard is up to 16 mm), it is rigid and durable. The weight of 1 sq.m is only 5 kg, which does not create additional loads on the supporting structures.
Two-tier ceilings allow you to hide communications under cladding sheets and place heat and sound insulation. They perfectly level any base surface, masking even large defects and curvature.
Drywall is resistant to light impacts and does not tear, unlike PVC film, which is used in stretch ceilings. The material is non-flammable, environmentally friendly, “breathes”, and does not accumulate static electricity.
When installing gypsum boards, “wet” mortars are not used, the process is dry and clean. Drywall is durable, and its price is quite affordable even for budget repairs.
Flaws
There are not many disadvantages to drywall:
- additional finishing of the entire surface is required, including labor-intensive putty;
- precise cutting is required, especially for shaped structures;
- it is inconvenient to attach sheets by weight;
- gypsum is afraid of water and can become limp and deformed.
For rooms with high humidity, moisture-resistant green gypsum board is recommended; in case of fire hazard, fire-resistant pink gypsum board is recommended.
To a large extent, all the shortcomings are offset by the possibilities that drywall provides for creativity and the high speed of installation. Currently, it is the most affordable and technologically advanced material for interior decoration.
Expanding the kitchen: design ideas
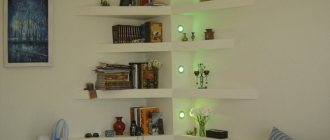
Designers propose to play up a small space with the help of a “floating ceiling”. Its meaning is that the profiles are not installed tightly to the walls, and the voids are filled with LED strip. This lighting option guarantees airiness and a visual increase in space.
By varying the power and direction of the built-in lighting, you can create a different atmosphere in the kitchen space.
In addition to classic spot lighting, the market offers cornice compositions made from LED lamps of any complexity and parameters. But here it should be taken into account that the additional layer “takes away” the height of the room, so this option is more suitable for rooms with high ceilings.
A large print applied using a stencil or a finished vinyl sticker will visually increase the space.
A square kitchen will be “stretched out” by an oval or rectangular element in the middle of the ceiling structure.
A ceiling with profiles made of untreated wood will be the highlight of a loft interior.
For a kitchen in a classic and provincial style, finishing corners and joints with borders imitation gypsum stucco is suitable.
Pros of gypsum boards:
- Environmentally friendly, compared to other ceiling materials. The base is gypsum. Although impregnations and glues to improve performance properties are of chemical origin.
- Perfectly smooth surface with matte or glossy texture.
- High aesthetic properties. A variety of designs for cladding, lighting, and decor.
- Reliable camouflage of communications (wiring, alarms, ventilation pipes).
- Clarity in preparing the surface for decorative finishing and cladding.
- Do-it-yourself installation is accessible, subject to accurate calculations of the size of the slabs and skills in attaching the sheets to the base.
- Easy restoration of damaged coating - just repaint. Mechanical damage to the profiles themselves require partial or complete replacement.
Minuses:
Kinds
The designs of two-tier gypsum board ceilings are varied. The most popular are frame, diagonal, zonal and curly.
Framework
They are like a recessed frame around the perimeter with a protruding middle part. Volumetric lighting from spotlights or LED strips is installed in the niche. The effect of “floating” in the air is created, which enriches and makes even the simplest interior original. In addition, track moving lamps can be used to divide the room into zones or highlight an object.
Diagonal
This ceiling visually divides the room into two parts. In one it is located lower, in the other – higher. Illumination is often installed at the junction between planes of different heights, and the line itself can be straight or curved.
Diagonal two-tier ceilings are used to zone dining rooms combined with a living room or kitchen. They allow you to visually highlight the dining area, place of relaxation or cooking.
Zonal
With this design, zoning the space of the room is simplified. The boundaries of each selection are emphasized by relief elements, lighting, color or texture of the finish. Before manufacturing, it is important to imagine in advance the arrangement of furniture, household appliances and equipment.
The zoning effect is emphasized by the decoration of walls, floors, textiles, and decorative structures. Zoned ceilings are good not only in large rooms where there is room for creativity, but also in small rooms to optimize space.
Figured
This is a kind of convex painting on the ceiling. The designer conveys his thoughts through three-dimensional figures arranged in an artistic manner. Protruding fragments are emphasized by lighting, contrasting trim, and decorative details.
Curly ceilings are expressive, catch the eye and draw attention to themselves. In order not to overload the situation, they must be used very carefully.
Style selection
Contrary to popular belief, multi-level plasterboard ceilings are used not only in modern design. They fit perfectly into many classic and traditional styles, it is only important to choose the right finish and palette. Designs designed in different styles have the following features:
- Classic, neoclassical . You can turn the ceiling into a work of art by making it multi-tiered and providing it with appropriate decor, such as stucco molding and baguette inserts. Options with arched and central elements have an organic look. It is better to abandon spotlights in favor of LED strips, which can be placed unnoticed.
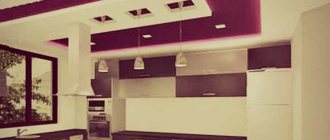
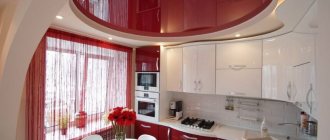
- High tech . The ceiling will fit into the design if you make it monochrome (gray, black or white) and complement it with lighting fixtures that match the style. Track rotating lamps on a metal rod, white LED strips, spotlights, and chandeliers with asymmetrical shades fit well into the idea.
High-tech design Source mobile-business.by
- Minimalism . It is worth abandoning multi-tiered structures, complex shapes and excessive detailing. The ceiling looks emphatically simple; the color is usually white or light grey. The choice of lighting fixtures is the same as for a high-tech interior, only instead of asymmetrical chandeliers they choose models of strict geometric shapes.
- Modern . The ceiling design welcomes smooth lines and shapes, colors from the beige palette: milky, cream, ivory. If you want to make a plasterboard ceiling an accent of the interior, choose a contrasting black and white palette and asymmetry. Much depends on the chandelier. It can be luxurious or austere, perhaps futuristic in shape.
Source pinimg.com
Diagrams and sketches of two-level plasterboard ceilings
In order for the interior to sparkle with new colors, but at the same time be harmonious, you first need to draw up a diagram of the room and develop a sketch of a two-level ceiling. It is advisable to make the drawing to scale, since then all the lines are transferred to the basic structure or patterns.
Drawing of a two-level ceiling with lighting
A sketch is developed for one room or a whole group at once, united by a design idea. Each project is individual. When creating it, you need to take into account the features of the room: purpose, geometry, mounting locations for lamps and curtains, and the general concept of the interior.
If you decide to install a two-level plasterboard ceiling yourself, you will have to do the design yourself. If this is difficult for you, you can use ready-made drawings from the Internet, adapting them to your conditions.
Design development
The distinctive characteristics of plasterboard are strength, hardness, and resistance to mechanical damage. In all cases, the process of installing a suspended structure begins with the development of a sketch. The most popular options include wavy lines and round elements - they are especially effective for multifunctional rooms. Laconic shapes are easy to fit into a room of any size.
In some cases, there is a need to visually increase the height of the room or zoning it; for this, a two-level plasterboard ceiling is the ideal solution. With its help, you can, for example, allocate places for resting, eating, working, sleeping, and so on. The design of such finishes, which always look extremely impressive, includes combinations of various shaped elements on the plasterboard ceiling, materials, and lighting. Overly complex systems require artistic taste and technical knowledge when developing them, since when designing a structure, the load on the frame is calculated and fasteners are selected.
Tool for working with drywall
To make a frame, cut and fasten sheets, you will need the following tools:
- sharp metal scissors;
- screwdriver;
- Phillips screwdriver;
- perforator for holes in a concrete slab;
- durable knife for cutting slabs;
- cutter for neat cutting of narrow strips;
- tape measure, pencil and cord for marking;
- level for controlling horizontal/vertical structures;
- jigsaw or drywall hacksaw for cutting curved lines;
- a chamfering plane (if commercially available) can be replaced with a knife;
- an awl or piercer for laying utilities;
- stepladder or scaffolding;
- lift or support for sheets.
If the volume is large, handles for carrying sheet materials will be useful. With their help you can transfer 3 sheets at a time.
Materials
For installation of ceilings, it is not recommended to use wall plasterboard - it is thick and heavy, or arched - too thin, capable of deforming under its own weight. Optimally - ceiling plasterboard with a thickness of 9.5 mm, designed for a certain load.
The frame will be made of materials:
- ceiling guide profile PPN 28x27;
- load-bearing profile PP 60x27;
- flexible profiles for curved structures;
- suspensions for attaching the frame to the ceiling;
- screws and dowels for profiles;
- small self-tapping screws - “bugs” - for connecting profiles to each other;
- “crabs” are cross-shaped connectors for joining or extending the length of slats.
To fasten gypsum board sheets you will need self-tapping screws 20-25 mm long.
How to make a two-level plasterboard ceiling: installation instructions
Ceiling installation includes:
- preparation;
- marking;
- installation of the first tier frame;
- electricity supply;
- installation of the second level frame;
- gypsum board sheathing.
In complex ceilings, the procedure may be different. First, the frame of the first tier is mounted and sheathed, then the second level is attached to this surface as a base one, followed by lining it with gypsum boards.
Preparing the ceiling for drywall
A heavily damaged base with large defects, peeling plaster or cracks must be carefully prepared:
- remove protruding sagging, old dilapidated finishing;
- prime and putty.
- treat with antiseptics to prevent fungus and mold.
A dry, clean and durable base surface is almost ready for finishing. If additional insulation or noise protection is required, mineral wool slabs with vapor barrier and acoustic materials are attached to the ceiling.
Drywall cannot withstand high loads, so embedded parts are installed on the ceiling to hang heavy chandeliers, ventilation ducts and other equipment. The installation of main communications must be completed before the installation of profiles begins.
Marking for the frame
A two-level ceiling is a complex spatial structure. Marking it correctly is almost half the job done.
Using a laser level and a cord, a horizontal line is cut out on the walls for the frame of the first tier. You need to deviate from the base base enough to accommodate all large communications - ventilation ducts, pipes, etc.
The main profiles will be installed in increments equal to the width of the gypsum board, that is, 1200 mm. Markings are made for them on the ceiling.
The second level in ceilings with complex reliefs is marked using templates. They are made on the basis of drawings, where the bending radii for each rounding are calculated.
Some craftsmen use lining or profiles for marking. With their help, you can draw slightly curved contours, but for complex patterns or lines with different bending radii, you cannot do without a pattern.
Construction of the first level frame
Guide profiles PN 27x28 are attached to the walls along the horizontal marking line. Dowel-nails 6x40 mm or nylon dowels with self-tapping screws are used. The fastening pitch is no more than 50 cm. Even short sections of the profile require at least 3 fastening points. It is recommended to place sealing tapes under the slats.
According to the markings on the ceiling, butterfly hangers are installed for the main profiles in increments of up to 100 cm. The recommended fastener is anchor wedges, 2 pieces per hanger. A sealant is also used for sound insulation.
The main profiles are attached to the hangers using self-tapping screws. The edges of the “butterflies” are bent or trimmed. The horizontalness of the frame must be ideal. Now “crabs” are snapped onto the main profiles every 50 cm. The distance from the wall to the first connector is 10 cm.
The supporting profiles should not be spaced apart; to do this, they are cut off a little. The slats are inserted into the “crabs” and secured to them with self-tapping screws with a press washer.
Gypsum plasterboard covering of the first tier frame
The drywall is lifted and secured with supports. Each sheet is attached to the supporting profiles with self-tapping screws in increments of no more than 20 cm; 10-15 mm must be retreated from the edge. The joints in the strips should be spaced apart. The screw heads are slightly recessed.
Factory edges are not processed, but where there is a cut, a chamfer is removed at an angle of 22.5° using a special plane or knife. This is necessary so that the joints can be carefully puttied.
Second level frame
Guide profiles are attached to the ceiling along marked lines. To create a bend, they are cut through 3-5 cm depending on the radius of curvature, but it is better to use special flexible elements.
Next, sections of load-bearing ceiling profiles with a length equal to the height of the second tier are attached to the profiles perpendicular to the ceiling. They are needed for fastening gypsum boards in a vertical plane. The circuit is then closed using guide rails.
Now, to set the horizontal plane, PPN 28x27 are screwed to the bottom of the profiles. Ceiling profiles are distributed with a certain step. They form the basis for attaching the gypsum board to the frame.
Sheathing with plasterboard of the second level
The sheets are screwed to the profiles, the excess is carefully trimmed along the contour. At the same time, holes for spotlights are prepared. The wires are carried in special corrugated tubes to each lamp, as well as to the chandeliers.
After this, all vertical sections are sheathed with plasterboard. For contours with a small radius of curvature, strips of the required length are cut out, which are then screwed to the vertical profiles.
Electrical wiring
The cables are installed at the stage of constructing the frames before the final sheathing with plasterboard. The rules for laying hidden power lines are described in the PUE. The connection diagram to devices and the location of connection to the existing network must be thought out in advance.
The wiring is placed in corrugated channels made of plastic or metal. They protect power lines from moisture and accidental damage. The corrugation is fixed to the ceiling or frame with clamps or copper twists.
Wiring
Drywall is an excellent material for masking electrical wiring. That is why many people make excellent use of this property and install hidden electrical wiring, thereby avoiding the need to make grooves in the walls.
For hidden electrical wiring, corrugated hoses and non-flammable boxes are used. Installation is done as follows:
- After installing the profile under the drywall, the stage of laying the telephone, telephone cable, and electrical wiring begins. All wires must be insulated with corrugation to prevent a fire hazard in the future;
- To install electrical wiring, you need to stock up on the following materials and tools; corrugated hose;
- distribution boxes;
- cable;
- clips for attaching the hose;
- dowel nails;
- hammer drill with drills.
All electrical leads must be hidden in a corrugation
Electrical wiring installation
Wires run down through specially prepared holes
Plasterboard ceiling finishing
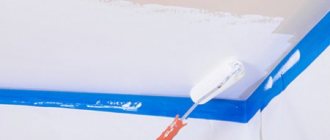
A two-level ceiling can be painted, wallpapered or plastered. Before finishing, putty is applied first to the seams and screws, and then to the entire surface. The joints are pre-sealed with serpyanka or reinforcing tape. Drywall and each layer of putty are primed to strengthen and increase adhesion.
Before painting and wallpapering, the surface is sanded to maximum smoothness in several steps. There are no strict requirements for the quality of preparation for plastering, since the solution creates an additional relief on the ceiling. But it is advisable to use moisture-resistant sheets.
Installation of two-level plasterboard ceilings with lighting
A special side is made for laying the LED strip. It is installed along the edge of the wall or tier of the second level and gives the rays of light the desired direction. The width of the light strip depends on the design of the side and the location of the light source.
To make a backlit box you will need UD and CD profiles. From them the frame for the niche and the tape is mounted. The horizontal sheets of the second tier are cut with an allowance, and a vertical strip is attached to the resulting “shelf”, which serves as a limiter for light.
Installation of the 2nd level frame
- we draw lines on the drywall that will help to correctly place the UD profiles;
- we fix the pre-rounded UD profile on the wall and ceiling - to give it the desired shape, it is necessary to make notches;
- we cut off the necessary fragments of the CD profile and insert the flat side into the already mounted UD profile, fasten them in increments of 50-60 cm for linear segments and 20-30 cm for round ones;
- if some pieces stick out, you should cover them with a UD profile.
Ceiling care
Dust accumulates in niches and recesses of two-level plasterboard ceilings, which gives an untidy appearance. To keep them beautiful and fresh for a long time, the surface must be cleaned regularly with a vacuum cleaner or a soft, fluffy cloth. Spotlights and chandeliers are also wiped 1-2 times a year.
When cleaning you need to be careful. Although the structures are quite durable, strong impacts can damage them. If repairs to the finish are required after some time, the wallpaper must be carefully removed and new ones installed. You can refresh the paint many times without removing the bottom layer.
Preparation
Before you start installing a two-level ceiling, you will need to check the base foundation for unevenness, differences, gaps and cracks. The previous finish is removed using a spatula, and the peeling plaster is removed to the base. If the flaws and defects are too deep, it is necessary to widen the cracks and then fill them again with putty or a mixture of sand and cement. Before puttying, the ceiling surface is thoroughly primed. This will ensure better adhesion of the mixture to the rough floor.
Before proceeding with installation, you need to wait until the surface is completely dry.
GCR sheets must be brought into the room, placed horizontally, leaving them in this position for 2-3 days so that they take the correct shape and adapt to the climatic conditions under which they will be used.