Attracting birds to the site is both useful and pleasant. It is useful because they destroy insect pests, it is pleasant to listen to their singing and observe the behavior of birds. That’s why many people come up with the idea of building a birdhouse with their own hands. People over 40 years old can remember their school days: during labor lessons, boys made houses for birds. But it’s not just property owners who make birdhouses. Often residents of apartment buildings hang them on trees near the house, on balconies and loggias.
I want to permeate the city with the singing of birds
What to make from
The answer is clear - from wood, and deciduous trees: conifers are too resinous. The resin can stain the plumage, resulting in the death of the bird. You should not use plywood, chipboard or OSB. Rarely does anyone live in such birdhouses: glue and binders scare away birds. For the same reason, we assemble and fasten the workpieces only with nails or screws, we do not use glue.
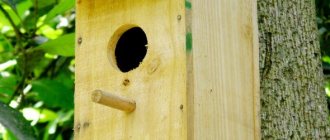
Most often, birdhouses are made from boards. The thickness of the boards is at least 20 mm. This thickness is enough to maintain a stable temperature inside, which is important when hatching chicks. Moreover, the boards need to be unplaned; in any case, the inner surface should be rough. The front part under the entrance is also specially scratched: along these notches, chicks and birds rise to the entrance.
The wall under the taphole is additionally scratched
To prevent the boards from cracking during assembly, we pre-drill holes for the screws. The diameter is slightly smaller than the diameter of the screw.
What can you do to protect birds from danger?
Cats will climb onto the roof of a bird's house to hunt chicks. To make this process more difficult for them, the roof is made slippery, nails are driven into it, or the canopy itself is lengthened. And also the birdhouses themselves are mounted on a high five-meter pole with tin reflectors in the middle or metal strips, which will make it difficult for harmful, curious cats to climb up to the birdhouse.
Also, when the woodpecker likes the birdhouse, he will hollow out the entrance to his size in order to drive out the birds that have moved in and peck at the laid eggs. To protect against such hooligan behavior of competitors, the entrance to the bird house itself is lined with tin all around, so that the woodpecker cannot adapt the entrance to its size and destroy the nest.
To enjoy the singing of birds and receive help from garden pests or simply admire them, you will have to furnish a house for your feathered friends. And protect from possible dangers in the form of cats, woodpeckers, rain, sun and wind. Birds do not like drafts, and chicks do not like dampness. When the entire structure is made correctly and securely strengthened, the birds will settle in it and have offspring.
Sizes of birdhouses for different types of birds
To attract different types of birds, the size of the house should vary. It is mainly the proportions of the “body” itself and the entrance that change. The goal is to create nesting conditions that are more familiar to this species.
| Bird species | Bottom dimensions | Birdhouse height | Taphole dimensions | Note |
| Starlings | 10*10 cm | 30-40 cm | about 5 cm | a taphole is preferable to a round shape |
| Titmouse - tits, flycatchers, redstarts, sparrows, pygmy owls | 10-12 cm | 25-30 cm | 30-35 mm | round entrance |
| Lesser titmouse or flycatcher (flycatchers, redstarts) | 10*8 cm | 25-30 cm | 30 mm | |
| Poluduplyanka | 10*8 cm | 20 cm | height 33-50 mm across the entire width of the wall | taphole - a longitudinal slot across the entire width of the front wall |
As you can see from the table, basically only the height changes. The width remains more or less stable. There is no point in making birdhouses anymore. They will stimulate the laying of more eggs, and the birds will not be able to fully feed a large number of chicks; as a result, the offspring will be weak and, most likely, die.
Which birds live in which birdhouses?
If you want to attract wagtails, make a birdhouse laid on its side: its height will be 10-12 cm and width - 35-40 cm, with the same small entrance located approximately in the middle. Wagtails have weak legs, and they cannot climb a high wall to the entrance. That is why there is such a choice of nesting sites. It is also advisable to make a ladder about 10 cm wide in front of the entrance so that they can enter on foot.
Birdhouse for wagtails
The semi-duplyanka requires some explanation. Some birds are accustomed to nesting not in hollows, but in recesses between branches. They rarely settle in completely closed artificial nesting areas. If you want to attract, for example, a gray flycatcher, make it a small box in which the entrance runs the entire width of the front wall.
Half nest for gray flycatcher
Just keep in mind that some types of squirrels also like to live in such houses.
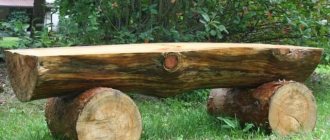
There is another nesting site that birds often like better - a nesting box. This is a birdhouse made from a piece of log. Often dried wood is cut into logs of suitable size, turning it into apartments for birds. The height and diameter are selected based on the dimensions that were indicated for a regular birdhouse. The bottom and roof of the nest are made from a piece of board.
Duplyanka - birdhouse made of logs
If the birdhouse has a small entrance, the lid is removable. This is necessary so that the insides can be treated from parasites. Sometimes this happens: birds live for several years in a row, and then stop settling. The parasites just multiplied inside. Having removed the lid and thrown out the old nesting box, the birdhouse is scalded with boiling water. This is often enough. You can also treat the inside with a weak solution of potassium permanganate (slightly pinkish).
Safety
It's a shame and a pity when birds' nests are destroyed. This is mainly done by cats, and also by woodpeckers. Therefore, when you make a birdhouse with your own hands, increase the roof overhang. In almost all drawings it is drawn 5 cm long. In order to protect the birdhouse from the cat, it is necessary to make sure that he cannot reach the entrance. To do this, the roof must protrude by at least 7 cm, and it is better to add a couple more - for large specimens. This ledge will also protect from slanting rain: the likelihood that the chicks will get wet becomes even less.
Another option is to put nails on the lid. The cat is unlikely to get hurt, but he won’t be able to sit comfortably - the nails won’t let him.
Make the roof overhang larger so that the cat cannot reach the chicks with his paw.
There are several ways to protect chicks from woodpeckers:
- beat the taphole with tin:
- drive several nails around the tap hole;
- nail a piece of wood on the taphole area, the fibers of which run horizontally.
All this will prevent the woodpecker from expanding the entrance and getting to the eggs or chicks. The last trick - the cover - will also complicate the cat’s task: it is more difficult to reach the chick through a long entrance.
Measures against enemies: 1 - against woodpeckers, 2.3 - against cats
They still escape from cats and possible invaders with the help of protective belts. They are made either from tin strips or from “brooms”. You will understand everything by looking at the picture. Please note that the distances must be maintained within 3-4 cm. Then the animals will not be able to jump over the protective belts. There should be no twigs, feeders or other possible supports between them and the birdhouse.
on the tree.
Birdhouses are usually tied to a tree with a rope. To do this, a thick long beam is nailed to the back wall of the house. It is leaned against a tree and a rope is wrapped repeatedly around it - wrapping the beam and the tree trunk at the same time.
But in the West, birdhouses are often nailed to a tree (it’s harder to tie, easier to nail, although it’s cruel to an adult tree). To do this, the back wall of the birdhouse is made a little higher in height - so that there is a protrusion of the board on top where nails can be driven in.
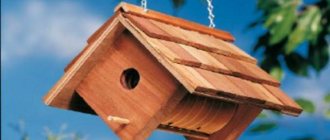
In the same way, you can make this upper projection of the back wall even longer. Long enough to drill a hole in it and hang it on a rope or iron hook as in the photo below.
You can also drive a hook into the roof of the house and use it to hang a birdhouse on a chain or rope on a thick and strong tree branch at your dacha.
SUPPORT FOR THE NIGHTBOOK.
In addition to wood, any tall structure made from scrap materials can serve as a support for a birdhouse. This could be a large branch cut from an apple tree. It can be dug into the ground. But you should understand that on such a support the birdhouses will be too low above the ground, and it will be easy for cats to reach the house (this will alarm the bird). This support model is good in cases where there are no cats in the area and you have a quiet nook in the yard where even your “human foot” almost never sets foot.
Therefore, to maintain the bird’s sense of safety, it is necessary to make high structures of supports for wooden birdhouses. For example, such as in the photo of bird houses below.
Also, an original portal in the form of a pergola can serve as a support-pedestal for a bird house. But also for places with infrequent traffic. If people wander back and forth through this portal, the birds will not want to settle. It is better to place such a pergola in a quiet corner of your garden and not visit it often. Birds will appreciate the solitude and wilderness and will choose this place for safe breeding.
But in the photo below we see that holders for simple wooden birdhouses can be very different from beams with decorative carpentry to ordinary old garden forks stuck into compacted earth.
Also, the support post for your new birdhouse, made by yourself, can be interestingly decorated with fresh flowers. If you plant a climbing plant near a pole, or hang pots of flowers as in the photo with birdhouses below.
Where to hang
Where to hang a birdhouse is also a science. If you are going to set it up on a tree, then at a height of at least 2.5-3 meters. There should be no paths or busy places near the selected tree - a well, a bench, etc.
You also need to choose the right place
When choosing a place on a tree, keep in mind that there should be no large branches in front of the entrance: the approach must be free. At the same time, you need to unfold it so that the “window” faces south. All this increases the chances that residents will move into your birdhouse.
Another point: you need to tie or nail it so that the “house” is tilted slightly forward. This will make it easier for the chicks to get out, and less rain will clog them.
Briefly about the main thing
To make birds your allies in the fight against garden pests, they need to be provided with comfortable housing.
The main thing in such a matter, how to build a birdhouse, is the size of the house itself and the holes in it. It is based on them that birds of different breeds choose their nesting place.
It is unlikely that they will like a birdhouse made of artificial materials that are too smooth, cold or saturated with toxic compounds, so it is better not to split hairs and choose wood for construction. Boards or scraps of round timber, which make excellent birdhouses of various shapes and cute nest boxes.
Having placed the finished houses at the required height, protected from winds, precipitation and predators, there is no doubt that residents will appear in them.
How to make a birdhouse with your own hands: photo report
We will do the easiest option - with a flat roof. As already mentioned, we take unplaned hardwood boards with a thickness of 20 mm or more. To avoid splinters, it is better to work with gloves. According to the drawing, we cut the blanks. Try to keep the cuts straight and at right angles: there should be no gaps. Immediately after hatching, the chicks are without feathers, and the slightest draft can kill them. Therefore, all edges must be smooth.
Drawing of a birdhouse with dimensions
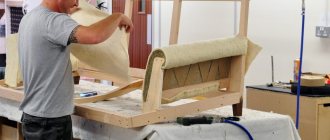
We take long thin nails - diameter 1.5-2 mm, length 4-5 cm and a hammer. Let's start assembly. We nail the sides to the front part at right angles. For each - three to four nails.
Let's start building a birdhouse
Turning the workpiece upside down, take the bottom, insert it, and level it. We nail it to the sides. We cover the top with the back wall and also nail it. Don't forget about connecting the back wall with the sides.
Insert the bottom and nail the back wall
Turning the tap hole upside down, we nail the bottom on this side as well. All that remains is to assemble the roof. We take the remaining square - the double of the bottom, nail it so that the visor sticking out in front is at least 5 cm (preferably 7-10 cm, as they said before). If the nails stick out, bend them.
We assemble and install the roof
The roof just needs to fit tightly. If something gets in the way, we use a chisel. That's all, the birdhouse with your own hands is ready.
Birds will adapt without a perch
Often a perch is installed under the entrance. Is it needed or not? If there are enough branches around, it’s better not to do it. If there are no branches, you need to either make a perch or a small shelf, although you can do without them. Why? Because cats also rely on them and it is easier for them to reach the chicks with support. How to make a titmouse, watch the video
For starlings
Common starlings are the most common and most desirable inhabitants of birdhouses. Therefore, without going into details for now, let’s see how to make a birdhouse for starlings. The common starling is a rather large bird for hollow nesters, and its relatives, the mynah starling and others, are even larger. Therefore, in general, a birdhouse, which is a birdhouse, is larger and deeper than others, its entrance is wider, and a pole is required under the entrance. Starlings prefer to nest in places inaccessible to predators, but with good visibility, and the starling is a very caring head of the family. He will sing a marriage song only if the chosen one has the opportunity to immediately inspect and accept the living space attached to the proposal of the wing and heart.
Drawings of a birdhouse for starlings
Drawing of the most popular birdhouse, the so-called. village type is shown in Fig. The assembly order is as follows:
- Blanks are cut from the board;
- In the facade, a taphole is cut out in advance using a feather drill or a wood crown, a pole is inserted into the drilled hole, the inside of the front wall, if necessary, is “roughened” as indicated above;
- The sides are glued to the bottom and then the front and back walls;
- Level the box from the bottom and side walls while the glue is liquid, and tie it with twine until it sets;
- Dry the box in a vertical position on a spread polyethylene film;
- When the glue has set, the box is fastened with nails or self-tapping screws, 2-3 for each glue seam;
- Trying on the blank of the lid without the lining, trim/trim the upper edges of the front and rear walls so that the roof fits tightly;
- The lid overlay is placed on flowing glue, the lid is put in place, and supporting the overlay with a finger through the tap hole, the roof is finally adjusted in place;
- Once the glue under the lining has set, pull it to the lid with 4 small nails or self-tapping screws.
These instructions for making a birdhouse are designed to use PVA glue. In old manuals, from which current authors copy a lot of really useful advice, they recommend assembling birdhouses using wood glue, but this is because much better PVA simply wasn’t available then. Compared to PVA bone wood glue:
- Water resistant.
- It is plastic when dried: it does not dry out, does not crack, and ensures complete sealing of the seams.
- Allows you to smear the parts with glue and immediately fold them, within 3-5 minutes to adjust the connection in place, slightly moving the parts in passing, without breaking the adhesive layer.
- Always ready to work, does not require the use of a glue gun or other special equipment.
- Used as an impregnating composition diluted 3-5 times with water, it allows the use of some waste hygroscopic materials for birdhouses.
- Cheaper than wood glue and more durable outdoors.
PVA has only 2 disadvantages over wood glue: its seam is plastic, which is not significant for a birdhouse that is not a sideboard or a sofa, and after assembling it on PVA, the product must be dried for at least a day in a warm room, and wood glue sets immediately.
Making a nest - a birdhouse from a log
If the feathered people have a choice - to live in a nest box or a birdhouse made of boards - they will choose a nest box. It is more similar to the usual “housing” - a hollow, there are no cracks on the sides and, therefore, it is warmer. They are less noticeable on the tree, which means there is a greater chance of raising offspring. These are advantages from the birds' point of view. Now about the advantages from the point of view of the “manufacturers”: a fallen tree is used for work, and it is free. If you find a suitable one, it will be enough for a large number of birdhouses. About the disadvantages - making nest boxes takes longer and is more difficult: you have to manually pick out the core, leaving the walls intact.
From the nest to flight
Now about how to find a suitable tree. Aspen is best suited: it usually rots from the inside, but remains hard along the outer edge. Therefore, we go in search of an aspen forest, and there, among the fallen trees, we look for something suitable: we cut several trunks. It is important to find one with a whole edge and a rotten middle - the work will go faster.
It is advisable to find such aspen - with a rotten core, but strong edges
Often such trees have rotten bark, which makes them look unsightly. We peel off the bark and drag the log to the dacha or house. There we cut it into logs of suitable size. Dimensions are determined by diameter. For a birdhouse, the inner diameter of the nest should be 22-30 cm, respectively, the outer diameter - 27-36 cm. For the titmouse, the sections closer to the top are suitable - the inner diameter is 15-22 cm, the outer diameter is 19-26 cm.
The height of the log also depends on the type of house - a titmouse is 20-40 cm high (but they are more willing to settle in low ones), a birdhouse - from 30 to 45 cm. When sawing, try to make the bevel that appears at the bottom level, and at the top - at a slight slope - so that sediment flowed from the roof. To make roofs and bottoms, you will need cutting boards; you can use unedged boards and slabs.
We take the cut log and begin to pick out the core with a chisel. The task is to dig a through hole. After this, even hard wood is easier to chop. To make the process go faster, you can drill holes with a drill, then break out the jumpers with a chisel.
The task is to dig a through hole
As a rule, the rotten core runs out quickly, then you have to chop off pieces of wood using a chisel and a hammer or mallet. But with a hole in the center it is much easier - the longitudinal pieces are chipped off, the work proceeds at normal speed.
We work with a chisel and hammer
The walls should remain about 1.5-3 cm. We try to work on the middle more or less smoothly, without large chips. When the walls are selected, we make a taphole. If there is a knot, you can hollow it out. Or take a crust and a drill, drill in a suitable place. If there is no crown, take a regular drill, drill holes in a circle, then, using the same chisel, cut through the remaining jumpers.
DIY birdhouse made from logs is almost ready
A piece of board 2-2.5 cm thick goes to the bottom. It is nailed or screwed onto self-tapping screws. The protruding parts are cut off as close to the walls as possible.
Attaching the bottom
All that remains is to nail the roof. The same board or slab will do. Before screwing in the screw, drill holes, otherwise the board may split.
Attaching the roof
Actually, you have already made a birdhouse with your own hands, all that remains is to secure it from attacks by woodpeckers. If there are knots on the walls, it is advisable to coat them with plasticine (regular, children's). They can also be used to seal the gaps that remain between the bottom and the roof and walls: it is rarely possible to fit everything neatly. If you don’t want to cover it with plasticine, you can caulk it with hemp rope. It is applied to the crack and driven into it with a flat screwdriver (actually there are special blades for caulking, but they are large - this is the time, and for “one-time use” you should buy them...). If it doesn't go well, you can hit the handle with a hammer.
Caulking the “seams” with hemp rope
How to decorate a birdhouse
While the birdhouse is new, it looks relatively good, but after a couple of months it will darken. This is good for the birds - it will become less noticeable and they will only benefit from this. But not all homeowners like to look at such an unsightly “decoration”. To improve the appearance, the birdhouse can be painted, but you need to choose “natural” colors - brown, gray, shades of green. You want your birds to survive, right? This means their nest needs to be camouflaged, and not painted in all the colors of the rainbow, attracting all possible predators.
This is what the wood looks like after a couple of months. An interestingly decorated nest box
Being creative can also be safe for birds))
Options for creative nest boxes
If you hang such a house on a birch tree, it will be invisible
Unusual shape
And this one is just ideal - no cracks in the floor))
Titmouse is inhabited
Beautiful decoration and disguise
We hope that now you can not only make a birdhouse with your own hands, but also decorate it competently (from the point of view of the birds).
Decorative decorations
To obtain a more functional birdhouse design that will decorate your summer cottage, you can use various materials for decorating a birdhouse. To make it attractive, you can play with the design with various colored details. Birds will feel comfortable in a decorative house, brightly painted.
Imagination inspires some craftsmen to build entire palaces for birds, which are a real decoration of the garden plot. For the basic design, they take a simple version of a birdhouse, which is additionally decorated with various decorative elements.
https://youtube.com/watch?v=QDXeB2tGWbI
Before painting the house with acrylic paints, the body of the structure should be primed using white paint. The roof is painted black or brown. It is best to remove it from the house before painting. Colored paint adheres better to matte white paint, so all elements are usually initially painted white. The contours can be outlined with a thin synthetic brush using black acrylic. This will preserve the original appearance of the birdhouse for a longer time.
To decorate the product, you can use decorative elements that will turn the birdhouse into a real house. These may include a pipe or a fence. They are cut out of wood. The finished elements are coated with acrylic paint and fixed to the birdhouse. The decorative pipe is installed on the roof of the birdhouse, for which a special hole is made in it. Such decorative designs will delight the eye all season, and after use they can be renewed again with paint.
We recommend that you read
Drawings with dimensions
Some drawings of birdhouses are in the text, we are posting a few more in this section. Adjusting the dimensions to suit the planned “tenants” is probably not a problem. Also note that the layout is given for a 2 cm thick board. Adjustments are necessary when increasing or decreasing the thickness.
Birdhouse with a triangular roof: drawing, dimensions
Birdhouse with a triangular roof: layout by detail Birdhouse with a sloping roof (the front wall is higher). Hole diameter - 45-50 mm