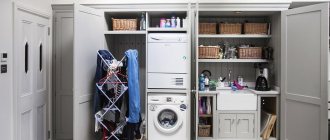
Some city citizens have their own country house with a plot of land, while most just have a summer house with a vegetable garden. As a rule, various equipment and technical means are used to cultivate the land and clean the area. To store them, a shed or small outbuilding must be built on any site. Summer residents try to build such structures themselves in order to save their own money. Therefore, many of them are interested in how to make a door from boards with their own hands.
Types of doors by design
A solid wood box has the following advantages:
- low thermal conductivity;
- high strength and frost resistance;
- durability;
- environmental friendliness;
- opportunity to implement different design ideas.
At the same time, wooden canvas has the following features:
- unprocessed raw materials quickly absorb moisture;
- presence of cracks and knots;
- flammability.
To reduce absorption, the board is dried, treated with hot steam and impregnations.
Massive doors
Before making wooden doors, it is recommended to determine the features of the production process. The dacha can be protected from robbers by a massive canvas, for the manufacture of which thick tongue-and-groove or planed boards are used. The resulting structure is strengthened with horizontal or inclined jumpers.
To make a massive door, dense wood is used
To make a massive entrance door, cedar, larch or oak are used. This type of wood is characterized by a dense structure and textured pattern.
If the project of a summer cottage includes a bathhouse, then linden and pine are used to arrange the opening. The bathhouse must be used after treating the wood with an antiseptic.
Paneled doors
To make paneled fabric, boards and beams obtained by gluing lamellas are used. Then the workpiece is covered with veneer. Before constructing the canvas, a drawing is prepared. It indicates the configuration of the panels. It can be the same or different. Glass can be used instead of wooden elements.
Paneled doors are most often installed indoors
To equip the vertical and transverse elements, you will need to glue the timber. To make the canvas, a floorboard of appropriate thickness is used. To fix individual elements, spikes are used.
Door assembly diagram
If a panel is used to make the canvas, you need to consider:
- The reliability of the product is directly affected by the number of cross-sections;
- a homemade box is formed from timber, and a lath or plastic is used to make a panel;
- glazing bead is used to fix panels.
Since the paneled door is thin, it is considered the best option for creating an interior doorway.
Panel doors
The panel box is made of fiberboard, veneer or laminate. The frame is assembled from boards. Fiberboard, MDF or chipboard sheets are used as a shield.
Panel door design
The canvases under consideration are classified into the following types:
- solid - filled with beams fastened together;
- hollow - made from side and transverse beams. Lining is used for cladding;
- small-hollow - have different fillings.
To create a high-quality canvas yourself, the frame is first covered with plywood. The material is laid in 2 layers. Size of 1 layer – 24 mm. This technology prevents deformation of the coating.
Tools for making doors
In order to make any model of a wooden door, you will definitely need high-quality tools and a stable, large table-workbench on which all the elements will be assembled into a single piece.
Tools you need to prepare:
It is difficult to make a high-quality door without a router
- Manual milling machine - this device will help make the door leaf smooth, cut out any holes and grooves, straighten the right angles of the structure, process the glazing bead and much more. If your goal is to make a professional-looking door, then you can’t do without this tool.
Set of hand carpentry tools
- Planer for leveling the end sides of the door.
- Clamps for tightening glued fabric.
- Hacksaw.
- Bow and hand saw.
- Chisels of different sizes.
- Rubber and regular hammer.
- Building level.
- Ruler, tape measure, folding meter and pencil.
- Sandpaper and sanding machine.
- Screwdriver.
Necessary materials
To make doors you will need the following materials:
- Wood - its grade, quantity and dimensions are selected for each door separately. The choice of this material will be discussed below.
- Wood glue.
- Self-tapping screws of different lengths.
In addition, for each type of door you will need to prepare specific materials, which will be mentioned in the sections on the manufacture of certain door panels.
Selection of lumber
It is imperative to know how to choose the right blanks for the door leaf, otherwise the finished door may become deformed, and it will no longer be possible to correct this defect.
It is very important to choose quality material
The main criteria when choosing wood are:
- The type of wood is chosen according to desire and financial capabilities.
- For doors, so-called industrial wood is purchased, since it has a small number of knots, and if there are any, they are small in size and light in color.
- In order for the wood to “behave” well during processing and during the period of operation of the doors, upon purchase the material must have a residual moisture content of 12÷15%. It is recommended to choose material dried in a special drying chamber. Wood treated in this way will not deform or dry out, since the chamber creates an optimal temperature effect on its fibers.
- When buying boards, you must check them for evenness. To do this, they should be laid on a flat surface and tried to be connected to each other using tongue-and-groove locks. The boards should not be bent or bent.
- The thickness of the door boards can be 25÷50 mm, depending on where it will be installed - at the entrance or between rooms.
- Before starting work, it is recommended to go over all surfaces of the boards with a sanding machine with fine-grained sandpaper. If this device is not available, then you can make a grinding device yourself from an ordinary wooden block, attaching sandpaper to it.
What tools will you need?
Work begins with preparing the necessary tools. It is best if they are carried out on a stable table. Required tools include:
- Set of chisels.
- Carpenter's plane.
- Bow saw.
- End plane.
- Tenon saw.
- Hacksaw.
- Hand saw.
- Hacksaw.
- Saw for making veneer.
- Manual type milling cutter.
- Rubber and standard hammer.
- Screwdriver.
- Sanding machine (or regular sandpaper).
- Roulette, meter tape.
- Construction levels.
- Technical pencil.
Step-by-step door manufacturing technology
The first step is to thoroughly dry the purchased wood. This step can significantly delay the manufacturing stage, but is necessary. Drying on average takes from 1 to 2 months. The boards should not touch each other. They are interspersed with special gaskets. This technology ensures unhindered release of moisture from the material. Using undried wood can lead to door deformation and the formation of fungus.
When drying conifers in a special chamber, it is unacceptable to set the temperature above 50 °C. The resin will leak out, which will lead to a decrease in the strength characteristics of the material.
Making a solid door
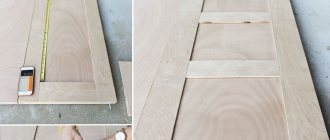
In order to make a solid wood door, you will need to complete the following steps:
- mark and cut the boards into fragments of the required size;
- check the location of the resulting segments - they need to be rotated so that the growth rings “look” in one direction;
- If there is a tongue-and-groove fastening system, connect the fragments into a single web. First you need to coat the joints with wood glue. This will provide the structure with additional strength;
- the spike remaining on the end of the canvas should be cut off and the resulting plane processed;
- the resulting structure must be fixed with clamps and left until the glue dries completely;
- the next stage is surface treatment using a milling cutter and subsequent grinding;
- The final stage is fastening the canvas using crossbars. To do this, it is necessary to prepare bars of the required length, preferably trapezoidal in shape, to ensure a tight connection. Next, you need to form the grooves - usually their depth is equal to half or one third of the thickness of the canvas. After this, all that remains is to drive the crossbars into the grooves coated with glue using a rubber hammer or mallet.
Making a paneled door
Manufacturing a panel door is a complex process that requires a variety of tools, as well as specialized knowledge and experience.
The first step is to prepare the timber for making the frame. It is processed using a milling cutter, after which grooves are cut out on the pillar elements, and tenons are made on the transverse elements. Next, the panels are made. Solid wood, plywood, chipboard, glass are suitable for this.
All elements are connected into a single structure, and all tenons are coated with wood glue. You will need a large space to work.
Step-by-step assembly instructions:
- We coat the tenons of the crossbars with glue and install them in the grooves of the vertical elements.
- We install the middles.
- We install panels.
- We glue the vertical beam.
- We fix the panels with decorative glazing beads.
Use a rubber mallet to tightly connect the parts. Align the corners, focusing on the construction corner. Clamp the product with clamps and leave to dry.
Manufacturing of a panel door
To make a thyroid cloth you need:
- assemble a frame from beams connected at the corners using the “half-tree” technology;
- line the frame on one side with plywood or fiberboard. The material is fixed with glue;
- the resulting void is filled with cellular material or MDF bars. They are glued from the inside to the existing cladding layer.
- The structure is covered with a second sheet of fiberboard and sent under the press.
If desired, you can make an additional facing layer from laminated material or sheathe the canvas with wooden slats.
Making a door from clapboard
The basis of such a door is a frame made of beams. It can be made according to the same principle as the frame for panel panels. We cover the finished frame with clapboard and the door is ready for installation.
It's actually not that simple. Keep in mind that each board needs to be coated with glue for a more secure fit. On the first day, it is recommended to install only two slats - on both sides of the canvas. Glue the lamella and secure it with a self-tapping screw. After this, we clamp it with a clamp until the glue protrudes along the entire perimeter of the rail and wait for it to dry completely. On the other side we do the same actions. Every day we add only two boards and gradually cover the entire plane. It is better to drill the connecting holes in the lamellas in advance, since when screwing in the self-tapping screw, the panel may split.
How to make and assemble a door frame with your own hands
Before describing the process of manufacturing a door frame, it is necessary to familiarize yourself with its structure. It is a frame structure that is mounted on the edges of the doorway. The frame is necessary for installing the door, which is attached to the base using hinges. The following materials are suitable for manufacturing: wood, MDF.
The design includes the following elements:
- counter beam - a post on which the lock's strike plate is installed;
- loop beam - loops are attached to it;
- ceiling beam - top bar;
- threshold - bottom beam, relevant for entrance doors.
Manufacturing stages
- We make the necessary calculations. To the dimensions of the door leaf we know, we add an additional distance to create small gaps - 3 mm on the top and sides and a few mm on the bottom.
- We saw off the necessary parts at an angle of 45°. A miter box will help you avoid making mistakes when forming an angle.
- We connect the bars into a U-shaped or rectangular composition using self-tapping screws.
Manufacturing of accessories and platbands
The following materials are suitable for these elements: MDF, wood, chipboard.
To make the extension, measure the width of the wall that needs to be covered with a plank. We select a wooden lamella of the appropriate size. We file one of the long sections. A chamfer is formed that can easily extend beyond the box part. We sand the surface of the lamella to an ideal state, after which we paint it with stain and cover it with two layers of varnish.
In the case of MDF or chipboard, everything is much simpler. You will only need to veneer the edges of the slats, covering them with edge PVC using a hot iron.
It is best to fasten homemade extensions using self-tapping screws. You need to start from the top horizontal bar to leave the opportunity to adjust the length of the side slats.
For homemade platbands, it is better to use solid or glued bars. Solid products require painting. Glued ones often have a coating in the form of veneer or laminate.
When making a decorative element yourself, you can choose their shape to your liking. Your platbands can be:
- smooth - have a flat shape, are the easiest to manufacture;
- profiled - have various recesses or protrusions on the surface. In order to make them, you will need at least a hand router;
- figured - the most complex type of platbands. They are manufactured using special programmable machines according to specified drawings. You can make figured platbands yourself or order them from a wood carver. Products decorated with hand carvings are the most expensive version of curly planks.
What your platbands will be like depends only on your taste and financial capabilities.
Installation of ready-made decorative elements is carried out either using special nails without a head or mounting glue. When fixing massive planks, it is better to choose the first option. The platbands will be securely fastened, and traces of thin nails will be practically invisible.
Before installation, the ends of the platbands are cut using a miter box at an angle of 45°. The planks are fastened in the following sequence:
- strip near door hinges;
- second side element;
- top panel.
To hide the fastening points as much as possible, you can rub these places with mastic or a cosmetic pencil.
Independent insertion and installation of fittings
Mortizing a lock is a rather complex stage at which you cannot make mistakes.
The first step is to lay the door flat. After that, drill a hole at a distance of 100-120 cm from the bottom. Insert the latch and trace the hardware along the outline with a marker. After this, we make a recess under the front cover. For this work, you can use a chisel or milling cutter. We place the housing in the recess so that its edge is level with the end of the door. We mark the places where the handles are attached and drill holes. The latch is installed in place and fixed with self-tapping screws. Next comes the turn of the handles and decorative trims. Special hexagons are provided for their installation.
Necessary equipment
Before starting work, you need not only to decide on the choice of material, but also to prepare the necessary tools. If special machines are used in factories, they are not provided at home. That is why it is worth choosing an already processed board and preparing the main equipment:
- You can use a thicknesser to process a board, but if you have already purchased a finished product, you won’t need it. If the board is not processed, then it is better to purchase a stripping machine with a double-sided mechanism;
- A milling machine is necessary to create interlocking joints. He is also able to select a chamfer and make shaped workpieces;
- If you need to glue adjustments to the frame, you will need a special press;
- To get a board of the right size, you need to have a circular, electric or circular saw;
- You won’t be able to create interior doors with your own hands without a drill and screwdriver. The canvas will have to be cleaned, so you won’t be able to do it without a hacksaw.
After creating the canvas, it must be processed. Construction stores sell a special colorless impregnation that will not change the color of the wood, but will provide it with protective properties. If you decide to paint the structure, you will need a compressor with a sprayer. This device will allow the paint material to lie flat.
Just in case, it is better to have on hand a grinding machine, a chisel, a corner, a level, self-tapping screws, a construction pencil, wood glue and a tape measure.
Installation of door frame and door
The next step is to install the frame and hang the door.
- We install the formed box in the opening and fix one side with long self-tapping screws in places that will be closed with hinges.
- We attach the hinges to the door leaf and frame and hang the door.
- We close the door and mark a place for the locking plate. Drill a hole to fit the latch.
- We secure the second side of the box. Before this, you need to close the door and adjust the gap, making it the same over the entire height of the door.
- We install a wooden wedge between the frame and the doorway at the latch level and fix it with a self-tapping screw through the hole provided for the locking hardware.
- We install the locking plate and secure the box with wooden wedges.
Installation
First, install the box using polyurethane foam. After hardening, begin installing the canvas. For wooden structures, it is better to choose removable hinges. They can withstand heavy weight and are easy to install. Such hinges are suitable for a barn door, entrance or interior structure.
Adjustment
If the door cannot be closed due to the frame being skewed, you should remove the panel and check the joints of the beams. An angle of 90° must be maintained. If necessary, the box is corrected. When hinges become the cause, the attachment point is deepened or completely changed. The last option is suitable when there is no way to correct the current location of the loops.
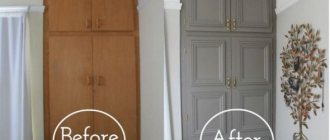
Decorating wooden doors
When all structural elements are ready, you can move on to the next stage of manufacturing wooden doors - decoration. This moment is very responsible and important, because during the finishing process it is very easy to damage components if you act ineptly.
Experts advise not to do such actions yourself, but to trust the professionals. However, if you have at least some skill with a brush and know how to apply paint, then treating the door yourself is not difficult.
If you need to paint several structures, then before making a wooden door, you can buy a spray gun and a compressor, which will make the process easier. But this is quite expensive and does not make sense if it is used only once. It's cheaper to rent them. These devices allow you to quickly and efficiently apply paint to the surface of wood.
In addition to painting, ways to decorate the door leaf are:
- treatment with varnish or stain;
- gluing with PVC or veneer;
- coating with film or laminate;
- leatherette lining;
- drawing a picture on wood;
- wallpapering;
- fabric decor;
- wax impregnation and more.
If you decide to make wooden interior doors with your own hands from a material that is susceptible to moisture, then before decorative finishing you should coat the future door with a water-repellent composition. It is also recommended to apply a composition that protects against putrefactive processes, as well as the formation of mold and the spread of parasites.
Painting
At the next stage, the finished structure is processed and decorated. It is recommended to adhere to the following plan:
- processing the coating with sandpaper or a grinding machine;
- impregnation of wood with antiseptic. The first layer should dry well. The processing is then repeated;
- the canvas is covered with a special putty, which can be replaced with a primer. In this case, the canvas is processed 2 times. But each applied layer must dry well. This will take about 2 days;
- Paint, varnish, and stain are used to finish the coating. The stain must be applied over the primer. Taking into account the desired shade, the appropriate number of layers of stain is applied. Each layer will take 4 hours to dry. To fix the result, the stain is coated with two layers of varnish.
To finish the door, paint, varnish, and stain are used
Experts advise treating the door with special protective agents against moisture and pests . If the door leaf will be installed in an apartment, then it is coated with a fire retardant. To perform a more complex decoration option, you will need the help of a specialist. Read more about painting and treating doors in the article “Painting wooden doors.”
Insulation and sound insulation
Insulation is used to carry out thermal insulation work. With its help, the part of the canvas that is covered with fiberboard is pasted over. If the foam extends beyond the frame, it is cut off with a knife. The finishing material is fixed on top - fabric or leatherette. A stapler is used to secure the material.
Door insulation scheme
Conclusion
As you can see, making a door with your own hands is not so difficult, in any case, a person who is not afraid of a hacksaw and a hammer can handle such a task. In the video in this article, the craftsmen reveal their subtleties and give recommendations for arranging doors, so study our instructions, watch the video and don’t be afraid, everything will work out for you.
Sources:
- https://o-dveryah.ru/derevjannye/kak-sdelat-iz-dosok-svoimi-rukami/
- https://DomZastroika.ru/dveri/vhodnye/izgotovlenie-derevyannyx.html
- https://stroyday.ru/remont-kvartiry/okna-i-dveri/kak-sdelat-dver-iz-dosok-svoimi-rukami.html
- https://roomester.ru/dekor/dveri/derevyannaya-dver-svoimi-rukami.html
- https://kachestvolife.club/stroitelstvo/dveri/poshagovaya-instrukciya-izgotovleniya-derevyannoy-dveri-svoimi-rukami-kakie-instrumenty-potrebuyutsya
- https://doorchange.ru/svoimi-rukami/kak-sdelat-dver-samostoyatelno-2-varianta-dostupnyh-novichku.html
- 1
Lining material
The following materials for linings are used in production:
- chipboard;
- Fiberboard;
- MDF;
- Plywood.
The most popular option is chipboard.
Important! Chipboard is used in inexpensive models.
The main disadvantages of chipboard:
- Presence of toxins in the material;
- High hygroscopicity, which leads to rapid damage to the canvas;
- Significant mass and thickness of the canvas.
Fiberboard is a more reliable option; harmful chemicals are used in its production, but their levels in the finished product rarely exceed sanitary standards. The more viscous structure of fiberboard allows you to significantly reduce the weight and thickness of the web.
But fiberboard is not without negative properties. The main one is low resistance to mechanical damage. When deformed, the fiberboard panel immediately crumbles and crumbles. Using putty you can solve the problem of destruction, but this approach worsens the appearance of the door.
MDF is a modified type of fiberboard. It has the same features, the key difference is the lightness and thinness of the canvas.
Important! MDV is the best option for lining a frame door.
Plywood is a controversial option to use. On the one hand, the material includes natural wood, the plywood sheet is light and thin. But there is one important nuance - plywood is very susceptible to modifications in geometry, is prone to sagging, drying out, is sensitive to operating conditions and cannot be repaired.