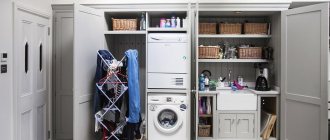
To make a sliding door with your own hands, you need drawings, a description of the work plan and step-by-step instructions, because this is a rather non-trivial task, especially for a beginner. At the same time, installing a sliding door is an opportunity to save space, which is especially important when the room area is limited.
In this way, you can still zone the room, without having to build durable floors. You can even make such a design with your own hands, using new materials or old fabric - you just have to purchase a special mechanism and components for it. Today we will dwell on this type of work in detail.
DIY sliding door
How do sliding systems work?
The compartment door is designed in such a way that its doors slide apart to the sides. This can be either one or two door leaves, moving parallel to the ceiling or sliding inward. And if the general operating principle of such doors is the same, then the installation and opening methods are different. Let's talk about this in more detail.
Table No. 1. Main types of sliding systems.
| View | Description |
| Mounted | In this case, the canvas is fixed on guides - on the ceiling or directly above the opening. This way the doors will move along the wall with a slight indentation from it. It is not recommended to install furniture or any other objects near the door - they will be an obstacle to the door panels. |
| Hanging | In this case, the door leaf is fixed to the cut of the opening. Accordingly, the door moves close to the wall, which looks more neat and aesthetically pleasing. Hanging doors allow you to place pieces of furniture next to the opening - they won’t get in the way. |
Table No. 2. Types of interior sliding doors by opening method
| View, illustration | Description |
| This is the most primitive version of sliding doors, so even an inexperienced person can handle the manufacture of such a model. The design comes with either one or two panels. |
| The movement of the canvas does not occur along a smooth guide, but along a circle. This option is ideal for rooms with curved ceilings and is good for corner cabinets. The design has a very original appearance, but not every person can handle its manufacture. |
| They also come with one or two doors and move in different directions according to the same principle as sliding doors. The difference is that they slide into special recesses in the wall, which makes this design very convenient, because you can place furniture near the wall without any problems. Of course, making such a door will be a little more difficult, because you will have to provide for a niche in the ceiling. |
| The design is designed in such a way that a separate guide is fixed for each blade. Such doors are often installed as interior partitions and for decoration. They can be assembled in a single part of the opening - just pull one panel by the edge, and the others will follow it. Of course, this is also a rather complex system, just like the radius, so it’s not easy to make. |
| The canvases are fixed in the opening and move towards each other. The design assumes the ability to open only one half of the opening. However, you can place various objects against the walls that will definitely not interfere with the opening of the doors. |
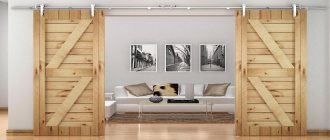
| This is a very simple hinged door design. The canvas moves on rollers attached to the top. The disadvantages include not the best sound insulation. |
Design diagram with top movement mechanism
Features of door frame assembly
By and large, assembling a frame from timber is not so difficult - in fact, you will need to twist a rectangular frame and reinforce it in the middle with a pair of jumpers. We can say that this is an elementary job that any home craftsman can handle. Nevertheless, there are some subtleties here - not many, but still there.
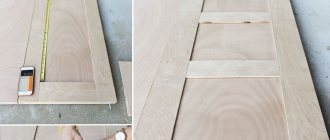
- Precise cutting of bars. If there are deviations from 90 degrees, then it will not be possible to rigidly join the beam. You can ensure an even cut only with a new sharp jigsaw file and a square, which will make an accurate trim at 90 degrees.
- The second point is the connection of the bars. The first thing to note is the need to pre-drill the holes. Without them, any self-tapping screw will split the wood. The standard diameter of the self-tapping screw is 3.5 mm - a drill for it needs to be purchased about 2-2.5 mm. In addition, the connection of the bars will be much stronger if glue is also used along with the self-tapping screw.
- Frame diagonal. What is a diagonal? In fact, these are even 90-degree angles of the structure. Diagonal is a test of angles. If you measure the distance from the upper right and lower left corners of the frame, then it should be equal to the same distance, only measured from the upper left corner to the lower right corner.
- And the last point is the even distribution of jumpers. I think you can figure this out on your own.
Doors made of lining photo
It is also worth noting such a point as the accuracy of cutting slats. In principle, this is a standard approach to cutting material, but it would be useful to remind you of this point. We are talking about taking into account the thickness of the timber. That is, if you want to get a canvas 800 mm wide, then the jumpers between the vertical bars need to be cut to a size of 600 mm, minus the 100 mm wide beam located on both sides.
What mounting options are there?
Depending on the type of structure, the following installation methods are distinguished:
- With two guides. They are fixed on the ceiling to a wooden beam (which is previously installed there) and from below. Thus, the canvas is securely fixed, allowing it to move smoothly and without obstacles. The only disadvantage that can be highlighted is that for the lower profile in the floor you will have to make a recess in advance using the gating method. If it is not embedded into the floor, the structure will look unsightly and the profile itself will quickly become unusable. In addition, contaminants often accumulate in it.
Doors with two tracks - With one guide. For canvases of this type, special fasteners are provided. They are installed in the opening and move along the profile, which is located on top. An additional rail is not installed at the bottom, because usually such doors have a small mass.
Subtleties and nuances of installing lining on a frame
It’s a little more complicated here than in the case of a frame, but in general everything is accessible if you do it thoughtfully and with arrangement. Let's start in order.
- We take the first lamella and first trim off one of its edges. After the trimming is completed, set aside from the smooth edge a size equal to the height of the door leaf, and according to the mark, mark the cutting line with a square. We cut it, and then be sure to cut off the tenon of the lining. Try to do it evenly, but if it doesn’t work out a little, it’s okay; later, when the door is sheathed on both sides, all the unevenness can be removed by sanding. You will need to prepare two such slats - for one and the other side of the door leaf.
- Now install them. At this stage of the work, they need to be glued - two at once. On one and the other side of the canvas. To do this, lubricate the timber at the place where the slats are installed, generously lubricate it with glue, attach the clapboard and secure it to the frame with clamps. You need to tighten the clamps until the glue comes out evenly around the entire perimeter of the surface to be glued. We clamped the doors and left them alone for a day for the glue to dry completely.
- Then, when the glue has dried, you can continue installing the lining. Again, the panel needs to be glued, and then additionally secured with a self-tapping screw, driving it into the groove of the panel diagonally. Such self-tapping screws need to be installed in places where the lining comes into contact with the timber. To improve bonding, it is also better to clamp the edges with clamps.
- All panels are installed in this way, except for the last strip.
The last one, after precise cutting to the width, is glued to the frame, just like the very first one. How to make a door from clapboard photo
There's no need to rush here. You need to move gradually - adding one lane on each side every day. Yes, it takes a long time, but the gluing will be reliable - this way you can tighten each fastening point with clamps, thereby ensuring a high-quality connection of the lining to the frame.
Materials for making sliding doors
The reliability of the structure will also depend on the quality of the materials from which it is made, so special attention should be paid to this point.
The sliding system is a mechanism that consists of guides, rails and rollers. It can be made from various materials:
- Steel. It is these durable mechanisms that are best suited for installing heavy interior doors. They securely fix the canvas and do not deform under load. The only drawback is the noticeable noise when the doors move.
- Aluminum. Guides made of this metal should be chosen only if you plan to install a weightless canvas. One of the advantages of such a mechanism is the silent movement of the canvases.
- Plastic. A mechanism made from this material is used only for simple hinged doors.
It is recommended to use only durable, steel guides
Note! An equally important point is the choice of material for the canvas itself. In this case, the purpose of the structure will be of great importance.
Table No. 3. The most popular materials for making door leaves.
| Material | Description |
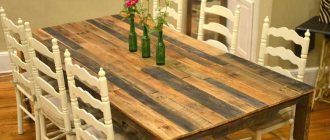
| Wood | Sliding doors are usually made from natural solid wood, which are best suited to a classic interior. It should be taken into account that the canvas will have a large mass, therefore the fastenings must be as strong as possible. In addition, if you make your own door from natural wood, you need to take care to protect the structure from fungus using special treatment. |
| MDF or chipboard | Such materials are often used to make doors, because they are much cheaper than natural wood, but at the same time have good resistance to temperature changes and humidity. However, it should be noted that MDF is much easier to saw - it is from this material that a structure of any shape can be cut. In addition, it is environmentally friendly compared to chipboard. Most often, craftsmen prefer to choose laminated panels, because such a door does not need to be primed or painted. It is strictly not recommended to use chipboard for sliding doors in a children's room, because this material contains toxic synthetic resins. |
| Plexiglas | In this case, we are not talking about standard glass, but a special organic material that is resistant to mechanical damage. Such doors have an unusual appearance - they can be matte, glossy, with or without various patterns. Of course, such a canvas serves as a decoration rather than as protection from noise or prying eyes. An excellent replacement for glass construction are polycarbonate sheets. This material also has an unusual appearance, but it is quite durable. Another obvious advantage of polycarbonate is the huge variety of colors. |
Glass doors are often used by designers to create respectable interiors.
If you have the desire and opportunity, you can combine the listed materials. Some craftsmen prefer to install glass or mirrors in wooden doors.
Important point! It is important to use only high-quality material in your work, otherwise the door leaf may become deformed. This especially often happens when natural wood is poorly processed and dried.
Step-by-step instruction
The door is made according to a previously prepared drawing. To do this, you need to decide on the parameters of the future canvas.
The height of the standard structure is 2 m, and the width is 90 cm. Builders recommend reducing the indicators (to reduce heat loss) to 180x180 cm. If the door is made for a bathhouse, then make a small window in the clapboard panel with your own hands.
Lining diagram.
A good frame installed in the door opening is used to hang the structure. Otherwise, the frame is made with your own hands.
To do this you will need a beam with a cross section of 100x100 mm, a hammer and construction nails. After installing the box, measurements are taken. The lining door is made taking into account the data obtained.
Wood is used first. The weight of such a structure will be significant.
A more expensive analogue is considered to be a sheet of plywood sheets. Builders recommend making the door from lining, combining the low weight of the product and low financial costs. The frame is made of boards with parameters of 100x300 mm. The central part is presented in the form of a lining.
The necessary material can be purchased at the construction market. When choosing boards, preference is given to well-dried wood. The board is treated with drying oil (one side is smooth).
Making a sliding door
Even a novice master can handle a simple version of the sliding design. We will look at the main stages of manufacturing a sliding door.
Before starting installation, you must prepare all materials and tools
Materials and tools
During the work we will need the following devices:
- electric drill, screwdriver;
- chisel;
- electric jigsaw;
- Bulgarian;
- building level;
- roulette;
- Screwdriver Set;
- a simple pencil and a ruler.
In addition, you will need to prepare materials:
- chipboard sheets for door leaves;
- guide rails, rollers, fittings;
- bars with a cross section of 5×5 centimeters;
- anchor fastenings;
- decorative additions;
- self-tapping screws
Calculations and drawings
It is recommended to draw up a drawing of the door leaf with dimensions. To do this, we will need to first measure the doorway (it is necessary to take into account the distance to the ceiling in order to determine the method of installing the sliding doors). In addition, you should take into account the distance from the opening to the corners, because in all cases it is not enough for the sash to slide out freely.
If you decide to install a frame over a doorway, then first of all you need to take into account the thickness of the floors - if there are too crooked walls, the measurements may not match, so they will have to be double-checked several times. In addition, you should make sure that the floor is level and not sloped.
This is what the measurement diagram looks like
According to the standard, the canvas has the following dimensions:
- width – from 40 to 90 centimeters;
- height – 275 centimeters.
When making a door yourself, you should not make it too large, because the rollers may not withstand excessive load.
When choosing the classic version of sliding doors, you need to make a leaf that will be 20-50 millimeters higher than the opening. The width of these doors should be 20-30 millimeters larger on both sides.
The table shows the maximum dimensions of door leaves. The possibility of deviation from these values is not excluded, but only to a lesser extent
In the case of installing a cassette mechanism, it is necessary to cut out the canvas exactly to the size of the opening, because first the mechanism itself will be installed, and only then the niche.
By combining materials, you can make the door leaf weightless. Here are some of the most popular lightweight design options.
If you think that it will be easier to make a door leaf from wooden blocks, then the following diagram of their connections will be useful in your work
In this case, you should use polished timber, which will not have to be further processed. In order to make the most accurate cuts, it is advisable to purchase specialized carpentry equipment.
The process of making a sliding door: step-by-step instructions
Step 1. First of all, we need to cut out a door leaf of the required size from a sheet of chipboard. This can be done at home, but it is better to turn to professional furniture makers. Next we need to process the edges. This is quite simple to do, using an iron or hair dryer with hot air, after which the edges can be cut off with a utility knife.
Treated and untreated chipboard edges
Important point! During work, you must use protective gloves for your hands and special glasses for your eyes.
Step 2. Now you need to take a wooden beam and measure the required length from it.
You should mark and saw off the beam using a jigsaw
Now, according to preliminary markings, we will need to fix the beam above the doorway (in our case it will be held on by four long screws)
Step 3. Now you need to measure the required length of the rails.
You can cut the metal guide using a grinder
Now you should make holes in the guide for the screws
It is necessary to place it on a chair, holding it with one hand, and drill through holes.
Step 4. Next you will need to screw the guide rail to the wooden block above the opening.
You need to hold it with one hand and screw in the screws one by one
Important point! If the guide is installed without a bar, then it is necessary to fix it a few centimeters further from the wall, otherwise the door will touch the trim when moving.
It is necessary to carefully check the correct position of the bar and the guide using a level, because the ability to freely open the door depends on this.
Step 5. Now you need to attach the metal fasteners from the kit to the door leaf.
We attach the hanging mounts for the rollers with self-tapping screws
Step 6. Now you should mark the location where the door handle is attached.
It is important not to make mistakes in the calculations and put marks on all sides
Now you need to make holes using a drill along the marking lines
This is necessary in order to place a jigsaw blade there and cut out a recess for attaching the handle.
You should also cut out the hole carefully, moving exactly along the marked lines.
Tips for choosing a jigsaw
It’s better not to rush here and, if necessary, make a few more holes with a drill on the other side.
The door handle mount should be installed in the resulting hole, after which you will need to insert the door handle itself
Step 7. The next step is to insert the rollers into the top guide.
You need to insert two rollers into the guide
Now you need to screw the door lock from below
The groove in the door leaf must be made using a grinder and a special circle.
Step 8. Next you need to hang the door leaf.
Using the screws located on the rollers, you should set the canvas to the optimal level, after which it can be secured with nuts
Next, you need to insert the clamps into the guide and wrap them up - this will be needed so that the door does not go beyond the rails
Step 9. The fastenings will need to be covered with decorative trim in the color of the door leaf.
First you need to measure the exact length of the extension, and then you will need to cut it to size with a jigsaw
The extension can be secured to small nails with decorative heads. It is important to carefully fix it on both sides. Now we need to mark and cut the side panels for our door. Then all that remains is to install them according to the same principle.
Upon completion of all work, it is necessary to check the functionality of the structure - the door should move smoothly along the guide without any obstacles.
Video - Sliding door from an ordinary one. DIY compartment door
This is the simplest option for making a sliding structure at home, which is suitable for beginners. If desired, you can also install a lower guide with rollers. In this case, it will be necessary to make a recess according to its dimensions in the floor. It is worth noting that this is a more modern option, because such a mechanism operates silently.
Important point! In this case, when hanging the door, the door leaf is first inserted into the lower guide, and then into the upper one.
Saving Tips
Installation of sliding doors should be carried out on high-quality roller carriages. Despite the high cost of the mechanisms, they significantly save money in the future. Cheap rollers quickly break down with frequent use and need to be replaced. High-quality carriages will last a long time.
The cheapest way to make a door leaf is from plain or laminated chipboard or MDF. This material can be decorated to your taste. This can be done using varnish, paint, self-adhesive film, wallpaper or any other method.
For wooden doors, you should choose material that has been dried in special cabinets. Otherwise, the structure may become deformed in the first months of operation, and then the frame will have to be redone.
Advantages and disadvantages of sliding doors
Before you start manufacturing sliding doors, you need to carefully study all the advantages and disadvantages of such structures. It is worth considering that sliding doors are also not suitable in all cases.
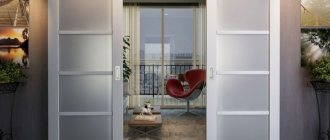
Interior sliding doors can be incredibly aesthetic
The following advantages of sliding doors should be highlighted:
- such doors take up minimal space compared to any swing models;
- you can open and close the canvas without much effort; even a child can handle such actions;
- even if there is a draft in the room, the door will definitely not slam or open from it;
- this is the best way to divide a room into several zones, because glass sheets are often used as decorative partitions;
- some door designs do not provide for a threshold, so this option is suitable if disabled or elderly people live in the apartment;
- the design is perfect for any room, including the bathroom, kitchen, bedroom;
- If you have additional funds, you can install an automatic door opening mechanism.
Installing this design allows you to visually expand the wall
However, it is necessary to note the disadvantages due to which some people refuse to install interior sliding doors:
- if the canvas moves along the wall, then it is impossible to place furniture near it (it turns out that the design conceals useful space);
- poor sound insulation from extraneous sounds is often observed - this is due to the fact that there are gaps between the canvas and the frame;
- Because of such doors, heat in the room is worse retained;
- the cost of installing sliding doors will be significantly higher compared to the standard option;
- if you buy budget components, the door may fail within a few months;
- If you are going to install compartment doors with two leaves, then it will be more difficult to cope with this process, because these parts should be perfectly matched to each other, so you will have to involve a professional craftsman in the work.
Video - Installation of sliding doors in thin ceilings
Only if it is assembled correctly will you be able to evaluate the ease of use of sliding doors, so when installing it yourself, you must carefully take measurements. Even minor deviations will lead to the design not functioning properly. The work must be carried out slowly and carefully, then the result will definitely please all household members.
You can learn more about how to make sliding doors with your own hands by reading our article.